2008 NISSAN ROGUE turn signal
[x] Cancel search: turn signalPage 94 of 309
Black plate (94,1)
Model "S35-D" EDITED: 2007/ 12/ 19
SIC3486SIC3487
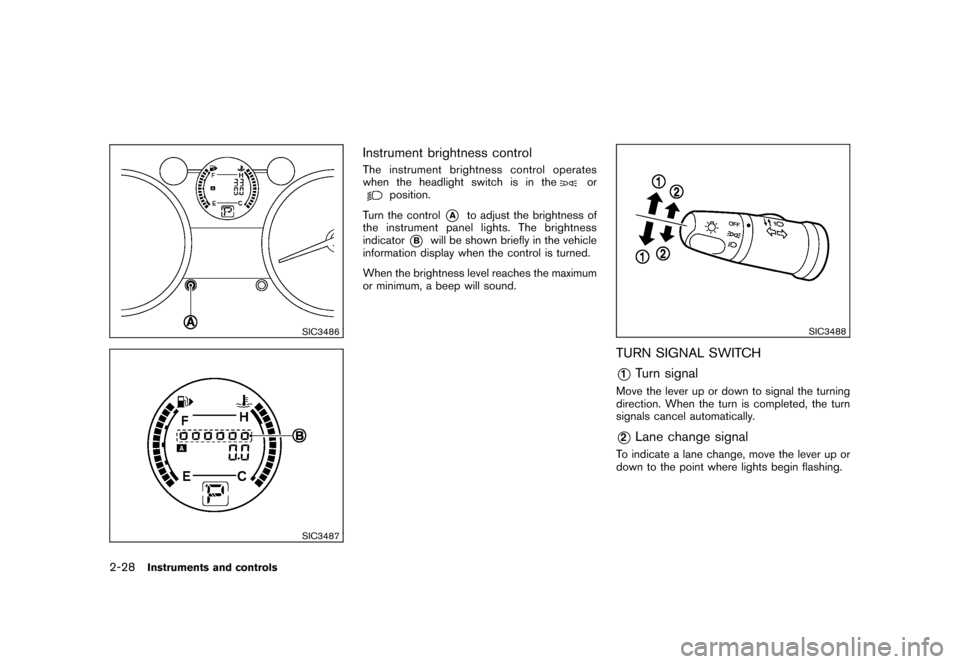
Instrument brightness controlThe instrument brightness control operates
when the headlight switch is in the
or
position.
Turn the control
*A
to adjust the brightness of
the instrument panel lights. The brightness
indicator
*B
will be shown briefly in the vehicle
information display when the control is turned.
When the brightness level reaches the maximum
or minimum, a beep will sound.
SIC3488
TURN SIGNAL SWITCH*1
Turn signal
Move the lever up or down to signal the turning
direction. When the turn is completed, the turn
signals cancel automatically.*2
Lane change signal
To indicate a lane change, move the lever up or
down to the point where lights begin flashing.
2-28
Instruments and controls
Page 95 of 309
Black plate (95,1)
Model "S35-D" EDITED: 2007/ 12/ 19
SIC3020
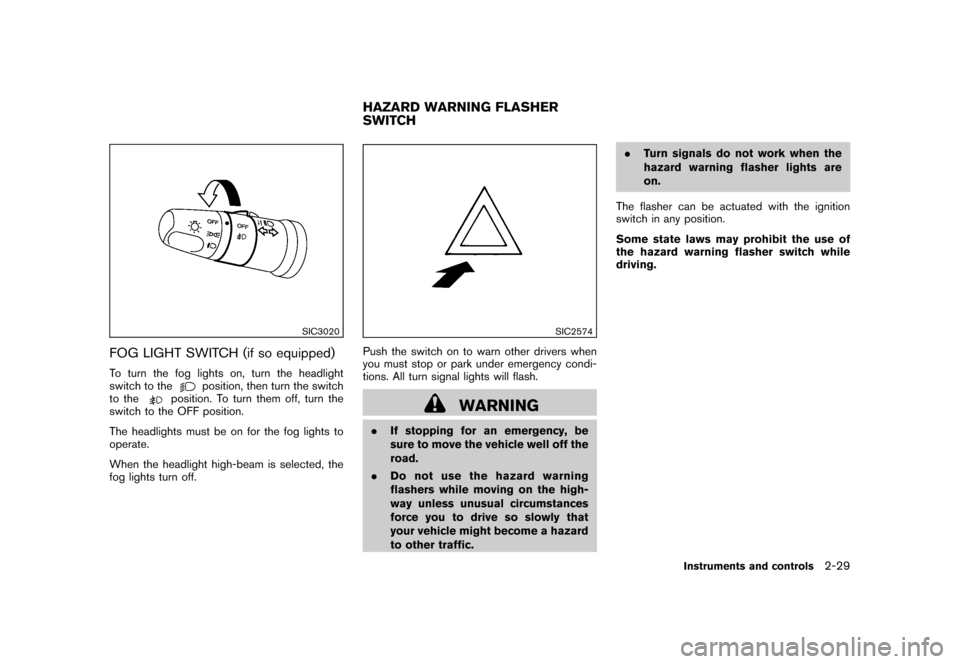
FOG LIGHT SWITCH (if so equipped)To turn the fog lights on, turn the headlight
switch to the
position, then turn the switch
to the
position. To turn them off, turn the
switch to the OFF position.
The headlights must be on for the fog lights to
operate.
When the headlight high-beam is selected, the
fog lights turn off.
SIC2574
Push the switch on to warn other drivers when
you must stop or park under emergency condi-
tions. All turn signal lights will flash.
WARNING
.If stopping for an emergency, be
sure to move the vehicle well off the
road.
.Do not use the hazard warning
flashers while moving on the high-
way unless unusual circumstances
force you to drive so slowly that
your vehicle might become a hazard
to other traffic..Turn signals do not work when the
hazard warning flasher lights are
on.
The flasher can be actuated with the ignition
switch in any position.
Some state laws may prohibit the use of
the hazard warning flasher switch while
driving.HAZARD WARNING FLASHER
SWITCH
Instruments and controls
2-29
Page 114 of 309
Black plate (114,1)
Model "S35-D" EDITED: 2007/ 12/ 19
SIC3182
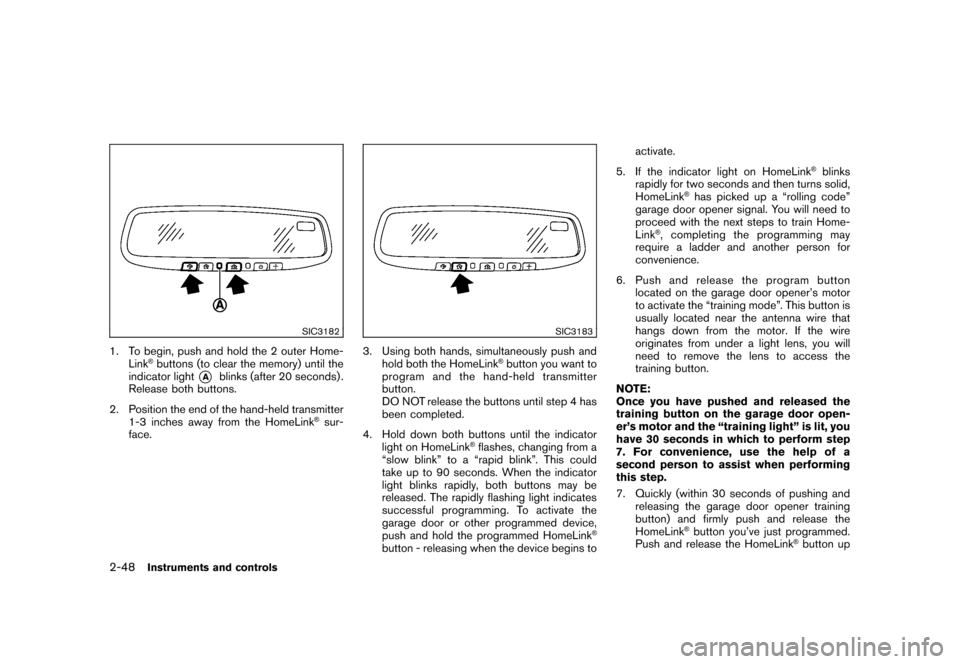
1. To begin, push and hold the 2 outer Home-
Link
®buttons (to clear the memory) until the
indicator light
*A
blinks (after 20 seconds) .
Release both buttons.
2. Position the end of the hand-held transmitter
1-3 inches away from the HomeLink
®sur-
face.
SIC3183
3. Using both hands, simultaneously push and
hold both the HomeLink
®button you want to
program and the hand-held transmitter
button.
DO NOT release the buttons until step 4 has
been completed.
4. Hold down both buttons until the indicator
light on HomeLink
®flashes, changing from a
“slow blink” to a “rapid blink”. This could
take up to 90 seconds. When the indicator
light blinks rapidly, both buttons may be
released. The rapidly flashing light indicates
successful programming. To activate the
garage door or other programmed device,
push and hold the programmed HomeLink
®
button - releasing when the device begins toactivate.
5. If the indicator light on HomeLink
®blinks
rapidly for two seconds and then turns solid,
HomeLink
®has picked up a “rolling code”
garage door opener signal. You will need to
proceed with the next steps to train Home-
Link
®, completing the programming may
require a ladder and another person for
convenience.
6. Push and release the program button
located on the garage door opener’s motor
to activate the “training mode”. This button is
usually located near the antenna wire that
hangs down from the motor. If the wire
originates from under a light lens, you will
need to remove the lens to access the
training button.
NOTE:
Once you have pushed and released the
training button on the garage door open-
er’s motor and the “training light” is lit, you
have 30 seconds in which to perform step
7. For convenience, use the help of a
second person to assist when performing
this step.
7. Quickly (within 30 seconds of pushing and
releasing the garage door opener training
button) and firmly push and release the
HomeLink
®button you’ve just programmed.
Push and release the HomeLink
®button up
2-48
Instruments and controls
Page 148 of 309
Black plate (150,1)
Model "S35-D" EDITED: 2007/ 12/ 19
A NISSAN dealer will be able to service your
environmentally friendly air conditioner system.
WARNING
The system contains refrigerant under
high pressure. To avoid personal injury,
any air conditioner service should be
done only by an experienced technician
with the proper equipment.
AUDIO OPERATION PRECAUTIONS
RadioTurn the ignition switch to the ACC or ON
position and push the PWR (power/VOL (vo-
lume) control to turn on the radio. If you listen to
the radio with the engine not running, the ignition
switch should be turned to the ACC position.
Radio reception is affected by station signal
strength, distance from radio transmitter, build-
ings, bridges, mountains and other external
influences. Intermittent changes in reception
quality normally are caused by these external
influences.
Using a cellular phone in or near the
vehicle may influence radio reception
quality.
Radio reception:
Your NISSAN radio system is equipped with
state-of-the-art electronic circuits to enhance
radio reception. These circuits are designed to
extend reception range, and to enhance the
quality of that reception.
However there are some general characteristics
of both FM and AM radio signals that can affect
radio reception quality in a moving vehicle, even
when the finest equipment is used. These
characteristics are completely normal in a given
reception area, and do not indicate any mal-function in your NISSAN radio system.
Reception conditions will constantly change
because of vehicle movement. Buildings, terrain,
signal distance and interference from other
vehicles can work against ideal reception.
Described below are some of the factors that
can affect your radio reception.
Some cellular phones or other devices may
cause interference or a buzzing noise to come
from the audio system speakers. Storing the
device in a different location may reduce or
eliminate the noise.AUDIO SYSTEM
4-6
Heater, air conditioner, audio and phone systems
Page 151 of 309
Black plate (153,1)
Model "S35-D" EDITED: 2007/ 12/ 19
The CD can be played when the tem-
perature of the player returns to nor-
mal.
Unplayable Track:
The file is unplayable in this audio
system (only MP3 or WMA CD) .
Compact Disc (CD) with MP3 or WMA
(for 6CD changer model only)Explanation of terms:
.MP3 — MP3 is short for Moving Pictures
Experts Group Audio Layer 3. MP3 is the
most well-known compressed digital audio
file format. This format allows for near “CD
quality” sound, but at a fraction of the size of
normal audio files. MP3 conversion of an
audio track from CD-ROM can reduce the
file size by approximately 10:1 ratio (Sam-
pling: 44.1 kHz, Bit rate: 128 kbps) with
virtually no perceptible loss in quality. MP3
compression removes the redundant and
irrelevant parts of a sound signal that the
human ear doesn’t hear.
.WMA — Windows Media Audio (WMA) is a
compressed audio format created by Micro-
soft as an alternative to MP3. The WMA
codec offers greater file compression than
the MP3 codec, enabling storage of more
digital audio tracks in the same amount ofspace when compared to MP3s at the same
level of quality.
.Bit rate — Bit rate denotes the number of
bits per second used by a digital music files.
The size and quality of a compressed digital
audio file is determined by the bit rate used
when encoding the file.
.Sampling frequency — Sampling frequency
is the rate at which the samples of a signal
are converted from analog to digital (A/D
conversion) per second.
.Multisession — Multisession is one of the
methods for writing data to media. Writing
data once to the media is called a single
session, and writing more than once is
called a multisession.
.ID3/WMA Tag — The ID3/WMA tag is the
part of the encoded MP3 or WMA file that
contains information about the digital music
file such as song title, artist, album title,
encoding bit rate, track time duration, etc.
ID3 tag information is displayed on the
Album/Artist/Track title line on the display.
* Windows
®and Windows Media
®are regis-
tered trademarks or trademarks of Microsoft
Corporation in the United States of America
and other countries of Microsoft Corporation
of the USA.
SAA1025
Playback order chart
Playback order:
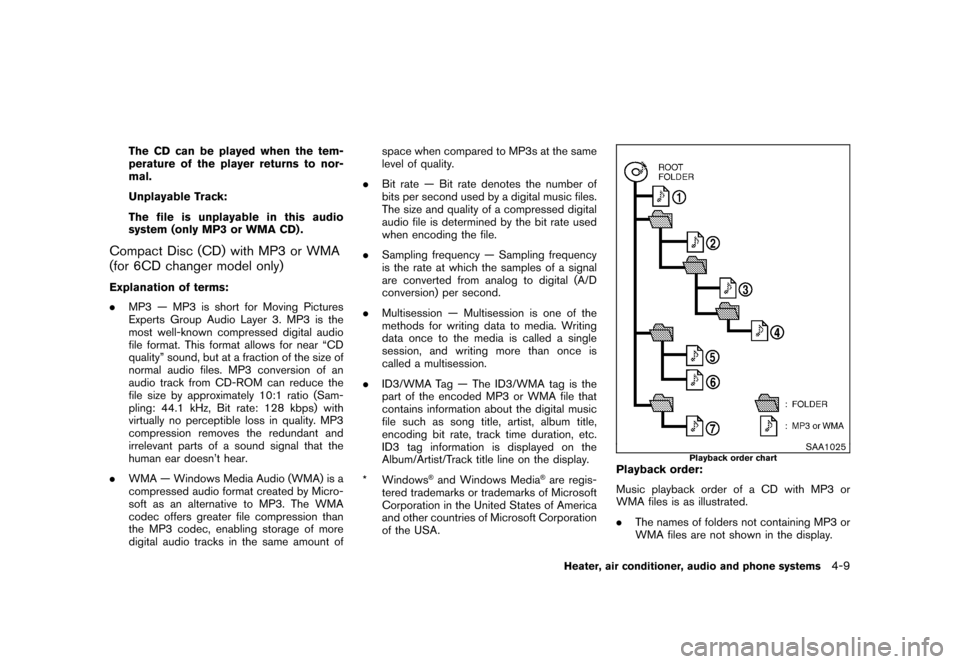
Music playback order of a CD with MP3 or
WMA files is as illustrated.
.The names of folders not containing MP3 or
WMA files are not shown in the display.
Heater, air conditioner, audio and phone systems
4-9
Page 156 of 309
Black plate (158,1)
Model "S35-D" EDITED: 2007/ 12/ 19
desired level. Use the TUNE or SEEK button
also to adjust Fader or Balance modes. Fader
adjusts the sound level between the front and
rear speakers and Balance adjusts the sound
between the right and left speakers.
To turn the Beep sound off or on, push the
TUNE button until the desired mode is dis-
played. This turns on or off the beep sound when
audio buttons are pushed.
Once the sound quality is set to the desired
level, push the AUDIO button repeatedly until
the radio or CD display appears. After 10
seconds, the radio or CD display reappears.
MUTE button:
Push the
button to mute the audio sound.
Push thebutton again to release the mute.
CLOCK button:
Push the CLOCK button to turn on or off the
CLOCK display.
See “CLOCK” in the “2. Instruments and
controls” section for the detailed clock adjust-
ment operation.DISPLAY CHANGE:
This button will work during CD operation. (See
“CD PLAY INFORMATION” later in this section) .
Radio operation
RADIO (FM/AM) band select:
Pushing the RADIO band select button will
change the band as follows:
AM?FM?AM
When RADIO button is pushed while the
ignition switch is in the ACC or ON, the radio
will come on at the station last played.
The last station played will also come on when
the ON·OFF/VOL control knob is pushed to ON.
If a compact disc is playing when the RADIO
band select button is pushed, the compact disc
will automatically be turned off and the last radio
station played will come on.
The FM stereo indicator ST will glow during FM
stereo reception. When the stereo broadcast
signal is weak, the radio will automatically
change from stereo to monaural reception.
TUNE (Tuning):
Push the TUNE button
or
for manual
tuning. To move quickly through the channels,
push and hold either side of the TUNE button
down for more than 0.5 second.
SEEK tuning:
Push the SEEK button
or
to tune from
high to low or low to high frequencies and stops
at the next broadcasting station.
SCAN tuning:
Push the SCAN button to tune from low to high
frequencies and stops at each broadcasting
station for 5 seconds. Pushing the button again
during this 5 second period will stop SCAN
tuning and the radio will remain tuned to that
station.
If the SCAN button is not pushed within 5
seconds, SCAN tuning moves to the next
station.PRESET select:
Push the PRESET A·B·C button to go to the next
PRESET. After choosing from the PRESET A, B
or C, you can select the desired station pushing
the station preset buttons
to
.
to
Station memory operations:
18 stations can be set for PRESET A, B and C.
The PRESET A, B and C function allows you to
store a combination of FM and AM stations for
easy access.
1. Push the PRESET A·B·C button to change
4-14
Heater, air conditioner, audio and phone systems
Page 159 of 309
Black plate (161,1)
Model "S35-D" EDITED: 2007/ 12/ 19
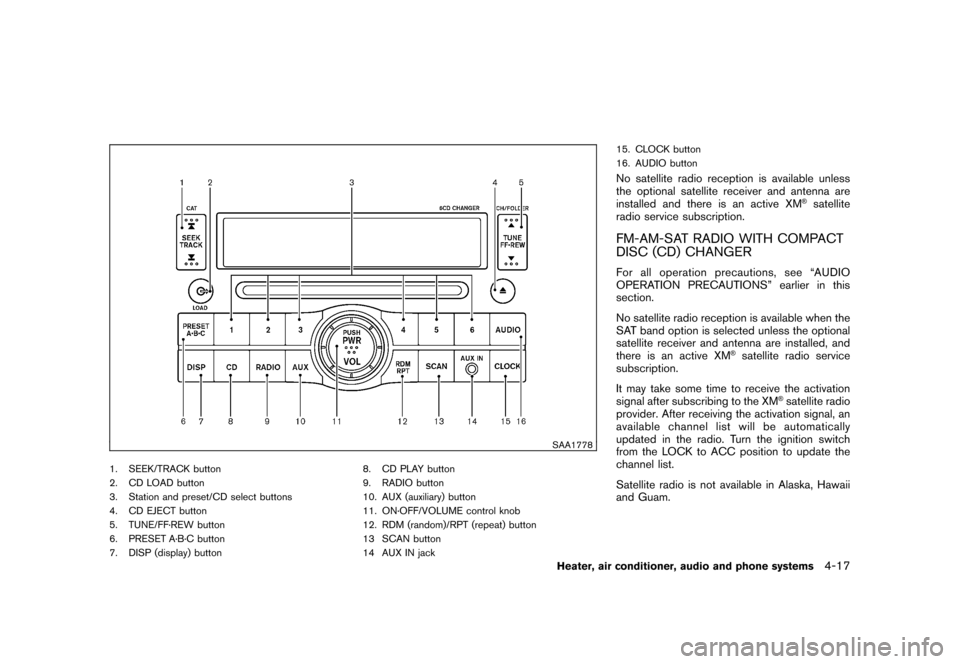
SAA1778
1. SEEK/TRACK button
2. CD LOAD button
3. Station and preset/CD select buttons
4. CD EJECT button
5. TUNE/FF·REW button
6. PRESET A·B·C button
7. DISP (display) button8. CD PLAY button
9. RADIO button
10. AUX (auxiliary) button
11. ON·OFF/VOLUME control knob
12. RDM (random)/RPT (repeat) button
13 SCAN button
14 AUX IN jack15. CLOCK button
16. AUDIO button
No satellite radio reception is available unless
the optional satellite receiver and antenna are
installed and there is an active XM
®satellite
radio service subscription.
FM-AM-SAT RADIO WITH COMPACT
DISC (CD) CHANGERFor all operation precautions, see “AUDIO
OPERATION PRECAUTIONS” earlier in this
section.
No satellite radio reception is available when the
SAT band option is selected unless the optional
satellite receiver and antenna are installed, and
there is an active XM
®satellite radio service
subscription.
It may take some time to receive the activation
signal after subscribing to the XM
®satellite radio
provider. After receiving the activation signal, an
available channel list will be automatically
updated in the radio. Turn the ignition switch
from the LOCK to ACC position to update the
channel list.
Satellite radio is not available in Alaska, Hawaii
and Guam.
Heater, air conditioner, audio and phone systems
4-17
Page 161 of 309
Black plate (163,1)
Model "S35-D" EDITED: 2007/ 12/ 19
button is pushed, the compact disc will auto-
matically be turned off and the last radio station
played will turn on.
The FM stereo indicator ST will glow during FM
stereo reception. When the stereo broadcast
signal is weak, the radio will automatically
change from stereo to monaural reception.
TUNE (Tuning):
Push the TUNE button
or
for manual
tuning. To move quickly through the channels,
push and hold the TUNE button.
SEEK tuning:
.For AM and FM radio
Push the SEEK button
or
to tune
from low to high or high to low frequencies
and to stop at the next broadcasting station.
.For satellite radio
Push the SEEK button
or
to tune
to the first channel of the next or previous
category.
SCAN tuning:
Push the SCAN button to tune from low to high
frequencies and stops at each broadcasting
station for 5 seconds. Pushing the button againduring this 5 seconds period will stop SCAN
tuning and the radio will remain tuned to that
station.
If the SCAN tuning button is not pushed within 5
seconds, SCAN tuning moves to the next
station.
PRESET select:
Push the PRESET A·B·C button to go to the next
PRESET. After choosing from the PRESET A, B
or C, you can select the desired channel by
pushing the station preset buttons
to
.
to
Station memory operations:
18 stations/channels can be set for PRESET A,
B and C. The PRESET A, B and C function
allows you to store a combination of FM, AM and
SAT (if so equipped) stations for easy access.
1. Push the PRESET A·B·C button to change
between storage banks.
2. Tune to the desired station using the SEEK,
SCAN or TUNE button.
3. Push and hold any of the desired station
preset buttons (1-6) until a beep sound is
heard. (The radio mutes when the select
button is pushed.)
4. The channel indicator will then come on and
the sound will resume. Memorizing is nowcomplete.
5. Other buttons can be set in the same
manner.
If the battery cable is disconnected, or if the fuse
opens, the radio memory will be erased. In that
case, reset the desired stations.
Radio Data System (RDS):
RDS stands for Radio Data System, and is a
data information service transmitted by some
radio stations on the FM band (not AM band)
and/or SAT encoded within a regular radio
broadcast. Currently, most RDS stations are in
large cities, but many stations are now con-
sidering broadcasting RDS data.
RDS can display:
.Station call sign, such as “WHFR 98.3”.
.Station name, such as “The Groove”.
.Music or programming type such as “Clas-
sical”, “Country” or “Rock”.
.Traffic reports about delays or construction.
If the station broadcasts RDS information, the
RDS icon is displayed.
RADIO DISPLAY CHANGE:
When the DISP button is pushed for less than
Heater, air conditioner, audio and phone systems
4-19