2008 NISSAN ROGUE remove seats
[x] Cancel search: remove seatsPage 46 of 309
Black plate (45,1)
Model "S35-D" EDITED: 2007/ 12/ 19
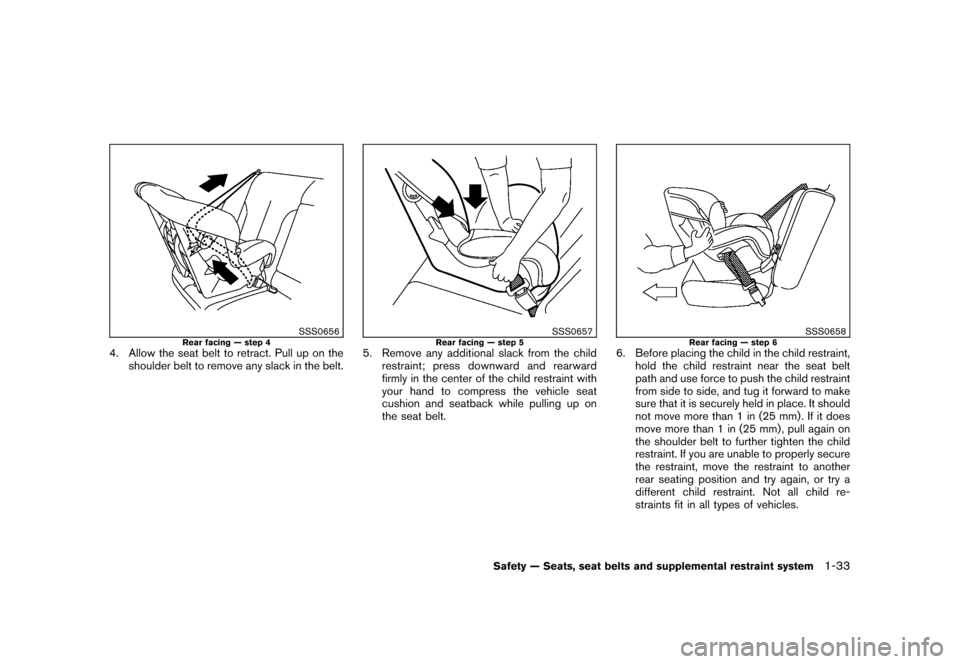
SSS0656
Rear facing — step 4
4. Allow the seat belt to retract. Pull up on the
shoulder belt to remove any slack in the belt.
SSS0657
Rear facing — step 5
5. Remove any additional slack from the child
restraint; press downward and rearward
firmly in the center of the child restraint with
your hand to compress the vehicle seat
cushion and seatback while pulling up on
the seat belt.
SSS0658
Rear facing — step 6
6. Before placing the child in the child restraint,
hold the child restraint near the seat belt
path and use force to push the child restraint
from side to side, and tug it forward to make
sure that it is securely held in place. It should
not move more than 1 in (25 mm) . If it does
move more than 1 in (25 mm) , pull again on
the shoulder belt to further tighten the child
restraint. If you are unable to properly secure
the restraint, move the restraint to another
rear seating position and try again, or try a
different child restraint. Not all child re-
straints fit in all types of vehicles.
Safety — Seats, seat belts and supplemental restraint system
1-33
Page 47 of 309
Black plate (46,1)
Model "S35-D" EDITED: 2007/ 12/ 19
7. Check that the retractor is in the ALR mode
by trying to pull more seat belt out of the
retractor. If you cannot pull any more seat
belt webbing out of the retractor, the
retractor is in the ALR mode.
8. Check to make sure that the child restraint is
properly secured prior to each use. If the
belt is not locked, repeat steps 3 through 7.
After the child restraint is removed and the seat
belt fully retracted, the ALR mode (child restraint
mode) is canceled.
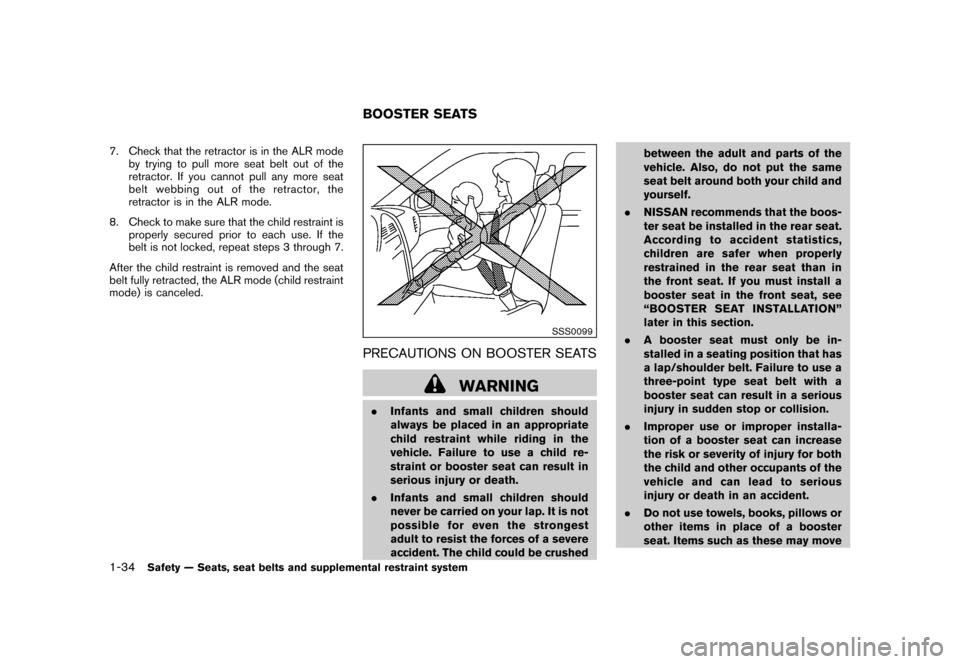
SSS0099
PRECAUTIONS ON BOOSTER SEATS
WARNING
.Infants and small children should
always be placed in an appropriate
child restraint while riding in the
vehicle. Failure to use a child re-
straint or booster seat can result in
serious injury or death.
.Infants and small children should
never be carried on your lap. It is not
possible for even the strongest
adult to resist the forces of a severe
accident. The child could be crushedbetween the adult and parts of the
vehicle. Also, do not put the same
seat belt around both your child and
yourself.
.NISSAN recommends that the boos-
ter seat be installed in the rear seat.
According to accident statistics,
children are safer when properly
restrained in the rear seat than in
the front seat. If you must install a
booster seat in the front seat, see
“BOOSTER SEAT INSTALLATION”
later in this section.
.A booster seat must only be in-
stalled in a seating position that has
a lap/shoulder belt. Failure to use a
three-point type seat belt with a
booster seat can result in a serious
injury in sudden stop or collision.
.Improper use or improper installa-
tion of a booster seat can increase
the risk or severity of injury for both
the child and other occupants of the
vehicle and can lead to serious
injury or death in an accident.
.Do not use towels, books, pillows or
other items in place of a booster
seat. Items such as these may moveBOOSTER SEATS
1-34
Safety — Seats, seat belts and supplemental restraint system
Page 50 of 309
Black plate (49,1)
Model "S35-D" EDITED: 2007/ 12/ 19
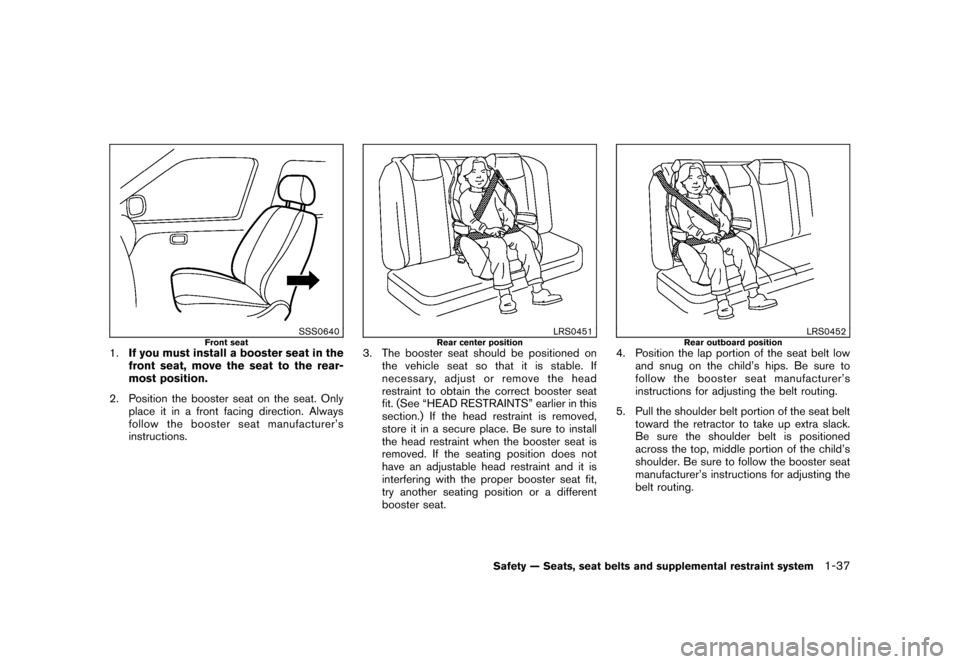
SSS0640
Front seat
1.If you must install a booster seat in the
front seat, move the seat to the rear-
most position.
2. Position the booster seat on the seat. Only
place it in a front facing direction. Always
follow the booster seat manufacturer’s
instructions.
LRS0451
Rear center position
3. The booster seat should be positioned on
the vehicle seat so that it is stable. If
necessary, adjust or remove the head
restraint to obtain the correct booster seat
fit. (See “HEAD RESTRAINTS” earlier in this
section.) If the head restraint is removed,
store it in a secure place. Be sure to install
the head restraint when the booster seat is
removed. If the seating position does not
have an adjustable head restraint and it is
interfering with the proper booster seat fit,
try another seating position or a different
booster seat.
LRS0452
Rear outboard position
4. Position the lap portion of the seat belt low
and snug on the child’s hips. Be sure to
follow the booster seat manufacturer’s
instructions for adjusting the belt routing.
5. Pull the shoulder belt portion of the seat belt
toward the retractor to take up extra slack.
Be sure the shoulder belt is positioned
across the top, middle portion of the child’s
shoulder. Be sure to follow the booster seat
manufacturer’s instructions for adjusting the
belt routing.
Safety — Seats, seat belts and supplemental restraint system
1-37
Page 96 of 309
Black plate (96,1)
Model "S35-D" EDITED: 2007/ 12/ 19
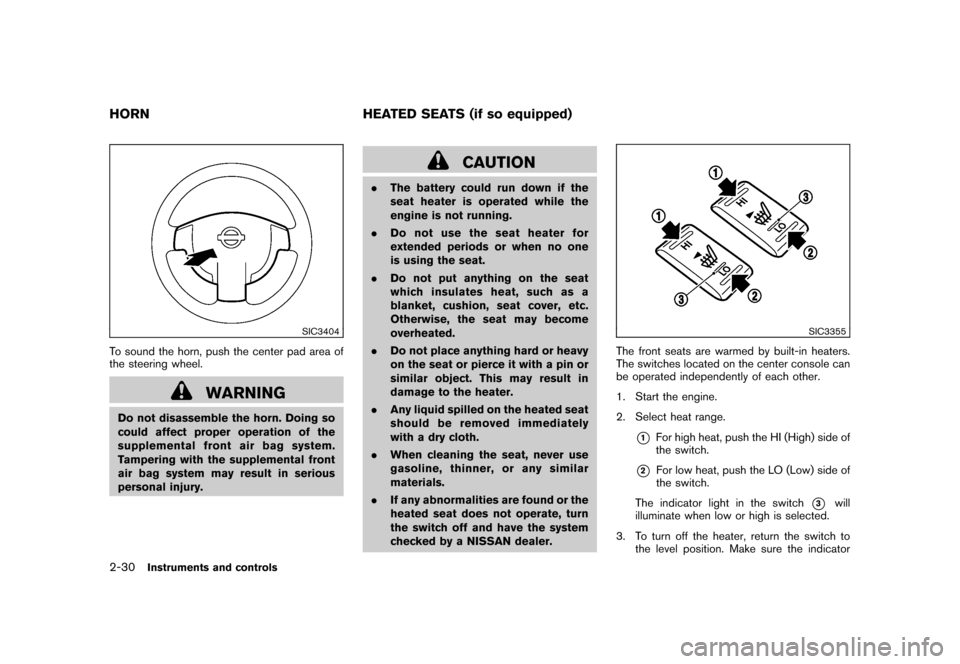
SIC3404
To sound the horn, push the center pad area of
the steering wheel.
WARNING
Do not disassemble the horn. Doing so
could affect proper operation of the
supplemental front air bag system.
Tampering with the supplemental front
air bag system may result in serious
personal injury.
CAUTION
.The battery could run down if the
seat heater is operated while the
engine is not running.
.Do not use the seat heater for
extended periods or when no one
is using the seat.
.Do not put anything on the seat
which insulates heat, such as a
blanket, cushion, seat cover, etc.
Otherwise, the seat may become
overheated.
.Do not place anything hard or heavy
on the seat or pierce it with a pin or
similar object. This may result in
damage to the heater.
.Any liquid spilled on the heated seat
should be removed immediately
with a dry cloth.
.When cleaning the seat, never use
gasoline, thinner, or any similar
materials.
.If any abnormalities are found or the
heated seat does not operate, turn
the switch off and have the system
checked by a NISSAN dealer.
SIC3355
The front seats are warmed by built-in heaters.
The switches located on the center console can
be operated independently of each other.
1. Start the engine.
2. Select heat range.
*1
For high heat, push the HI (High) side of
the switch.
*2
For low heat, push the LO (Low) side of
the switch.
The indicator light in the switch
*3
will
illuminate when low or high is selected.
3. To turn off the heater, return the switch to
the level position. Make sure the indicator
HORN HEATED SEATS (if so equipped)2-30
Instruments and controls
Page 229 of 309
Black plate (236,1)
Model "S35-D" EDITED: 2007/ 12/ 19
Occasionally remove loose dust from the interior
trim, plastic parts and seats using a vacuum
cleaner or soft bristled brush. Wipe the vinyl and
leather surfaces with a clean, soft cloth dam-
pened in mild soap solution, then wipe clean
with a dry soft cloth.
Regular care and cleaning is required in order to
maintain the appearance of the leather.
Before using any fabric protector, read the
manufacturer’s recommendations. Some fabric
protectors contain chemicals that may stain or
bleach the seat material.
Use a cloth dampened only with water, to clean
the meter and gauge lens.
CAUTION
.Do not use water or acidic cleaners
(hot steam cleaners) on the seat.
This can damage the seat or occu-
pant classification sensor. This can
also affect the operation of the air
bag system and result in serious
personal injury.
.Never use benzine, thinner, or any
similar material.
.Small dirt particles can be abrasive
and damaging to the leather sur-
faces and should be removedpromptly. Do not use saddle soap,
car waxes, polishes, oils, cleaning
fluids, solvents, detergents or am-
monia-based cleaners as they may
damage the leather’s natural finish.
.Never use fabric protectors unless
recommended by the manufacturer.
.Do not use glass or plastic cleaner
on meter or gauge lens covers. It
may damage the lens cover.
FLOOR MATSThe use of genuine NISSAN floor mats can
extend the life of your vehicle carpet and make it
easier to clean the interior.No matter what
mats are used, be sure they are fitted for
your vehicle and are properly positioned in
the footwell to prevent interference with
pedal operation.Mats should be maintained
with regular cleaning and replaced if they
become excessively worn.
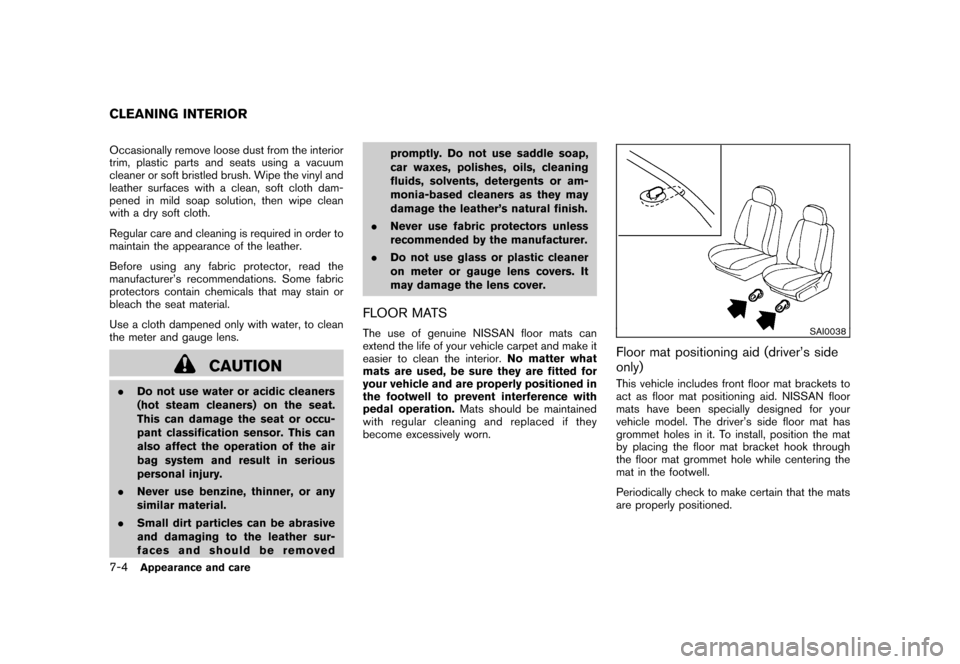
SAI0038
Floor mat positioning aid (driver’s side
only)This vehicle includes front floor mat brackets to
act as floor mat positioning aid. NISSAN floor
mats have been specially designed for your
vehicle model. The driver’s side floor mat has
grommet holes in it. To install, position the mat
by placing the floor mat bracket hook through
the floor mat grommet hole while centering the
mat in the footwell.
Periodically check to make certain that the mats
are properly positioned.
CLEANING INTERIOR7-4
Appearance and care
Page 230 of 309
Black plate (237,1)
Model "S35-D" EDITED: 2007/ 12/ 19
SEAT BELTSThe seat belts can be cleaned by wiping them
with a sponge dampened in a mild soap
solution. Allow the belts to dry completely in
the shade before using them.
See “SEAT BELTS” in the “1. Safety — Seats,
seat belts and supplemental restraint system”
section.
WARNING
Do not allow wet seat belts to roll up in
the retractor. NEVER use bleach, dye, or
chemical solvents to clean the seat
belts, since these materials may se-
verely weaken the seat belt webbing.
MOST COMMON FACTORS CONTRI-
BUTING TO VEHICLE CORROSION.The accumulation of moisture-retaining dirt
and debris in body panel sections, cavities,
and other areas.
.Damage to paint and other protective coat-
ings caused by gravel and stone chips or
minor traffic accidents.ENVIRONMENTAL FACTORS INFLU-
ENCE THE RATE OF CORROSION
MoistureAccumulation of sand, dirt and water on the
vehicle body underside can accelerate corro-
sion. Wet floor coverings will not dry completely
inside the vehicle, and should be removed for
drying to avoid floor panel corrosion.Relative humidityCorrosion will be accelerated in areas of high
relative humidity, especially those areas where
the temperatures stay above freezing where
atmospheric pollution exists, or where road salt
is used.TemperatureA temperature increase will accelerate the rate
of corrosion to those parts which are not well
ventilated.
Air pollutionIndustrial pollution, the presence of salt in the air
in coastal areas, or heavy road salt use will
accelerate the corrosion process. Road salt will
also accelerate the disintegration of paint
surfaces.TO PROTECT YOUR VEHICLE FROM
CORROSION.Wash and wax your vehicle often to keep the
vehicle clean.
.Always check for minor damage to the paint
and repair it as soon as possible.
.Keep drain holes at the bottom of the doors
open to avoid water accumulation.
.Check the underbody for accumulation of
sand, dirt or salt. If present, wash with water
as soon as possible.
CAUTION
.NEVER remove dirt, sand or other
debris from the passenger compart-
ment by washing it out with a hose.
Remove dirt with a vacuum cleaner
or broom.
.Never allow water or other liquids to
come in contact with electronic
CORROSION PROTECTION
Appearance and care
7-5