2008 NISSAN ROGUE clock
[x] Cancel search: clockPage 155 of 309
Black plate (157,1)
Model "S35-D" EDITED: 2007/ 12/ 19
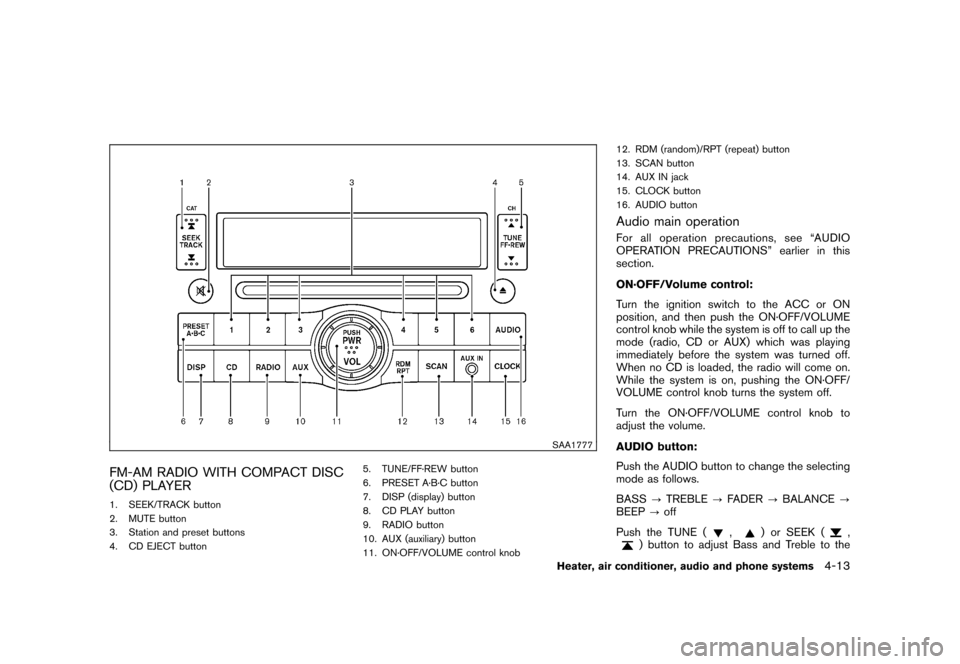
SAA1777
FM-AM RADIO WITH COMPACT DISC
(CD) PLAYER1. SEEK/TRACK button
2. MUTE button
3. Station and preset buttons
4. CD EJECT button5. TUNE/FF·REW button
6. PRESET A·B·C button
7. DISP (display) button
8. CD PLAY button
9. RADIO button
10. AUX (auxiliary) button
11. ON·OFF/VOLUME control knob12. RDM (random)/RPT (repeat) button
13. SCAN button
14. AUX IN jack
15. CLOCK button
16. AUDIO button
Audio main operationFor all operation precautions, see “AUDIO
OPERATION PRECAUTIONS” earlier in this
section.
ON·OFF/Volume control:
Turn the ignition switch to the ACC or ON
position, and then push the ON·OFF/VOLUME
control knob while the system is off to call up the
mode (radio, CD or AUX) which was playing
immediately before the system was turned off.
When no CD is loaded, the radio will come on.
While the system is on, pushing the ON·OFF/
VOLUME control knob turns the system off.
Turn the ON·OFF/VOLUME control knob to
adjust the volume.
AUDIO button:
Push the AUDIO button to change the selecting
mode as follows.
BASS?TREBLE?FADER?BALANCE?
BEEP?off
Push the TUNE (
,
) or SEEK (
,
) button to adjust Bass and Treble to the
Heater, air conditioner, audio and phone systems
4-13
Page 156 of 309
Black plate (158,1)
Model "S35-D" EDITED: 2007/ 12/ 19
desired level. Use the TUNE or SEEK button
also to adjust Fader or Balance modes. Fader
adjusts the sound level between the front and
rear speakers and Balance adjusts the sound
between the right and left speakers.
To turn the Beep sound off or on, push the
TUNE button until the desired mode is dis-
played. This turns on or off the beep sound when
audio buttons are pushed.
Once the sound quality is set to the desired
level, push the AUDIO button repeatedly until
the radio or CD display appears. After 10
seconds, the radio or CD display reappears.
MUTE button:
Push the
button to mute the audio sound.
Push thebutton again to release the mute.
CLOCK button:
Push the CLOCK button to turn on or off the
CLOCK display.
See “CLOCK” in the “2. Instruments and
controls” section for the detailed clock adjust-
ment operation.DISPLAY CHANGE:
This button will work during CD operation. (See
“CD PLAY INFORMATION” later in this section) .
Radio operation
RADIO (FM/AM) band select:
Pushing the RADIO band select button will
change the band as follows:
AM?FM?AM
When RADIO button is pushed while the
ignition switch is in the ACC or ON, the radio
will come on at the station last played.
The last station played will also come on when
the ON·OFF/VOL control knob is pushed to ON.
If a compact disc is playing when the RADIO
band select button is pushed, the compact disc
will automatically be turned off and the last radio
station played will come on.
The FM stereo indicator ST will glow during FM
stereo reception. When the stereo broadcast
signal is weak, the radio will automatically
change from stereo to monaural reception.
TUNE (Tuning):
Push the TUNE button
or
for manual
tuning. To move quickly through the channels,
push and hold either side of the TUNE button
down for more than 0.5 second.
SEEK tuning:
Push the SEEK button
or
to tune from
high to low or low to high frequencies and stops
at the next broadcasting station.
SCAN tuning:
Push the SCAN button to tune from low to high
frequencies and stops at each broadcasting
station for 5 seconds. Pushing the button again
during this 5 second period will stop SCAN
tuning and the radio will remain tuned to that
station.
If the SCAN button is not pushed within 5
seconds, SCAN tuning moves to the next
station.PRESET select:
Push the PRESET A·B·C button to go to the next
PRESET. After choosing from the PRESET A, B
or C, you can select the desired station pushing
the station preset buttons
to
.
to
Station memory operations:
18 stations can be set for PRESET A, B and C.
The PRESET A, B and C function allows you to
store a combination of FM and AM stations for
easy access.
1. Push the PRESET A·B·C button to change
4-14
Heater, air conditioner, audio and phone systems
Page 159 of 309
Black plate (161,1)
Model "S35-D" EDITED: 2007/ 12/ 19
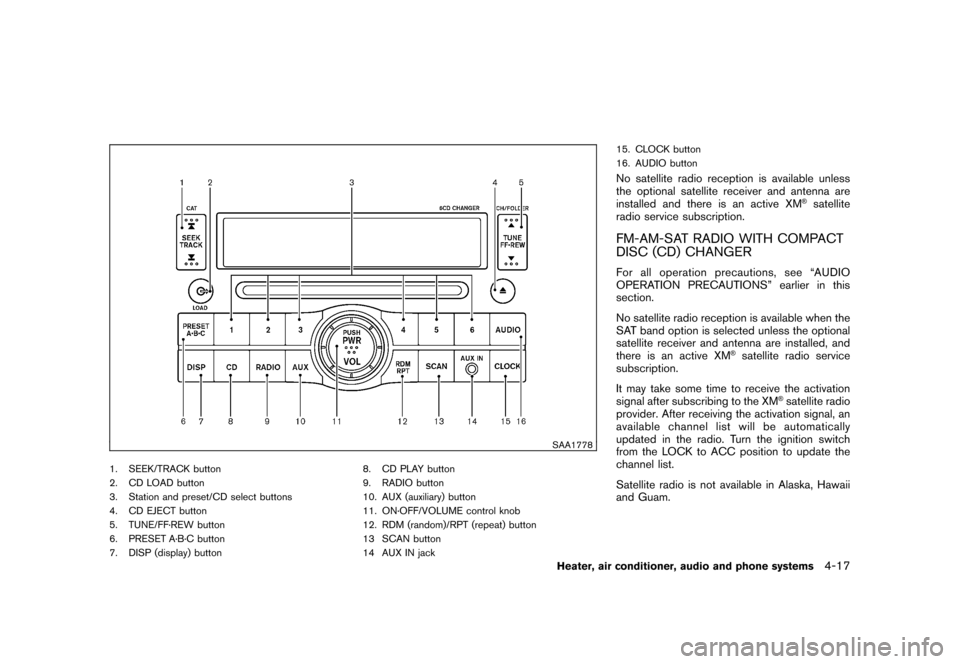
SAA1778
1. SEEK/TRACK button
2. CD LOAD button
3. Station and preset/CD select buttons
4. CD EJECT button
5. TUNE/FF·REW button
6. PRESET A·B·C button
7. DISP (display) button8. CD PLAY button
9. RADIO button
10. AUX (auxiliary) button
11. ON·OFF/VOLUME control knob
12. RDM (random)/RPT (repeat) button
13 SCAN button
14 AUX IN jack15. CLOCK button
16. AUDIO button
No satellite radio reception is available unless
the optional satellite receiver and antenna are
installed and there is an active XM
®satellite
radio service subscription.
FM-AM-SAT RADIO WITH COMPACT
DISC (CD) CHANGERFor all operation precautions, see “AUDIO
OPERATION PRECAUTIONS” earlier in this
section.
No satellite radio reception is available when the
SAT band option is selected unless the optional
satellite receiver and antenna are installed, and
there is an active XM
®satellite radio service
subscription.
It may take some time to receive the activation
signal after subscribing to the XM
®satellite radio
provider. After receiving the activation signal, an
available channel list will be automatically
updated in the radio. Turn the ignition switch
from the LOCK to ACC position to update the
channel list.
Satellite radio is not available in Alaska, Hawaii
and Guam.
Heater, air conditioner, audio and phone systems
4-17
Page 160 of 309
Black plate (162,1)
Model "S35-D" EDITED: 2007/ 12/ 19
Audio main operationHead unit:
The radio has an FM diversity reception system,
which employs two antennas printed on the rear
window. This system automatically switches to
the antenna which is receiving less interference.
The auto loudness circuit enhances the low and
high frequency ranges automatically in both
radio reception and CD playback.
ON·OFF/Volume control:
Turn the ignition switch to the ACC or ON
position, and then push the ON·OFF/VOLUME
control knob while the system is off to call up the
mode (radio, CD or AUX) which was playing
immediately before the system was turned off.
While the system is on, pushing the ON·OFF/
VOLUME control knob turns the system off.
Turn the ON·OFF/VOLUME control knob to
adjust the volume.
AUDIO button:
Push the AUDIO button to change the selecting
mode as follows.
BASS?TREBLE?FADER?BALANCE?
SSV?BEEP?off
Push the TUNE (
,
) or SEEK (
,
) button to adjust Bass and Treble to the
desired level. Use the TUNE or SEEK button
also to adjust Fader or Balance modes. Fader
adjusts the sound level between the front and
rear speakers and Balance adjusts the sound
between the right and left speakers.
To turn the beep sound off or on, push the TUNE
button until the desired mode is displayed. This
turns on or off the beep sound when audio
buttons are pushed.
To change the Speed Sensitive Volume (SSV)
mode to OFF, LOW, MID or HIGH, push the
TUNE button until the desired mode is dis-
played.
Once you have adjusted the sound quality to the
desired level, push the AUDIO button repeatedly
until the radio or CD display reappears. Other-
wise, the radio or CD display will automatically
reappear after about 10 seconds.CLOCK button:
Push the CLOCK button to turn on or off the
CLOCK display.
See “CLOCK” in the “2. Instruments and
controls” section for the detailed clock adjust-
ment operation.
DISPLAY CHANGE:
This button will work during FM or satellite radio
(if so equipped) and CD operation. Find the
detailed function in the description of each item.
Radio operation
RADIO (FM/AM/SAT) band select:
Pushing the RADIO button will change the band
as follows:
(Without satellite radio)
AM?FM?AM
(With satellite radio)
AM?FM?SAT (XM)?AM
When the RADIO button is pushed while the
ignition switch is in the ACC or ON position, the
radio will come on at the station last played.
The last station/channel played will also come
on when the ON·OFF/VOL control knob is
pushed to ON.
The satellite radio mode will be skipped unless
an optional satellite receiver and antenna are
installed and an XM
®satellite radio service
subscription is active. Satellite radio is not
available in Alaska, Hawaii and Guam.
If a compact disc is playing when the RADIO
4-18
Heater, air conditioner, audio and phone systems
Page 166 of 309
Black plate (168,1)
Model "S35-D" EDITED: 2007/ 12/ 19
SAA1236
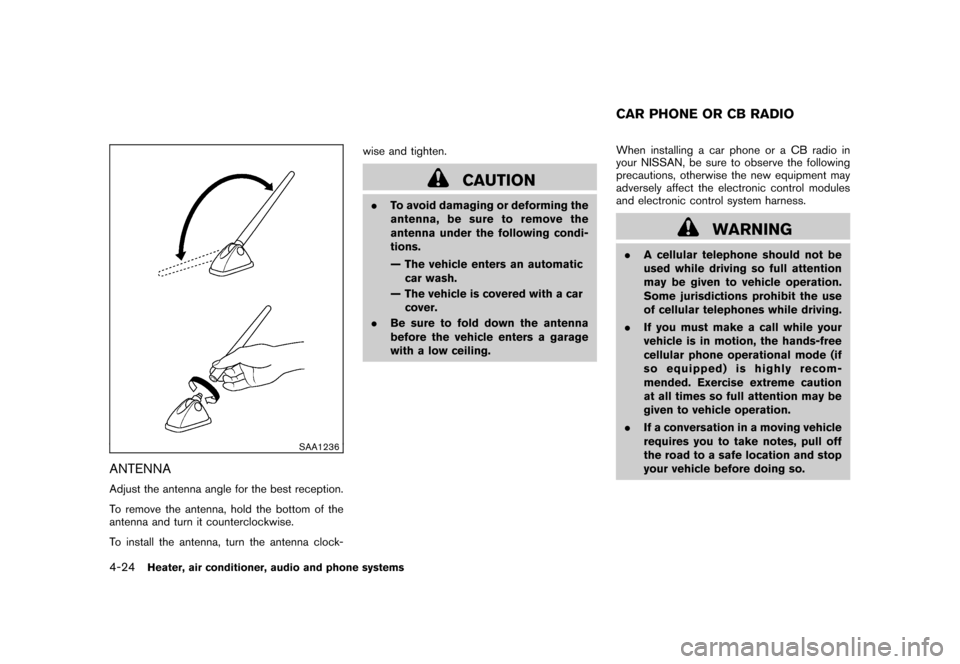
ANTENNAAdjust the antenna angle for the best reception.
To remove the antenna, hold the bottom of the
antenna and turn it counterclockwise.
To install the antenna, turn the antenna clock-wise and tighten.
CAUTION
.
To avoid damaging or deforming the
antenna,besuretoremovethe
antenna under the following condi-
tions.
— The vehicle enters an automatic
car wash.
— The vehicle is covered with a car cover.
. Be sure to fold down the antenna
before the vehicle enters a garage
with a low ceiling. When installing a car phone or a CB radio in
your NISSAN, be sure to observe the following
precautions, otherwise the new equipment may
adversely affect the electronic control modules
and electronic control system harness.
WARNING
.
A cellular telephone should not be
used while driving so full attention
may be given to vehicle operation.
Some jurisdictions prohibit the use
of cellular telephones while driving.
. If you must make a call while your
vehicle is in motion, the hands-free
cellular phone operational mode (if
so equipped) is highly recom-
mended. Exercise extreme caution
at all times so full attention may be
given to vehicle operation.
. If a conversation in a moving vehicle
requires you to take notes, pull off
the road to a safe location and stop
your vehicle before doing so.CAR PHONE OR CB RADIO
4-24
Heater, air conditioner, audio and phone systems
Page 190 of 309
Black plate (194,1)
Model "S35-D" EDITED: 2007/ 12/ 19
CONTINUOUSLY VARIABLE TRANS-
MISSION (CVT)The ignition lock is designed so that the ignition
switch cannot be turned to the LOCK position
until the selector lever is moved to the P (Park)
position.
.When turning the ignition switch to the
LOCK position, make sure that the selector
lever is in the P (Park) position.
.When removing the key from the ignition
switch (if it is inserted) , make sure that the
selector lever is in the P (Park) position.
When the ignition switch cannot be turned to
the LOCK position:
1. Move the selector lever to the P (Park)
position.
2. Turn the ignition switch slightly in the ON
direction.
3. TurntheignitionswitchtotheLOCK
position.
4. Remove the key, if it is inserted in the ignition
switch.
If the ignition switch is turned to the LOCK
position, the selector lever cannot be moved
from the P (Park) position. The selector lever can
be moved if the ignition switch is in the ON
position with the foot brake pedal depressed.The OFF position
*1
is between the LOCK and
ACC positions, although it is not marked on the
ignition switch.
STEERING LOCK
To lock steering wheel1. Turn the ignition switch to the LOCK
position.
2. Remove the key, if it is inserted in the ignition
switch.
3. Turn the steering wheel 1/6 of a turn
clockwise from the straight up position.To unlock steering wheel1. Insert the key into the ignition switch, if
necessary.
2. Gently turn the ignition switch while rotating
the steering wheel slightly right and left.KEY POSITIONS
LOCK (0)Except for the Intelligent Key equipped
model:
The key can only be removed from the ignition
switch at this position.
The steering lock can only be locked at this
position.For the Intelligent Key equipped model:
PUSH OFF -
The steering lock can only be locked at this
position.
PUSH ON -
The ignition switch will be unlocked while
carrying the Intelligent Key.
OFF (1)The engine is turned off with the steering wheel
unlocked.ACC (2)The electrical accessory power activates without
the engine turned on.ON (3)The ignition system and the electrical accessory
power activate without the engine turned on.START (4)The engine starter activates and the engine will
start. The ignition switch, when released, will
automatically turn to the ON position.
CAUTION
As soon as the engine has started,
release the ignition switch immediately.
5-10
Starting and driving
Page 214 of 309
Black plate (220,1)
Model "S35-D" EDITED: 2007/ 12/ 19
SCE0722
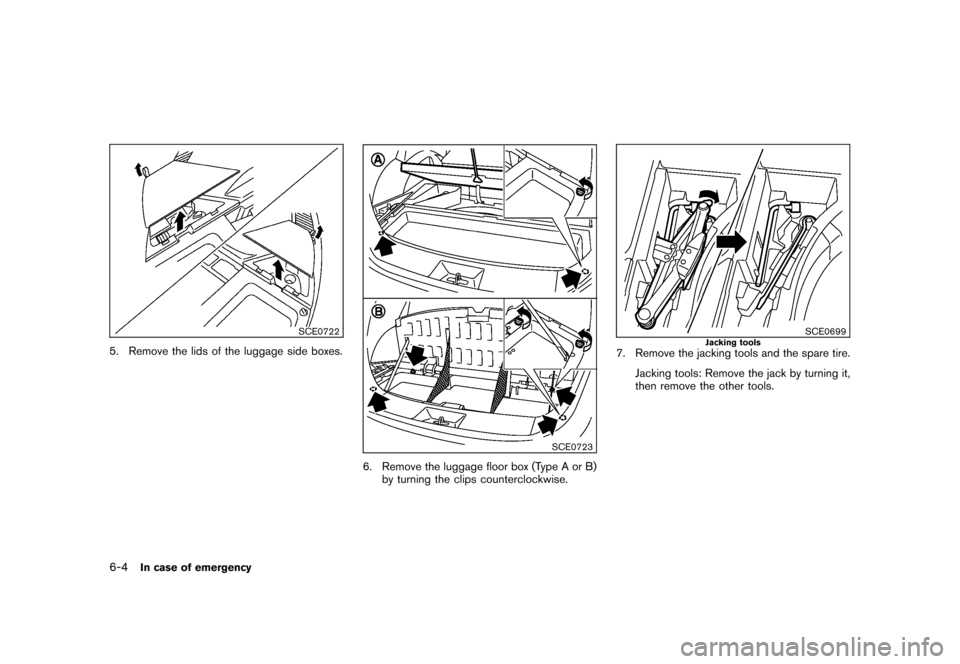
5. Remove the lids of the luggage side boxes.
SCE0723
6. Remove the luggage floor box (Type A or B)
by turning the clips counterclockwise.
SCE0699
Jacking tools
7. Remove the jacking tools and the spare tire.
Jacking tools: Remove the jack by turning it,
then remove the other tools.
6-4
In case of emergency
Page 217 of 309
Black plate (223,1)
Model "S35-D" EDITED: 2007/ 12/ 19
SCE0751
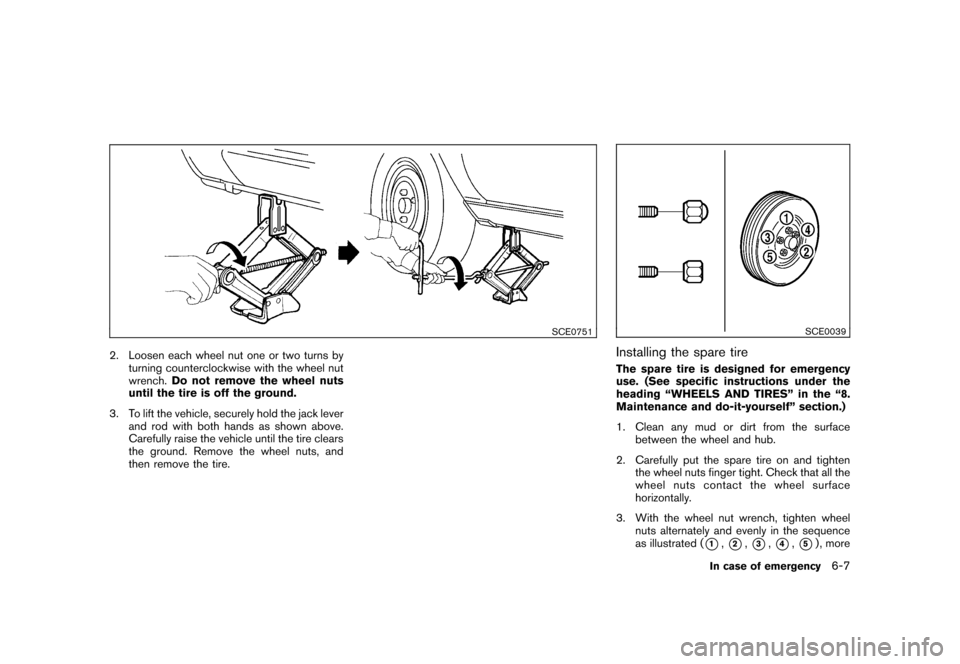
2. Loosen each wheel nut one or two turns by
turning counterclockwise with the wheel nut
wrench.Do not remove the wheel nuts
until the tire is off the ground.
3. To lift the vehicle, securely hold the jack lever
and rod with both hands as shown above.
Carefully raise the vehicle until the tire clears
the ground. Remove the wheel nuts, and
then remove the tire.
SCE0039
Installing the spare tireThe spare tire is designed for emergency
use. (See specific instructions under the
heading “WHEELS AND TIRES” in the “8.
Maintenance and do-it-yourself” section.)
1. Clean any mud or dirt from the surface
between the wheel and hub.
2. Carefully put the spare tire on and tighten
the wheel nuts finger tight. Check that all the
wheel nuts contact the wheel surface
horizontally.
3. With the wheel nut wrench, tighten wheel
nuts alternately and evenly in the sequence
as illustrated (
*1,*2,*3,*4,*5) , more
In case of emergency
6-7