2008 NISSAN ROGUE change time
[x] Cancel search: change timePage 159 of 309
Black plate (161,1)
Model "S35-D" EDITED: 2007/ 12/ 19
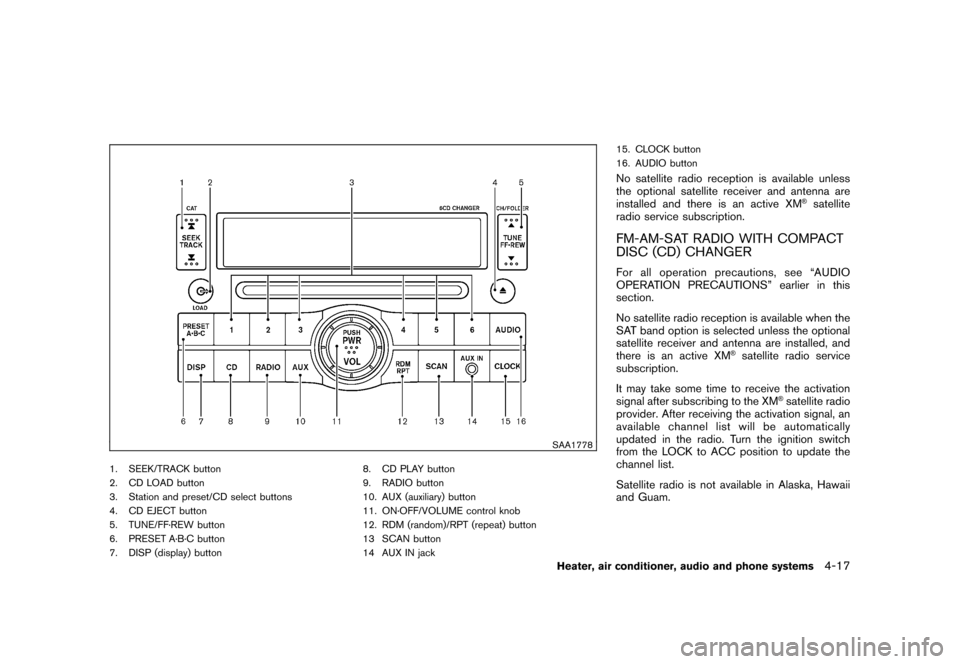
SAA1778
1. SEEK/TRACK button
2. CD LOAD button
3. Station and preset/CD select buttons
4. CD EJECT button
5. TUNE/FF·REW button
6. PRESET A·B·C button
7. DISP (display) button8. CD PLAY button
9. RADIO button
10. AUX (auxiliary) button
11. ON·OFF/VOLUME control knob
12. RDM (random)/RPT (repeat) button
13 SCAN button
14 AUX IN jack15. CLOCK button
16. AUDIO button
No satellite radio reception is available unless
the optional satellite receiver and antenna are
installed and there is an active XM
®satellite
radio service subscription.
FM-AM-SAT RADIO WITH COMPACT
DISC (CD) CHANGERFor all operation precautions, see “AUDIO
OPERATION PRECAUTIONS” earlier in this
section.
No satellite radio reception is available when the
SAT band option is selected unless the optional
satellite receiver and antenna are installed, and
there is an active XM
®satellite radio service
subscription.
It may take some time to receive the activation
signal after subscribing to the XM
®satellite radio
provider. After receiving the activation signal, an
available channel list will be automatically
updated in the radio. Turn the ignition switch
from the LOCK to ACC position to update the
channel list.
Satellite radio is not available in Alaska, Hawaii
and Guam.
Heater, air conditioner, audio and phone systems
4-17
Page 163 of 309
Black plate (165,1)
Model "S35-D" EDITED: 2007/ 12/ 19
is being played, the compact disc will play while
forwarding or rewinding. When the button is
released, the compact disc will return to the
normal play speed.
APS (Automatic Program
Search) FF, APS REW:
When the(APS FF) button is pushed while
the compact disc is being played, the program
next to the present one will start to play from its
beginning. Push several times to skip through
programs. The compact disc will advance the
number of times the button is pushed. (When
the last program on the compact disc is skipped
through, the first program will be played.) When
the
(APS REW) button is pushed, the
program being played returns to its beginning.
Push several times to skip back through
programs. The compact disc will go back the
number of times the button is pushed.
SCAN tuning:
When the SCAN tuning button is pushed for
less than 1.5 seconds while the CD is being
played, the beginning of all the tracks of CDs will
be played for 10 seconds in sequence.
When the SCAN tuning button is pushed for
more than 1.5 seconds while the CD is being
played, the first program in all the CDs will be
played for 10 seconds.Pushing the button again during this 10 second
period will stop SCAN tuning.
If the SCAN tuning button is not pushed within
10 seconds, SCAN tuning moves to the next
disc program.
CD PLAY selection:
To change to another CD already loaded into the
player, push the CD play select buttons
to
.RANDOM (RDM)/REPEAT (RPT):
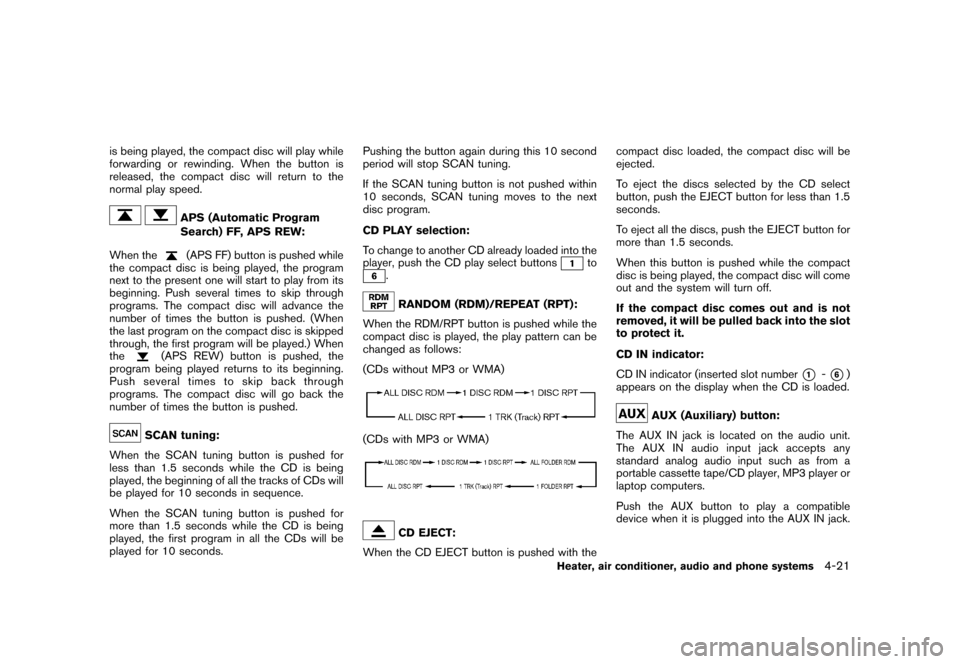
When the RDM/RPT button is pushed while the
compact disc is played, the play pattern can be
changed as follows:
(CDs without MP3 or WMA)
(CDs with MP3 or WMA)
CD EJECT:
When the CD EJECT button is pushed with thecompact disc loaded, the compact disc will be
ejected.
To eject the discs selected by the CD select
button, push the EJECT button for less than 1.5
seconds.
To eject all the discs, push the EJECT button for
more than 1.5 seconds.
When this button is pushed while the compact
disc is being played, the compact disc will come
out and the system will turn off.
If the compact disc comes out and is not
removed, it will be pulled back into the slot
to protect it.
CD IN indicator:
CD IN indicator (inserted slot number
*1
-*6)
appears on the display when the CD is loaded.
AUX (Auxiliary) button:
The AUX IN jack is located on the audio unit.
The AUX IN audio input jack accepts any
standard analog audio input such as from a
portable cassette tape/CD player, MP3 player or
laptop computers.
Push the AUX button to play a compatible
device when it is plugged into the AUX IN jack.
Heater, air conditioner, audio and phone systems
4-21
Page 165 of 309
Black plate (167,1)
Model "S35-D" EDITED: 2007/ 12/ 19
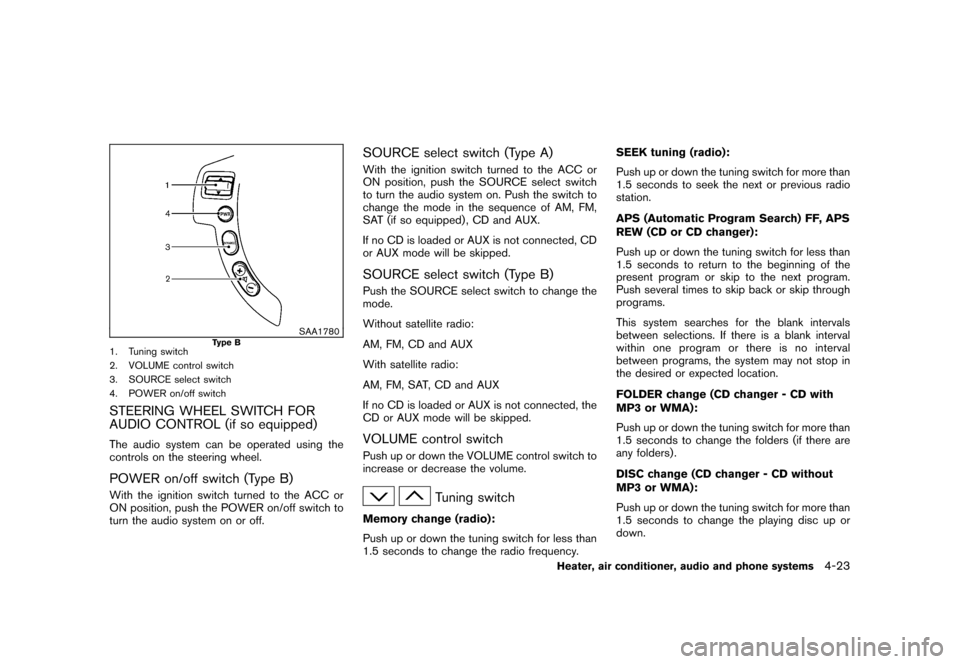
SAA1780
Type B
1. Tuning switch
2. VOLUME control switch
3. SOURCE select switch
4. POWER on/off switchSTEERING WHEEL SWITCH FOR
AUDIO CONTROL (if so equipped)The audio system can be operated using the
controls on the steering wheel.POWER on/off switch (Type B)With the ignition switch turned to the ACC or
ON position, push the POWER on/off switch to
turn the audio system on or off.
SOURCE select switch (Type A)With the ignition switch turned to the ACC or
ON position, push the SOURCE select switch
to turn the audio system on. Push the switch to
change the mode in the sequence of AM, FM,
SAT (if so equipped) , CD and AUX.
If no CD is loaded or AUX is not connected, CD
or AUX mode will be skipped.SOURCE select switch (Type B)Push the SOURCE select switch to change the
mode.
Without satellite radio:
AM, FM, CD and AUX
With satellite radio:
AM, FM, SAT, CD and AUX
If no CD is loaded or AUX is not connected, the
CD or AUX mode will be skipped.VOLUME control switchPush up or down the VOLUME control switch to
increase or decrease the volume.
Tuning switch
Memory change (radio):
Push up or down the tuning switch for less than
1.5 seconds to change the radio frequency.SEEK tuning (radio):
Push up or down the tuning switch for more than
1.5 seconds to seek the next or previous radio
station.
APS (Automatic Program Search) FF, APS
REW (CD or CD changer):
Push up or down the tuning switch for less than
1.5 seconds to return to the beginning of the
present program or skip to the next program.
Push several times to skip back or skip through
programs.
This system searches for the blank intervals
between selections. If there is a blank interval
within one program or there is no interval
between programs, the system may not stop in
the desired or expected location.
FOLDER change (CD changer - CD with
MP3 or WMA):
Push up or down the tuning switch for more than
1.5 seconds to change the folders (if there are
any folders) .
DISC change (CD changer - CD without
MP3 or WMA):
Push up or down the tuning switch for more than
1.5 seconds to change the playing disc up or
down.
Heater, air conditioner, audio and phone systems
4-23
Page 176 of 309
Black plate (178,1)
Model "S35-D" EDITED: 2007/ 12/ 19
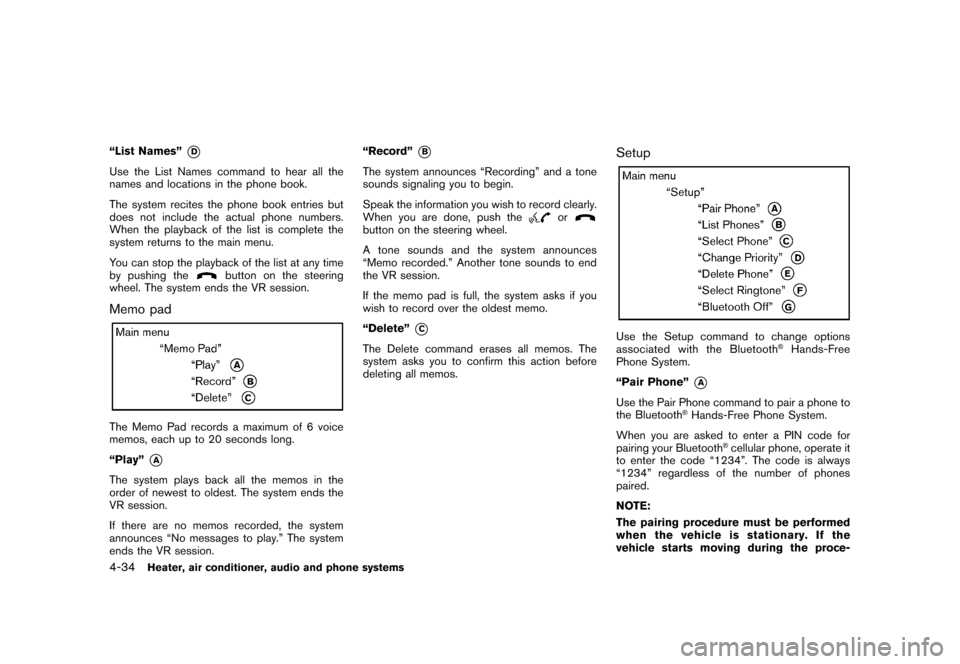
“List Names”
*D
Use the List Names command to hear all the
names and locations in the phone book.
The system recites the phone book entries but
does not include the actual phone numbers.
When the playback of the list is complete the
system returns to the main menu.
You can stop the playback of the list at any time
by pushing the
button on the steering
wheel. The system ends the VR session.
Memo padThe Memo Pad records a maximum of 6 voice
memos, each up to 20 seconds long.
“Play”
*A
The system plays back all the memos in the
order of newest to oldest. The system ends the
VR session.
If there are no memos recorded, the system
announces “No messages to play.” The system
ends the VR session.“Record”
*B
The system announces “Recording” and a tone
sounds signaling you to begin.
Speak the information you wish to record clearly.
When you are done, push the
or
button on the steering wheel.
A tone sounds and the system announces
“Memo recorded.” Another tone sounds to end
the VR session.
If the memo pad is full, the system asks if you
wish to record over the oldest memo.
“Delete”
*C
The Delete command erases all memos. The
system asks you to confirm this action before
deleting all memos.
SetupUse the Setup command to change options
associated with the Bluetooth
®Hands-Free
Phone System.
“Pair Phone”
*A
Use the Pair Phone command to pair a phone to
the Bluetooth
®Hands-Free Phone System.
When you are asked to enter a PIN code for
pairing your Bluetooth
®cellular phone, operate it
to enter the code “1234”. The code is always
“1234” regardless of the number of phones
paired.
NOTE:
The pairing procedure must be performed
when the vehicle is stationary. If the
vehicle starts moving during the proce-
4-34
Heater, air conditioner, audio and phone systems
Page 177 of 309
Black plate (179,1)
Model "S35-D" EDITED: 2007/ 12/ 19
dure, the procedure will be cancelled. Also,
see “Pairing procedure” earlier in this
section for additional information.
Up to 5 phones can be paired. If you try to pair a
sixth phone, the system announces that you
must first delete one phone or replace an
existing phone.
If you try to pair a phone that has already been
paired to your vehicle’s system, the system
announces the name the phone is already using.
The pairing procedure will then be canceled.
When prompted by the system, choose from the
following commands:
.“New phone” — see “Pairing procedure”
earlier in this section.
.“Replace phone” — The system announces
the names of the phones already paired and
asks which you would like to replace.
Once you say the name of the phone you
wish to replace, the paring procedure will
begin. (See “Pairing procedure” earlier in
this section.)
.“List phone” — See the description below.
“List Phones”
*B
Use the List Phones command to hear the
names of the phones currently paired. If no
phones are paired, the system announces, “Nopaired phones to list.” The system then ends the
VR session.
“Select Phone”
*C
Use the Select Phone command to select a
phone of lesser priority when two or more
phones paired with Bluetooth
®Hands-Free
Phone System are in the vehicle at the same
time.
The system asks you to name the phone and
confirm the selection.
Once the selection is confirmed, the selected
phone remains active until the ignition switch is
turned OFF or you select a new phone.
“Change Priority”
*D
Use the Change Priority command to change
the priority level of the active phone.
The priority level determines which phone is
active when more than one paired Bluetooth
®
phone is in the vehicle.
The system states the priority level of the active
phone and asks for a new priority level (1, 2, 3,
4, 5) .
If the new priority level is already being used for
another phone, the two phones will swap priority
levels.For example, if the current priority levels are:
Priority Level 1 = Phone A
Priority Level 2 = Phone B
Priority Level 3 = Phone C
and you change the priority level of Phone C to
Level 1, then:
Priority Level 1 = Phone C
Priority Level 2 = Phone B
Priority Level 3 = Phone A
“Delete Phone”
*E
Use the Delete Phone command to delete a
specific phone or all phones from the Bluetooth
®
Hands-Free Phone System.
The system announces the names of the phones
already paired with the system and their priority
level. The system then gives you the option to
delete a specific phone, all phones or listen to
the list again.
Once you chose to delete a phone or all phones,
the system asks you to confirm this action.
NOTE:
When you delete a phone, the associated
phone book for that phone will also be
deleted.
“Select Ringtone”
*F
Use the Select Ringtone command to select the
Heater, air conditioner, audio and phone systems
4-35
Page 182 of 309
Black plate (186,1)
Model "S35-D" EDITED: 2007/ 12/ 19
WARNING
.Do not leave children or adults who
would normally require the support
of others alone in your vehicle. Pets
should not be left alone either. They
could accidentally injure themselves
or others through inadvertent op-
eration of the vehicle. Also, on hot,
sunny days, temperatures in a
closed vehicle could quickly become
high enough to cause severe or
possibly fatal injuries to people or
animals.
.Properly secure all cargo with ropes
or straps to help prevent it from
sliding or shifting. Do not place
cargo higher than the seatbacks. In
a sudden stop or collision, unse-
cured cargo could cause personal
injury.EXHAUST GAS (carbon monoxide)
WARNING
.Do not breathe exhaust gases; they
contain colorless and odorless car-
bon monoxide. Carbon monoxide isdangerous. It can cause uncon-
sciousness or death.
.If you suspect that exhaust fumes
are entering the vehicle, drive with
all windows fully open, and have the
vehicle inspected immediately.
.Do not run the engine in closed
spaces such as a garage.
.Do not park the vehicle with the
engine running for any extended
length of time.
.Keep the lift gate closed while
driving, otherwise exhaust gases
could be drawn into the passenger
compartment. If you must drive with
the lift gate open, follow these
precautions:
1. Open all the windows.
2. Set the
air recirculation to off
and the fan control to high to
circulate the air.
.If electrical wiring or other cable
connections must pass to a trailer
through the seal on the lift gate or
the body, follow the manufacturer’s
recommendation to prevent carbon
monoxide entry into the vehicle..If a special body, camper or other
equipment is added for recreational
or other usage, follow the manufac-
turer’s recommendation to prevent
carbon monoxide entry into the
vehicle. (Some recreational vehicle
appliances such as stoves, refrig-
erators, heaters, etc. may also gen-
erate carbon monoxide.)
.The exhaust system and body
should be inspected by a qualified
mechanic whenever:
— The vehicle is raised for service.
— You suspect that exhaust fumes
are entering into the passenger
compartment.
— You notice a change in the
sound of the exhaust system.
— You have had an accident invol-
ving damage to the exhaust
system, underbody, or rear of
the vehicle.
THREE-WAY CATALYSTThe three-way catalyst is an emission control
device installed in the exhaust system. Exhaust
gases in the three-way catalyst are burned at
high temperatures to help reduce pollutants.
PRECAUTIONS WHEN STARTING
AND DRIVING5-2
Starting and driving
Page 185 of 309
Black plate (189,1)
Model "S35-D" EDITED: 2007/ 12/ 19
pressure sensors, and the TPMS will
not function properly.
Some devices and transmitters may temporarily
interfere with the operation of the TPMS and
cause the low tire pressure warning light to
illuminate. Some examples are:
.Facilities or electric devices using similar
radio frequencies are near the vehicle.
.If a transmitter set to similar frequencies is
being used in or near the vehicle.
.If a computer (or similar equipment) or a DC/
AC converter is being used in or near the
vehicle.
FCC Notice:
Changes or modifications not expressly
approved by the party responsible for
compliance could void the user’s authority
to operate the equipment.
This device complies with Part 15 of the
FCC Rules and RSS-210 of Industry Cana-
da.
Operation is subject to the following two
conditions: (1) This device may not cause
harmful interference, and (2) this device
must accept any interference received,
including interference that may cause un-
desired operation of the device.
AVOIDING COLLISION AND ROLL-
OVER
WARNING
Failure to operate this vehicle in a safe
and prudent manner may result in loss
of control or an accident.
Be alert and drive defensively at all times. Obey
all traffic regulations. Avoid excessive speed,
high speed cornering, or sudden steering
maneuvers, because these driving practices
could cause you to lose control of your vehicle.
As with any vehicle, a loss of control could
result in a collision with other vehicles or
objects, or cause the vehicle to rollover,
particularly if the loss of control causes the
vehicle to slide sideways.Be attentive at all
times, and avoid driving when tired. Never drive
when under the influence of alcohol or drugs
(including prescription or over-the-counter
drugs which may cause drowsiness) . Always
wear your seat belt as outlined in the “SEAT
BELTS” in the “1. Safety — Seats, seat belts and
supplemental restraint system” section of this
manual, and also instruct your passengers to do
so.
Seat belts help reduce the risk of injury in
collisions and rollovers.In a rollover crash, an
unbelted or improperly belted person issignificantly more likely to be injured or
killed than a person properly wearing a
seat belt.
ON-PAVEMENT AND OFF-ROAD
DRIVING PRECAUTIONSUtility vehicles have a significantly higher
rollover rate than other types of vehicles.
They have higher ground clearance than pas-
senger cars to make them capable of performing
in a variety of on-pavement and off-road
applications. This gives them a higher center of
gravity than ordinary cars. An advantage of
higher ground clearance is a better view of the
road, allowing you to anticipate problems.
However, they are not designed for cornering
at the same speeds as conventional passenger
cars any more than low-slung sports cars are
designed to perform satisfactorily under off-road
conditions. If at all possible, avoid sharp turns or
abrupt maneuvers, particularly at high speeds.
As with other vehicles of this type, failure to
operate this vehicle correctly may result in loss
of control or vehicle rollover. Seat belts help
reduce the risk of injury in collisions and
rollovers. In a rollover crash, an unbelted or
improperly belted person is significantly more
likely to be injured or killed than a person
properly wearing a seat belt.
Be sure to read “DRIVING SAFETY PRECAU-
TIONS” later in this section.
Starting and driving
5-5
Page 241 of 309
Black plate (248,1)
Model "S35-D" EDITED: 2007/ 12/ 19
.Waste oil must be disposed of
properly.
.Check your local regulations.
Perform steps 4 to 9 when the engine oil
filter change is needed.
4. Remove the plastic cover over the oil filter
location by removing the small plastic clips.
5. Loosen the oil filter with an oil filter wrench.
Remove the oil filter by turning it by hand.
6. Wipe the engine oil filter mounting surface
with a clean rag.
CAUTION
Be sure to remove any old gasket
material remaining on the mounting
surface of the engine. Failure to do so
could lead to engine damage.
7. Coat the gasket on the new filter with clean
engine oil.
8. Screw in the oil filter clockwise until a slight
resistance is felt, then tighten additionally
more than 2/3 turn.
Oil filter tightening torque:
11 to 15 ft-lb
(14.7 to 20.5 N·m)
9. Install the plastic cover.10. Clean and re-install the drain plug with a
new washer. Securely tighten the drain plug
with a wrench.
Drain plug tightening torque:
22 to 29 ft-lb
(29 to 39 N·m)
Do not use excessive force.
11. Refill engine with recommended oil through
the oil filler opening, and install the oil filler
cap securely.
See “CAPACITIES AND RECOMMENDED
FUEL/LUBRICANTS” in the “9. Technical
and consumer information” section for drain
and refill capacity. The drain and refill
capacity depends on the oil temperature
and drain time. Use these specifications for
reference only. Always use the dipstick to
determine the proper amount of oil in the
engine.
12. Start the engine and check for leakage
around the drain plug and the oil filter.
Correct as required.
13. Turn the engine off and wait more than 10
minutes. Check the oil level with the dipstick.
Add engine oil if necessary.
After the operation1. Lower the vehicle carefully to the ground.
2. Dispose of waste oil and filter properly.
WARNING
.Prolonged and repeated contact
with used engine oil may cause skin
cancer.
.Try to avoid direct skin contact with
used oil. If skin contact is made,
wash thoroughly with soap or hand
cleaner as soon as possible.
.Keep used engine oil out of reach of
children.
8-10
Maintenance and do-it-yourself