2008 NISSAN ROGUE engine overheat
[x] Cancel search: engine overheatPage 71 of 309
Black plate (71,1)
Model "S35-D" EDITED: 2007/ 12/ 19
SIC3550
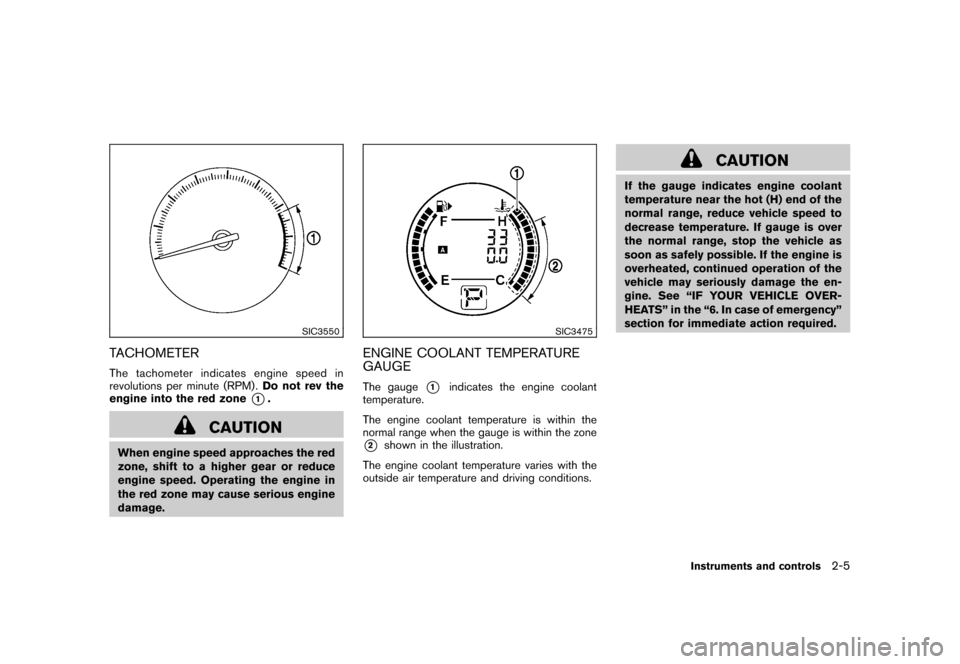
TACHOMETERThe tachometer indicates engine speed in
revolutions per minute (RPM) .Do not rev the
engine into the red zone
*1.
CAUTION
When engine speed approaches the red
zone, shift to a higher gear or reduce
engine speed. Operating the engine in
the red zone may cause serious engine
damage.
SIC3475
ENGINE COOLANT TEMPERATURE
GAUGEThe gauge
*1
indicates the engine coolant
temperature.
The engine coolant temperature is within the
normal range when the gauge is within the zone
*2
shown in the illustration.
The engine coolant temperature varies with the
outside air temperature and driving conditions.
CAUTION
If the gauge indicates engine coolant
temperature near the hot (H) end of the
normal range, reduce vehicle speed to
decrease temperature. If gauge is over
the normal range, stop the vehicle as
soon as safely possible. If the engine is
overheated, continued operation of the
vehicle may seriously damage the en-
gine. See “IF YOUR VEHICLE OVER-
HEATS” in the “6. In case of emergency”
section for immediate action required.
Instruments and controls
2-5
Page 96 of 309
Black plate (96,1)
Model "S35-D" EDITED: 2007/ 12/ 19
SIC3404
To sound the horn, push the center pad area of
the steering wheel.
WARNING
Do not disassemble the horn. Doing so
could affect proper operation of the
supplemental front air bag system.
Tampering with the supplemental front
air bag system may result in serious
personal injury.
CAUTION
.The battery could run down if the
seat heater is operated while the
engine is not running.
.Do not use the seat heater for
extended periods or when no one
is using the seat.
.Do not put anything on the seat
which insulates heat, such as a
blanket, cushion, seat cover, etc.
Otherwise, the seat may become
overheated.
.Do not place anything hard or heavy
on the seat or pierce it with a pin or
similar object. This may result in
damage to the heater.
.Any liquid spilled on the heated seat
should be removed immediately
with a dry cloth.
.When cleaning the seat, never use
gasoline, thinner, or any similar
materials.
.If any abnormalities are found or the
heated seat does not operate, turn
the switch off and have the system
checked by a NISSAN dealer.
SIC3355
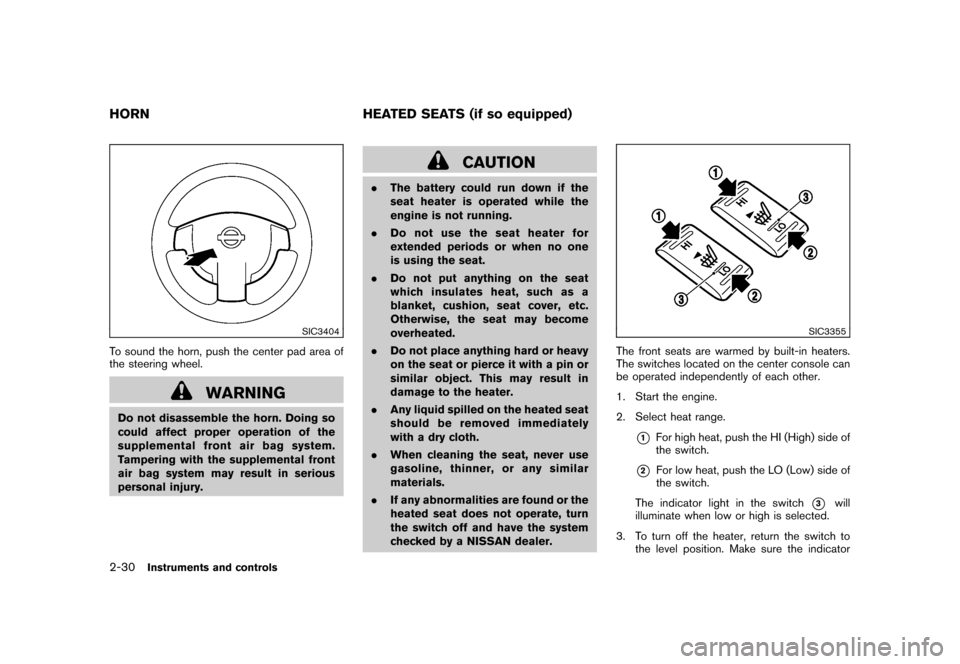
The front seats are warmed by built-in heaters.
The switches located on the center console can
be operated independently of each other.
1. Start the engine.
2. Select heat range.
*1
For high heat, push the HI (High) side of
the switch.
*2
For low heat, push the LO (Low) side of
the switch.
The indicator light in the switch
*3
will
illuminate when low or high is selected.
3. To turn off the heater, return the switch to
the level position. Make sure the indicator
HORN HEATED SEATS (if so equipped)2-30
Instruments and controls
Page 98 of 309
Black plate (98,1)
Model "S35-D" EDITED: 2007/ 12/ 19
the clock set mode.
The display will return to the regular clock
display after 10 seconds.
If the power supply is disconnected, the
clock will not indicate the correct time.
Readjust the time.
SIC3492
Instrument panel
SIC3493
Center console (if so equipped)
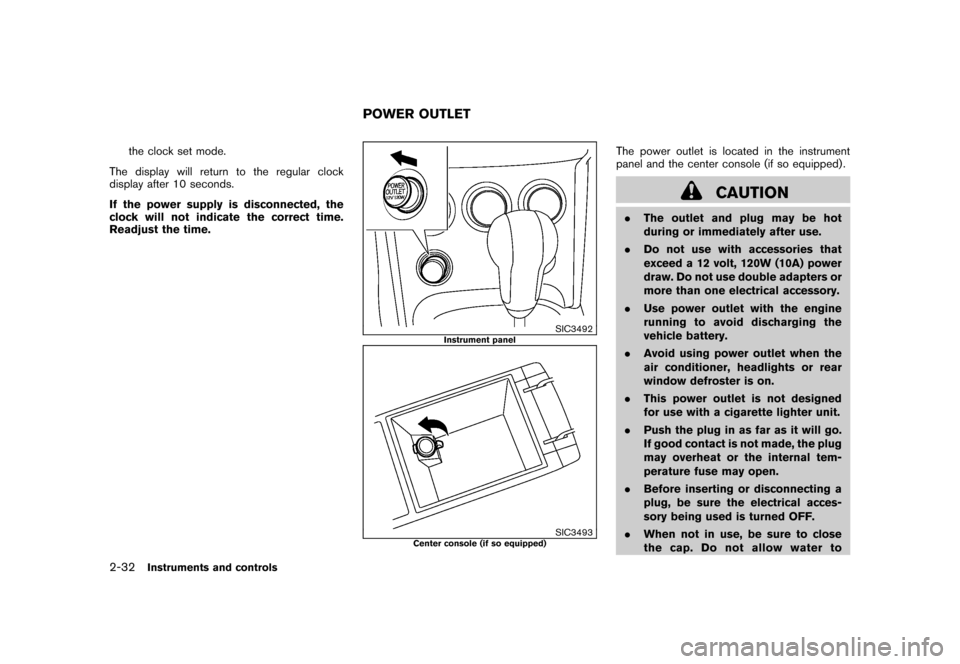
The power outlet is located in the instrument
panel and the center console (if so equipped) .
CAUTION
.The outlet and plug may be hot
during or immediately after use.
.Do not use with accessories that
exceed a 12 volt, 120W (10A) power
draw. Do not use double adapters or
more than one electrical accessory.
.Use power outlet with the engine
running to avoid discharging the
vehicle battery.
.Avoid using power outlet when the
air conditioner, headlights or rear
window defroster is on.
.This power outlet is not designed
for use with a cigarette lighter unit.
.Push the plug in as far as it will go.
If good contact is not made, the plug
may overheat or the internal tem-
perature fuse may open.
.Before inserting or disconnecting a
plug, be sure the electrical acces-
sory being used is turned OFF.
.When not in use, be sure to close
the cap. Do not allow water to
POWER OUTLET
2-32
Instruments and controls
Page 183 of 309
Black plate (187,1)
Model "S35-D" EDITED: 2007/ 12/ 19
WARNING
.The exhaust gas and the exhaust
system are very hot. Keep people,
animals or flammable materials
away from the exhaust system com-
ponents.
.Do not stop or park the vehicle over
flammable materials such as dry
grass, waste paper or rags. They
may ignite and cause a fire.
CAUTION
.Do not use leaded gasoline. Depos-
its from leaded gasoline will ser-
iously reduce the three-way
catalyst’s ability to help reduce ex-
haust pollutants.
.Keep your engine tuned up. Mal-
functions in the ignition, fuel injec-
tion, or electrical systems can cause
overrich fuel flow into the three-way
catalyst, causing it to overheat. Do
not keep driving if the engine mis-
fires, or if noticeable loss of perfor-
mance or other unusual operating
conditions are detected. Have thevehicle inspected promptly by a
NISSAN dealer.
.Avoid driving with an extremely low
fuel level. Running out of fuel could
cause the engine to misfire, dama-
ging the three-way catalyst.
.Do not race the engine while warm-
ing it up.
.Do not push or tow your vehicle to
start the engine.
TIRE PRESSURE MONITORING SYS-
TEM (TPMS)Each tire, including the spare (if provided) ,
should be checked monthly when cold and
inflated to the inflation pressure recommended
by the vehicle manufacturer on the vehicle
placard or tire inflation pressure label. (If your
vehicle has tires of a different size than the size
indicated on the vehicle placard or tire inflation
pressure label, you should determine the proper
tire inflation pressure for those tires.)
As an added safety feature, your vehicle has
been equipped with a Tire Pressure Monitoring
System (TPMS) that illuminates a low tire
pressure telltale when one or more of your tires
is significantly under-inflated. Accordingly, when
the low tire pressure telltale illuminates, you
should stop and check your tires as soon aspossible, and inflate them to the proper pres-
sure. Driving on a significantly under-inflated tire
causes the tire to overheat and can lead to tire
failure. Under-inflation also reduces fuel effi-
ciency and tire tread life, and may affect the
vehicle’s handling and stopping ability.
Please note that the TPMS is not a substitute for
proper tire maintenance, and it is the driver’s
responsibility to maintain correct tire pressure,
even if under-inflation has not reached the level
to trigger illumination of the TPMS low tire
pressure telltale.
Your vehicle has also been equipped with a
TPMS malfunction indicator to indicate when the
system is not operating properly. The TPMS
malfunction indicator is combined with the low
tire pressure telltale. When the system detects a
malfunction, the telltale will flash for approxi-
mately one minute and then remain continuously
illuminated. This sequence will continue upon
subsequent vehicle start-ups as long as the
malfunction exists. When the malfunction indi-
cator is illuminated, the system may not be able
to detect or signal low tire pressure as intended.
TPMS malfunctions may occur for a variety of
reasons, including the installation of replace-
ment or alternate tires or wheels on the vehicle
that prevent the TPMS from functioning properly.
Always check the TPMS malfunction telltale
after replacing one or more tires or wheels on
your vehicle to ensure that the replacement or
Starting and driving
5-3
Page 186 of 309
Black plate (190,1)
Model "S35-D" EDITED: 2007/ 12/ 19
DRINKING ALCOHOL/DRUGS AND
DRIVING
WARNING
Never drive under the influence of
alcohol or drugs. Alcohol in the blood-
stream reduces coordination, delays
reaction time and impairs judgement.
Driving after drinking alcohol increases
the likelihood of being involved in an
accident injuring yourself and others.
Additionally, if you are injured in an
accident, alcohol can increase the se-
verity of the injury.
NISSAN is committed to safe driving. However,
you must choose not to drive under the influence
of alcohol. Every year thousands of people are
injured or killed in alcohol-related accidents.
Although the local laws vary on what is
considered to be legally intoxicated, the fact is
that alcohol affects all people differently and
most people underestimate the effects of
alcohol.
Remember, drinking and driving don’t mix! And
that is true for drugs, too (over-the-counter,
prescription, and illegal drugs) . Don’t drive if
your ability to operate your vehicle is impaired by
alcohol, drugs, or some other physical condition.
DRIVING SAFETY PRECAUTIONSYour NISSAN is designed for both normal and
off-road use. However, avoid driving in deep
water or mud as your NISSAN is mainly
designed for leisure use, unlike a conventional
off-road vehicle.
Remember that Two-Wheel Drive (2WD) mod-
els are less capable than All-Wheel Drive
(AWD) models for rough road driving and
extrication when stuck in deep snow, mud, or
the like.
Please observe the following precautions:
WARNING
.Drive carefully when off the road
and avoid dangerous areas. Every
person who drives or rides in this
vehicle should be seated with their
seat belt fastened. This will keep
you and your passengers in position
when driving over rough terrain.
.Do not drive across steep slopes.
Instead drive either straight up or
straight down the slopes. Off-road
vehicles can tip over sideways much
more easily than they can forward or
backward.
.Many hills are too steep for anyvehicle. If you drive up them, you
may stall. If you drive down them,
you may not be able to control your
speed. If you drive across them, you
may roll over.
.Do not shift ranges while driving on
downhill grades as this could cause
loss of control of the vehicle.
.Stay alert when driving to the top of
a hill. At the top there could be a
drop-off or other hazard that could
cause an accident.
.If your engine stalls or you cannot
make it to the top of a steep hill,
never attempt to turn around. Your
vehicle could tip or roll over. Always
back straight down in R (Reverse)
range. Never back down in N (Neu-
tral) , using only the brake, as this
could cause loss of control.
.Heavy braking going down a hill
could cause your brakes to overheat
and fade, resulting in loss of control
and an accident. Apply brakes
lightly and use a low range to
control your speed.
.Unsecured cargo can be thrown
around when driving over rough
5-6
Starting and driving
Page 205 of 309
Black plate (209,1)
Model "S35-D" EDITED: 2007/ 12/ 19
WARNING
.If the engine is not running or is
turned off while driving, the power
assist for the steering will not work.
Steering will be harder to operate.
.When the electric power steering
warning light illuminates with the
engine running, the power assist for
the steering will cease operation.
You will still have control of the
vehicle but the steering will be
harder to operate.
The electric power steering system is designed
to provide power assist while driving to operate
the steering wheel with light force.
When the steering wheel is operated repeatedly
or continuously while parking or driving at a very
low speed, the power assist for the steering
wheel will be reduced. This is to prevent
overheating of the electric power steering
system and protect it from getting damaged.
While the power assist is reduced, steering
wheel operation will become heavy. When the
temperature of the electric power steering
system goes down, the power assist level will
return to normal. Avoid repeating such steering
wheel operations that could cause the electric
power steering system to overheat.You may hear a fricative sound when the
steering wheel is operated quickly. However,
this is not a malfunction.
If the electric power steering warning light
illuminates while the engine is running, it may
indicate the electric power steering system is
not functioning properly and may need servicing.
Have the electric power steering system
checked by a NISSAN dealer. (See “Electric
power steering warning light” in the “2. Instru-
ments and controls” section.)
When the electric power steering warning light
illuminates with the engine running, the power
assist for the steering will cease operation. You
will still have control of the vehicle. However,
greater steering effort is needed, especially in
sharp turns and at low speeds.
BRAKING PRECAUTIONSThe brake system has two separate hydraulic
circuits. If one circuit malfunctions, you will still
have braking at two wheels.
You may feel a small click and hear a sound
when the brake pedal is fully depressed slowly.
This is not a malfunction and indicates that the
brake assist mechanism is operating properly.Vacuum assisted brakesThe brake booster aids braking by using engine
vacuum. If the engine stops, you can stop the
vehicle by depressing the brake pedal. However,
greater foot pressure on the brake pedal will be
required to stop the vehicle and the stopping
distance will be longer.Using the brakesAvoid resting your foot on the brake pedal while
driving. This will cause overheating of the
brakes, wearing out the brake and pads faster
and reduce gas mileage.
To help reduce brake wear and to prevent the
brakes from overheating, reduce speed and
downshift to a lower gear before going down a
slope or long grade. Overheated brakes may
reduce braking performance and could result in
loss of vehicle control.
ELECTRIC POWER STEERING
SYSTEMBRAKE SYSTEM
Starting and driving
5-25
Page 221 of 309
Black plate (227,1)
Model "S35-D" EDITED: 2007/ 12/ 19
CAUTION
.Do not continue to drive if your
vehicle overheats. Doing so could
cause engine damage or a vehicle
fire.
.To avoid the danger of being
scalded, never remove the radiator
cap while the engine is still hot.
When the radiator cap is removed,
pressurized hot water will spurt out,
possibly causing serious injury.
.Do not open the hood if steam is
coming out.
If your vehicle is overheating (indicated by an
extremely high temperature gauge reading) , or if
you feel a lack of engine power, detect abnormal
noise, etc., take the following steps:
1. Move the vehicle safely off the road, apply
the parking brake and move the selector
lever to the P (Park) position.
Do not stop the engine.
2. Turn off the air conditioner. Open all the
windows, move the heater or air conditioner
temperature control to maximum hot and fan
control to high speed.3. Get out of the vehicle. Look and listen for
steam or coolant escaping from the radiator
before opening the hood. (If steam or
coolant is escaping, turn off the engine.)
Do not open the hood further until no steam
or coolant can be seen.
4. Open the engine hood.
WARNING
If steam or water is coming from the
engine, stand clear to prevent getting
burned.
5. Visually check drive belts for damage or
looseness. Also check if the cooling fan is
running. The radiator hoses and radiator
should not leak water. If coolant is leaking,
the water pump belt is missing or loose, or
the cooling fan does not run, stop the
engine.
WARNING
Be careful not to allow your hands, hair,
jewelry or clothing to come into contact
with, or get caught in, engine belts or
the engine cooling fan. The engine
cooling fan can start at any time.6. After the engine cools down, check the
coolant level in the reservoir tank with the
engine running. Add coolant to the reservoir
tank if necessary. Have your vehicle repaired
at a NISSAN dealer.
IF YOUR VEHICLE OVERHEATS
In case of emergency
6-11
Page 238 of 309
Black plate (245,1)
Model "S35-D" EDITED: 2007/ 12/ 19
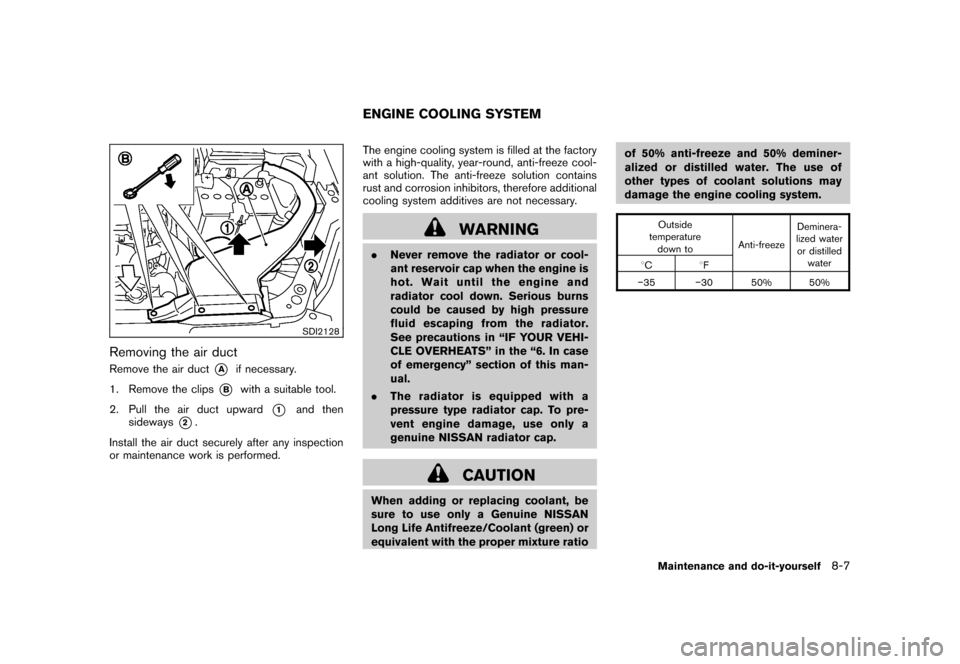
SDI2128
Removing the air ductRemove the air duct
*A
if necessary.
1. Remove the clips
*B
with a suitable tool.
2. Pull the air duct upward
*1
and then
sideways
*2.
Install the air duct securely after any inspection
or maintenance work is performed.The engine cooling system is filled at the factory
with a high-quality, year-round, anti-freeze cool-
ant solution. The anti-freeze solution contains
rust and corrosion inhibitors, therefore additional
cooling system additives are not necessary.
WARNING
.Never remove the radiator or cool-
ant reservoir cap when the engine is
hot. Wait until the engine and
radiator cool down. Serious burns
could be caused by high pressure
fluid escaping from the radiator.
See precautions in “IF YOUR VEHI-
CLE OVERHEATS” in the “6. In case
of emergency” section of this man-
ual.
.The radiator is equipped with a
pressure type radiator cap. To pre-
vent engine damage, use only a
genuine NISSAN radiator cap.
CAUTION
When adding or replacing coolant, be
sure to use only a Genuine NISSAN
Long Life Antifreeze/Coolant (green) or
equivalent with the proper mixture ratioof 50% anti-freeze and 50% deminer-
alized or distilled water. The use of
other types of coolant solutions may
damage the engine cooling system.
Outside
temperature
down toAnti-freezeDeminera-
lized water
or distilled
water
8C8F
�35�30 50%
50%
ENGINE COOLING SYSTEM
Maintenance and do-it-yourself
8-7