2008 NISSAN QUEST tire type
[x] Cancel search: tire typePage 167 of 376
In case of low tire pressure, a message “LOW
PRESSURE” or “CHECK ALL TIRES” is dis-
played on the screen:
LOW PRESSURE — CHECK ALL TIRES.
WARNING
cWhen a spare tire is mounted or a wheel
is replaced, tire pressure will not be
indicated, the Tire Pressure Monitoring
System (TPMS) will not function and
the low tire pressure warning light will
flash for approximately 1 minute. The
light will remain on after 1 minute. Con-
tact your NISSAN dealer as soon as
possible for tire replacement and/or
system resetting.
cReplacing tires with those not originally
specified by NISSAN could affect the
proper operation of the TPMS.
HOW TO USE THE SETTING
BUTTON
Pressing the SETTING button will change the
settings menu as follows:
Backlight!Day Mode Brightness!Night
Mode Brightness!Clock Adjust HOURS!Clock Adjust MINUTES!Units!Lang!MP3
Disp Type (if so equipped)!Audio or OFF!
Backlight
Backlight
To turn off the screen, select “OFF” of the Back-
light mode by pressing the TUNE button.
The message “Press SETTINGS to resume” will
display for approximately 5 seconds then the
screen will turn off.
To turn on the screen, press the SETTING button
and select “ON” by pressing the TUNE button.
When any button besides SETTING is pressed
with the screen off, the screen turns on for further
operation. The screen will turn off automatically
after the operation is finished.
Day mode brightness
The brightness of the screen during the day can
be changed by pressing the TUNE button.
For additional information, see “
button”
later in this section.
Night mode brightness
The brightness of the screen during the night can
be changed by pressing the TUNE button.
For additional information, see “
button”
later in this section.
Clock operation
The digital clock displays time when the ignition
key is in ACC or ON.
If the power supply is disconnected, the
clock will not indicate the correct time.
Readjust the time.
Clock adjust hours
Press the SETTING button until Clock Adjust
HOURS is shown in the display. Press the TUNE
button up or down to adjust the hour.
Clock adjust minutes
Press the SETTING button again Clock Adjust
Minutes is shown in the display. Press the TUNE
button up or down to adjust the minutes.
To exit the clock adjustment, press the SETTING
button repeatedly. The screen will return to the
audio display if the audio is on. If the audio is not
on, the screen will return to a blank display.
Units
To change the units press the TUNE button to
select “ENGLISH” or “METRIC”.
Unit: US — MI, °F, MPG
Metric — km, °C, L/100 km
Display screen, heater, air conditioner, audio and phone systems4-5
ZREVIEW COPYÐ2008 Quest(van)
Owners ManualÐUSA_English(nna)
06/29/07Ðdebbie
X
Page 222 of 376

TUNE/FLDR·CAT
(Folder·Catalog):
While playing an MP3, press the
TUNE/FLDR·CAT button
orto scan
through available folders.
TUNE/FLDR·CAT (Fast
Forward and Rewind):
When the TUNE/FLDR·CAT button is pressed for
more than 1.5 seconds,
(fast forward)
or(rewind) while the compact disc is be-
ing played, the compact disc will play while fast
forwarding or rewinding . When the button is
released, the compact disc will return to normal
play speed.
CD select buttons:
To play another CD that has been loaded, press a
CD select button (1 – 6) .
SCAN/RPT (Type A only):
When the SCAN/RPT button is pressed while
the compact disc is being played, the play pattern
can be changed as follows:
1 DISC REPEAT!1 TRACK REPEAT!ALL
DISC RANDOM!1 DISC RANDOM
1 DISC REPEAT: The disc that is currently play-
ing will be repeated1 TRACK REPEAT: The track that is currently
playing will be repeated.
ALL DISC RANDOM: Tracks from all discs will be
played randomly.
1 DISC RANDOM: Tracks from the disc that is
currently playing will be played randomly.
RPT·RDM button (Type B only):
When the RPT·RDM button is pressed while the
compact disc is played, the play pattern can be
changed as follows:
1 DISC REPEAT!1 TRACK REPEAT!ALL
DISC RANDOM!1 DISC RANDOM
1 DISC REPEAT: The disc that is currently play-
ing will be repeated.
1 TRACK REPEAT: The track that is currently
playing will be repeated.
ALL DISC RANDOM: Tracks from all discs will be
played randomly.
1 DISC RANDOM: Tracks from the disc that is
currently playing will be played randomly.
REAR CTRL:
Pressing the REAR CTRL button turns the rear
seat audio controller on. REAR CTRL ON will
display. Pressing it again will turn the rear seat
audio controller off. REAR CTRL OFF will display.
If the vehicle is not equipped with a rear seat
audio controller, the display will show “REAR AV
N/A”.
(SPEAKER CONTROL) button:
Press this
button to turn the rear speakers
off and the headphones on. Press this
button again to turn rear seat speakers back on
and the headphones off.
CD EJECT:
Current/Selected disc:
cPress the
button, then press the slot
number (1 – 6) for the desired disc. The
compact disc will be ejected. If no slot num-
ber (1 – 6) is pressed, the current loaded
disc will be ejected. Also, if the ejected disc
is not removed within 15 seconds, the disc
will reload.
All discs:
cPress and hold the
button for more
than 1.5 seconds. The compact discs will be
ejected one by one. If a disc is not removed
within 15 seconds, or the
button is
pressed again during the eject sequence,
the entire disc eject sequence will be can-
celed.
When this button is pressed while the compact
disc is being played, the compact disc will eject
and the last source will be played.
4-60Display screen, heater, air conditioner, audio and phone systems
ZREVIEW COPYÐ2008 Quest(van)
Owners ManualÐUSA_English(nna)
06/29/07Ðcathy
X
Page 270 of 376
This procedure is described in the vehicle service
manual and can be performed by a NISSAN
dealer.
ANTI-LOCK BRAKING SYSTEM
(ABS)
WARNING
cThe Anti-lock Braking System (ABS) is a
sophisticated device, but it cannot pre-
vent accidents resulting from careless
or dangerous driving techniques. It can
help maintain vehicle control during
braking on slippery surfaces. Remem-
ber that stopping distances on slippery
surfaces will be longer than on normal
surfaces even with ABS. Stopping dis-
tances may also be longer on rough,
gravel or snow covered roads, or if you
are using tire chains. Always maintain a
safe distance from the vehicle in front
of you. Ultimately, the driver is respon-
sible for safety.
cTire type and condition may also affect
braking effectiveness.
– When replacing tires, install the
specified size of tires on all four
wheels.– When installing a spare tire, make
sure that it is the proper size and type
as specified on the Tire and Loading
Information label. See “Tire and
Loading Information label” in the
“Technical and consumer informa-
tion” section of this manual.
– For detailed information, see
“Wheels and tires” in the “Mainte-
nance and do-it-yourself” section of
this manual.
The Anti-lock Braking System (ABS) controls the
brakes so the wheels do not lock during hard
braking or when braking on slippery surfaces.
The system detects the rotation speed at each
wheel and varies the brake fluid pressure to pre-
vent each wheel from locking and sliding. By
preventing each wheel from locking, the system
helps the driver maintain steering control and
helps to minimize swerving and spinning on slip-
pery surfaces.
Using the system
Depress the brake pedal and hold it down. De-
press the brake pedal with firm steady pressure,
but do not pump the brakes. The ABS will oper-
ate to prevent the wheels from locking up. Steer
the vehicle to avoid obstacles.
WARNING
Do not pump the brake pedal. Doing so
may result in increased stopping
distances.
Normal operation
The ABS operates at speeds above3-6MPH(5
- 10 km/h) .
When the ABS senses that one or more wheels
are close to locking up, the system electronically
controls the pressure applied to each brake.
This action is similar to pumping the brakes very
quickly. You may feel a pulsation in the brake
pedal and hear a noise from under the hood or
feel a vibration from the actuator when it is oper-
ating. This is normal and indicates that the ABS is
operating properly. However, the pulsation may
indicate that road conditions are hazardous and
extra care is required while driving.
Self-test feature
The ABS includes electronic sensors, electric
pumps, hydraulic solenoids and a computer. The
computer has a built-in diagnostic feature that
tests the system each time you start the engine
and move the vehicle at a low speed in forward or
reverse. When the self-test occurs, you may hear
a “clunk” noise and/or feel a pulsation in the brake
5-18Starting and driving
ZREVIEW COPYÐ2008 Quest(van)
Owners ManualÐUSA_English(nna)
06/29/07Ðdebbie
X
Page 272 of 376
cWhen driving on extremely inclined sur-
faces such as higher banked corners,
the Traction Control System may not
operate properly and the
indica-
tor light may come on. Do not drive on
these types of roads.
cIf wheels or tires other than the recom-
mended ones are used, the Traction
Control System may not operate prop-
erly and the
indicator light may
come on.
cThe Traction Control System is not a
substitute for winter tires or tire chains
on a snow covered road.When accelerating or driving on slippery sur-
faces, the tires may spin or slide. With the Vehicle
Dynamic Control (VDC) system, sensors detect
these movements and control the braking and
engine output to help improve vehicle stability.
cWhen the Vehicle Dynamic Control (VDC)
system is operating, theSLIPindicator in
the instrument panel blinks.
cIf theSLIPindicator blinks, the road condi-
tions are slippery. Be sure to adjust your
speed and driving to these conditions. See
“Slip indicator light”, and “Vehicle Dynamic
Control (VDC) off indicator light” in the “In-
struments and controls” section.
cIndicator light
If a malfunction occurs in the system, the
SLIPand
indicator lights come on in
the instrument panel.
As long as these indicator lights are on, the
traction control function is canceled.
If the vehicle is operated with the Vehicle Dy-
namic Control system OFF using the VDC OFF
switch, VDC functions will be turned off. The
VDC system will still try to transfer power from a
slipping drive wheel to one with more traction
when the VDC system switch is OFF. TheSLIP
indicator will flash if wheel spin is detected. The
ABS will still operate with the VDC system off.When the VDC system is operating, you may feel
a pulsation in the brake pedal and hear a noise or
vibration from under the hood. This is normal and
indicates that the VDC system is working prop-
erly.
The computer has a built in diagnostic feature
that tests the system each time you start the
engine and move the vehicle forward or in reverse
at a slow speed. When the self-test occurs, you
may hear a clunk noise and/or feel a pulsation in
the brake pedal. This is normal and is not an
indication of a malfunction.
WARNING
cThe Vehicle Dynamic Control system is
designed to help improve driving stabil-
ity but does not prevent accidents due
to abrupt steering operation at high
speeds or by careless or dangerous
driving techniques. Reduce vehicle
speed and be especially careful when
driving and cornering on slippery sur-
faces and always drive carefully.
VEHICLE DYNAMIC CONTROL (VDC)
SYSTEM (if so equipped)
5-20Starting and driving
ZREVIEW COPYÐ2008 Quest(van)
Owners ManualÐUSA_English(nna)
06/29/07Ðdebbie
X
Page 273 of 376
cIf brake related parts such as brake
pads, rotors and calipers are not stan-
dard equipment or are extremely dete-
riorated, the Vehicle Dynamic Control
system may not operate properly and
the Vehicle Dynamic Control off indica-
tor light may come on.
cDo not modify the vehicle’s suspension.
If suspension parts such as shock ab-
sorbers, struts, springs, stabilizer bars,
bushings and wheels are not NISSAN
approved for your vehicle or are ex-
tremely deteriorated the Vehicle Dy-
namic Control system may not operate
properly. This could adversely affect ve-
hicle handling performance, and the
VDC OFF indicator light may come on.
cWhen driving on extremely inclined sur-
faces such as higher banked corners,
the Vehicle Dynamic Control system
may not operate properly and the VDC
OFF indicator light may come on. Do
not drive on these types of roads.
cWhen driving on an unstable surface
such as a turntable, ferry, elevator or
ramp, the Vehicle Dynamic Control off
indicator light may illuminate. This is
not a malfunction. Restart the engine
after driving onto a stable surface.cIf wheels or tires other than the recom-
mended ones are used, the Vehicle Dy-
namic Control system may not operate
properly and the Vehicle Dynamic Con-
trol off indicator light may come on.
cThe Vehicle Dynamic Control system is
not a substitute for winter tires or tire
chains on a snow covered road.
WARNING
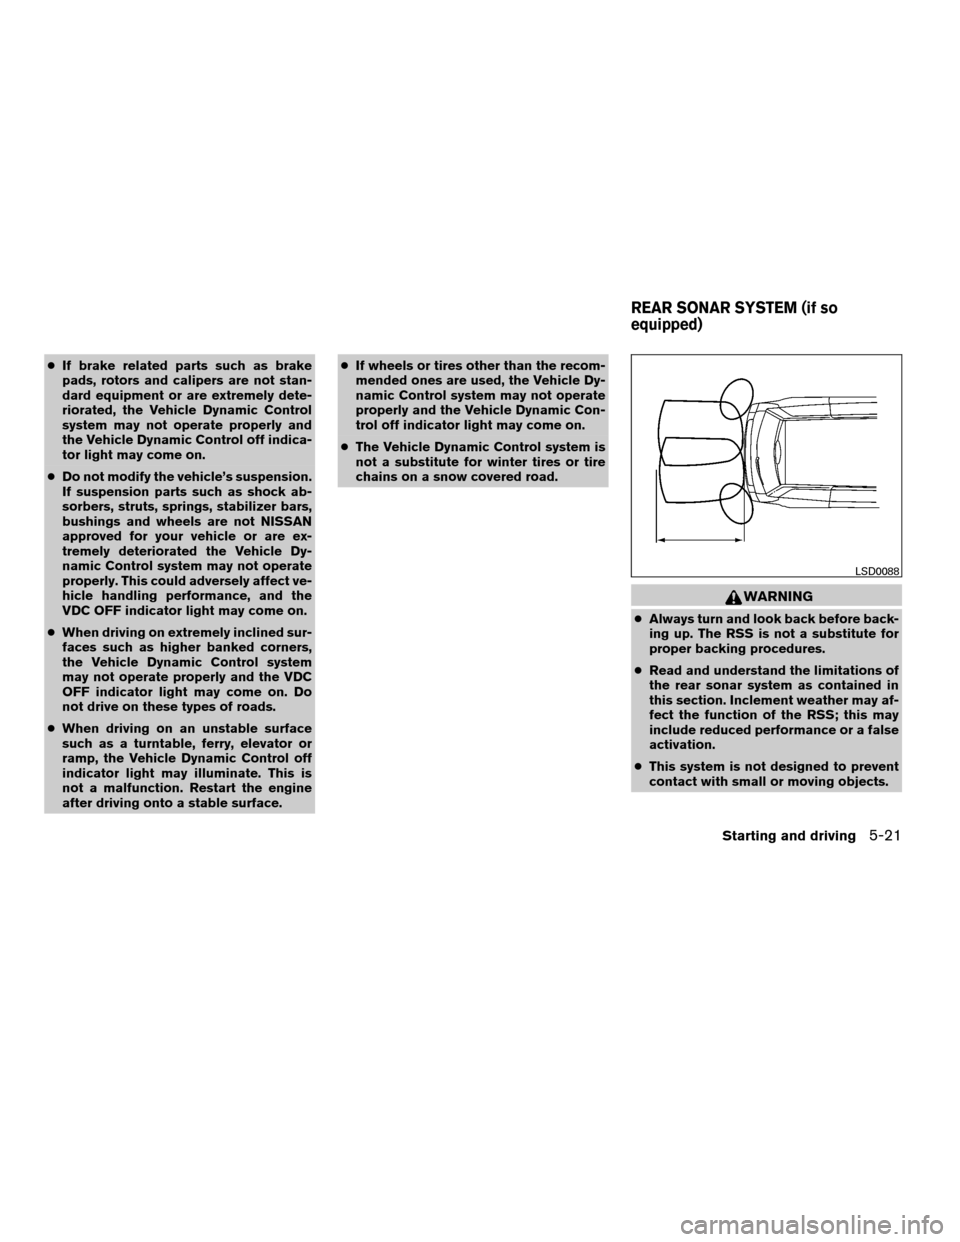
cAlways turn and look back before back-
ing up. The RSS is not a substitute for
proper backing procedures.
cRead and understand the limitations of
the rear sonar system as contained in
this section. Inclement weather may af-
fect the function of the RSS; this may
include reduced performance or a false
activation.
cThis system is not designed to prevent
contact with small or moving objects.
LSD0088
REAR SONAR SYSTEM (if so
equipped)
Starting and driving5-21
ZREVIEW COPYÐ2008 Quest(van)
Owners ManualÐUSA_English(nna)
06/29/07Ðdebbie
X
Page 275 of 376
DRAINING OF COOLANT WATER
If the vehicle is to be left outside without anti-
freeze, drain the cooling system, including the
engine block. Refill before operating the vehicle.
For details, see “Changing engine coolant” in the
“Maintenance and do-it-yourself” section of this
manual.
TIRE EQUIPMENT
1. SUMMER tires have a tread designed to
provide superior performance on dry pave-
ment. However, the performance of these
tires will be substantially reduced in snowy
and icy conditions. If you operate your ve-
hicle on snowy or icy roads, NISSAN recom-
mends the use of MUD & SNOW or ALL
SEASON TIRES on all four wheels. Please
consult a NISSAN dealer for the tire type,
size, speed rating and availability informa-
tion.
2. For additional traction on icy roads, studded
tires may be used. However, some U.S.
states and Canadian provinces prohibit their
use. Check local, state and provincial laws
before installing studded tires.
Skid and traction capabilities of studded
snow tires on wet or dry surfaces may be
poorer than that of non-studded snow tires.3. Tire chains may be used. For details see
“Tire chains” in the “Maintenance and do-it-
yourself” section of this manual.
SPECIAL WINTER EQUIPMENT
It is recommended that the following items be
carried in the vehicle during winter:
cA scraper and stiff-bristled brush to remove
ice and snow from the windows and wiper
blades.
cA sturdy, flat board to be placed under the
jack to give it firm support.
cA shovel to dig the vehicle out of snowdrifts.
cExtra window washer fluid to refill the reser-
voir tank.
DRIVING ON SNOW OR ICE
WARNING
cWet ice (32°F, 0°C and freezing rain) ,
very cold snow or ice can be slick and
very hard to drive on. The vehicle will
have much less traction or “grip” under
these conditions. Try to avoid driving on
wet ice until the road is salted or
sanded.cWhatever the condition, drive with cau-
tion. Accelerate and slow down with
care. If accelerating or downshifting too
fast, the drive wheels will lose even
more traction.
cAllow more stopping distance under
these conditions. Braking should be
started sooner than on dry pavement.
cAllow greater following distances on
slippery roads.
cWatch for slippery spots (glare ice) .
These may appear on an otherwise
clear road in shaded areas. If a patch of
ice is seen ahead, brake before reach-
ing it. Try not to brake while on the ice,
and avoid any sudden steering
maneuvers.
cDo not use the cruise control on slip-
pery roads.
cSnow can trap dangerous exhaust
gases under your vehicle. Keep snow
clear of the exhaust pipe and from
around your vehicle.
Starting and driving5-23
ZREVIEW COPYÐ2008 Quest(van)
Owners ManualÐUSA_English(nna)
06/29/07Ðdebbie
X
Page 281 of 376
cUse the correct jack-up points. Never
use any other part of the vehicle for jack
support.
cNever jack up the vehicle more than
necessary.
cNever use blocks on or under the jack.
cDo not start or run the engine while
vehicle is on the jack. It may cause the
vehicle to move. This is especially true
for vehicles with limited slip
differentials.
cDo not allow passengers to stay in the
vehicle while it is on the jack.
cNever run the engine with a wheel(s) off
the ground. It may cause the vehicle to
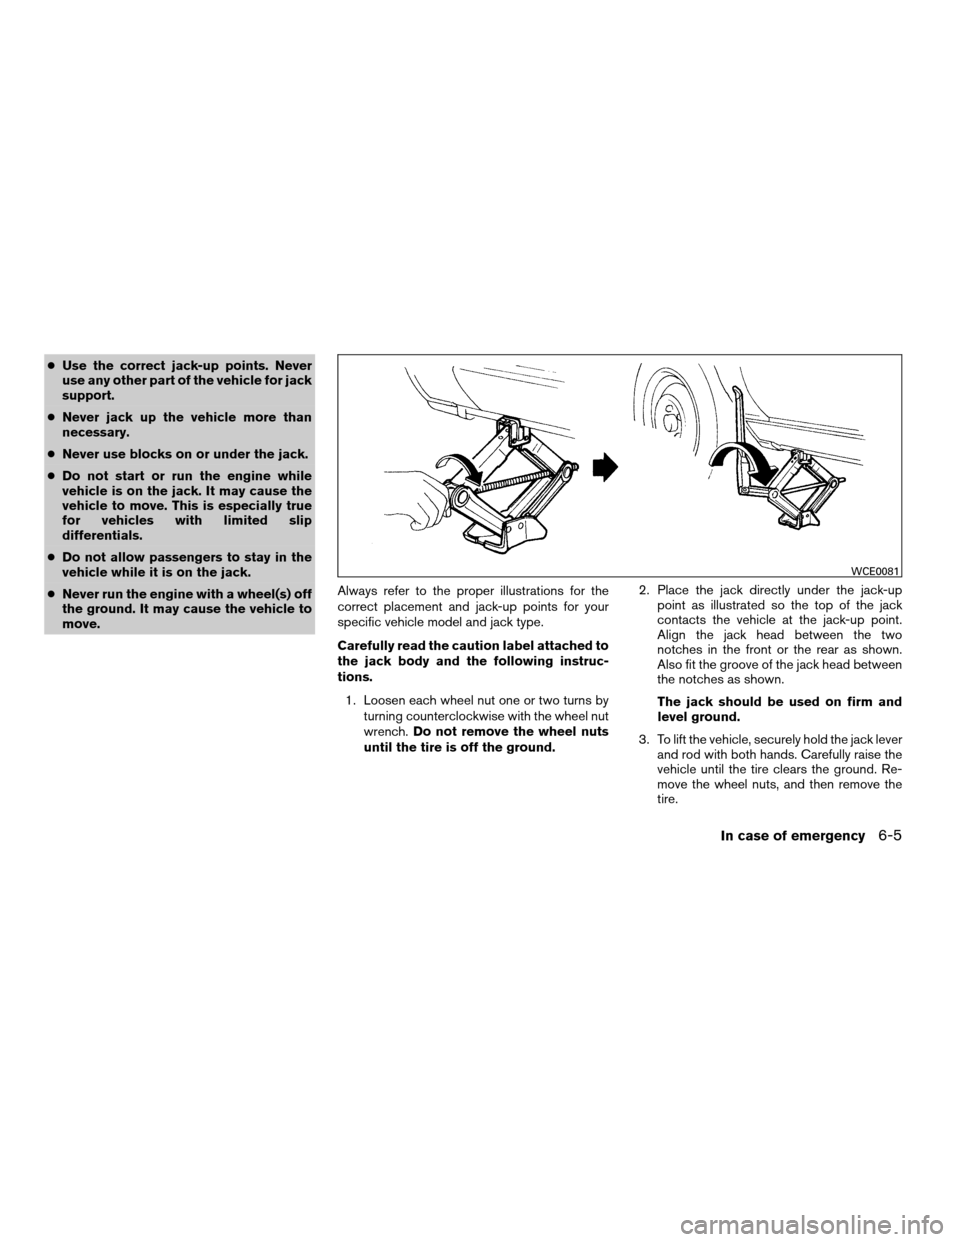
move.Always refer to the proper illustrations for the
correct placement and jack-up points for your
specific vehicle model and jack type.
Carefully read the caution label attached to
the jack body and the following instruc-
tions.
1. Loosen each wheel nut one or two turns by
turning counterclockwise with the wheel nut
wrench.Do not remove the wheel nuts
until the tire is off the ground.2. Place the jack directly under the jack-up
point as illustrated so the top of the jack
contacts the vehicle at the jack-up point.
Align the jack head between the two
notches in the front or the rear as shown.
Also fit the groove of the jack head between
the notches as shown.
The jack should be used on firm and
level ground.
3. To lift the vehicle, securely hold the jack lever
and rod with both hands. Carefully raise the
vehicle until the tire clears the ground. Re-
move the wheel nuts, and then remove the
tire.
WCE0081
In case of emergency6-5
ZREVIEW COPYÐ2008 Quest(van)
Owners ManualÐUSA_English(nna)
06/29/07Ðdebbie
X
Page 295 of 376

8 Maintenance and do-it-yourself
Maintenance requirements..........................8-2
General maintenance..............................8-2
Explanation of general maintenance items.........8-2
Maintenance precautions...........................8-5
Engine compartment check locations................8-6
Engine cooling system.............................8-7
Checking engine coolant level...................8-7
Changing engine coolant........................8-8
Engine oil.........................................8-8
Checking engine oil level........................8-8
Changing engine oil............................8-9
Changing engine oil filter.......................8-10
5-speed automatic transmission fluid...............8-11
Power steering fluid...............................8-11
Brake fluid.......................................8-11
Brake fluid....................................8-12
Window washer fluid.............................8-12
Window washer fluid reservoir..................8-12
Battery..........................................8-13
Jump starting.................................8-14
Drive belt........................................8-14
Spark plugs......................................8-15
Replacing spark plugs.........................8-15Air cleaner.......................................8-16
In-cabin microfilter.............................8-16
Windshield wiper blades..........................8-17
Cleaning.....................................8-17
Replacing....................................8-17
Brakes..........................................8-20
Self-adjusting brakes..........................8-20
Brake pad wear indicators......................8-20
Fuses...........................................8-20
Engine compartment...........................8-20
Passenger compartment.......................8-21
Battery replacement..............................8-23
Keyfob.......................................8-23
Lights...........................................8-24
Headlights....................................8-24
Fog lights (if so equipped)......................8-25
Exterior and interior lights.......................8-26
Wheels and tires.................................8-30
Tire pressure..................................8-30
Tire labeling...................................8-33
Types of tires..................................8-36
Tire chains....................................8-37
Changing wheels and tires.....................8-37
ZREVIEW COPYÐ2008 Quest(van)
Owners ManualÐUSA_English(nna)
06/29/07Ðdebbie
X