2008 NISSAN QUEST belt
[x] Cancel search: beltPage 43 of 376
cIf the child restraint is not anchored
properly, the risk of a child being in-
jured in a collision or a sudden stop
greatly increases.
cChild restraint anchor points are de-
signed to withstand only those loads
imposed by correctly fitted child re-
straints. Under no circumstances are
they to be used for adult seat belts or
harnesses.
cAdjustable seatbacks should be posi-
tioned to fit the child restraint, but as
upright as possible.
cAfter attaching the child restraint, test it
before you place the child in it. Push it
from side to side while holding the seat
near the LATCH attachment or by the
seat belt path. Try to tug it forward and
check to see if the belt holds the re-
straint in place. The child restraint
should not move more than 1 inch (25
mm) . If the restraint is not secure,
tighten the belt as necessary, or put the
restraint in another seat and test it
again. You may need to try a different
child restraint. Not all child restraints fit
in all types of vehicles.cWhen your child restraint is not in use,
keep it secured with the LATCH System
or a seat belt to prevent it from being
thrown around in case of a sudden stop
or accident.
CAUTION
Remember that a child restraint left in a
closed vehicle can become very hot.
Check the seating surface and buckles
before placing your child in the child
restraint.
This vehicle is equipped with a universal child
restraint lower anchor system, referred to as the
Lower Anchors and Tethers for CHildren System
or LATCH. Some child restraints include two rigid
or webbing-mounted attachments that can be
connected to these lower anchors. For details,
see the “Lower Anchors and Tethers for CHildren
System (LATCH)” later in this section.
If you do not have a LATCH compatible child
restraint, the vehicle seat belts can be used. See
“Child restraint installation using the seat belts”
later in this section. In general, child restraints are
also designed to be installed with the lap portion
of a lap/shoulder seat belt.Several manufacturers offer child restraints for
infants and small children of various sizes. When
selecting any child restraint, keep the following
points in mind:
cChoose only a restraint with a label certifying
that it complies with Federal Motor Vehicle
Safety Standard 213 or Canadian Motor
Vehicle Safety Standard 213.
cCheck the child restraint in your vehicle to be
sure it is compatible with the vehicle’s seat
and seat belt system.
cIf the child restraint is compatible with your
vehicle, place your child in the child restraint
and check the various adjustments to be
sure the child restraint is compatible with
your child. Choose a child restraint that is
designed for your child’s height and weight.
Always follow all recommended procedures.
All U.S. states and Canadian provinces or
territories require that infants and small
children be restrained in an approved child
restraint at all times while the vehicle is
being operated.
Safety—Seats, seat belts and supplemental restraint system1-27
ZREVIEW COPYÐ2008 Quest(van)
Owners ManualÐUSA_English(nna)
06/29/07Ðdebbie
X
Page 44 of 376
LOWER ANCHORS AND TETHERS
FOR CHILDREN SYSTEM (LATCH)
Your vehicle is equipped with special anchor
points that are used with Lower Anchors and
Tethers for CHildren System (LATCH) compat-
ible child restraints.
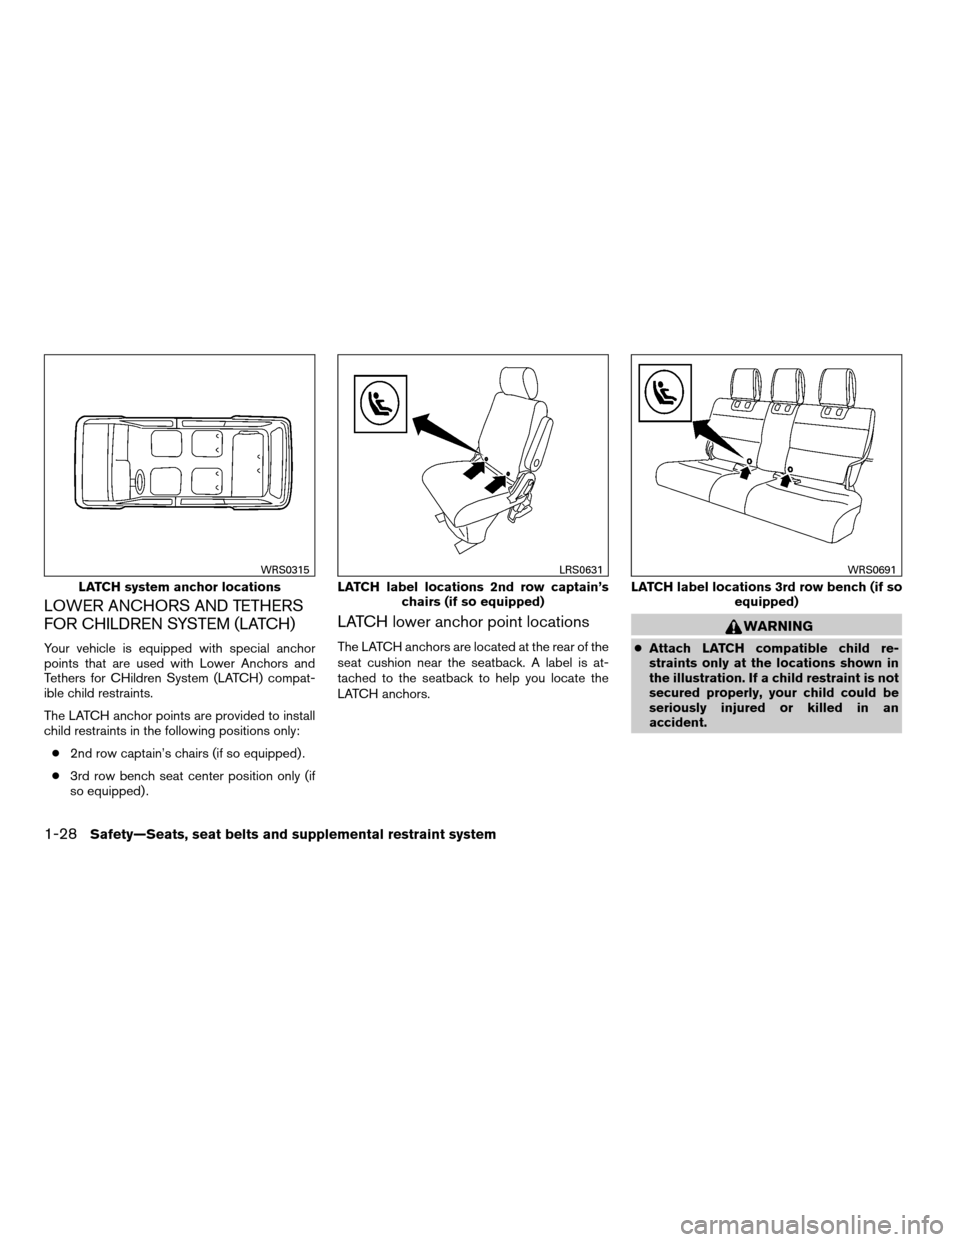
The LATCH anchor points are provided to install
child restraints in the following positions only:
c2nd row captain’s chairs (if so equipped) .
c3rd row bench seat center position only (if
so equipped) .
LATCH lower anchor point locations
The LATCH anchors are located at the rear of the
seat cushion near the seatback. A label is at-
tached to the seatback to help you locate the
LATCH anchors.
WARNING
cAttach LATCH compatible child re-
straints only at the locations shown in
the illustration. If a child restraint is not
secured properly, your child could be
seriously injured or killed in an
accident.
LATCH system anchor locations
WRS0315
LATCH label locations 2nd row captain’s
chairs (if so equipped)
LRS0631
LATCH label locations 3rd row bench (if so
equipped)
WRS0691
1-28Safety—Seats, seat belts and supplemental restraint system
ZREVIEW COPYÐ2008 Quest(van)
Owners ManualÐUSA_English(nna)
06/29/07Ðdebbie
X
Page 45 of 376
cChild restraint anchor points are de-
signed to withstand only those loads
imposed by correctly fitted child re-
straints. Under no circumstance are
they to be used for adult seat belts or
harnesses.Installing child restraint LATCH anchor
attachments
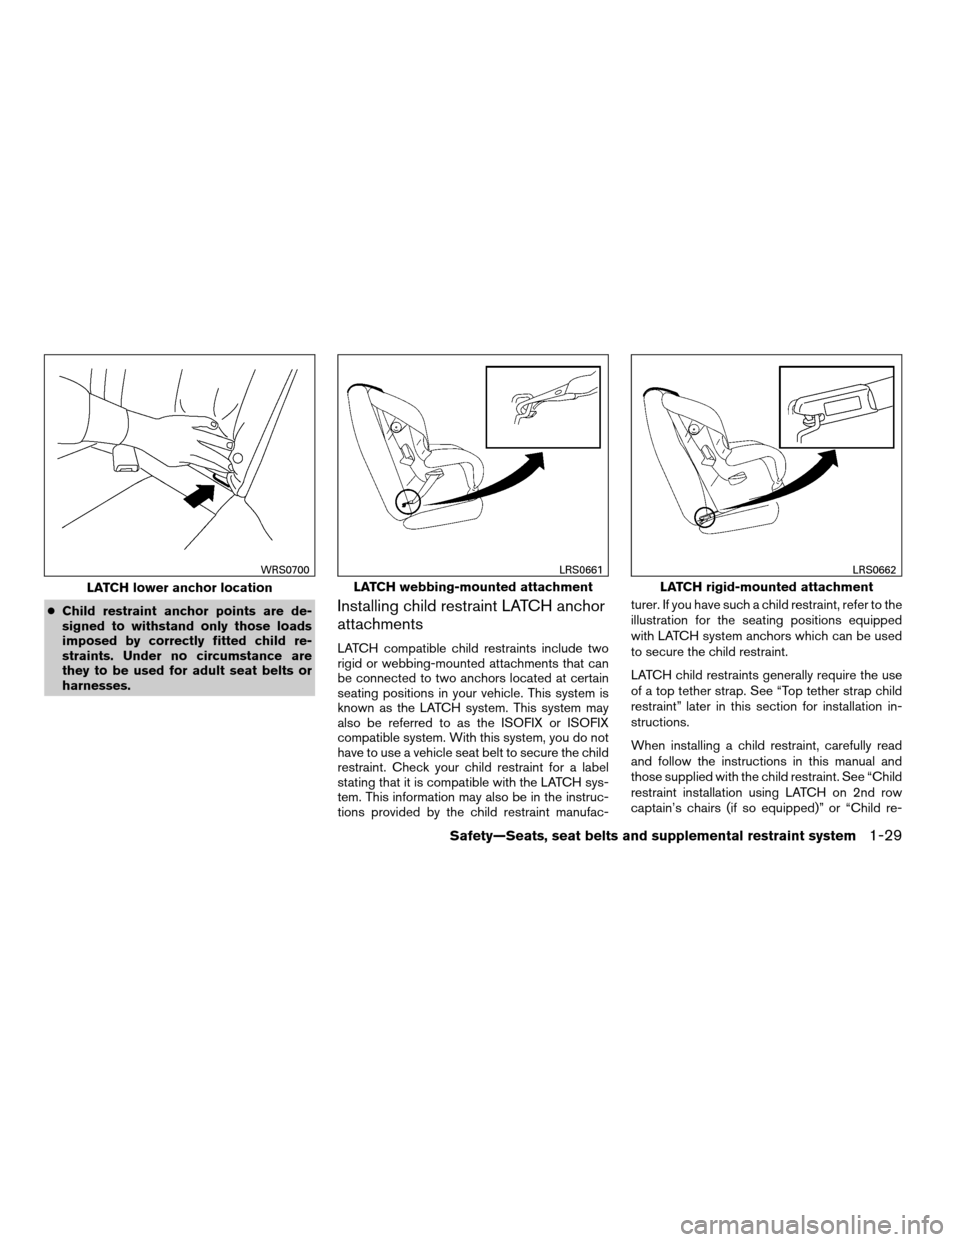
LATCH compatible child restraints include two
rigid or webbing-mounted attachments that can
be connected to two anchors located at certain
seating positions in your vehicle. This system is
known as the LATCH system. This system may
also be referred to as the ISOFIX or ISOFIX
compatible system. With this system, you do not
have to use a vehicle seat belt to secure the child
restraint. Check your child restraint for a label
stating that it is compatible with the LATCH sys-
tem. This information may also be in the instruc-
tions provided by the child restraint manufac-turer. If you have such a child restraint, refer to the
illustration for the seating positions equipped
with LATCH system anchors which can be used
to secure the child restraint.
LATCH child restraints generally require the use
of a top tether strap. See “Top tether strap child
restraint” later in this section for installation in-
structions.
When installing a child restraint, carefully read
and follow the instructions in this manual and
those supplied with the child restraint. See “Child
restraint installation using LATCH on 2nd row
captain’s chairs (if so equipped)” or “Child re-
LATCH lower anchor location
WRS0700
LATCH webbing-mounted attachment
LRS0661
LATCH rigid-mounted attachment
LRS0662
Safety—Seats, seat belts and supplemental restraint system1-29
ZREVIEW COPYÐ2008 Quest(van)
Owners ManualÐUSA_English(nna)
06/29/07Ðdebbie
X
Page 46 of 376
straint installation using LATCH on 3rd row
bench seat (if so equipped)” in this section.
TOP TETHER STRAP CHILD
RESTRAINT
If the manufacturer of your child restraint requires
the use of a top tether strap, it must be secured to
the anchor point.
WARNING
cChild restraint anchor points are de-
signed to withstand only those loads
imposed by correctly fitted child re-
straints. Under no circumstances are
they to be used for adult seat belts or
harnesses.
cDo not allow cargo to contact the top
tether strap when it is attached to the
top tether anchor. Properly secure the
cargo so it does not contact the top
tether strap. Cargo that is not properly
secured or cargo that contacts the top
tether strap may damage it during a
collision. Your child could be seriously
injured or killed in a collision if the top
tether strap is damaged.
Top Tether Anchor Point Locations
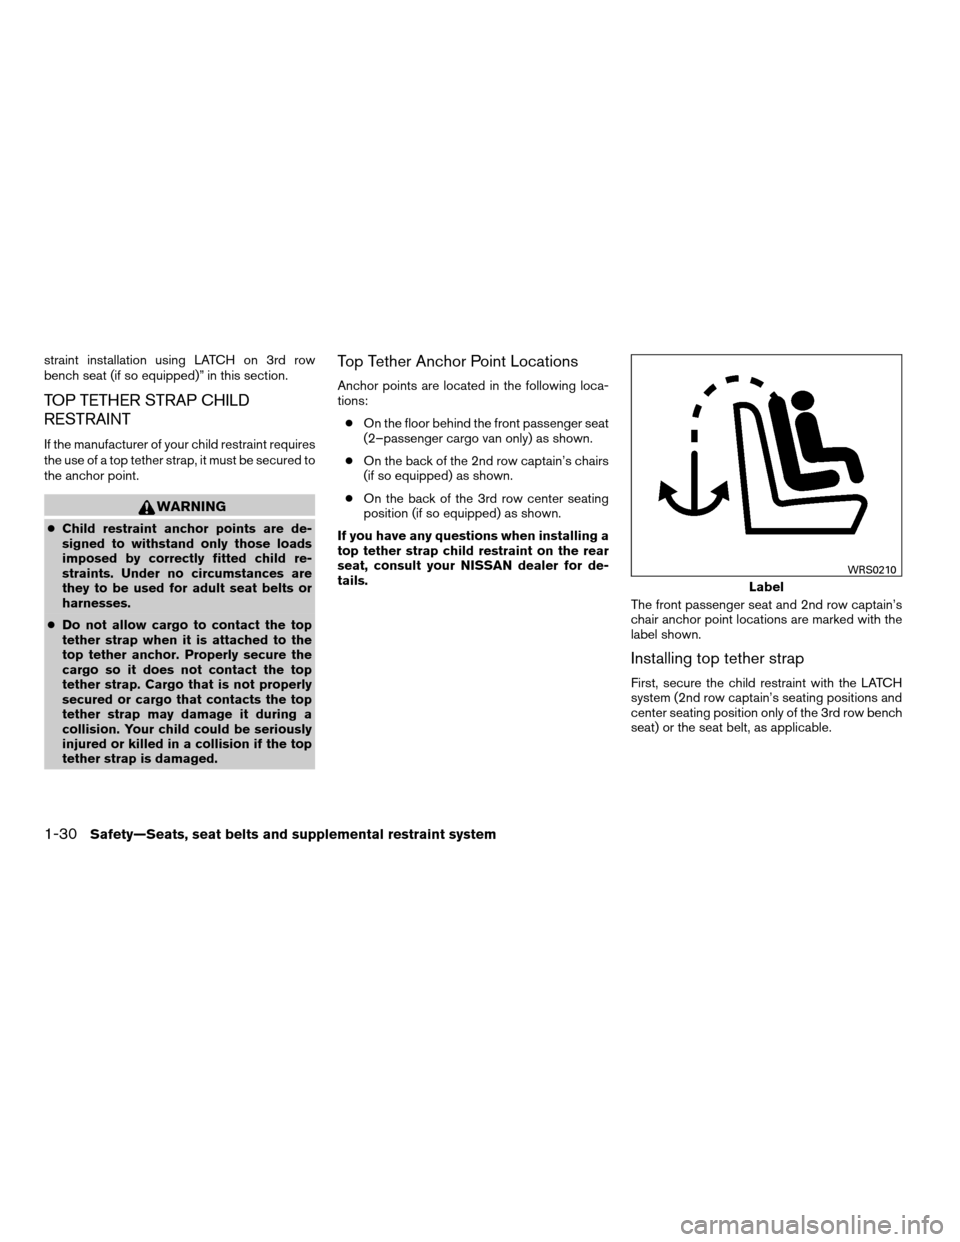
Anchor points are located in the following loca-
tions:
cOn the floor behind the front passenger seat
(2–passenger cargo van only) as shown.
cOn the back of the 2nd row captain’s chairs
(if so equipped) as shown.
cOn the back of the 3rd row center seating
position (if so equipped) as shown.
If you have any questions when installing a
top tether strap child restraint on the rear
seat, consult your NISSAN dealer for de-
tails.
The front passenger seat and 2nd row captain’s
chair anchor point locations are marked with the
label shown.
Installing top tether strap
First, secure the child restraint with the LATCH
system (2nd row captain’s seating positions and
center seating position only of the 3rd row bench
seat) or the seat belt, as applicable.
Label
WRS0210
1-30Safety—Seats, seat belts and supplemental restraint system
ZREVIEW COPYÐ2008 Quest(van)
Owners ManualÐUSA_English(nna)
06/29/07Ðdebbie
X
Page 47 of 376
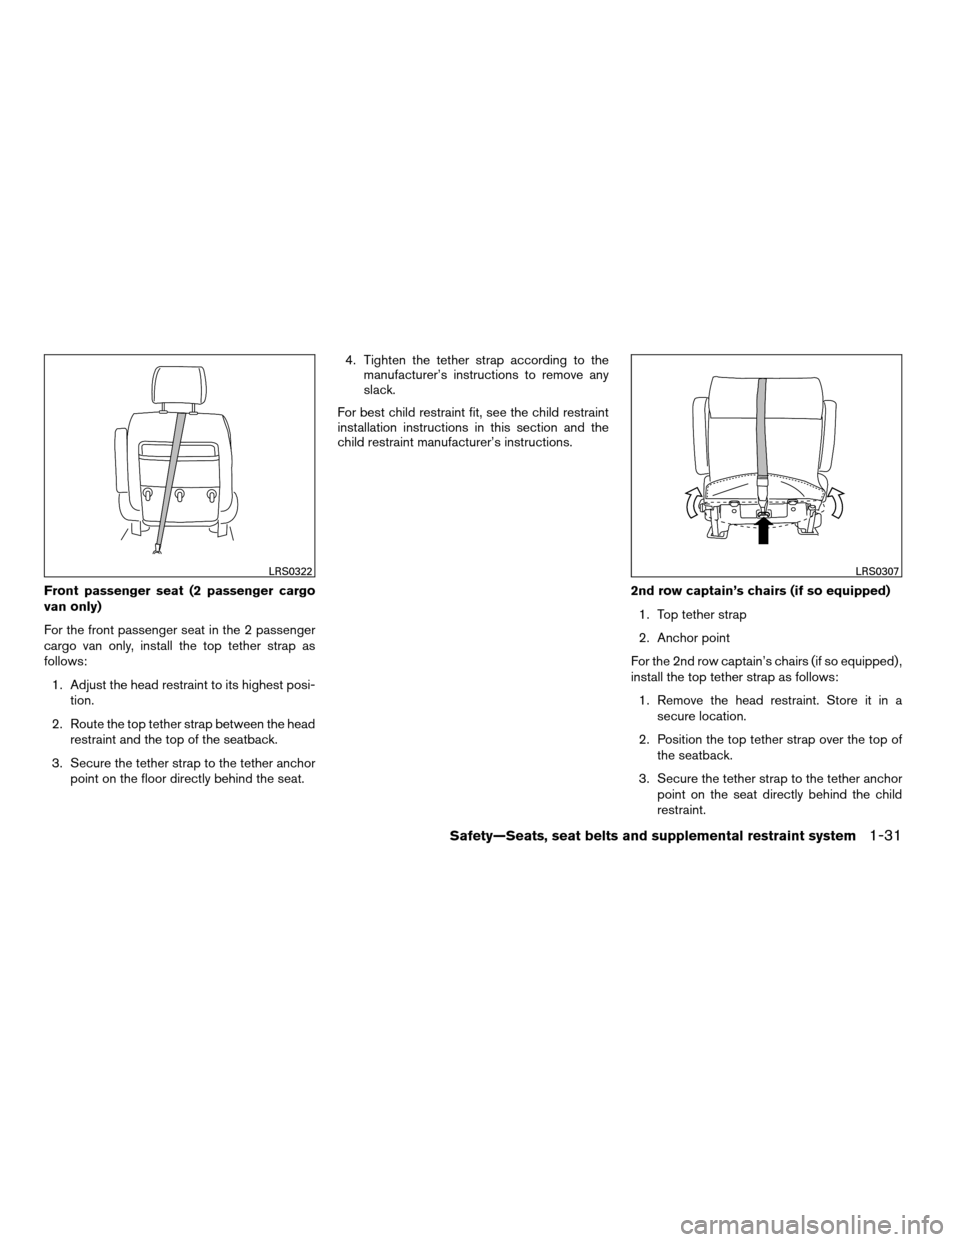
Front passenger seat (2 passenger cargo
van only)
For the front passenger seat in the 2 passenger
cargo van only, install the top tether strap as
follows:
1. Adjust the head restraint to its highest posi-
tion.
2. Route the top tether strap between the head
restraint and the top of the seatback.
3. Secure the tether strap to the tether anchor
point on the floor directly behind the seat.4. Tighten the tether strap according to the
manufacturer’s instructions to remove any
slack.
For best child restraint fit, see the child restraint
installation instructions in this section and the
child restraint manufacturer’s instructions.
2nd row captain’s chairs (if so equipped)
1. Top tether strap
2. Anchor point
For the 2nd row captain’s chairs (if so equipped) ,
install the top tether strap as follows:
1. Remove the head restraint. Store it in a
secure location.
2. Position the top tether strap over the top of
the seatback.
3. Secure the tether strap to the tether anchor
point on the seat directly behind the child
restraint.
LRS0322LRS0307
Safety—Seats, seat belts and supplemental restraint system1-31
ZREVIEW COPYÐ2008 Quest(van)
Owners ManualÐUSA_English(nna)
06/29/07Ðdebbie
X
Page 48 of 376
4. Tighten the tether strap according to the
manufacturer’s instructions to remove any
slack.
For best child restraint fit, see the child restraint
installation instructions in this section and the
child restraint manufacturer’s instructions.
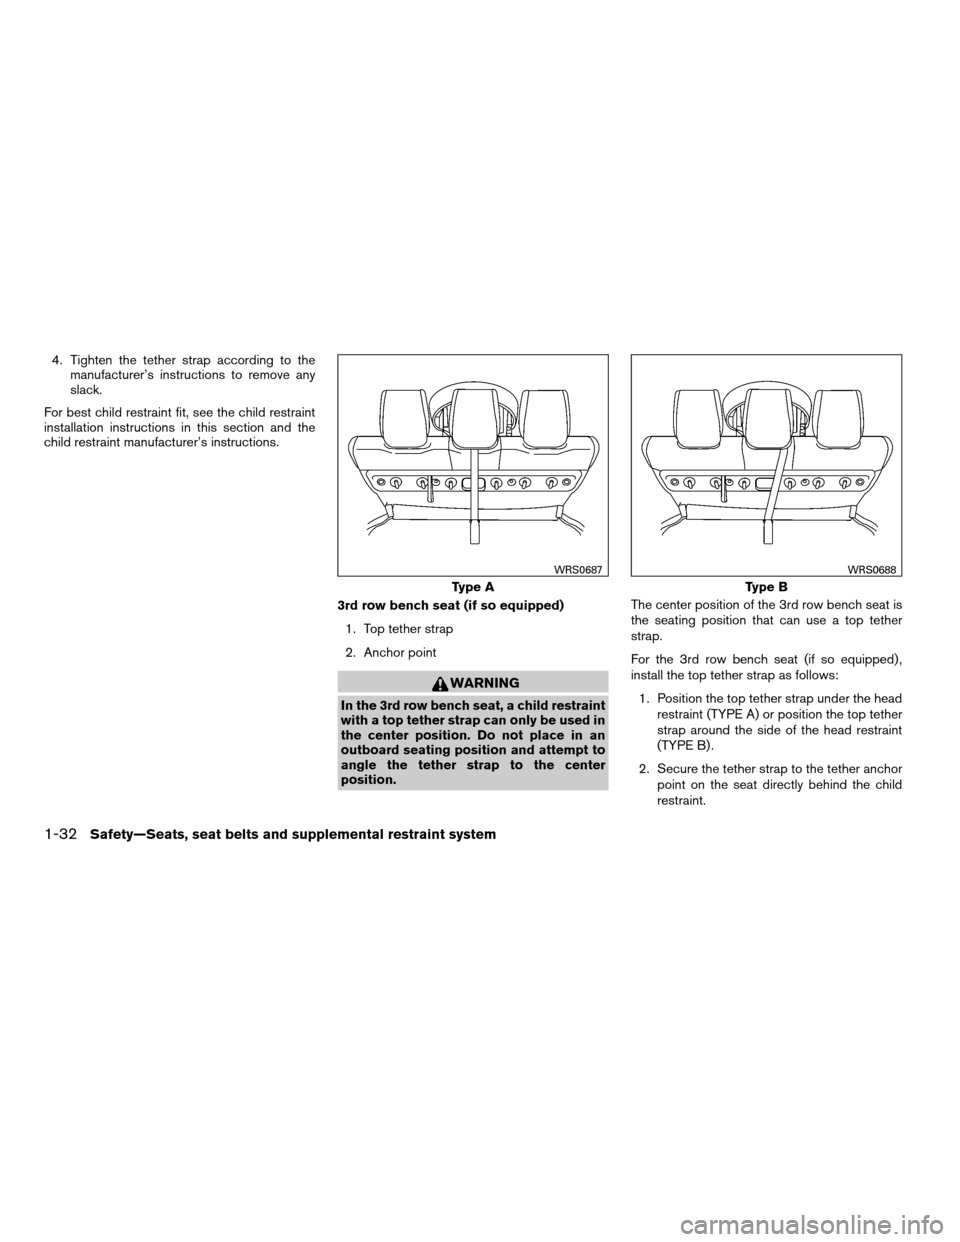
3rd row bench seat (if so equipped)
1. Top tether strap
2. Anchor point
WARNING
In the 3rd row bench seat, a child restraint
with a top tether strap can only be used in
the center position. Do not place in an
outboard seating position and attempt to
angle the tether strap to the center
position.The center position of the 3rd row bench seat is
the seating position that can use a top tether
strap.
For the 3rd row bench seat (if so equipped) ,
install the top tether strap as follows:
1. Position the top tether strap under the head
restraint (TYPE A) or position the top tether
strap around the side of the head restraint
(TYPE B) .
2. Secure the tether strap to the tether anchor
point on the seat directly behind the child
restraint.
Type A
WRS0687
Type B
WRS0688
1-32Safety—Seats, seat belts and supplemental restraint system
ZREVIEW COPYÐ2008 Quest(van)
Owners ManualÐUSA_English(nna)
06/29/07Ðdebbie
X
Page 49 of 376
3. Tighten the tether strap according to the
manufacturer’s instructions to remove any
slack.
For best child restraint fit, see the child restraint
installation instructions in this section and the
child restraint manufacturer’s instructions.
CHILD RESTRAINT INSTALLATION
USING LATCH-2ND ROW
CAPTAIN’S CHAIRS (if so equipped)
WARNING
cAttach LATCH compatible child re-
straints only at the locations shown. For
the LATCH lower anchor locations, see
“Lower Anchors and Tethers for CHil-
dren System (LATCH)” in this section. If
a child restraint is not secured properly,
your child could be seriously injured or
killed in an accident.
cThe LATCH anchors are designed to
withstand only those loads imposed by
correctly fitted child restraints. Under
no circumstance are they to be used for
adult seat belts or harnesses.cInspect the lower anchors by inserting
your fingers into the lower anchor area
and feeling to make sure there are no
obstructions over the LATCH anchors,
such as seat belt webbing or seat cush-
ion material. The child restraint will not
be secured properly if the LATCH an-
chors are obstructed.
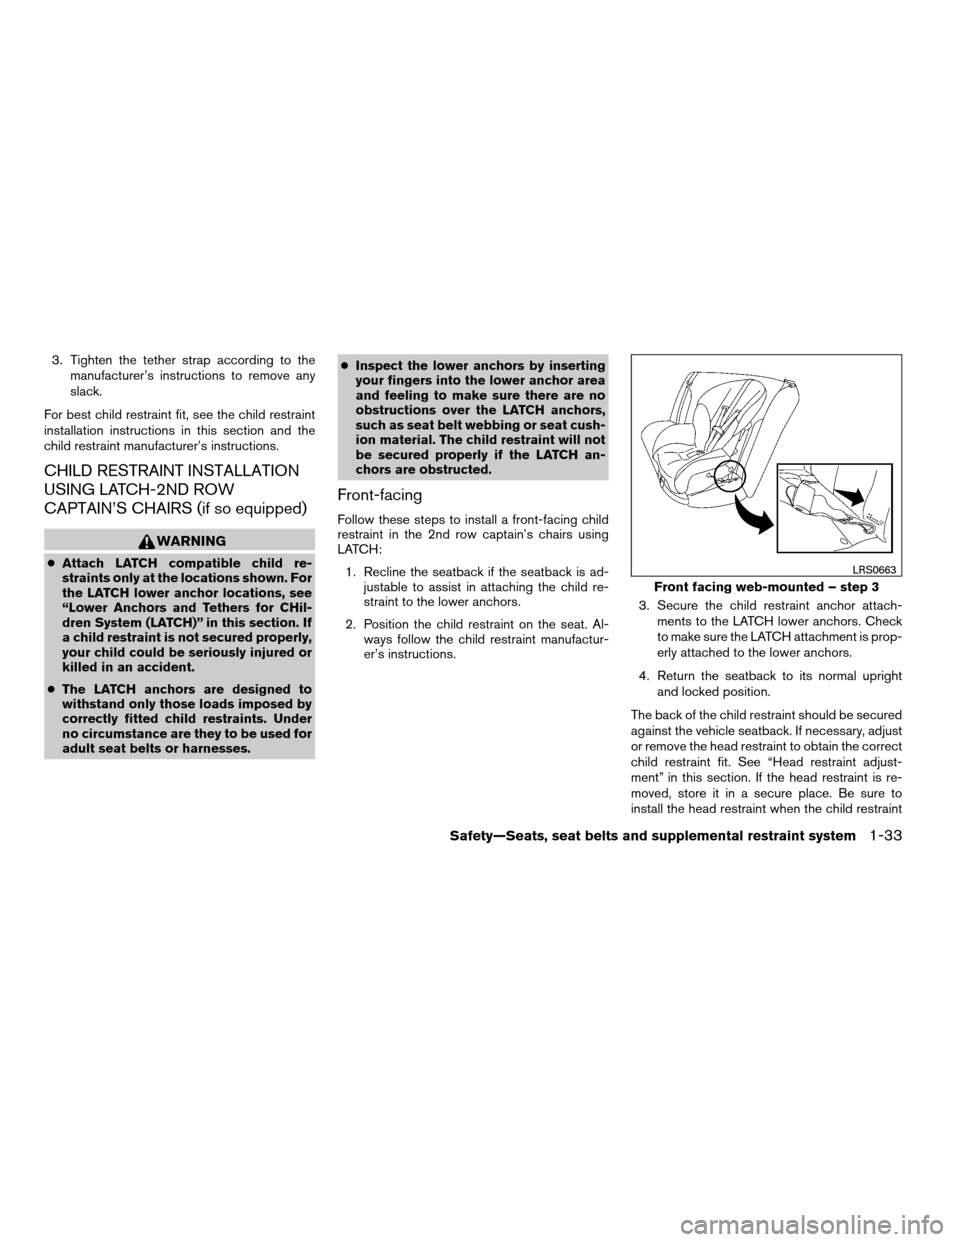
Front-facing
Follow these steps to install a front-facing child
restraint in the 2nd row captain’s chairs using
LATCH:
1. Recline the seatback if the seatback is ad-
justable to assist in attaching the child re-
straint to the lower anchors.
2. Position the child restraint on the seat. Al-
ways follow the child restraint manufactur-
er’s instructions.3. Secure the child restraint anchor attach-
ments to the LATCH lower anchors. Check
to make sure the LATCH attachment is prop-
erly attached to the lower anchors.
4. Return the seatback to its normal upright
and locked position.
The back of the child restraint should be secured
against the vehicle seatback. If necessary, adjust
or remove the head restraint to obtain the correct
child restraint fit. See “Head restraint adjust-
ment” in this section. If the head restraint is re-
moved, store it in a secure place. Be sure to
install the head restraint when the child restraint
Front facing web-mounted – step 3
LRS0663
Safety—Seats, seat belts and supplemental restraint system1-33
ZREVIEW COPYÐ2008 Quest(van)
Owners ManualÐUSA_English(nna)
06/29/07Ðdebbie
X
Page 50 of 376

is removed. If the seating position does not have
an adjustable head restraint and it is interfering
with the proper child restraint fit, try another
seating position or a different child restraint.5. For child restraints that are equipped with
webbing mounted attachments, remove any
additional slack from the anchor attach-
ments. Press downward and rearward firmly
in the center of the child restraint with your
knee to compress the vehicle seat cushion
and seatback while tightening the webbing
of the anchor attachments.
6. If the child restraint is equipped with a top
tether strap, route the top tether strap and
secure the tether strap to the tether anchor
point. See “Top tether strap child restraint” in
this section.7. Before placing the child in the child restraint,
hold the child restraint near the LATCH at-
tachment and use force to push the child
restraint from side to side, and tug it forward
to make sure that it is securely held in place.
It should not move more than 1 in (25 mm) . If
it does move more than 1 in (25 mm) , pull
again on the anchor attachments to further
tighten the child restraint. If you are unable to
properly secure the restraint, move the re-
straint to another seating position and try
again, or try a different child restraint. Not all
child restraints fit in all types of vehicles.
Front facing rigid-mounted – step 3
LRS0664
Front facing – step 5
LRS0671
Front facing – step 7
WRS0697
1-34Safety—Seats, seat belts and supplemental restraint system
ZREVIEW COPYÐ2008 Quest(van)
Owners ManualÐUSA_English(nna)
06/29/07Ðdebbie
X