2008 NISSAN QUEST key fob battery
[x] Cancel search: key fob batteryPage 158 of 376

MEMORY STORAGE FUNCTION
Two positions for the driver’s seat, accelerator
and brake pedals, and outside mirrors can be
stored in the automatic drive positioner memory.
Follow these procedures to use the memory sys-
tem.
1. Set the automatic transmission selector le-
ver to the P (Park) position.
2. Turn the ignition ON.3. Adjust the driver’s seat, accelerator and
brake pedals, and outside mirrors to the
desired positions by manually operating
each adjusting switch. For additional infor-
mation, see “Seats” in the “Safety—Seats,
seat belts and supplemental restraint sys-
tem” section and “Pedal position adjust-
ment” and “Outside mirrors” earlier in this
section.
During this step, do not turn the ignition to
any position other than ON.
4. Push the SET switch and, within 5 seconds,
push the memory switch (1 or 2) fully for at
least 1 second.
The indicator light for the pushed memory
switch will come on and stay on for approxi-
mately 5 seconds after pushing the switch.
After the indicator light goes off, the se-
lected positions are stored in the selected
memory (1 or 2) .
If a new memory is stored in the same memory
switch, the previous memory will be deleted.
Linking a keyfob to a stored memory
position
Each keyfob can be linked to a stored memory
position (memory switch 1 or 2) with the follow-
ing procedure.1. Follow the steps for storing a memory posi-
tion.
2. While the indicator light for the memory
switch being set is illuminated for 5 sec-
onds, press the
button on the keyfob.
The indicator light will blink. After the indica-
tor light goes off, the keyfob is linked to that
memory setting.
With the key removed from the ignition switch,
press the
button on the keyfob. The driv-
er’s seat, accelerator and brake pedals, and out-
side mirrors will move to the memorized position.
NOTE:
If a new memory position is saved to the
memory switch, the keyfob automatically
re-links.
Confirming memory storage
cTurn the ignition ON and push the SET
switch. If the main memory has not been
stored, the indicator light will come on for
approximately 0.5 seconds. When the
memory has stored the position, the indica-
tor light will stay on for approximately 5 sec-
onds.
cIf the battery cable is disconnected, or if the
fuse opens, the memory storage function will
be canceled and must be restarted before a
WPD0347
3-26Pre-driving checks and adjustments
ZREVIEW COPYÐ2008 Quest(van)
Owners ManualÐUSA_English(nna)
06/29/07Ðdebbie
X
Page 274 of 376

cThe system is designed as an aid to the
driver in detecting large stationary ob-
jects to help avoid damaging the ve-
hicle. The system will not detect small
objects below the bumper, and may not
detect objects close to the bumper or
on the ground.
cIf your vehicle sustains damage to the
rear bumper fascia, leaving it mis-
aligned or bent, the sensing zone may
be altered causing inaccurate measure-
ment of obstacles or false alarms.
The Rear Sonar System (RSS) sounds a tone to
warn the driver of obstacles near the rear bumper
when the shift selector is in R (Reverse) . The
system may not detect objects at speeds above 3
mph (5 km/h) and may not detect certain angular
or moving objects.
The RSS detects obstacles up to 6 feet (1.8 m)
from the rear bumper with a decreased coverage
area at the outer corners of the bumper, (refer to
the illustration for approximate zone coverage
areas) . As you move closer to the obstacle, the
rate of the tone increases. When the obstacle is
less than 10 inches (25.0 cm) away, the tone will
sound continuously. If the RSS detects a station-
ary or receding object further than 10 inches
(25.0 cm) from the side of the vehicle, the tonewill sound for only three seconds. Once the sys-
tem detects an object approaching, the tone will
sound again.
The RSS automatically turns on when the shift
selector lever is placed in R (Reverse) and the
ignition is ON. The RSS OFF switch on the
instrument panel allows the driver to turn the RSS
on and off. To turn the RSS off, the ignition must
be ON, and the shift selector lever in R (Reverse) .
An indicator light on the switch will illuminate
when the system is turned off. If the indicator light
illuminates when the RSS is not turned off, it may
indicate a failure in the RSS.
Keep the RSS sensors (located on the rear
bumper fascia) free from snow, ice and large
accumulations of dirt (do not clean the sensors
with sharp objects) . If the sensors are covered, it
will affect the accuracy of the RSS.FREEING A FROZEN DOOR LOCK
To prevent a door lock from freezing, apply de-
icer through the key hole. If the lock becomes
frozen, heat the key before inserting it into the key
hole or use the remote keyless entry keyfob (if so
equipped) .
ANTI-FREEZE
In the winter when it is anticipated that the tem-
perature will drop below 32°F (0°C) , check the
anti-freeze to assure proper winter protection.
For details, see “Engine cooling system” in the
“Maintenance and do-it-yourself” section of this
manual.
BATTERY
If the battery is not fully charged during extremely
cold weather conditions, the battery fluid may
freeze and damage the battery. To maintain maxi-
mum efficiency, the battery should be checked
regularly. For details, see “Battery” in the “Main-
tenance and do-it-yourself” section of this
manual.
COLD WEATHER DRIVING
5-22Starting and driving
ZREVIEW COPYÐ2008 Quest(van)
Owners ManualÐUSA_English(nna)
06/29/07Ðdebbie
X
Page 295 of 376

8 Maintenance and do-it-yourself
Maintenance requirements..........................8-2
General maintenance..............................8-2
Explanation of general maintenance items.........8-2
Maintenance precautions...........................8-5
Engine compartment check locations................8-6
Engine cooling system.............................8-7
Checking engine coolant level...................8-7
Changing engine coolant........................8-8
Engine oil.........................................8-8
Checking engine oil level........................8-8
Changing engine oil............................8-9
Changing engine oil filter.......................8-10
5-speed automatic transmission fluid...............8-11
Power steering fluid...............................8-11
Brake fluid.......................................8-11
Brake fluid....................................8-12
Window washer fluid.............................8-12
Window washer fluid reservoir..................8-12
Battery..........................................8-13
Jump starting.................................8-14
Drive belt........................................8-14
Spark plugs......................................8-15
Replacing spark plugs.........................8-15Air cleaner.......................................8-16
In-cabin microfilter.............................8-16
Windshield wiper blades..........................8-17
Cleaning.....................................8-17
Replacing....................................8-17
Brakes..........................................8-20
Self-adjusting brakes..........................8-20
Brake pad wear indicators......................8-20
Fuses...........................................8-20
Engine compartment...........................8-20
Passenger compartment.......................8-21
Battery replacement..............................8-23
Keyfob.......................................8-23
Lights...........................................8-24
Headlights....................................8-24
Fog lights (if so equipped)......................8-25
Exterior and interior lights.......................8-26
Wheels and tires.................................8-30
Tire pressure..................................8-30
Tire labeling...................................8-33
Types of tires..................................8-36
Tire chains....................................8-37
Changing wheels and tires.....................8-37
ZREVIEW COPYÐ2008 Quest(van)
Owners ManualÐUSA_English(nna)
06/29/07Ðdebbie
X
Page 317 of 376

CAUTION
Be careful not to allow children to swallow
the battery and removed parts.
KEYFOB
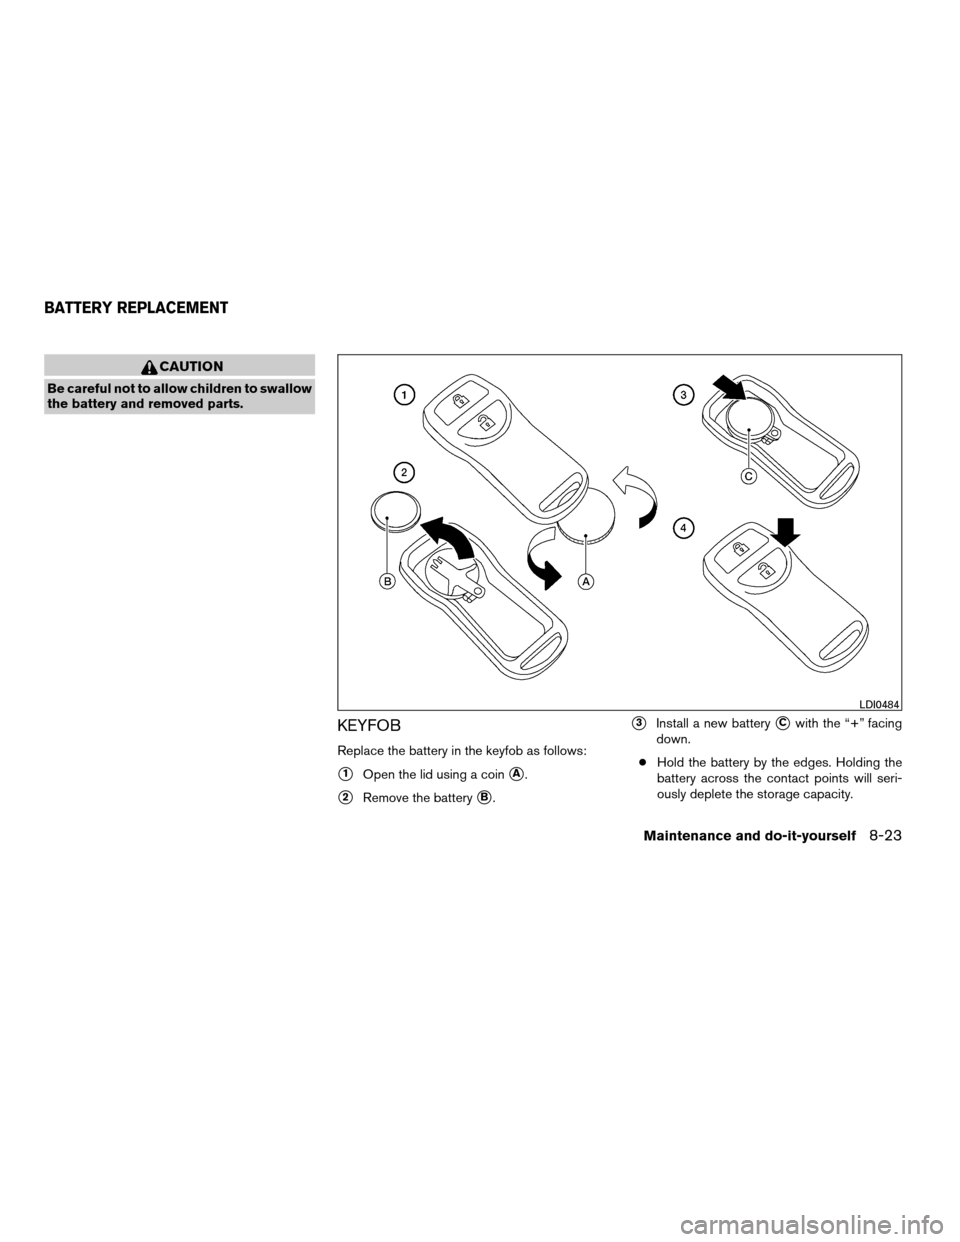
Replace the battery in the keyfob as follows:
s1Open the lid using a coinsA.
s2Remove the batterysB.
s3Install a new batterysCwith the “+” facing
down.
cHold the battery by the edges. Holding the
battery across the contact points will seri-
ously deplete the storage capacity.
LDI0484
BATTERY REPLACEMENT
Maintenance and do-it-yourself8-23
ZREVIEW COPYÐ2008 Quest(van)
Owners ManualÐUSA_English(nna)
06/29/07Ðdebbie
X
Page 318 of 376

cDo not touch the internal circuit and electric
terminals as it could cause a malfunction.
Recommended battery: CR2025 or equivalent.
s4Close the lid securely.
5. Press the
button, then thebutton two or three times to check the key-
fob operation.
If the battery is removed for any reason
other than replacement, perform step 5.
cAn improperly disposed battery can
hurt the environment. Always confirm
local regulations for battery disposal.
cThe keyfob is water-resistant; how-
ever, if it does get wet, immediately
wipe completely dry.
cThe operational range of the keyfob
extends to approximately 33 ft (10 m)
from the vehicle. This range may vary
with conditions.
FCC Notice:
Changes or modifications not expressly ap-
proved by the party responsible for compli-
ance could void the user’s authority to op-
erate the equipment.This device complies with Part 15 of the
FCC Rules and RSS-210 of Industry
Canada.
Operation is subject to the following two
conditions: (1) This device may not cause
harmful interference, and (2) this device
must accept any interference received, in-
cluding interference that may cause undes-
ired operation of the device.
HEADLIGHTS
Replacing the halogen headlight bulb
The headlight is a semi-sealed beam type which
uses a replaceable headlight (halogen) bulb. If
replacement is required, see your NISSAN
dealer.
CAUTION
cHigh pressure halogen gas is sealed
inside the halogen bulb. The bulb may
break if the glass envelope is scratched
or the bulb is dropped.
cWhen handling the bulb, do not touch
the glass envelope.
cDO NOT TOUCH THE BULB WITH BARE
HANDS.
LIGHTS
8-24Maintenance and do-it-yourself
ZREVIEW COPYÐ2008 Quest(van)
Owners ManualÐUSA_English(nna)
06/29/07Ðdebbie
X
Page 365 of 376

F
Flashers
(See hazard warning flasher switch)......2-23
Flat tire......................6-2
Floor mat positioning aid.............7-4
Fluid
Brake fluid..................8-11
Capacities and recommended
fuel/lubricants.................9-2
Engine coolant................8-7
Engine oil...................8-8
Power steering fluid.............8-11
Window washer fluid............8-12
F.M.V.S.S. certification label..........9-10
Fog light switch.................2-22
Front air bag system
(See supplemental restraint system).....1-59
Front seats....................1-2
Fuel
Capacities and recommended
fuel/lubricants.................9-2
Fuel economy................5-15
Fuel gauge..................2-6
Fuel octane rating..............9-4
Fuel recommendation............9-3
Fuel-filler door and cap...........3-19
Fuel-filler door lock opener lever......3-19
Fuel economy setting........4-4, 4-8, 4-19
Fuses......................8-20
Fusible links...................8-21G
Garage door opener, HomeLinkTUniversal
Transceiver...................2-44
Garment hook..................2-35
Gascap.....................3-19
Gauge
Engine coolant temperature gauge.....2-5
Fuel gauge..................2-6
Odometer...................2-4
Speedometer.................2-4
Tachometer..................2-5
Trip odometer.................2-4
General maintenance..............8-2
Glove box....................2-30
Glove box lock.................2-30
Grocery hooks.................2-31
H
Hands-free phone system, BluetoothT. . . .4-75
Hazard warning flasher switch.........2-23
Head restraints..................1-8
Active Head Restraint............1-7
Headlight and turn signal switch........2-18
Headlight control switch............2-18
Headlights....................8-24
Headphones
(See DVD entertainment system).......4-68
Heated seats..................2-24
Heater
Heater and air conditioner
controls................4-31, 4-40
Heater operation...........4-32, 4-41Rear seat air conditioner..........4-42
HomeLinkTUniversal Transceiver.......2-44
Hood release..................3-14
Horn.......................2-24
I
Ignition switch..................5-6
Immobilizer system..........2-15, 3-2, 5-7
Important vehicle information label.......9-10
In-cabin microfilter...............8-16
Increasing fuel economy............5-15
Indicator lights and audible reminders
(See warning/indicator lights and audible
reminders).....................2-7
Inside automatic anti-glare mirror.......3-23
Inside mirror...................3-23
Instrument brightness control.........2-21
Instrument panel..............0-6, 2-2
Instrument panel dimmer switch........2-21
Interior lights
(see Lights on demand switch)........2-41
ISOFIX child restraints.............1-28
J
Jump starting...................6-7
K
Key ........................3-2
Keyfob battery replacement..........8-23
10-3
ZREVIEW COPYÐ2008 Quest(van)
Owners ManualÐUSA_English(nna)
06/29/07Ðdebbie
X