2008 NISSAN QUEST check oil
[x] Cancel search: check oilPage 300 of 376

1. Power steering fluid reservoir
2. Engine oil filler cap
3. Air cleaner
4. Brake fluid reservoir
5. Battery
6. Fuse/fusible link box
7. Transmission dipstick
8. Engine oil dipstick
9. Radiator cap
10. Drive belt location
11. Fuse block
12. Windshield washer fluid reservoir
13. Engine coolant reservoir
NOTE:
Engine cover removed for clarity.
WDI0515
ENGINE COMPARTMENT CHECK
LOCATIONS
8-6Maintenance and do-it-yourself
ZREVIEW COPYÐ2008 Quest(van)
Owners ManualÐUSA_English(nna)
06/29/07Ðdebbie
X
Page 302 of 376
CHANGING ENGINE COOLANT
A NISSAN dealer can change the engine coolant.
The service procedure can be found in the
NISSAN Service Manual.
Improper servicing can result in reduced
heater performance and engine overheat-
ing.
WARNING
cTo avoid the danger of being scalded,
never change the coolant when the en-
gine is hot.
cNever remove the radiator cap when the
engine is hot. Serious burns could be
caused by high pressure fluid escaping
from the radiator.
cAvoid direct skin contact with used
coolant. If skin contact is made, wash
thoroughly with soap or hand cleaner
as soon as possible.
cKeep coolant out of the reach of chil-
dren and pets.
Engine coolant must be disposed of properly.
Check your local regulations.
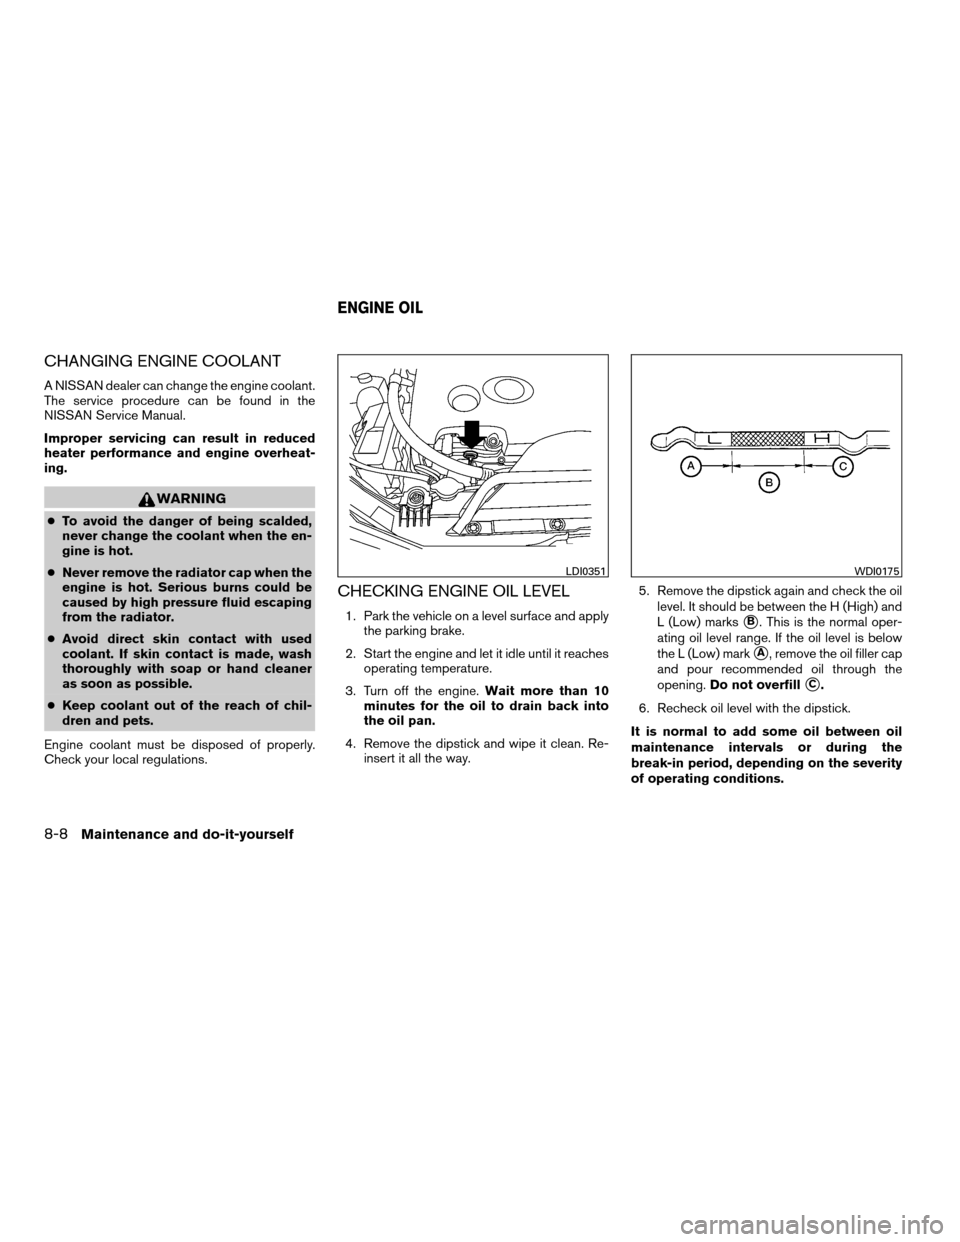
CHECKING ENGINE OIL LEVEL
1. Park the vehicle on a level surface and apply
the parking brake.
2. Start the engine and let it idle until it reaches
operating temperature.
3. Turn off the engine.Wait more than 10
minutes for the oil to drain back into
the oil pan.
4. Remove the dipstick and wipe it clean. Re-
insert it all the way.5. Remove the dipstick again and check the oil
level. It should be between the H (High) and
L (Low) markssB. This is the normal oper-
ating oil level range. If the oil level is below
the L (Low) mark
sA, remove the oil filler cap
and pour recommended oil through the
opening.Do not overfill
sC.
6. Recheck oil level with the dipstick.
It is normal to add some oil between oil
maintenance intervals or during the
break-in period, depending on the severity
of operating conditions.
LDI0351WDI0175
ENGINE OIL
8-8Maintenance and do-it-yourself
ZREVIEW COPYÐ2008 Quest(van)
Owners ManualÐUSA_English(nna)
06/29/07Ðdebbie
X
Page 303 of 376
CAUTION
Oil level should be checked regularly. Op-
erating the engine with an insufficient
amount of oil can damage the engine, and
such damage is not covered by warranty.
CHANGING ENGINE OIL
1. Park the vehicle on a level surface and apply
the parking brake.
2. Start the engine and let it idle until it reaches
operating temperature, then turn it off.
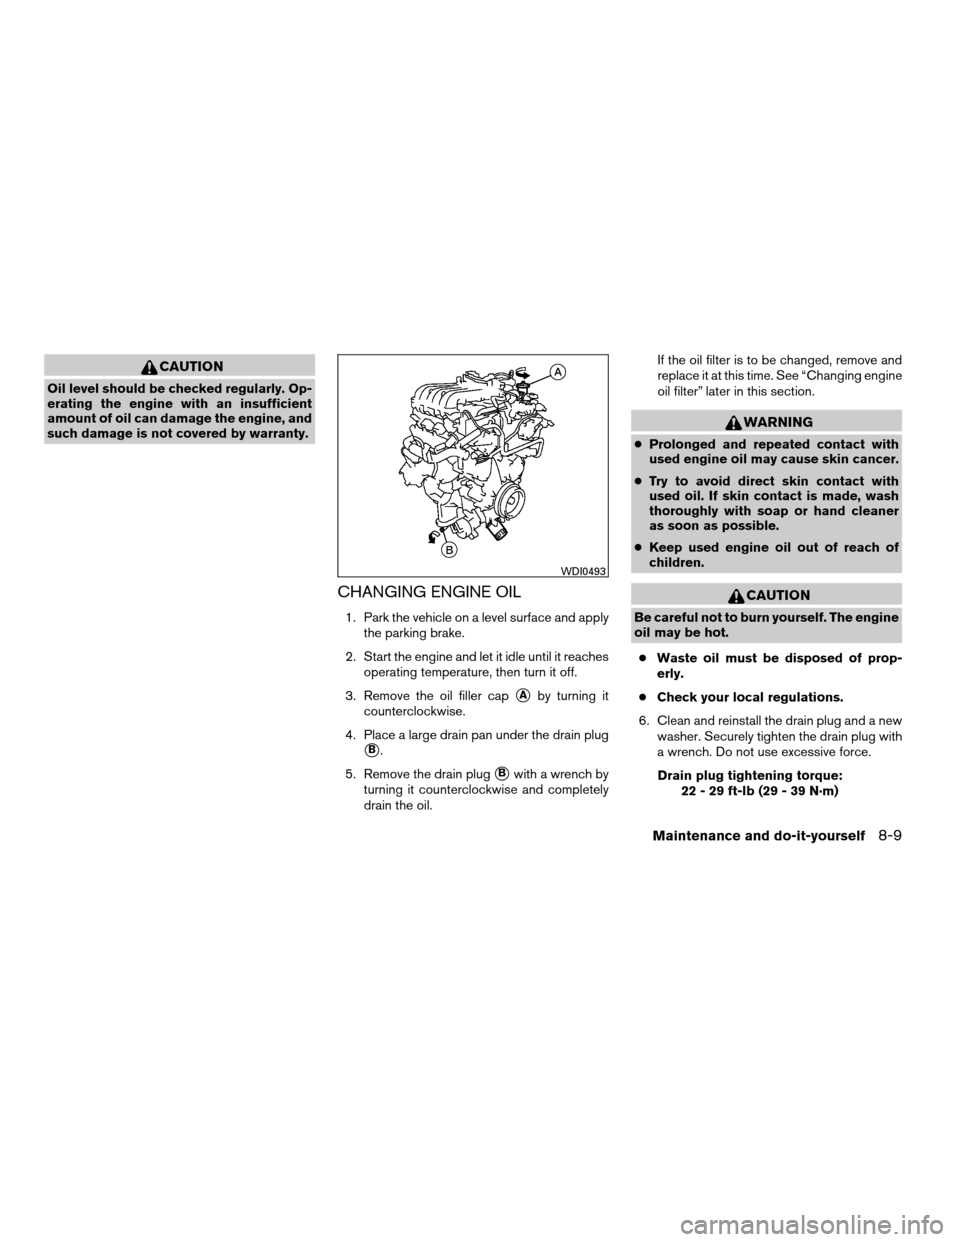
3. Remove the oil filler cap
sAby turning it
counterclockwise.
4. Place a large drain pan under the drain plug
sB.
5. Remove the drain plug
sBwith a wrench by
turning it counterclockwise and completely
drain the oil.If the oil filter is to be changed, remove and
replace it at this time. See “Changing engine
oil filter” later in this section.
WARNING
cProlonged and repeated contact with
used engine oil may cause skin cancer.
cTry to avoid direct skin contact with
used oil. If skin contact is made, wash
thoroughly with soap or hand cleaner
as soon as possible.
cKeep used engine oil out of reach of
children.
CAUTION
Be careful not to burn yourself. The engine
oil may be hot.
cWaste oil must be disposed of prop-
erly.
cCheck your local regulations.
6. Clean and reinstall the drain plug and a new
washer. Securely tighten the drain plug with
a wrench. Do not use excessive force.
Drain plug tightening torque:
22 - 29 ft-lb (29 - 39 N·m)
WDI0493
Maintenance and do-it-yourself8-9
ZREVIEW COPYÐ2008 Quest(van)
Owners ManualÐUSA_English(nna)
06/29/07Ðdebbie
X
Page 304 of 376
7. Refill engine with recommended oil through
the oil filler opening, then install the oil filler
cap securely.
See “Capacities and recommended
fuel/lubricants” in the “Technical and con-
sumer information” section of this manual for
drain and refill capacity.
The drain and refill capacity depends on the
oil temperature and drain time. Use these
specifications for reference only. Always use
the dipstick to determine when the proper
amount of oil is in the engine.
8. Start the engine. Check for leakage around
the drain plug and oil filter. Correct as re-
quired.
9. Turn the engine off and wait more than 10
minutes. Check the oil level with the dipstick.
Add engine oil if necessary.
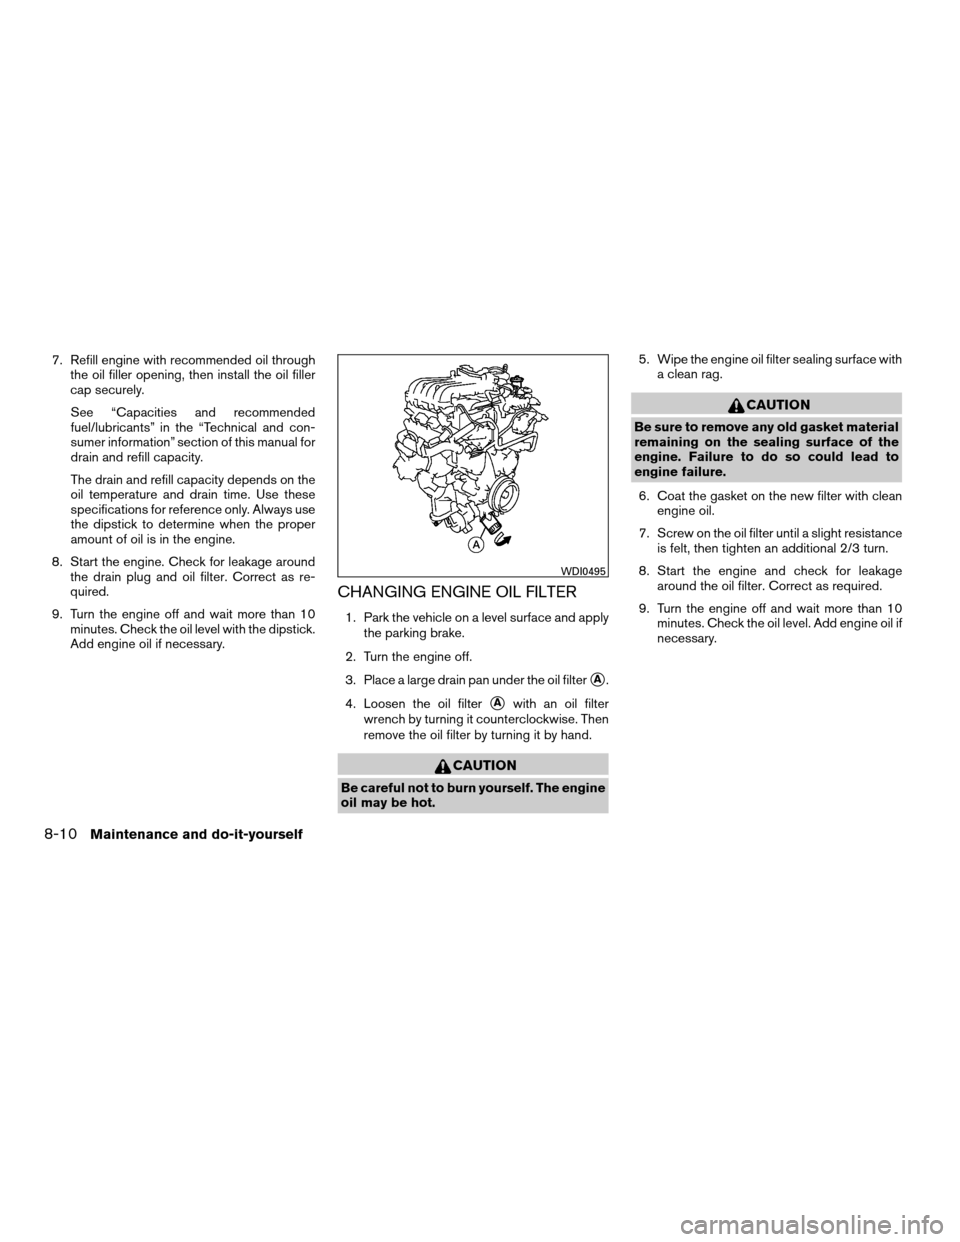
CHANGING ENGINE OIL FILTER
1. Park the vehicle on a level surface and apply
the parking brake.
2. Turn the engine off.
3. Place a large drain pan under the oil filter
sA.
4. Loosen the oil filter
sAwith an oil filter
wrench by turning it counterclockwise. Then
remove the oil filter by turning it by hand.
CAUTION
Be careful not to burn yourself. The engine
oil may be hot.5. Wipe the engine oil filter sealing surface with
a clean rag.
CAUTION
Be sure to remove any old gasket material
remaining on the sealing surface of the
engine. Failure to do so could lead to
engine failure.
6. Coat the gasket on the new filter with clean
engine oil.
7. Screw on the oil filter until a slight resistance
is felt, then tighten an additional 2/3 turn.
8. Start the engine and check for leakage
around the oil filter. Correct as required.
9. Turn the engine off and wait more than 10
minutes. Check the oil level. Add engine oil if
necessary.
WDI0495
8-10Maintenance and do-it-yourself
ZREVIEW COPYÐ2008 Quest(van)
Owners ManualÐUSA_English(nna)
06/29/07Ðdebbie
X
Page 357 of 376
cSome states or provinces have specific
regulations and speed limits for vehicles that
are towing trailers. Obey the local speed
limits.
cCheck your hitch, trailer wiring harness con-
nections, and trailer wheel lug nuts after 50
miles (80 km) of travel and at every break.
cWhen stopped in traffic for long periods of
time in hot weather, put the vehicle in the P
(Park) position.
cWhen launching a boat, don’t allow the wa-
ter level to go over the exhaust tail pipe or
rear bumper.
cMake sure you disconnect the trailer lights
before backing the trailer into the water or
the trailer lights may burn out.
When towing a trailer, final drive gear oil
should be replaced and transmission
oil/fluid should be changed more fre-
quently. For additional information, see the
“Maintenance and do-it-yourself” section
earlier in this manual.FLAT TOWING
Towing your vehicle with all four wheels on the
ground is sometimes called flat towing. This
method is sometimes used when towing a vehicle
behind a recreational vehicle, such as a motor
home.
CAUTION
cFailure to follow these guidelines can
result in severe transmission damage.
cWhenever flat towing your vehicle, al-
ways tow forward, never backward.
cDO NOT tow any automatic transmis-
sion vehicle with all four wheels on the
ground (flat towing) . Doing so WILL
DAMAGE internal transmission parts
due to lack of transmission lubrication.
cFor emergency towing procedures refer
to “Towing recommended by NISSAN”
in the “In case of emergency” section of
this manual.
Automatic Transmission
To tow a vehicle equipped with an automatic
transmission, an appropriate vehicle dollyMUST
be placed under the towed vehicle’s drive
wheels.Alwaysfollow the dolly manufacturer’s
recommendations when using their product.DOT (Department of Transportation) Quality
Grades: All passenger car tires must conform to
federal safety requirements in addition to these
grades.
Quality grades can be found where applicable on
the tire sidewall between tread shoulder and
maximum section width. For example:
Treadwear 200 Traction AA Temperature A
Treadwear
The treadwear grade is a comparative rating
based on the wear rate of the tire when tested
under controlled conditions on a specified gov-
ernment test course. For example, a tire graded
150 would wear one and one-half (1 1/2) times
as well on the government course as a tire graded
100. The relative performance of tires depends
upon the actual conditions of their use, however,
and may depart significantly from the norm due to
variations in driving habits, service practices and
differences in road characteristics and climate.
Traction AA, A, B and C
The traction grades, from highest to lowest, are
AA, A, B, and C. Those grades represent the
tire’s ability to stop on wet pavement as mea-
sured under controlled conditions on specified
government test surfaces of asphalt and con-
crete. A tire marked C may have poor traction
performance.
UNIFORM TIRE QUALITY GRADING
Technical and consumer information9-23
ZREVIEW COPYÐ2008 Quest(van)
Owners ManualÐUSA_English(nna)
06/29/07Ðdebbie
X
Page 363 of 376
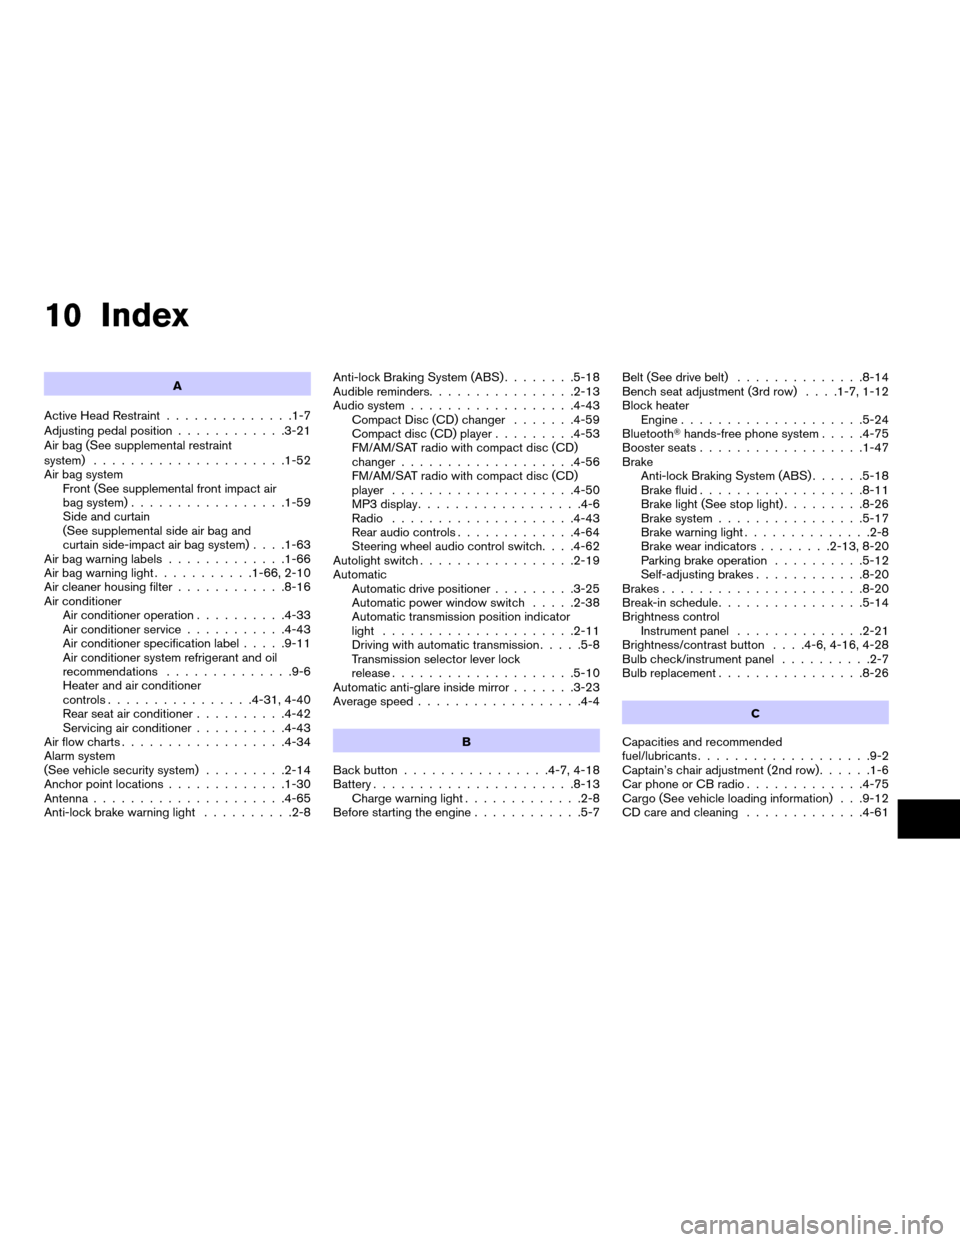
10 Index
A
Active Head Restraint..............1-7
Adjusting pedal position............3-21
Air bag (See supplemental restraint
system).....................1-52
Air bag system
Front (See supplemental front impact air
bag system).................1-59
Side and curtain
(See supplemental side air bag and
curtain side-impact air bag system). . . .1-63
Air bag warning labels.............1-66
Air bag warning light...........1-66, 2-10
Air cleaner housing filter............8-16
Air conditioner
Air conditioner operation..........4-33
Air conditioner service...........4-43
Air conditioner specification label.....9-11
Air conditioner system refrigerant and oil
recommendations..............9-6
Heater and air conditioner
controls................4-31, 4-40
Rear seat air conditioner..........4-42
Servicing air conditioner..........4-43
Air flow charts..................4-34
Alarm system
(See vehicle security system).........2-14
Anchor point locations.............1-30
Antenna.....................4-65
Anti-lock brake warning light..........2-8Anti-lock Braking System (ABS)........5-18
Audible reminders................2-13
Audio system..................4-43
Compact Disc (CD) changer.......4-59
Compact disc (CD) player.........4-53
FM/AM/SAT radio with compact disc (CD)
changer...................4-56
FM/AM/SAT radio with compact disc (CD)
player....................4-50
MP3 display..................4-6
Radio....................4-43
Rear audio controls.............4-64
Steering wheel audio control switch. . . .4-62
Autolight switch.................2-19
Automatic
Automatic drive positioner.........3-25
Automatic power window switch.....2-38
Automatic transmission position indicator
light.....................2-11
Driving with automatic transmission.....5-8
Transmission selector lever lock
release....................5-10
Automatic anti-glare inside mirror.......3-23
Average speed..................4-4
B
Back button................4-7, 4-18
Battery......................8-13
Charge warning light.............2-8
Before starting the engine............5-7Belt (See drive belt)..............8-14
Bench seat adjustment (3rd row). . . .1-7, 1-12
Block heater
Engine....................5-24
BluetoothThands-free phone system.....4-75
Booster seats..................1-47
Brake
Anti-lock Braking System (ABS)......5-18
Brake fluid..................8-11
Brake light (See stop light).........8-26
Brake system................5-17
Brake warning light..............2-8
Brake wear indicators........2-13, 8-20
Parking brake operation..........5-12
Self-adjusting brakes............8-20
Brakes......................8-20
Break-in schedule................5-14
Brightness control
Instrument panel..............2-21
Brightness/contrast button. . . .4-6, 4-16, 4-28
Bulb check/instrument panel..........2-7
Bulb replacement................8-26
C
Capacities and recommended
fuel/lubricants...................9-2
Captain’s chair adjustment (2nd row)......1-6
Car phone or CB radio.............4-75
Cargo (See vehicle loading information) . . .9-12
CD care and cleaning.............4-61
ZREVIEW COPYÐ2008 Quest(van)
Owners ManualÐUSA_English(nna)
06/29/07Ðdebbie
X
Page 364 of 376

CD changer (See audio system)........4-59
CD player (See audio system).........4-53
Child restraint with top tether strap......1-30
Child restraints.......1-17, 1-18, 1-26, 1-28
Precautions on child
restraints............1-26, 1-41, 1-47
Top tether strap anchor point locations . .1-30
Child safety sliding door lock..........3-9
Chimes, audible reminders...........2-13
Cleaning exterior and interior..........7-2
Clock
(models with navigation system)......4-26
(models without navigation system). .4-5, 4-16
Clock set..............4-5, 4-16, 4-26
C.M.V.S.S. certification label..........9-10
Cold weather driving..............5-22
Compact disc (CD) player...........4-53
Console box...................2-28
Control panel buttons
Brightness/contrast button . .4-6, 4-16, 4-28
Back button..............4-7, 4-18
Enter button..............4-7, 4-17
Setting button.........4-5, 4-11, 4-22
Startup screen...............4-18
Trip button............4-3, 4-8, 4-18
With navigation system...........4-17
Without navigation system.......4-2, 4-7
Controls
Audio controls (steering wheel)......4-62
Heater and air conditioner
controls................4-31, 4-40
Rear audio controls.............4-64
Rear seat air conditioner..........4-42
Coolant
Capacities and recommended
fuel/lubricants.................9-2Changing engine coolant..........8-8
Checking engine coolant level........8-7
Engine coolant temperature gauge.....2-5
Cornering light.................2-23
Corrosion protection...............7-5
Cruise control..................5-13
Cup holders............2-32, 2-33, 2-34
Curtain side-impact air bag system
(See supplemental side air bag and curtain
side-impact air bag system)..........1-63
D
Daytime running light system
(Canada only)..................2-20
Defroster switch
Rear window and outside mirror defroster
switch....................2-18
Digital video disc DVD.............4-65
Dimensions and weights.............9-8
Dimmer switch for instrument panel......2-21
Display controls
(see control panel buttons).....4-2, 4-7, 4-17
Distance to empty..........4-3, 4-9, 4-19
Door locks....................3-3
Door open warning................4-6
Door open warning light.............2-8
Drive belt....................8-14
Drive positioner, Automatic...........3-25
Driving
Cold weather driving............5-22
Driving with automatic transmission.....5-8
Precautions when starting and driving . . .5-2
DVD entertainment system...........4-65E
Economy - fuel.................5-15
Emission control information label.......9-10
Emission control system warranty.......9-24
Engine
Before starting the engine..........5-7
Block heater.................5-24
Capacities and recommended
fuel/lubricants.................9-2
Changing engine coolant..........8-8
Changing engine oil.............8-9
Changing engine oil filter..........8-10
Checking engine coolant level........8-7
Checking engine oil level..........8-8
Engine compartment check locations. . . .8-6
Engine coolant temperature gauge.....2-5
Engine cooling system............8-7
Engine oil...................8-8
Engine oil and oil filter recommendation . .9-5
Engine oil pressure warning light......2-9
Engine oil viscosity..............9-5
Engine serial number............9-10
Engine specifications.............9-7
Starting the engine..............5-8
English/metric setting.......4-5, 4-15, 4-25
Enter button................4-7, 4-17
Event data recorders..............9-26
Exhaust gas (Carbon monoxide)........5-2
Eyeglass case..................2-27
10-2
ZREVIEW COPYÐ2008 Quest(van)
Owners ManualÐUSA_English(nna)
06/29/07Ðdebbie
X
Page 366 of 376

Keyless entry system
(See remote keyless entry system).......3-9
L
Labels
Air conditioner specification label.....9-11
C.M.V.S.S. certification label........9-10
Emission control information label.....9-10
Engine serial number............9-10
F.M.V.S.S. certification label........9-10
Vehicle identification number (VIN) plate . .9-9
Warning labels (for SRS)..........1-66
Language setting..........4-6, 4-15, 4-25
LATCH (Lower Anchors and Tethers for CHildren)
System......................1-28
License plate
Installing the license plate.........9-11
Lift gate.....................3-14
Lift gate release.................3-18
Light
Air bag warning light.........1-66, 2-10
Brake light (See stop light).........8-26
Bulb check/instrument panel........2-7
Bulb replacement..............8-26
Charge warning light.............2-8
Cornering light...............2-23
Fog light switch...............2-22
Headlight and turn signal switch......2-18
Headlight control switch..........2-18
Headlights..................8-24
Light bulbs..................8-24
Low tire pressure warning light.......2-9
Low washer fluid warning light.......2-10
Passenger air bag and status light.....1-60Personal lights...............2-42
Security indicator light...........2-12
Warning/indicator lights and audible
reminders...................2-7
Lights
Map lights..................2-43
Lights on demand switch............2-41
Lock
Child safety sliding door lock........3-9
Door locks..................3-3
Fuel-filler door lock opener lever......3-19
Glove box lock...............2-30
Lift gate release...............3-18
Power door locks...............3-5
Low fuel warning light..............2-9
Low tire pressure warning light.........2-9
Low washer fluid warning light.........2-10
Luggage (See vehicle loading information) . .9-12
M
Main ON/OFF switch
(for power doors).............3-6, 3-15
Maintenance
Changing the maintenance
interval.................4-9, 4-20
Displaying the maintenance notice
reminder...............4-10, 4-20
General maintenance............8-2
Inside the vehicle...............8-3
Maintenance precautions..........8-5
Outside the vehicle..............8-2
Resetting the maintenance
interval................4-10, 4-20
Seat belt maintenance...........1-25Setting.................4-9, 4-19
Under the hood and vehicle.........8-4
Malfunction indicator light...........2-11
Manual front seat adjustment..........1-2
Manual vent windows..............2-39
Map lights....................2-43
Map pocket...................2-30
Meters and gauges................2-3
Instrument brightness control.......2-21
Mirror
Automatic anti-glare inside mirror.....3-23
Inside mirror.................3-23
Vanity mirror.................3-22
Moonroof....................2-40
N
NISSAN vehicle immobilizer
system................2-15, 3-2, 5-7
O
Octane rating (See fuel octane rating).....9-4
Odometer.....................2-4
Oil
Capacities and recommended
fuel/lubricants.................9-2
Changing engine oil.............8-9
Changing engine oil filter..........8-10
Checking engine oil level..........8-8
Engine oil...................8-8
Engine oil and oil filter recommendation . .9-5
Engine oil viscosity..............9-5
Overdrive switch................5-11
10-4
ZREVIEW COPYÐ2008 Quest(van)
Owners ManualÐUSA_English(nna)
06/29/07Ðdebbie
X