2008 NISSAN QUEST check engine light
[x] Cancel search: check engine lightPage 108 of 376
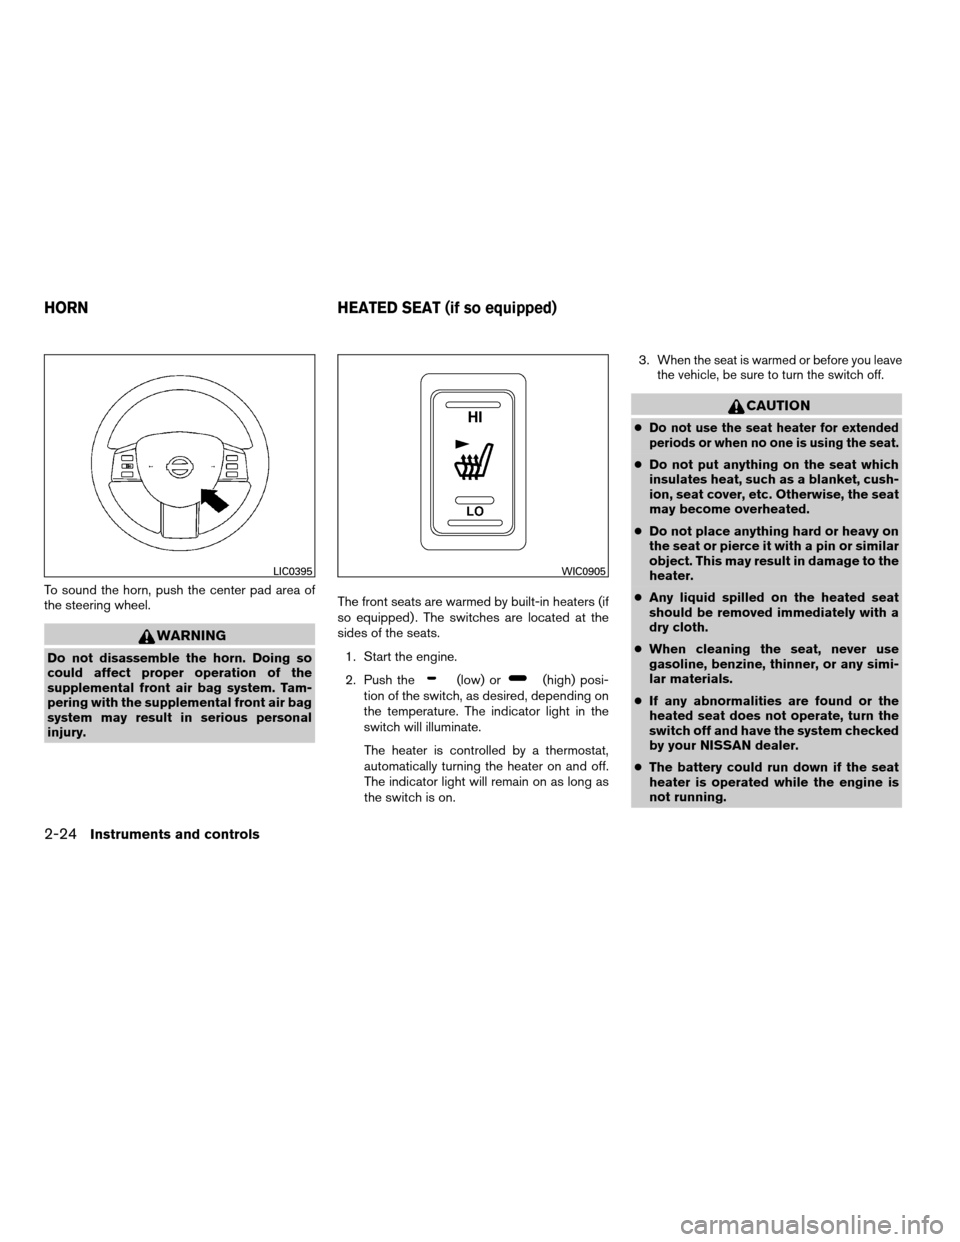
To sound the horn, push the center pad area of
the steering wheel.
WARNING
Do not disassemble the horn. Doing so
could affect proper operation of the
supplemental front air bag system. Tam-
pering with the supplemental front air bag
system may result in serious personal
injury.The front seats are warmed by built-in heaters (if
so equipped) . The switches are located at the
sides of the seats.
1. Start the engine.
2. Push the
(low) or(high) posi-
tion of the switch, as desired, depending on
the temperature. The indicator light in the
switch will illuminate.
The heater is controlled by a thermostat,
automatically turning the heater on and off.
The indicator light will remain on as long as
the switch is on.3.
When the seat is warmed or before you leave
the vehicle, be sure to turn the switch off.
CAUTION
cDo not use the seat heater for extended
periods or when no one is using the seat.
cDo not put anything on the seat which
insulates heat, such as a blanket, cush-
ion, seat cover, etc. Otherwise, the seat
may become overheated.
cDo not place anything hard or heavy on
the seat or pierce it with a pin or similar
object. This may result in damage to the
heater.
cAny liquid spilled on the heated seat
should be removed immediately with a
dry cloth.
cWhen cleaning the seat, never use
gasoline, benzine, thinner, or any simi-
lar materials.
cIf any abnormalities are found or the
heated seat does not operate, turn the
switch off and have the system checked
by your NISSAN dealer.
cThe battery could run down if the seat
heater is operated while the engine is
not running.
LIC0395WIC0905
HORN HEATED SEAT (if so equipped)
2-24Instruments and controls
ZREVIEW COPYÐ2008 Quest(van)
Owners ManualÐUSA_English(nna)
06/29/07Ðdebbie
X
Page 146 of 376
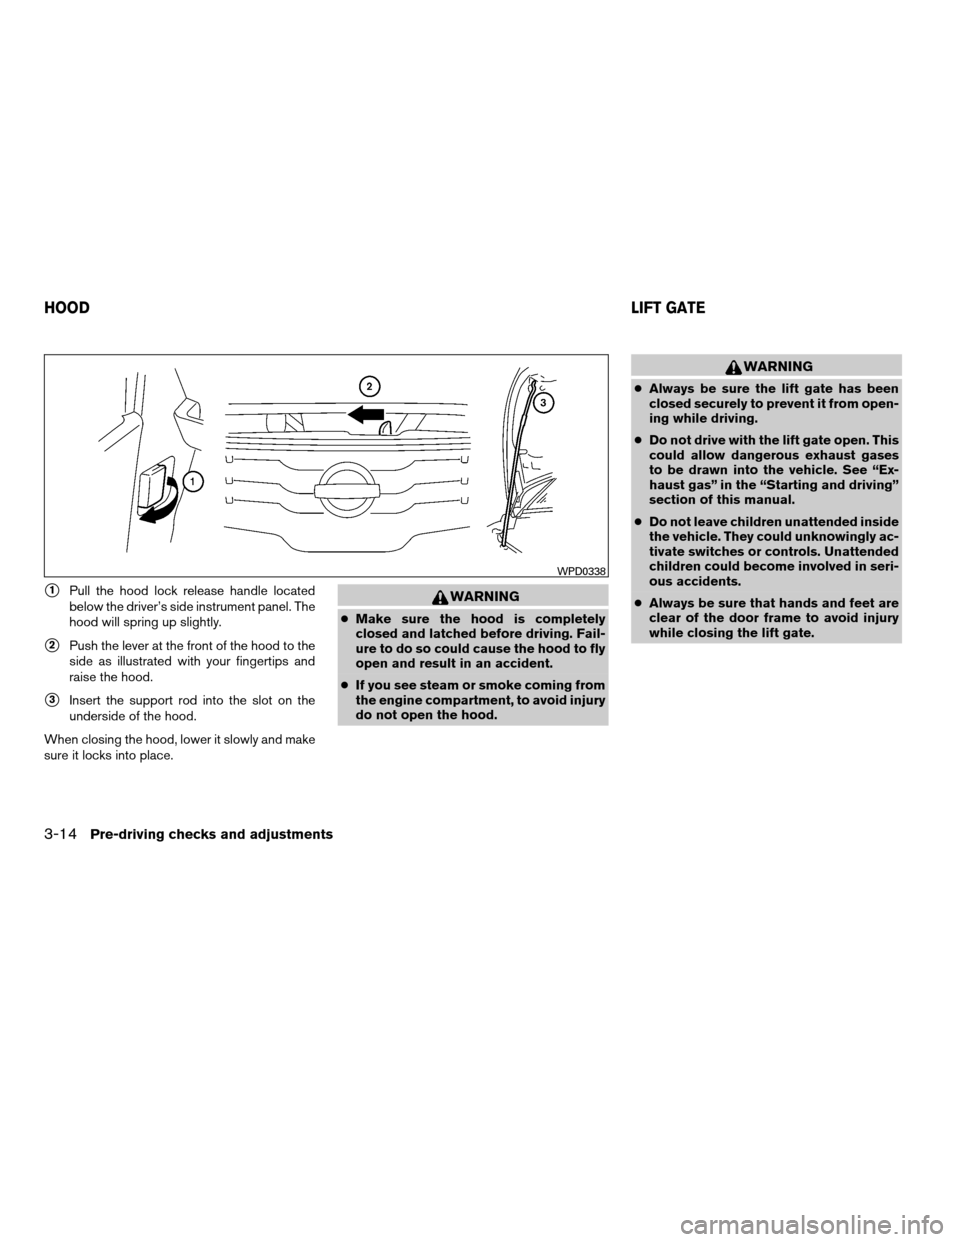
s1Pull the hood lock release handle located
below the driver’s side instrument panel. The
hood will spring up slightly.
s2Push the lever at the front of the hood to the
side as illustrated with your fingertips and
raise the hood.
s3Insert the support rod into the slot on the
underside of the hood.
When closing the hood, lower it slowly and make
sure it locks into place.
WARNING
cMake sure the hood is completely
closed and latched before driving. Fail-
ure to do so could cause the hood to fly
open and result in an accident.
cIf you see steam or smoke coming from
the engine compartment, to avoid injury
do not open the hood.
WARNING
cAlways be sure the lift gate has been
closed securely to prevent it from open-
ing while driving.
cDo not drive with the lift gate open. This
could allow dangerous exhaust gases
to be drawn into the vehicle. See “Ex-
haust gas” in the “Starting and driving”
section of this manual.
cDo not leave children unattended inside
the vehicle. They could unknowingly ac-
tivate switches or controls. Unattended
children could become involved in seri-
ous accidents.
cAlways be sure that hands and feet are
clear of the door frame to avoid injury
while closing the lift gate.
WPD0338
HOODLIFT GATE
3-14Pre-driving checks and adjustments
ZREVIEW COPYÐ2008 Quest(van)
Owners ManualÐUSA_English(nna)
06/29/07Ðdebbie
X
Page 152 of 376
WARNING
cGasoline is extremely flammable and
highly explosive under certain condi-
tions. You could be burned or seriously
injured if it is misused or mishandled.
Always stop the engine and do not
smoke or allow open flames or sparks
near the vehicle when refueling.
cDo not attempt to top off the fuel tank
after the fuel pump nozzle shuts off
automatically. Continued refueling may
cause fuel overflow, resulting in fuel
spray and possibly a fire.
cUse only an original equipment type
fuel-filler cap as a replacement. It has a
built-in safety valve needed for proper
operation of the fuel system and emis-
sion control system. An incorrect cap
can result in a serious malfunction and
possible injury. It could also cause the
malfunction indicator light to come on.
cNever pour fuel into the throttle body to
attempt to start your vehicle.cDo not fill a portable fuel container in
the vehicle or trailer. Static electricity
can cause an explosion of flammable
liquid, vapor or gas in any vehicle or
trailer. To reduce the risk of serious
injury or death when filling portable fuel
containers:
– Always place the container on the
ground when filling.
– Do not use electronic devices when
filling.
– Keep the pump nozzle in contact
with the container while you are fill-
ing it.
– Use only approved portable fuel con-
tainers for flammable liquid.
CAUTION
cIf fuel is spilled on the vehicle body,
flush it away with water to avoid paint
damage.
cTighten until the fuel-filler cap clicks.
Failure to tighten the fuel-filler cap
properly may cause the
Mal-
function Indicator Light (MIL) to illumi-
nate. If the
light illuminates be-
cause the fuel-filler cap is loose or
missing, tighten or install the cap and
continue to drive the vehicle.
The
light should turn off after a
few driving trips. If the
light
does not turn off after a few driving
trips, have the vehicle inspected by a
NISSAN dealer.
cFor additional information, see the
“Malfunction Indicator Light (MIL)” in
the “Instruments and Controls” section
earlier in this manual.
3-20Pre-driving checks and adjustments
ZREVIEW COPYÐ2008 Quest(van)
Owners ManualÐUSA_English(nna)
06/29/07Ðdebbie
X
Page 259 of 376

KEY POSITIONS
LOCK: Normal parking position (0)
OFF: (Not used) (1)
ACC: (Accessories) (2)
This position activates electrical accessories
such as the radio when the engine is not running.
ON: Normal operating position (3)
This position turns on the ignition system and the
electrical accessories.
START: (4)
This position starts the engine. As soon as the
engine has started, release the key. It automati-
cally returns to the ON position.
NISSAN VEHICLE IMMOBILIZER
SYSTEM
The NISSAN Vehicle Immobilizer System will not
allow the engine to start without the use of the
registered key.
If the engine fails to start using a registered key
(for example, when interference is caused by
another registered key, an automated toll road
device or automatic payment device on the key
ring) , restart the engine using the following pro-
cedures:1. Leave the ignition switch in the ON position
for approximately 5 seconds.
2. Turn the ignition switch to the OFF or LOCK
position, and wait approximately 10 sec-
onds.
3. Repeat steps 1 and 2.
4. Restart the engine while holding the device
(which may have caused the interference)
separate from the registered key.
If the no start condition re-occurs, NISSAN rec-
ommends placing the registered key on a sepa-
rate key ring to avoid interference from other
devices.cMake sure the area around the vehicle is
clear.
cCheck fluid levels such as engine oil, cool-
ant, brake fluid, and window washer fluid as
frequently as possible, or at least whenever
you refuel.
cCheck that all windows and lights are clean.
cVisually inspect tires for their appearance
and condition. Also check tires for proper
inflation.
cLock all doors.
cPosition seat and adjust head restraints.
cAdjust inside and outside mirrors.
cFasten seat belts and ask all passengers to
do likewise.
cCheck the operation of warning lights when
the key is turned to the ON (3) position. See
“Warning/indicator lights and audible re-
minders” in the “Instruments and controls”
section of this manual.
BEFORE STARTING THE ENGINE
Starting and driving5-7
ZREVIEW COPYÐ2008 Quest(van)
Owners ManualÐUSA_English(nna)
06/29/07Ðdebbie
X
Page 263 of 376
To push the shift lock release, complete the fol-
lowing procedure:
1. Turn the ignition key to the LOCK position
and remove the key
2. Apply the parking brake.
3. Remove the shift lock release cover as
shown.
4. Insert a small screwdriver in the shift lock
release slot and push down.
5. Move the shift selector lever to the N (Neu-
tral) position while holding down the shift
lock release.
6. Turn the key to the ON position to unlock the
steering wheel. Now the vehicle may be
moved to the desired location.
If the shift selector lever cannot be moved out of
P (Park) , have a NISSAN dealer check the auto-
matic transmission system as soon as possible.
WARNING
If the selector lever cannot be moved from
the P (Park) position while the engine is
running and the brake pedal is depressed,
the stop lights may not work. Malfunction-
ing stop lights could cause an accident
injuring yourself and others.
Accelerator downshift
— in D position —
For passing or hill climbing, depress the accel-
erator pedal to the floor. This shifts the transmis-
sion down into a lower gear, depending on the
vehicle speed.
Fail-safe
When the fail-safe operation occurs, please note
that the transmission will be locked in any of the
forward gears according to the condition.
If the vehicle is driven under extreme con-
ditions, such as excessive wheel spinning
and subsequent hard braking, the fail-safe
system may be activated. This will occur
even if all electrical circuits are functioning
properly. In this case, turn the ignition key
OFF and wait for 3 seconds. Then turn the
key back to the ON position. The vehicle
should return to its normal operating con-
dition. If it does not return to its normal
operating condition, have a NISSAN dealer
check the transmission and repair it if nec-
essary.
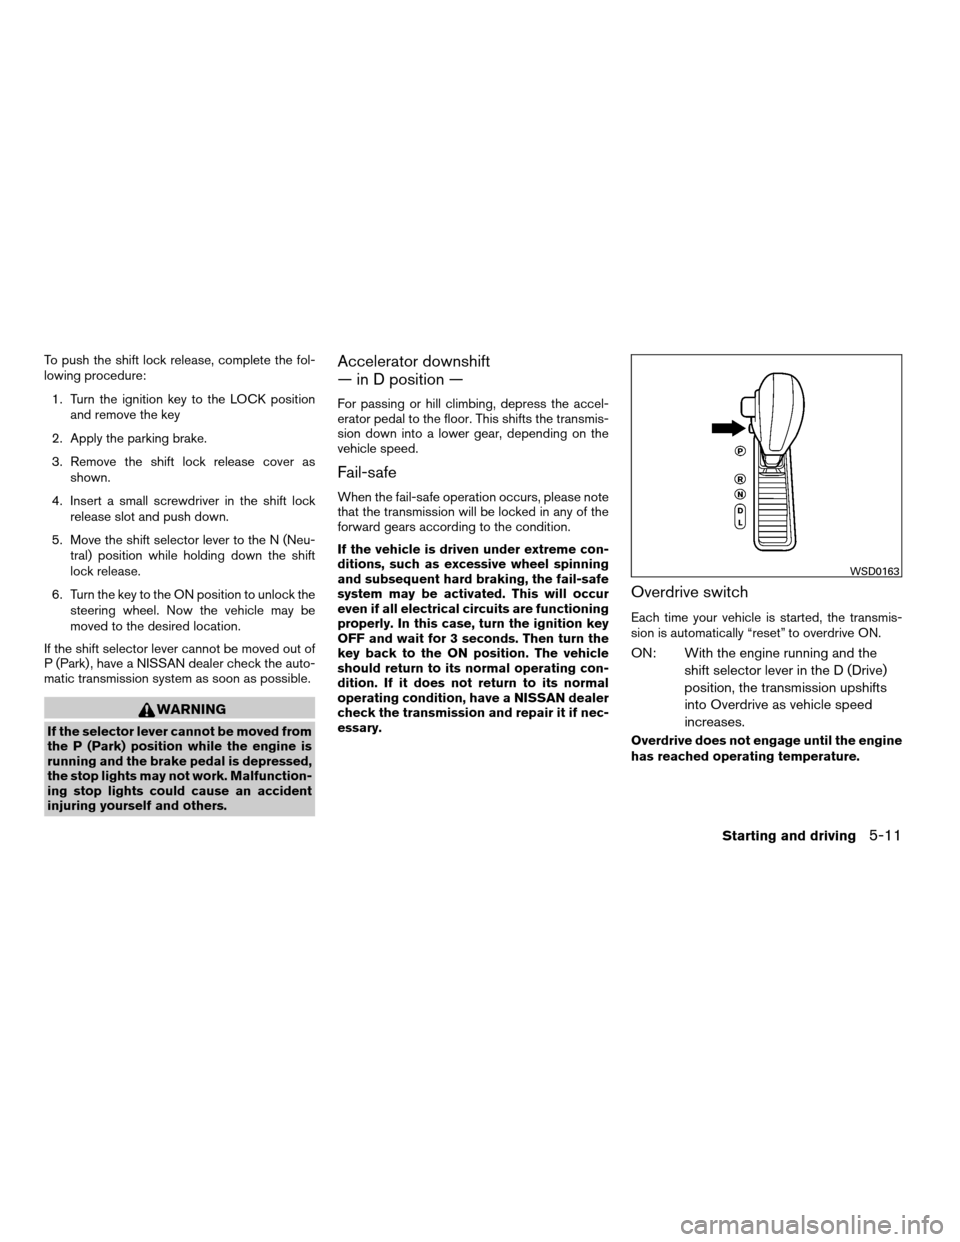
Overdrive switch
Each time your vehicle is started, the transmis-
sion is automatically “reset” to overdrive ON.
ON: With the engine running and the
shift selector lever in the D (Drive)
position, the transmission upshifts
into Overdrive as vehicle speed
increases.
Overdrive does not engage until the engine
has reached operating temperature.
WSD0163
Starting and driving5-11
ZREVIEW COPYÐ2008 Quest(van)
Owners ManualÐUSA_English(nna)
06/29/07Ðdebbie
X
Page 271 of 376
pedal. This is normal and does not indicate a
malfunction. If the computer senses a malfunc-
tion, it switches the ABS off and illuminates the
ABS warning light on the instrument panel. The
brake system then operates normally, but without
anti-lock assistance.
If the ABS warning light illuminates during the
self-test or while driving, have the vehicle
checked by a NISSAN dealer.When accelerating on slippery surfaces the tire
may spin or slip. With the vehicle Traction Control
System (TCS) , sensors detect these movements
and control the braking and engine output to help
improve vehicle stability while accelerating.
cWhen the traction control system is operat-
ing, the
indicator in the instrument
panel blinks.
cIf the
indicator blinks, the vehicle is
under slippery conditions. Be sure to drive
carefully. See “Slip indicator light” and “Trac-
tion Control System (TCS) off indicator
light” in the “Instruments and controls” sec-
tion of this manual.
cIf a malfunction occurs in the system,
the
andindicator lights
come on in the instrument panel.
As long as these lights are on, the traction control
function is canceled. The vehicle will behave like
a vehicle without the system.
WARNING
cThe Traction Control System is de-
signed to help improve driving stability
but does not prevent accidents due to
abrupt steering operation at high
speeds or by careless or dangerous
driving techniques. Reduce vehicle
speed and be especially careful when
driving and cornering on slippery sur-
faces and always drive carefully.
cIf brake related parts such as brake
pads, rotors and calipers are not stan-
dard equipment or are extremely dete-
riorated, the Traction Control System
may not operate properly and the
indicator light may come on.
cDo not modify the vehicle’s suspension.
If suspension parts such as shock ab-
sorbers, struts, springs, bushings and
wheels are not standard equipment or
are extremely deteriorated, the Traction
Control System may not operate prop-
erly and the
indicator light may
come on.
TRACTION CONTROL SYSTEM (TCS)
Starting and driving5-19
ZREVIEW COPYÐ2008 Quest(van)
Owners ManualÐUSA_English(nna)
06/29/07Ðdebbie
X
Page 274 of 376
cThe system is designed as an aid to the
driver in detecting large stationary ob-
jects to help avoid damaging the ve-
hicle. The system will not detect small
objects below the bumper, and may not
detect objects close to the bumper or
on the ground.
cIf your vehicle sustains damage to the
rear bumper fascia, leaving it mis-
aligned or bent, the sensing zone may
be altered causing inaccurate measure-
ment of obstacles or false alarms.
The Rear Sonar System (RSS) sounds a tone to
warn the driver of obstacles near the rear bumper
when the shift selector is in R (Reverse) . The
system may not detect objects at speeds above 3
mph (5 km/h) and may not detect certain angular
or moving objects.
The RSS detects obstacles up to 6 feet (1.8 m)
from the rear bumper with a decreased coverage
area at the outer corners of the bumper, (refer to
the illustration for approximate zone coverage
areas) . As you move closer to the obstacle, the
rate of the tone increases. When the obstacle is
less than 10 inches (25.0 cm) away, the tone will
sound continuously. If the RSS detects a station-
ary or receding object further than 10 inches
(25.0 cm) from the side of the vehicle, the tonewill sound for only three seconds. Once the sys-
tem detects an object approaching, the tone will
sound again.
The RSS automatically turns on when the shift
selector lever is placed in R (Reverse) and the
ignition is ON. The RSS OFF switch on the
instrument panel allows the driver to turn the RSS
on and off. To turn the RSS off, the ignition must
be ON, and the shift selector lever in R (Reverse) .
An indicator light on the switch will illuminate
when the system is turned off. If the indicator light
illuminates when the RSS is not turned off, it may
indicate a failure in the RSS.
Keep the RSS sensors (located on the rear
bumper fascia) free from snow, ice and large
accumulations of dirt (do not clean the sensors
with sharp objects) . If the sensors are covered, it
will affect the accuracy of the RSS.FREEING A FROZEN DOOR LOCK
To prevent a door lock from freezing, apply de-
icer through the key hole. If the lock becomes
frozen, heat the key before inserting it into the key
hole or use the remote keyless entry keyfob (if so
equipped) .
ANTI-FREEZE
In the winter when it is anticipated that the tem-
perature will drop below 32°F (0°C) , check the
anti-freeze to assure proper winter protection.
For details, see “Engine cooling system” in the
“Maintenance and do-it-yourself” section of this
manual.
BATTERY
If the battery is not fully charged during extremely
cold weather conditions, the battery fluid may
freeze and damage the battery. To maintain maxi-
mum efficiency, the battery should be checked
regularly. For details, see “Battery” in the “Main-
tenance and do-it-yourself” section of this
manual.
COLD WEATHER DRIVING
5-22Starting and driving
ZREVIEW COPYÐ2008 Quest(van)
Owners ManualÐUSA_English(nna)
06/29/07Ðdebbie
X
Page 278 of 376
TIRE PRESSURE MONITORING
SYSTEM (TPMS)
This vehicle is equipped with the Tire Pressure
Monitoring System (TPMS) . It monitors tire pres-
sure of all tires except the spare. When the low
tire pressure warning light is lit, one or more of
your tires is significantly under-inflated. If
equipped, the system also displays pressure of
all tires (except the spare tire) on the display
screen by sending a signal from a sensor that is
installed in each wheel. If the vehicle is being
driven with low tire pressure, the TPMS will acti-
vate and warn you of it by the low tire pressure
warning light. This system will activate only when
the vehicle is driven at speeds above 16 MPH
(25 km/h) . For more details, refer to
“Warning/indicator lights and audible reminders”
in the “Instruments and controls” section, “Tire
pressure information” in the “Display screen,
heater, air conditioner and audio systems” sec-
tion and “Tire Pressure Monitoring System
(TPMS)” in the “Starting and driving” section.
WARNING
cIf the low tire pressure warning light
illuminates while driving, avoid sudden
steering maneuvers or abrupt braking,
reduce vehicle speed, pull off the road
to a safe location and stop the vehicle
as soon as possible. Driving with under-
inflated tires may permanently damage
the tires and increase the likelihood of
tire failure. Serious vehicle damage
could occur and may lead to an acci-
dent and could result in serious per-
sonal injury. Check the tire pressure for
all four tires. Adjust the tire pressure to
the recommended COLD tire pressure
shown on the Tire and Loading Informa-
tion label to turn the low tire pressure
warning light OFF. If you have a flat tire,
replace it with a spare tire as soon as
possible.
cWhen a spare tire is mounted or a wheel
is replaced, tire pressure will not be
indicated, the TPMS will not function
and the low tire pressure warning light
will flash for approximately 1 minute.
The light will remain on after 1 minute.
Contact your NISSAN dealer as soon as
possible for tire replacement and/or
system resetting.cReplacing tires with those not originally
specified by NISSAN could affect the
proper operation of the TPMS.
cDo not inject any tire liquid or aerosol
tire sealant into the tires, as this may
cause a malfunction of the tire pressure
sensors.
CHANGING A FLAT TIRE
If you have a flat tire, follow the instructions be-
low.
Stopping the vehicle
1. Safely move the vehicle off the road and
away from traffic.
2. Turn on the hazard warning flashers.
3. Park on a level surface and apply the parking
brake. Move the shift selector lever to P
(Park) .
4. Turn off the engine.
5. Raise the hood to warn other traffic and to
signal professional road assistance person-
nel that you need assistance.
6. Have all passengers get out of the vehicle
and stand in a safe place, away from traffic
and clear of the vehicle.
FLAT TIRE
6-2In case of emergency
ZREVIEW COPYÐ2008 Quest(van)
Owners ManualÐUSA_English(nna)
06/29/07Ðdebbie
X