2008 NISSAN QUEST warning
[x] Cancel search: warningPage 346 of 376
Use the following steps to mount the front license
plate:
Before mounting the license plate, confirm that
the following parts are enclosed in the plastic
bag:
cLicense plate bracket
cLicense plate bracket screws x 2
cLicense plate screws x 2
cScrew grommets x 2
1. Make a shallow hole in the bumper fascia at
the location marks (small dimples) using a
0.39 in (10 mm) drill. To avoid damaging the
area behind the fascia, apply only light pres-
sure to the drill.
2. Insert the grommets into the holes in the
bumper fascia.
3. Insert a small flat-bladed screwdriver into
the grommet hole to turn the threaded part of
the grommet 90°.
4. Mount the license plate bracket using the
two longer screws.
5. Use the two shorter hex head screws to
mount the license plate to the license plate
bracket.WARNING
cIt is extremely dangerous to ride
in a cargo area inside a vehicle. In
a collision, people riding in these
areas are more likely to be seri-
ously injured or killed.
cDo not allow people to ride in any
area of your vehicle that is not
equipped with seats and seat
belts.
cBe sure everyone in your vehicle
is in a seat and using a seat belt
properly.
TERMS
It is important to familiarize yourself with
the following terms before loading your
vehicle:
cCurb Weight (actual weight of your
vehicle) - vehicle weight including:
standard and optional equipment, flu-
ids, emergency tools, and spare tire
assembly. This weightdoes notin-
clude passengers and cargo.cGVW (Gross Vehicle Weight) - curb
weight plus the combined weight of
passengers and cargo.
cGVWR (Gross Vehicle Weight Rat-
ing) - maximum total combined
weight of the unloaded vehicle, pas-
sengers, luggage, hitch, trailer
tongue load and any other optional
equipment. This information is lo-
cated on the F.M.V.S.S./C.M.V.S.S.
certification label.
cGAWR (Gross Axle Weight Rating) -
maximum weight (load) limit specified
for the front or rear axle. This informa-
tion is located on the
F.M.V.S.S./C.M.V.S.S. certification
label.
cGCWR (Gross Combined Weight
rating) - The maximum total weight
rating of the vehicle, passengers,
cargo, and trailer.
VEHICLE LOADING INFORMATION
9-12Technical and consumer information
ZREVIEW COPYÐ2008 Quest(van)
Owners ManualÐUSA_English(nna)
06/29/07Ðdebbie
X
Page 349 of 376
5. Determine the combined weight of
luggage and cargo being loaded on
the vehicle. That weight may not
safely exceed the available cargo and
luggage load capacity calculated in
Step 4.
6. If your vehicle will be towing a trailer,
load from your trailer will be trans-
ferred to your vehicle. Consult this
manual to determine how this re-
duces the available cargo and lug-
gage load capacity of your vehicle.
Before driving a loaded vehicle, confirm
that you do not exceed the Gross Vehicle
Weight Rating (GVWR) or the Gross Axle
Weight Rating (GAWR) for your vehicle.
See “Measurement of Weights” later in
this section.
Also check tires for proper inflation pres-
sures. See the Tire and Loading Informa-
tion label.LOADING TIPS
cThe GVW must not exceed GVWR
or GAWR as specified on the
F.M.V.S.S./C.M.V.S.S. certification
label.
cDo not load the front and rear axle to
the GAWR. Doing so will exceed the
GVWR.
WARNING
cProperly secure all cargo with
ropes or straps to help prevent it
from sliding or shifting. Do not
place cargo higher than the seat-
backs. In a sudden stop or colli-
sion, unsecured cargo could
cause personal injury.
cDo not load your vehicle any
heavier than the GVWR or the
maximum front and rear GAWRs.
If you do, parts of your vehicle
can break, tire damage could oc-
cur, or it can change the way your
vehicle handles. This could result
in loss of control and cause per-
sonal injury.cOverloading not only can shorten
the life of your vehicle and the
tire, but can also cause unsafe
vehicle handling and longer brak-
ing distances. This may cause a
premature tire failure which
could result in a serious accident
and personal injury. Failures
caused by overloading are not
covered by the vehicle’s
warranty.MEASUREMENT OF WEIGHTS
Secure loose items to prevent weight
shifts that could affect the balance of your
vehicle. When the vehicle is loaded, drive
to a scale and weigh the front and the rear
wheels separately to determine axle
loads. Individual axle loads should not ex-
ceed either of the gross axle weight rat-
ings (GAWR) . The total of the axle loads
should not exceed the gross vehicle
weight rating (GVWR) . These ratings are
given on the vehicle certification label. If
weight ratings are exceeded, move or re-
move items to bring all weights below the
ratings.
Technical and consumer information9-15
ZREVIEW COPYÐ2008 Quest(van)
Owners ManualÐUSA_English(nna)
06/29/07Ðdebbie
X
Page 350 of 376
WARNING
Overloading or improper loading of a
trailer and its cargo can adversely affect
vehicle handling, braking and perfor-
mance and may lead to accidents.
CAUTION
cDo not tow a trailer or haul a heavy load
for the first 500 miles (800 km) . Your
engine, axle or other parts could be
damaged.
cFor the first 500 miles (800 km) that you
tow a trailer, do not drive over 50 mph
(80 km/h) and do not make starts at full
throttle. This helps the engine and other
parts of your vehicle wear in at the
heavier loads.
Your new vehicle was designed to be used pri-
marily to carry passengers and cargo. Remember
that towing a trailer places additional loads on
your vehicle’s engine, drive train, steering, brak-
ing and other systems.
A NISSAN Towing Guide (U.S. only) is available
on the website at www.nissanusa.com. This
guide includes information on trailer towing ca-
pability and the special equipment required for
proper towing.
MAXIMUM LOAD LIMITS
Maximum trailer loads
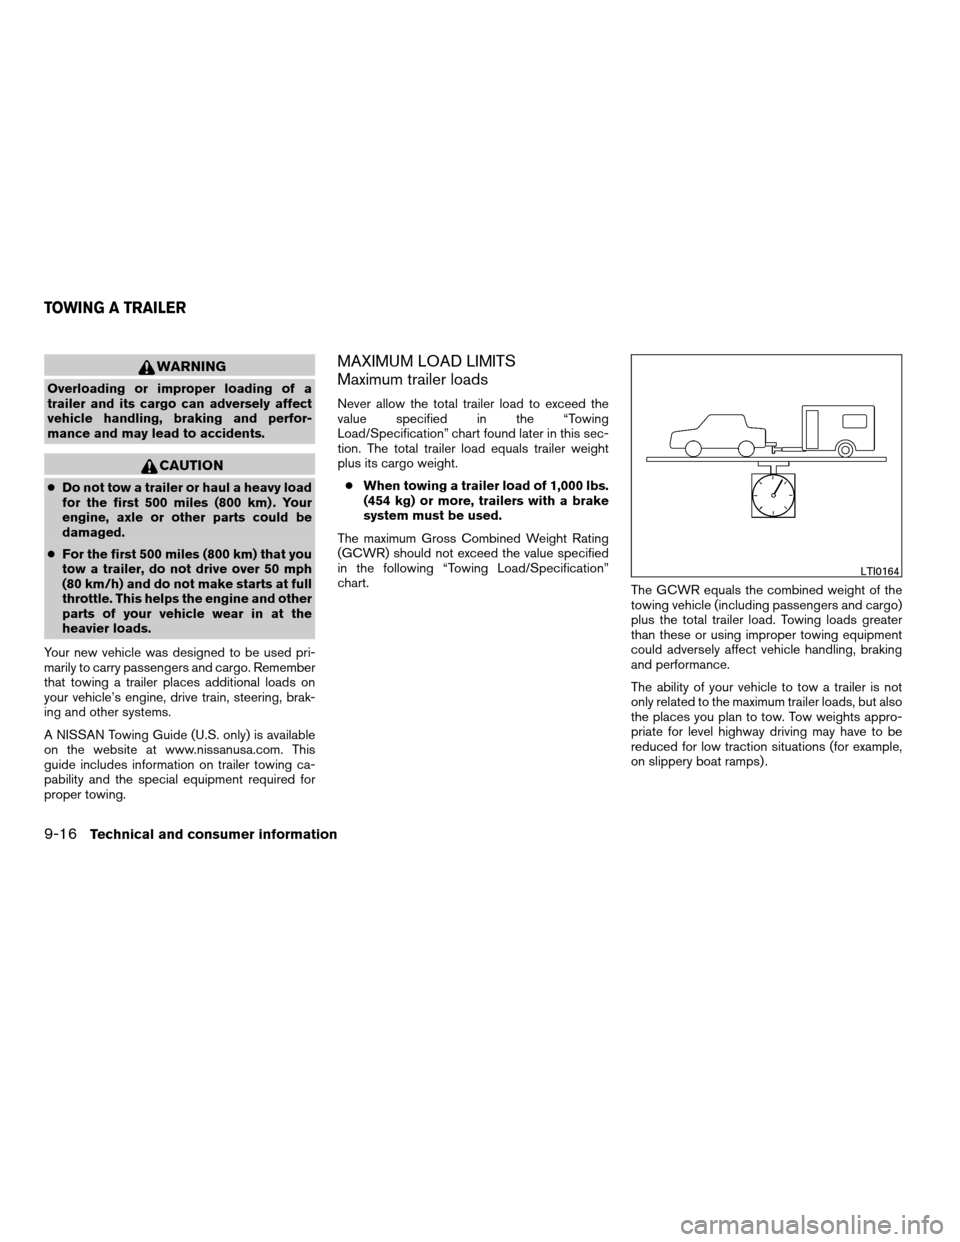
Never allow the total trailer load to exceed the
value specified in the “Towing
Load/Specification” chart found later in this sec-
tion. The total trailer load equals trailer weight
plus its cargo weight.
cWhen towing a trailer load of 1,000 lbs.
(454 kg) or more, trailers with a brake
system must be used.
The maximum Gross Combined Weight Rating
(GCWR) should not exceed the value specified
in the following “Towing Load/Specification”
chart.
The GCWR equals the combined weight of the
towing vehicle (including passengers and cargo)
plus the total trailer load. Towing loads greater
than these or using improper towing equipment
could adversely affect vehicle handling, braking
and performance.
The ability of your vehicle to tow a trailer is not
only related to the maximum trailer loads, but also
the places you plan to tow. Tow weights appro-
priate for level highway driving may have to be
reduced for low traction situations (for example,
on slippery boat ramps) .
LTI0164
TOWING A TRAILER
9-16Technical and consumer information
ZREVIEW COPYÐ2008 Quest(van)
Owners ManualÐUSA_English(nna)
06/29/07Ðdebbie
X
Page 351 of 376
Temperature conditions can also affect towing.
For example, towing a heavy trailer in high outside
temperatures on graded roads can affect engine
performance and cause overheating. The engine
protection mode, which helps reduce the chance
of engine damage, could activate and automati-
cally decrease engine power. Vehicle speed may
decrease under high load. Plan your trip carefully
to account for trailer and vehicle load, weather
and road conditions.
WARNING
Overheating can result in reduced engine
power and vehicle speed. The reduced
speed may be lower than other traffic,
which could increase the chance of a col-
lision. Be especially careful when driving.
Pull to the side of the road to a safe area.
Allow the engine to cool and return to
normal operation. See “If your vehicle
overheats” in the “In case of emergency”
section of this manual.
CAUTION
Vehicle damage resulting from improper
towing procedures is not covered by
NISSAN warranties.
Tongue load
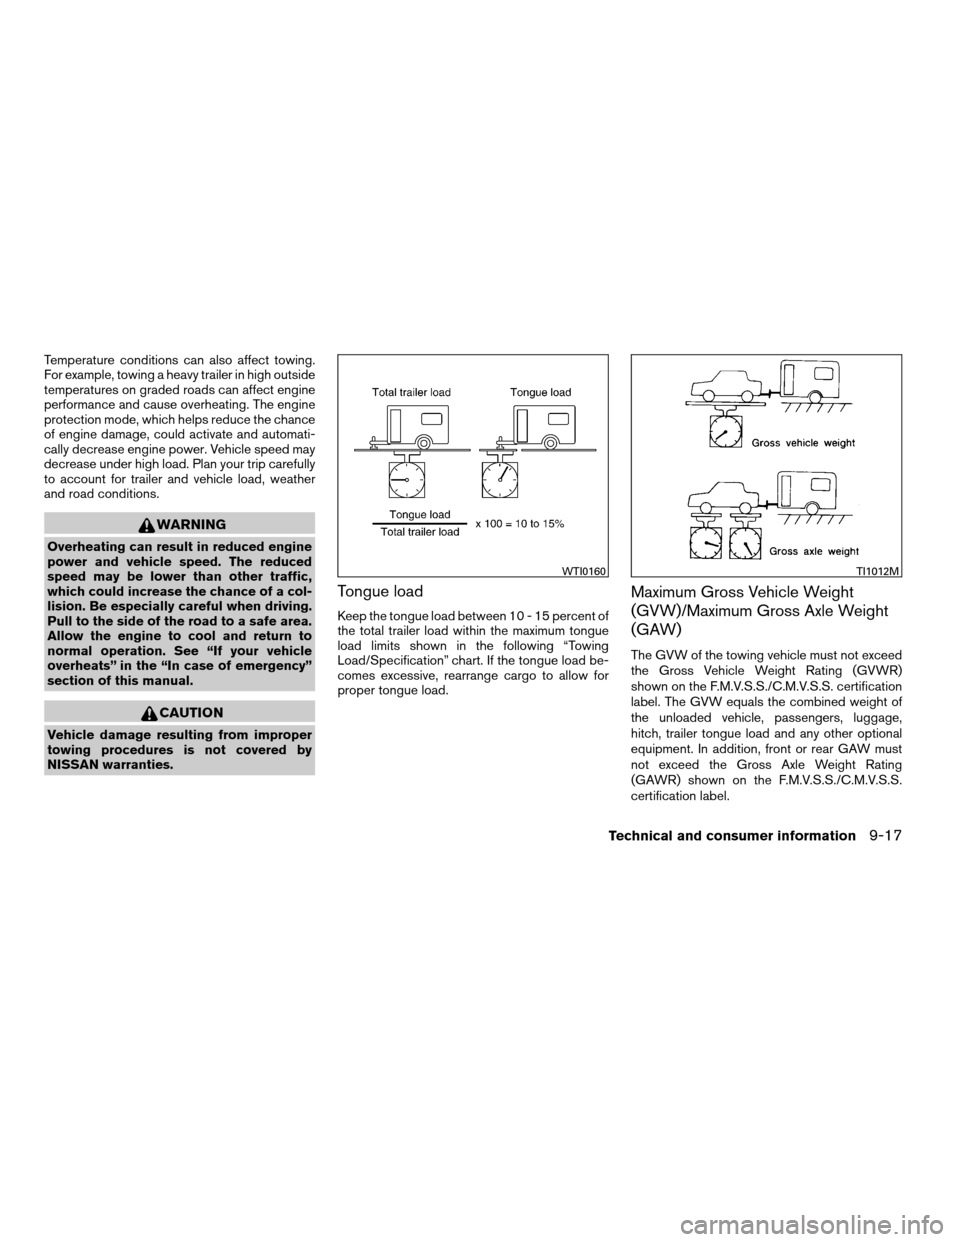
Keep the tongue load between 10 - 15 percent of
the total trailer load within the maximum tongue
load limits shown in the following “Towing
Load/Specification” chart. If the tongue load be-
comes excessive, rearrange cargo to allow for
proper tongue load.
Maximum Gross Vehicle Weight
(GVW)/Maximum Gross Axle Weight
(GAW)
The GVW of the towing vehicle must not exceed
the Gross Vehicle Weight Rating (GVWR)
shown on the F.M.V.S.S./C.M.V.S.S. certification
label. The GVW equals the combined weight of
the unloaded vehicle, passengers, luggage,
hitch, trailer tongue load and any other optional
equipment. In addition, front or rear GAW must
not exceed the Gross Axle Weight Rating
(GAWR) shown on the F.M.V.S.S./C.M.V.S.S.
certification label.
WTI0160TI1012M
Technical and consumer information9-17
ZREVIEW COPYÐ2008 Quest(van)
Owners ManualÐUSA_English(nna)
06/29/07Ðdebbie
X
Page 353 of 376
The available towing capacity may be less than
the maximum towing capacity due to the passen-
ger and cargo load in the vehicle.
Remember to keep trailer tongue weight be-
tween 10 - 15% of the trailer weight. If the tongue
load becomes excessive, rearrange the cargo to
obtain the proper tongue load. Do not exceed the
10 - 15% tongue weight specification even if the
calculated available tongue weight is greater
than 15%. If the calculated tongue weight is less
than 10% , reduce the total trailer weight to
match the available tongue weight.
Always verify that available capacities are within
the required ratings.
TOWING LOAD/SPECIFICATION
UNIT: lb (kg)
Maximum Towing Load
*13,500 (1,588)
Maximum Tongue Load 350 (158)
Gross Combined
Weight Rating8,500 (3,856)
*1: The towing capacity values are calculated
assuming a base vehicle with driver and any
options required to achieve the rating. Additional
passengers, cargo and/or optional equipmentwill add weight to the vehicle and reduce your
vehicle’s maximum towing capacity.
TOWING SAFETY
Trailer hitch
Choose a proper hitch for your vehicle and trailer.
A genuine NISSAN trailer hitch is available from
your NISSAN dealer (Canada only) . Make sure
the trailer hitch is securely attached to the ve-
hicle, to help avoid personal injury or property
damage due to sway caused by crosswinds,
rough road surfaces or passing trucks.
WARNING
Trailer hitch components have specific
weight ratings. Your vehicle may be ca-
pable of towing a trailer heavier than the
weight rating of the hitch components.
Never exceed the weight rating of the
hitch components. Doing so can cause
serious personal injury or property
damage.
Hitch ball
Choose a hitch ball of the proper size and weight
rating for your trailer:
cThe required hitch ball size is stamped on
most trailer couplers. Most hitch balls also
have the size printed on the top of the ball.cChoose the proper class hitch ball based on
the trailer weight.
cThe diameter of the threaded shank of the
hitch ball must be matched to the ball mount
hole diameter. The hitch ball shank should
be no more than 1/16” smaller than the hole
in the ball mount.
cThe threaded shank of the hitch ball must be
long enough to be properly secured to the
ball mount. There should be at least 2
threads showing beyond the lock washer
and nut.
Sway control device
Sudden maneuvers, wind gusts, and buffeting
caused by other vehicles can affect trailer han-
dling. Sway control devices may be used to help
control these affects. If you choose to use one,
contact a reputable trailer hitch supplier to make
sure the sway control device will work with the
vehicle, hitch, trailer and the trailer’s brake sys-
tem. Follow the instructions provided by the
manufacturer for installing and using the sway
control device.
Class I hitch
Class I trailer hitch equipment (receiver, ball
mount and hitch ball) can be used to tow trailers
of a maximum weight of 2,000 lb (909 kg) .
Technical and consumer information9-19
ZREVIEW COPYÐ2008 Quest(van)
Owners ManualÐUSA_English(nna)
06/29/07Ðdebbie
X
Page 355 of 376
WARNING
Never connect a trailer brake system di-
rectly to the vehicle brake system.
Pre-towing tips
cBe certain your vehicle maintains a level
position when a loaded and/or unloaded
trailer is hitched. Do not drive the vehicle if it
has an abnormal nose-up or nose-down
condition; check for improper tongue load,
overload, worn suspension or other possible
causes of either condition.
cAlways secure items in the trailer to prevent
load shift while driving.
cKeep the cargo load as low as possible in
the trailer to keep the trailer center of gravity
low.
cLoad the trailer so approximately 60% of the
trailer load is in the front half and 40% is in
the back half. Also make sure the load is
balanced side to side.
cCheck your hitch, trailer tire pressure, ve-
hicle tire pressure, trailer light operation, and
trailer wheel lug nuts every time you attach a
trailer to the vehicle.cBe certain your rearview mirrors conform to
all federal, state or local regulations. If not,
install any mirrors required for towing before
driving the vehicle.
cDetermine the overall height of the vehicle
and trailer so the required clearance is
known.
Trailer towing tips
In order to gain skill and an understanding of the
vehicle’s behavior, you should practice turning,
stopping and backing up in an area which is free
from traffic. Steering stability and braking perfor-
mance will be somewhat different than under
normal driving conditions.
cAlways secure items in the trailer to prevent
load shift while driving.
cLock the trailer hitch coupler with a pin or
lock to prevent the coupler from inadvert-
ently becoming unlatched.
cAvoid abrupt starts, acceleration or stops.
cAvoid sharp turns or lane changes.
cAlways drive your vehicle at a moderate
speed.
cWhen backing up, hold the bottom of the
steering wheel with one hand. Move your
hand in the direction in which you want thetrailer to go. Make small corrections and
back up slowly. If possible, have someone
guide you when you are backing up.
Always block the wheels on both vehicle and
trailer when parking. Parking on a slope is not
recommended; however, if you must do so:
CAUTION
If you move the shift selector lever to the P
(Park) position before blocking the
wheels and applying the parking brake,
transmission damage could occur.
1. Apply and hold the brake pedal.
2. Have someone place blocks on the downhill
side of the vehicle and trailer wheels.
3. After the wheel blocks are in place, slowly
release the brake pedal until the blocks ab-
sorb the vehicle load.
4. Apply the parking brake.
5. Shift the transmission into P (Park) .
6. Turn off the engine.
To drive away:
1. Start the vehicle.
2. Apply and hold the brake pedal.
3. Shift the transmission into gear.
Technical and consumer information9-21
ZREVIEW COPYÐ2008 Quest(van)
Owners ManualÐUSA_English(nna)
06/29/07Ðdebbie
X
Page 358 of 376
WARNING
The traction grade assigned to this tire is
based on straight-ahead braking traction
tests, and does not include acceleration,
cornering, hydroplaning, or peak traction
characteristics.
Temperature A, B and C
The temperature grades are A (the highest) , B,
and C, representing the tire’s resistance to the
generation of heat, and its ability to dissipate heat
when tested under controlled conditions on a
specified indoor laboratory test wheel. Sustained
high temperature can cause the material of the
tire to degenerate and reduce tire life, and exces-
sive temperature can lead to sudden tire failure.
The grade C corresponds to a level of perfor-
mance which all passenger car tires must meet
under the Federal Motor Safety Standard No.
109. Grades B and A represent higher levels of
performance on the laboratory test wheel than
the minimum required by law.
WARNING
The temperature grade for this tire is es-
tablished for a tire that is properly inflated
and not overloaded. Excessive speed,
under-inflation, or excessive loading, ei-
ther separately or in combination, can
cause heat build-up and possible tire
failure.Your NISSAN vehicle is covered by the following
emission warranties:
For USA
1. Emission Defects Warranty
2. Emissions Performance Warranty
Details of these warranties may be found with
other vehicle warranties in your Warranty Infor-
mation Booklet which comes with your NISSAN
vehicle. If you did not receive a Warranty Informa-
tion Booklet, or it is lost, you may obtain a re-
placement by writing to:
cNissan North America, Inc.
Consumer Affairs Department
P.O. Box 685003
Franklin, TN 37068-5003
For Canada
Emission Control System Warranty
Details of these warranties may be found with
other vehicle warranties in your Warranty Infor-
mation Booklet which comes with your NISSAN
vehicle. If you did not receive a Warranty Informa-
tion Booklet, or it is lost, you may obtain a re-
placement by writing to:
cNissan Canada Inc.
5290 Orbitor Drive
Mississauga, Ontario, L4W 4Z5
EMISSION CONTROL SYSTEM
WARRANTY
9-24Technical and consumer information
ZREVIEW COPYÐ2008 Quest(van)
Owners ManualÐUSA_English(nna)
06/29/07Ðdebbie
X
Page 359 of 376
If you believe that your vehicle has a de-
fect which could cause a crash or could
cause injury or death, you should immedi-
ately inform the National Highway Traffic
Safety Administration (NHTSA) in addi-
tion to notifying NISSAN.
If NHTSA receives similar complaints, it
may open an investigation, and if it finds
that a safety defect exists in a group of
vehicles, it may order a recall and remedy
campaign. However, NHTSA cannot be-
come involved in individual problems be-
tween you, your dealer, or NISSAN.
To contact NHTSA, you may call the Ve-
hicle Safety Hotline toll-free at 1-888-
327-4236 (TTY: 1-800-424-9153); go
to http://www.safercar.gov; or write to:
Administrator, NHTSA, 400 Seventh
Street, SW., Washington, D.C. 20590.
You can also obtain other information
about motor vehicle safety from
http://www.safercar.gov.
You may notify NISSAN by contacting our
Consumer Affairs Department, toll-free, at
1-800-NISSAN-1.Due to legal requirements in some states and
Canadian Provinces, your vehicle may be re-
quired to be in what is called the “ready condi-
tion” for an Inspection/Maintenance (I/M) test of
the emission control system.
The vehicle is set to the “ready condition” when it
is driven through certain driving patterns. Usually,
the ready condition can be obtained by ordinary
usage of the vehicle.
If a powertrain system component is repaired or
the battery is disconnected, the vehicle may be
reset to a “not ready” condition. Before taking the
I/M test, check the vehicle’s
inspection/maintenance test readiness condi-
tion. Turn the ignition switch ON without starting
the engine. If the Malfunction Indicator Light
(MIL) comes on steady for 20 seconds and then
blinks for 10 seconds , the I/M test condition is
9not ready9. If the MIL does not blink after 20
seconds, the I/M test condition is9ready.9If the
MIL indicates the vehicle is in a9not ready9con-
dition, drive the vehicle through the following
pattern to set the vehicle to the ready condition. If
you cannot or do not want to perform the driving
pattern, a NISSAN dealer can conduct it for you.WARNING
Always drive the vehicle in a safe and
prudent manner according to traffic con-
ditions and obey all traffic laws.
1. Start the engine when the engine coolant
temperature gauge needle points to C. Al-
low the engine to idle until the gauge needle
points between the C and H (normal oper-
ating temperature) .
2. Accelerate the vehicle to 55 MPH (88
km/h) , then quickly release the accelerator
pedal completely and keep it released for at
least 10 seconds.
3. Quickly depress the accelerator pedal for a
moment, then drive the vehicle at a speed of
53 - 60 MPH (86 - 96 km/h) for at least 9
minutes.
4. Stop the vehicle.
5. Accelerate the vehicle to 35 MPH (55 km/h)
and maintain the speed for 20 seconds.
6. Repeat steps 4 through 5 at least 10 times.
7. Accelerate the vehicle to 55 MPH (88 km/h)
and maintain the speed for at least 3 min-
utes.
REPORTING SAFETY DEFECTS (US
only)READINESS FOR INSPECTION/
MAINTENANCE (I/M) TEST
Technical and consumer information9-25
ZREVIEW COPYÐ2008 Quest(van)
Owners ManualÐUSA_English(nna)
06/29/07Ðdebbie
X