2008 NISSAN QUEST heater
[x] Cancel search: heaterPage 278 of 376

TIRE PRESSURE MONITORING
SYSTEM (TPMS)
This vehicle is equipped with the Tire Pressure
Monitoring System (TPMS) . It monitors tire pres-
sure of all tires except the spare. When the low
tire pressure warning light is lit, one or more of
your tires is significantly under-inflated. If
equipped, the system also displays pressure of
all tires (except the spare tire) on the display
screen by sending a signal from a sensor that is
installed in each wheel. If the vehicle is being
driven with low tire pressure, the TPMS will acti-
vate and warn you of it by the low tire pressure
warning light. This system will activate only when
the vehicle is driven at speeds above 16 MPH
(25 km/h) . For more details, refer to
“Warning/indicator lights and audible reminders”
in the “Instruments and controls” section, “Tire
pressure information” in the “Display screen,
heater, air conditioner and audio systems” sec-
tion and “Tire Pressure Monitoring System
(TPMS)” in the “Starting and driving” section.
WARNING
cIf the low tire pressure warning light
illuminates while driving, avoid sudden
steering maneuvers or abrupt braking,
reduce vehicle speed, pull off the road
to a safe location and stop the vehicle
as soon as possible. Driving with under-
inflated tires may permanently damage
the tires and increase the likelihood of
tire failure. Serious vehicle damage
could occur and may lead to an acci-
dent and could result in serious per-
sonal injury. Check the tire pressure for
all four tires. Adjust the tire pressure to
the recommended COLD tire pressure
shown on the Tire and Loading Informa-
tion label to turn the low tire pressure
warning light OFF. If you have a flat tire,
replace it with a spare tire as soon as
possible.
cWhen a spare tire is mounted or a wheel
is replaced, tire pressure will not be
indicated, the TPMS will not function
and the low tire pressure warning light
will flash for approximately 1 minute.
The light will remain on after 1 minute.
Contact your NISSAN dealer as soon as
possible for tire replacement and/or
system resetting.cReplacing tires with those not originally
specified by NISSAN could affect the
proper operation of the TPMS.
cDo not inject any tire liquid or aerosol
tire sealant into the tires, as this may
cause a malfunction of the tire pressure
sensors.
CHANGING A FLAT TIRE
If you have a flat tire, follow the instructions be-
low.
Stopping the vehicle
1. Safely move the vehicle off the road and
away from traffic.
2. Turn on the hazard warning flashers.
3. Park on a level surface and apply the parking
brake. Move the shift selector lever to P
(Park) .
4. Turn off the engine.
5. Raise the hood to warn other traffic and to
signal professional road assistance person-
nel that you need assistance.
6. Have all passengers get out of the vehicle
and stand in a safe place, away from traffic
and clear of the vehicle.
FLAT TIRE
6-2In case of emergency
ZREVIEW COPYÐ2008 Quest(van)
Owners ManualÐUSA_English(nna)
06/29/07Ðdebbie
X
Page 284 of 376

WARNING
Always follow the instructions below.
Failure to do so could result in damage to
the charging system and cause personal
injury.
1. If the booster battery is in another vehicle,
position the two vehicles to bring their bat-
teries near each other.
Do not allow the two vehicles to touch.
2. Apply the parking brake. Move the shift se-
lector lever to P (Park) . Switch off all unnec-
essary electrical systems (lights, heater, air
conditioner, etc.) .3. Remove vent caps on the battery (if so
equipped) . Cover the battery with an old
cloth to reduce explosion hazard.
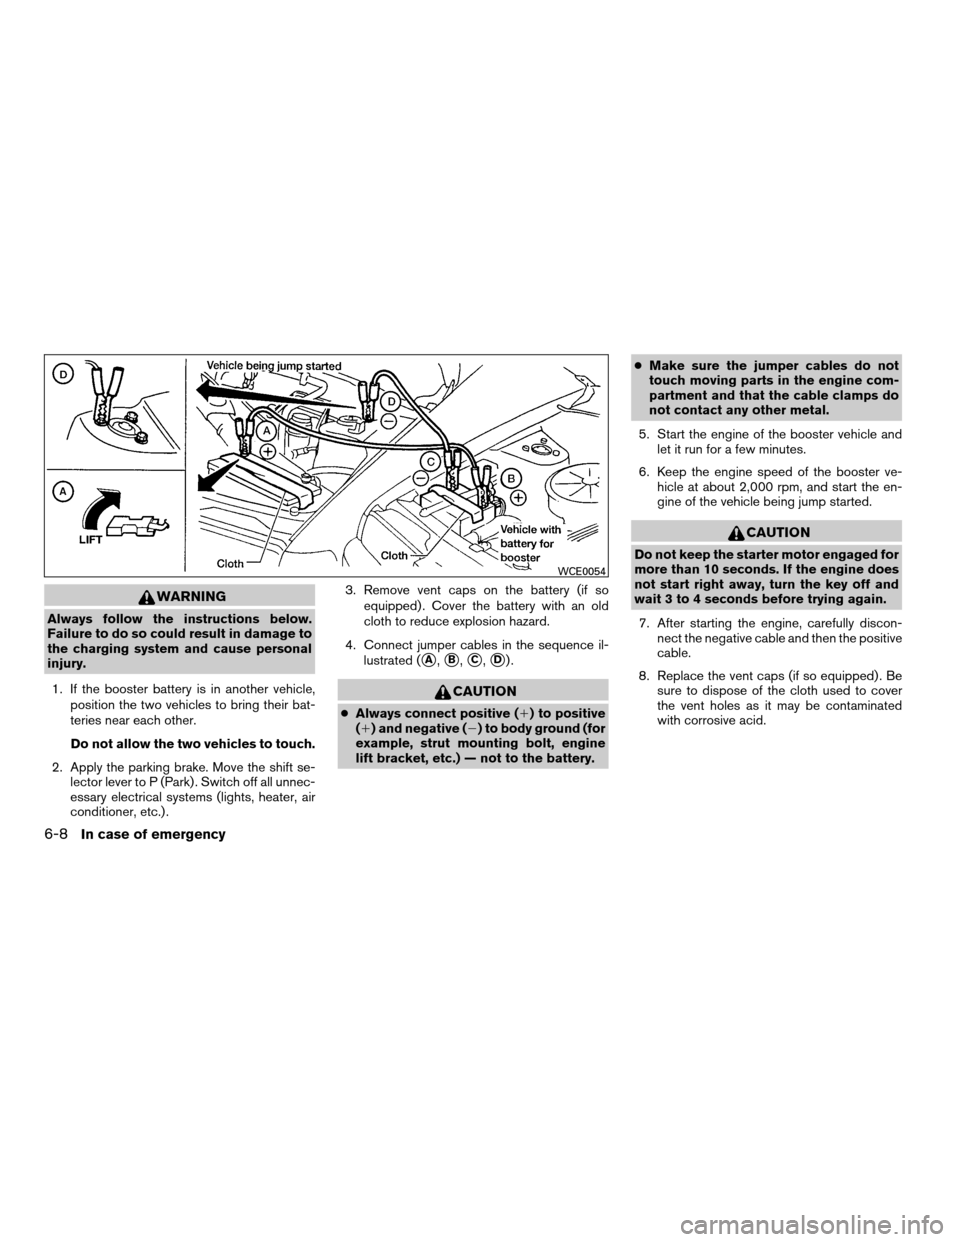
4. Connect jumper cables in the sequence il-
lustrated (
sA,sB,sC,sD).
CAUTION
cAlways connect positive (1) to positive
(1) and negative (2) to body ground (for
example, strut mounting bolt, engine
lift bracket, etc.) — not to the battery.cMake sure the jumper cables do not
touch moving parts in the engine com-
partment and that the cable clamps do
not contact any other metal.
5. Start the engine of the booster vehicle and
let it run for a few minutes.
6. Keep the engine speed of the booster ve-
hicle at about 2,000 rpm, and start the en-
gine of the vehicle being jump started.
CAUTION
Do not keep the starter motor engaged for
more than 10 seconds. If the engine does
not start right away, turn the key off and
wait 3 to 4 seconds before trying again.
7. After starting the engine, carefully discon-
nect the negative cable and then the positive
cable.
8. Replace the vent caps (if so equipped) . Be
sure to dispose of the cloth used to cover
the vent holes as it may be contaminated
with corrosive acid.
WCE0054
6-8In case of emergency
ZREVIEW COPYÐ2008 Quest(van)
Owners ManualÐUSA_English(nna)
06/29/07Ðdebbie
X
Page 285 of 376

CAUTION
Automatic transmission models cannot
be push-started or tow-started. Attempt-
ing to do so may cause transmission
damage.If your vehicle is overheating (indicated by an
extremely high temperature gauge reading) , or if
you feel a lack of engine power, detect abnormal
noise, etc. take the following steps.
WARNING
cDo not continue to drive if your vehicle
overheats. Doing so could cause engine
damage or a vehicle fire.
cTo avoid the danger of being scalded,
never remove the radiator cap while the
engine is still hot. When the radiator
cap is removed, pressurized hot water
will spurt out, possibly causing serious
injury.
cDo not open the hood if steam is com-
ing out.
1. Move the vehicle safely off the road, apply
the parking brake and move the shift lever to
P (Park) .
Do not stop the engine.
2. Turn off the air conditioner. Open all the
windows, move the heater or air conditioner
temperature control to maximum hot and fan
control to high speed.3. Get out of the vehicle. Look and listen for
steam or coolant escaping from the radiator
before opening the hood. (If steam or cool-
ant is escaping, turn off the engine.) Do not
open the hood further until no steam or
coolant can be seen.
4. Open the engine hood.
WARNING
If steam or water is coming from the en-
gine, stand clear to prevent getting
burned.
5. Visually check drive belts for damage or
looseness. Also check if the cooling fan is
running. The radiator hoses and radiator
should not leak water. If coolant is leaking,
the water pump belt is missing or loose, or
the cooling fan does not run, stop the en-
gine.
WARNING
Be careful not to allow your hands, hair,
jewelry or clothing to come into contact
with, or get caught in, engine belts or the
engine cooling fan. The engine cooling
fan can start at any time.
PUSH STARTING IF YOUR VEHICLE OVERHEATS
In case of emergency6-9
ZREVIEW COPYÐ2008 Quest(van)
Owners ManualÐUSA_English(nna)
06/29/07Ðdebbie
X
Page 298 of 376

Steering wheelCheck for changes in the steer-
ing system, such as excessive freeplay, hard
steering or strange noises.
Warning lights and chimesMake sure all
warning lights and chimes are operating properly.
Windshield wiper and washer*Check that
the wipers and washer operate properly and that
the wipers do not streak.
Windshield defrosterCheck that the air
comes out of the defroster outlets properly and in
sufficient quantity when operating the heater or
air conditioner.
Under the hood and vehicle
The maintenance items listed here should be
checked periodically (for example, each time you
check the engine oil or refuel) .
Battery*Check the fluid level in each cell. It
should be between the MAX and MIN lines. Ve-
hicles operated in high temperatures or under
severe conditions require frequent checks of the
battery fluid level.
Brake fluid levels*Make sure that the brake
fluid level is between the MIN and MAX lines on
the reservoir.
Engine coolant level*Check the coolant level
when the engine is cold.Engine drive belts*Make sure the drive belts
are not frayed, worn, cracked or oily.
Engine oil level*Check the level after parking
the vehicle on a level surface with the engine off.
Wait more than 10 minutes for the oil to drain
back into the oil pan.
Exhaust systemMake sure there are no loose
supports, cracks or holes. If the sound of the
exhaust seems unusual or there is a smell of
exhaust fumes, immediately have the exhaust
system inspected by a NISSAN dealer. See the
carbon monoxide warning in the “Starting and
driving” section of this manual.
Fluid leaksCheck under the vehicle for fuel, oil,
water or other fluid leaks after the vehicle has
been parked for a while. Water dripping from the
air conditioner after use is normal. If you should
notice any leaks or if gasoline fumes are evident,
check for the cause and have it corrected imme-
diately.
Power steering fluid level* and linesCheck
the level when the fluid is cold, with the engine
off. Check the lines for proper attachment, leaks,
cracks, etc.
Radiator and hosesCheck the front of the
radiator and clean off any dirt, insects, leaves,etc., that may have accumulated. Make sure the
hoses have no cracks, deformation, rot or loose
connections.
UnderbodyThe underbody is frequently ex-
posed to corrosive substances such as those
used on icy roads or to control dust. It is very
important to remove these substances from the
underbody, otherwise rust may form on the floor
pan, frame, fuel lines and exhaust system. At the
end of winter, the underbody should be thor-
oughly flushed with plain water, in those areas
where mud and dirt may have accumulated. See
the “Appearance and care” section of this
manual.
Windshield washer fluid*Check that there is
adequate fluid in the reservoir.
8-4Maintenance and do-it-yourself
ZREVIEW COPYÐ2008 Quest(van)
Owners ManualÐUSA_English(nna)
06/29/07Ðdebbie
X
Page 302 of 376

CHANGING ENGINE COOLANT
A NISSAN dealer can change the engine coolant.
The service procedure can be found in the
NISSAN Service Manual.
Improper servicing can result in reduced
heater performance and engine overheat-
ing.
WARNING
cTo avoid the danger of being scalded,
never change the coolant when the en-
gine is hot.
cNever remove the radiator cap when the
engine is hot. Serious burns could be
caused by high pressure fluid escaping
from the radiator.
cAvoid direct skin contact with used
coolant. If skin contact is made, wash
thoroughly with soap or hand cleaner
as soon as possible.
cKeep coolant out of the reach of chil-
dren and pets.
Engine coolant must be disposed of properly.
Check your local regulations.
CHECKING ENGINE OIL LEVEL
1. Park the vehicle on a level surface and apply
the parking brake.
2. Start the engine and let it idle until it reaches
operating temperature.
3. Turn off the engine.Wait more than 10
minutes for the oil to drain back into
the oil pan.
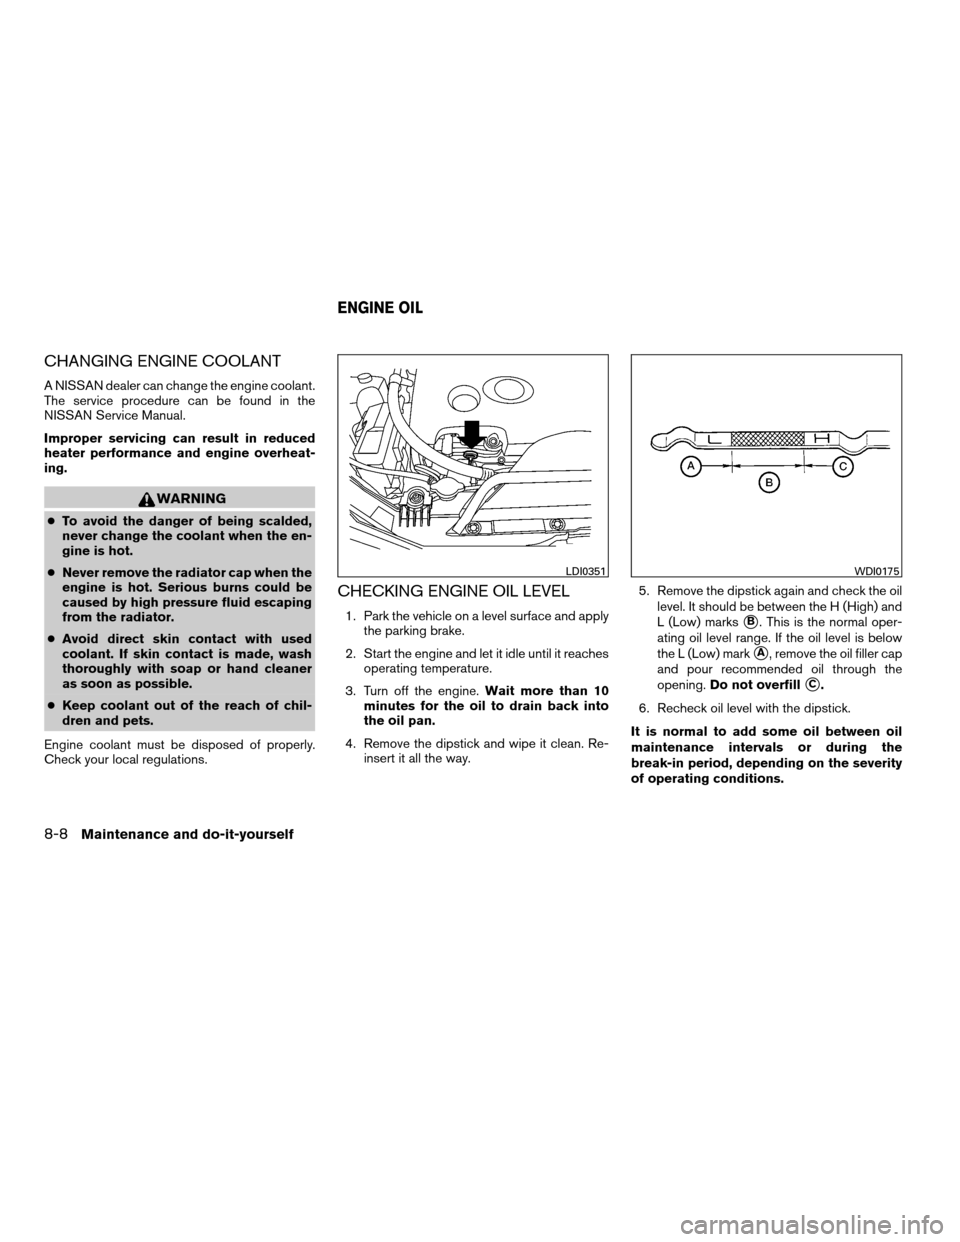
4. Remove the dipstick and wipe it clean. Re-
insert it all the way.5. Remove the dipstick again and check the oil
level. It should be between the H (High) and
L (Low) markssB. This is the normal oper-
ating oil level range. If the oil level is below
the L (Low) mark
sA, remove the oil filler cap
and pour recommended oil through the
opening.Do not overfill
sC.
6. Recheck oil level with the dipstick.
It is normal to add some oil between oil
maintenance intervals or during the
break-in period, depending on the severity
of operating conditions.
LDI0351WDI0175
ENGINE OIL
8-8Maintenance and do-it-yourself
ZREVIEW COPYÐ2008 Quest(van)
Owners ManualÐUSA_English(nna)
06/29/07Ðdebbie
X
Page 324 of 376

If you have a flat tire, see the “In case of
emergency” section of this manual.
TIRE PRESSURE
Tire Pressure Monitoring System
(TPMS)
This vehicle is equipped with the Tire
Pressure Monitoring System (TPMS) . It
monitors tire pressure of all tires except
the spare. When the low tire pressure
warning light is lit, one or more of your
tires is significantly under-inflated. If
equipped, the system also displays pres-sure of all tires (except the spare tire) on
the display screen by sending a signal
from a sensor that is installed in each
wheel.
The TPMS will activate only when the
vehicle is driven at speeds above 16 MPH
(25 km/h) . Also, this system may not de-
tect a sudden drop in tire pressure (for
example a flat tire while driving) .
For more details, refer to “Low tire pres-
sure warning light” in the “Instruments and
controls” section, “Tire pressure informa-
tion” in the “Display screen, heater, air
conditioner and audio and phone sys-
tems” section, “Tire Pressure Monitoring
System (TPMS)” in the “Starting and driv-
ing” section, and “Flat tire” in the “In case
of emergency” section.Tire inflation pressure
Check the tire pressures (including the
spare) often and always prior to long dis-
tance trips. The recommended tire pres-
sure specifications are shown on the
F.M.V.S.S./C.M.V.S.S. certification label
or the Tire and Loading Information labelunder the “Cold Tire Pressure” heading.
The Tire and Loading Information label is
affixed to the driver side center pillar. Tire
pressures should be checked regularly
because:
cMost tires naturally lose air over time.
cTires can lose air suddenly when
driven over potholes or other objects
or if the vehicle strikes a curb while
parking.
The tire pressures should be checked
when the tires are cold. The tires are
considered COLD after the vehicle has
been parked for 3 or more hours, or driven
less than 1 mile (1.6 km) at moderate
speeds.
Incorrect tire pressure, including un-
der inflation, may adversely affect
tire life and vehicle handling.
WDI0210
WHEELS AND TIRES
8-30Maintenance and do-it-yourself
ZREVIEW COPYÐ2008 Quest(van)
Owners ManualÐUSA_English(nna)
06/29/07Ðdebbie
X
Page 363 of 376

10 Index
A
Active Head Restraint..............1-7
Adjusting pedal position............3-21
Air bag (See supplemental restraint
system).....................1-52
Air bag system
Front (See supplemental front impact air
bag system).................1-59
Side and curtain
(See supplemental side air bag and
curtain side-impact air bag system). . . .1-63
Air bag warning labels.............1-66
Air bag warning light...........1-66, 2-10
Air cleaner housing filter............8-16
Air conditioner
Air conditioner operation..........4-33
Air conditioner service...........4-43
Air conditioner specification label.....9-11
Air conditioner system refrigerant and oil
recommendations..............9-6
Heater and air conditioner
controls................4-31, 4-40
Rear seat air conditioner..........4-42
Servicing air conditioner..........4-43
Air flow charts..................4-34
Alarm system
(See vehicle security system).........2-14
Anchor point locations.............1-30
Antenna.....................4-65
Anti-lock brake warning light..........2-8Anti-lock Braking System (ABS)........5-18
Audible reminders................2-13
Audio system..................4-43
Compact Disc (CD) changer.......4-59
Compact disc (CD) player.........4-53
FM/AM/SAT radio with compact disc (CD)
changer...................4-56
FM/AM/SAT radio with compact disc (CD)
player....................4-50
MP3 display..................4-6
Radio....................4-43
Rear audio controls.............4-64
Steering wheel audio control switch. . . .4-62
Autolight switch.................2-19
Automatic
Automatic drive positioner.........3-25
Automatic power window switch.....2-38
Automatic transmission position indicator
light.....................2-11
Driving with automatic transmission.....5-8
Transmission selector lever lock
release....................5-10
Automatic anti-glare inside mirror.......3-23
Average speed..................4-4
B
Back button................4-7, 4-18
Battery......................8-13
Charge warning light.............2-8
Before starting the engine............5-7Belt (See drive belt)..............8-14
Bench seat adjustment (3rd row). . . .1-7, 1-12
Block heater
Engine....................5-24
BluetoothThands-free phone system.....4-75
Booster seats..................1-47
Brake
Anti-lock Braking System (ABS)......5-18
Brake fluid..................8-11
Brake light (See stop light).........8-26
Brake system................5-17
Brake warning light..............2-8
Brake wear indicators........2-13, 8-20
Parking brake operation..........5-12
Self-adjusting brakes............8-20
Brakes......................8-20
Break-in schedule................5-14
Brightness control
Instrument panel..............2-21
Brightness/contrast button. . . .4-6, 4-16, 4-28
Bulb check/instrument panel..........2-7
Bulb replacement................8-26
C
Capacities and recommended
fuel/lubricants...................9-2
Captain’s chair adjustment (2nd row)......1-6
Car phone or CB radio.............4-75
Cargo (See vehicle loading information) . . .9-12
CD care and cleaning.............4-61
ZREVIEW COPYÐ2008 Quest(van)
Owners ManualÐUSA_English(nna)
06/29/07Ðdebbie
X
Page 364 of 376

CD changer (See audio system)........4-59
CD player (See audio system).........4-53
Child restraint with top tether strap......1-30
Child restraints.......1-17, 1-18, 1-26, 1-28
Precautions on child
restraints............1-26, 1-41, 1-47
Top tether strap anchor point locations . .1-30
Child safety sliding door lock..........3-9
Chimes, audible reminders...........2-13
Cleaning exterior and interior..........7-2
Clock
(models with navigation system)......4-26
(models without navigation system). .4-5, 4-16
Clock set..............4-5, 4-16, 4-26
C.M.V.S.S. certification label..........9-10
Cold weather driving..............5-22
Compact disc (CD) player...........4-53
Console box...................2-28
Control panel buttons
Brightness/contrast button . .4-6, 4-16, 4-28
Back button..............4-7, 4-18
Enter button..............4-7, 4-17
Setting button.........4-5, 4-11, 4-22
Startup screen...............4-18
Trip button............4-3, 4-8, 4-18
With navigation system...........4-17
Without navigation system.......4-2, 4-7
Controls
Audio controls (steering wheel)......4-62
Heater and air conditioner
controls................4-31, 4-40
Rear audio controls.............4-64
Rear seat air conditioner..........4-42
Coolant
Capacities and recommended
fuel/lubricants.................9-2Changing engine coolant..........8-8
Checking engine coolant level........8-7
Engine coolant temperature gauge.....2-5
Cornering light.................2-23
Corrosion protection...............7-5
Cruise control..................5-13
Cup holders............2-32, 2-33, 2-34
Curtain side-impact air bag system
(See supplemental side air bag and curtain
side-impact air bag system)..........1-63
D
Daytime running light system
(Canada only)..................2-20
Defroster switch
Rear window and outside mirror defroster
switch....................2-18
Digital video disc DVD.............4-65
Dimensions and weights.............9-8
Dimmer switch for instrument panel......2-21
Display controls
(see control panel buttons).....4-2, 4-7, 4-17
Distance to empty..........4-3, 4-9, 4-19
Door locks....................3-3
Door open warning................4-6
Door open warning light.............2-8
Drive belt....................8-14
Drive positioner, Automatic...........3-25
Driving
Cold weather driving............5-22
Driving with automatic transmission.....5-8
Precautions when starting and driving . . .5-2
DVD entertainment system...........4-65E
Economy - fuel.................5-15
Emission control information label.......9-10
Emission control system warranty.......9-24
Engine
Before starting the engine..........5-7
Block heater.................5-24
Capacities and recommended
fuel/lubricants.................9-2
Changing engine coolant..........8-8
Changing engine oil.............8-9
Changing engine oil filter..........8-10
Checking engine coolant level........8-7
Checking engine oil level..........8-8
Engine compartment check locations. . . .8-6
Engine coolant temperature gauge.....2-5
Engine cooling system............8-7
Engine oil...................8-8
Engine oil and oil filter recommendation . .9-5
Engine oil pressure warning light......2-9
Engine oil viscosity..............9-5
Engine serial number............9-10
Engine specifications.............9-7
Starting the engine..............5-8
English/metric setting.......4-5, 4-15, 4-25
Enter button................4-7, 4-17
Event data recorders..............9-26
Exhaust gas (Carbon monoxide)........5-2
Eyeglass case..................2-27
10-2
ZREVIEW COPYÐ2008 Quest(van)
Owners ManualÐUSA_English(nna)
06/29/07Ðdebbie
X