2008 NISSAN QASHQAI stop
[x] Cancel search: stopPage 10 of 297

Downloaded from www.Manualslib.com manuals search engine LEFT (LHD) AND RIGHT-HAND DRIVE
(RHD) MODELS
1.Driver’s main power window switch (P. 2-35)
2. Vents (P. 4-12)
3. Headlight and turn signal switch (P. 2-24)
4. Horn (P. 2-29)
5. Meters, gauges, and warning/indicator lights
(P. 2-2, 2-3)
6. Wiper/washer switch (P. 2-21)
Headlight cleaner*
1(P. 2-28)
7. Hazard warning flasher switch (P. 2-28)
8. Passenger power window switch (P. 2-36)
9. ESP OFF switch*
1(P. 5-40)
Headlight aiming control*
1(P. 2-27)
Outside mirror folding switch*
1(P. 3-18)
Outside mirror remote control (P. 3-18)
Stop/Start System OFF switch* (P. 5-21)
10. Fuse box (P. 8-23)
11. Steering wheel switches*
1
Audio control*1(P. 4-43)
Cruise control*
1(P. 5-29)
Speed limiter*
1(P. 5-31)
Trip computer display control*
1(P. 2-16)
12. Bonnet lock release lever (P. 3-14) Fuel filler lid opener lever (P. 3-15)
13. Steering wheel lock lever (P. 4-16)
14. Ignition switch or Ignition knob (Intelligent Key
models) (P. 5-6, 5-8)
15. Climate controls (P. 4-12)
16. High level vent control*
1(P. 4-12)
Storage*
1(P. 4-31)
17. Gear selector lever (P. 5-12)
18. Handbrake (P. 3-16)
19. 4WD mode control*
1(P. 5-24)
Power door lock switch (P. 3-10)
Seat heater switches*
1(P. 2-29)
20. Power outlet (P. 2-30)
21. Audio system (P. 4-21, 4-23)
NISSAN Connect*
2
Rear–view monitor*1(P. 4-2)
Around view monitor*
1(P. 4-4)
22. Glove box (P. 2-31)
23. Front passenger air bag deactivate switch
(P. 1-17)
*
1where fitted
*2Refer to the separately provided NISSAN Con-
nect Owner’s Manual.
See the page number indicated in parentheses
for operating details.
Illustrated table of contents0-5
Page 21 of 297
Downloaded from www.Manualslib.com manuals search engine WARNING
Do not adjust the driver’s seat while driving.
The seat may move suddenly and could cause
loss of control of the vehicle.
After adjustment, gently rock in the seat to
make sure it is securely locked.
The seatback should not be reclined any more
than needed for comfort. Seat belts are most
effective when the passenger sits well back
and upright in the seat. If the seatback is re-
clined, the risk of sliding under the lap belt
and being injured is increased.
When returning the seatbacks to the upright
position, be certain that they are completely
secured in the latched position. If they are not
completely secured, passengers may be in-
jured in an accident or sudden stop. When
operating the seatback release always rock
the seatback afterward to check that it is
locked.
When the vehicle is being used to carry cargo,
properly secure all cargo to help prevent it
from sliding or shifting. Do not place cargo
higher than the seatbacks. In a sudden stop
or collision, unsecured cargo could cause per-
sonal injury.
Never allow anyone to ride in the luggage area
or on the rear seat when it is in the folded-
down position. Use of these areas by passen-
gers without proper restraints could result in
serious injury in an accident or sudden stop.
Closely supervise children when they are
around the vehicle to prevent them from play-
ing and being locked in the luggage compart-
ment where they could be seriously injured.
Keep the vehicle locked with the rear seat-
back securely latched when not in use, and
prevent children from having access to the
vehicle’s keys.FRONT SEATS
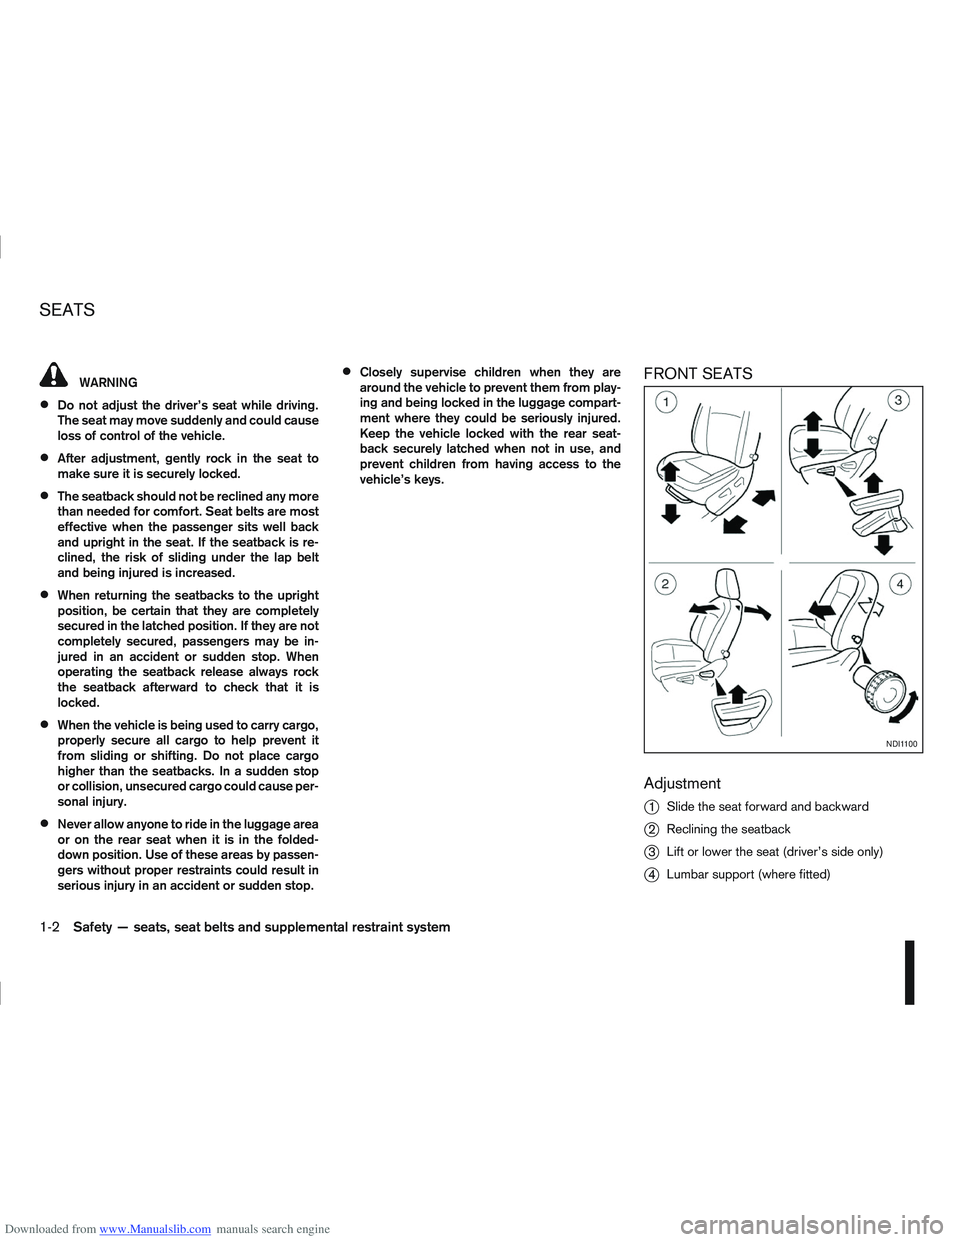
Adjustment
j
1Slide the seat forward and backward
j2Reclining the seatback
j3Lift or lower the seat (driver’s side only)
j4Lumbar support (where fitted)
NDI1100
SEATS
1-2Safety — seats, seat belts and supplemental restraint system
Page 38 of 297
Downloaded from www.Manualslib.com manuals search engine An improperly installed child restraint could
lead to serious injury in an accident.
Child restraints specially designed for infants and
small children are offered by several manufacturers.
When selecting any child restraint, keep the follow-
ing points in mind:
Choose a child restraint that complies with the
latest European safety standard, ECE Regula-
tion 44.04.
Place your child in the child restraint and check
the various adjustments to be sure that the child
restraint is suitable for your child. Always follow
all of the recommended procedures.
Check the child restraint in your vehicle to be
sure it is compatible with the vehicle’s seat belt
system.
Refer to the tables further on in this section for a
list of the recommended fitment positions and
the approved child restraint for your vehicle.
WARNING
Never install a rear facing child restraint in the
front seat without first deactivating the front
passenger air bag.
Adjustable seatbacks should be positioned to
fit the child seat; however, the seatback
should be as upright as possible.
Follow all of the child restraint manufacturer’s
instructions for installation and use.
Choose a child restraint appropriate to the
child and the vehicle. It may not be possible
to properly install some types of child restraint
in your vehicle.
Improper use of a child restraint can increase
injuries to the infant or child and other occu-
pants in the vehicle.
When your child restraint is not in use, keep it
secured with a seat belt to prevent it from
being thrown forwards in case of a sudden
stop or accident.
Remember that a child restraint left in a closed
vehicle can become very hot. Check the seat-
ing surface and buckles before placing your
child in the child restraint.
After attaching a child restraint, test the seat
before you place the child in it. Check that it
does not tilt too far from side to side. Try to
tug it forwards and check whether the belt
holds it in place. If the restraint is not secure,
tighten the belt as necessary, or put the re-
straint in another seat and test it again.
If the child restraint is not anchored properly,
the risk of a child being injured in a collision
or sudden stop greatly increases.
The front passenger seat should be
positioned to fit the child seat appropriately.
See “Installation of a child restraint system on
the front passenger seat” later in this section.
For a front facing child restraint installed on a
three-point type lap/shoulder belt, make sure the shoulder belt does not go in front of the
child’s face or neck. If it does, put the shoul-
der belt behind the child restraint.
If the child restraint is equipped with a locking
clip, ensure that the clip is securely fastened
to the vehicle seat belt. If the locking clip is
not used, injuries could result from the child
restraint tipping over during normal vehicle
braking or cornering.
Safety — seats, seat belts and supplemental restraint system1-19
Page 43 of 297
Downloaded from www.Manualslib.com manuals search engine Rear facing
If you must install a child restraint system in the front
seat, follow these steps:
1. Deactivate the front passenger air bag. See“Front passenger air bag deactivation system”
earlier in this section for further details.
2. Move the seat to the rearmost position.
3. Adjust the head restraint to its highest position. Remove it if it interferes with the child restraint
installation. In such situations, securely store the
head restraint in the luggage compartment so
that it does not become a dangerous projectile
during a sudden stop or in an accident.
4. Position the child restraint system in the front passenger seat.
Always follow the child restraint system manu-
facturer’s instructions for installation and use. 5. Route the seat belt tongue through the child re-
straint system and insert it into the buckle until
you hear and feel the latch engage.
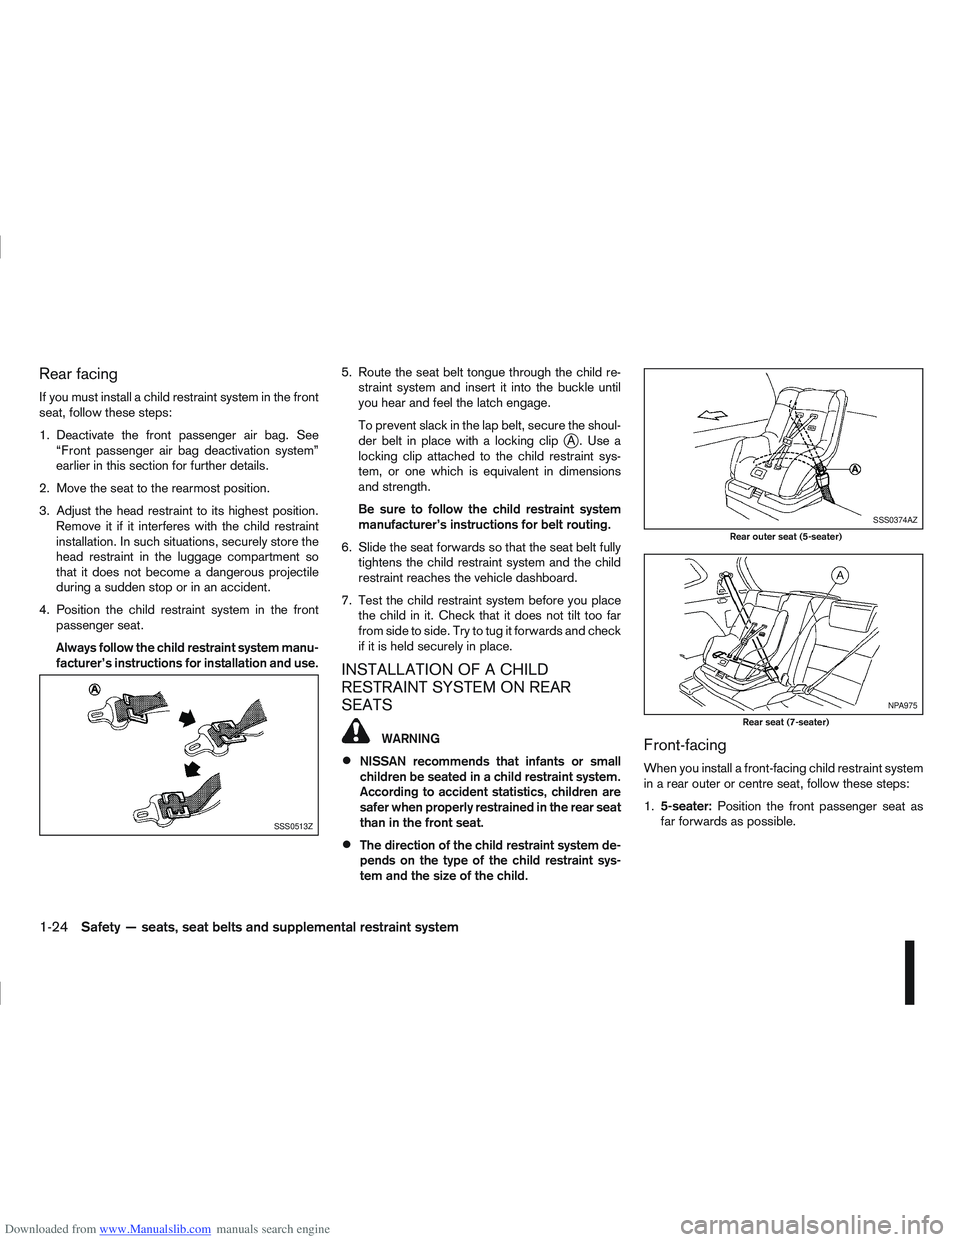
To prevent slack in the lap belt, secure the shoul-
der belt in place with a locking clip
jA. Use a
locking clip attached to the child restraint sys-
tem, or one which is equivalent in dimensions
and strength.
Be sure to follow the child restraint system
manufacturer’s instructions for belt routing.
6. Slide the seat forwards so that the seat belt fully tightens the child restraint system and the child
restraint reaches the vehicle dashboard.
7. Test the child restraint system before you place the child in it. Check that it does not tilt too far
from side to side. Try to tug it forwards and check
if it is held securely in place.
INSTALLATION OF A CHILD
RESTRAINT SYSTEM ON REAR
SEATS
WARNING
NISSAN recommends that infants or small
children be seated in a child restraint system.
According to accident statistics, children are
safer when properly restrained in the rear seat
than in the front seat.
The direction of the child restraint system de-
pends on the type of the child restraint sys-
tem and the size of the child.
Front-facing
When you install a front-facing child restraint system
in a rear outer or centre seat, follow these steps:
1.5-seater: Position the front passenger seat as
far forwards as possible.
SSS0513Z
SSS0374AZ
Rear outer seat (5-seater)
NPA975
Rear seat (7-seater)
1-24Safety — seats, seat belts and supplemental restraint system
Page 51 of 297
Downloaded from www.Manualslib.com manuals search engine NOTE
For an overview see “Instrument and control
layout” in the “0. Illustrated table of contents”
section and see “Meters and gauges” in the “0. Il-
lustrated table of contents” section.
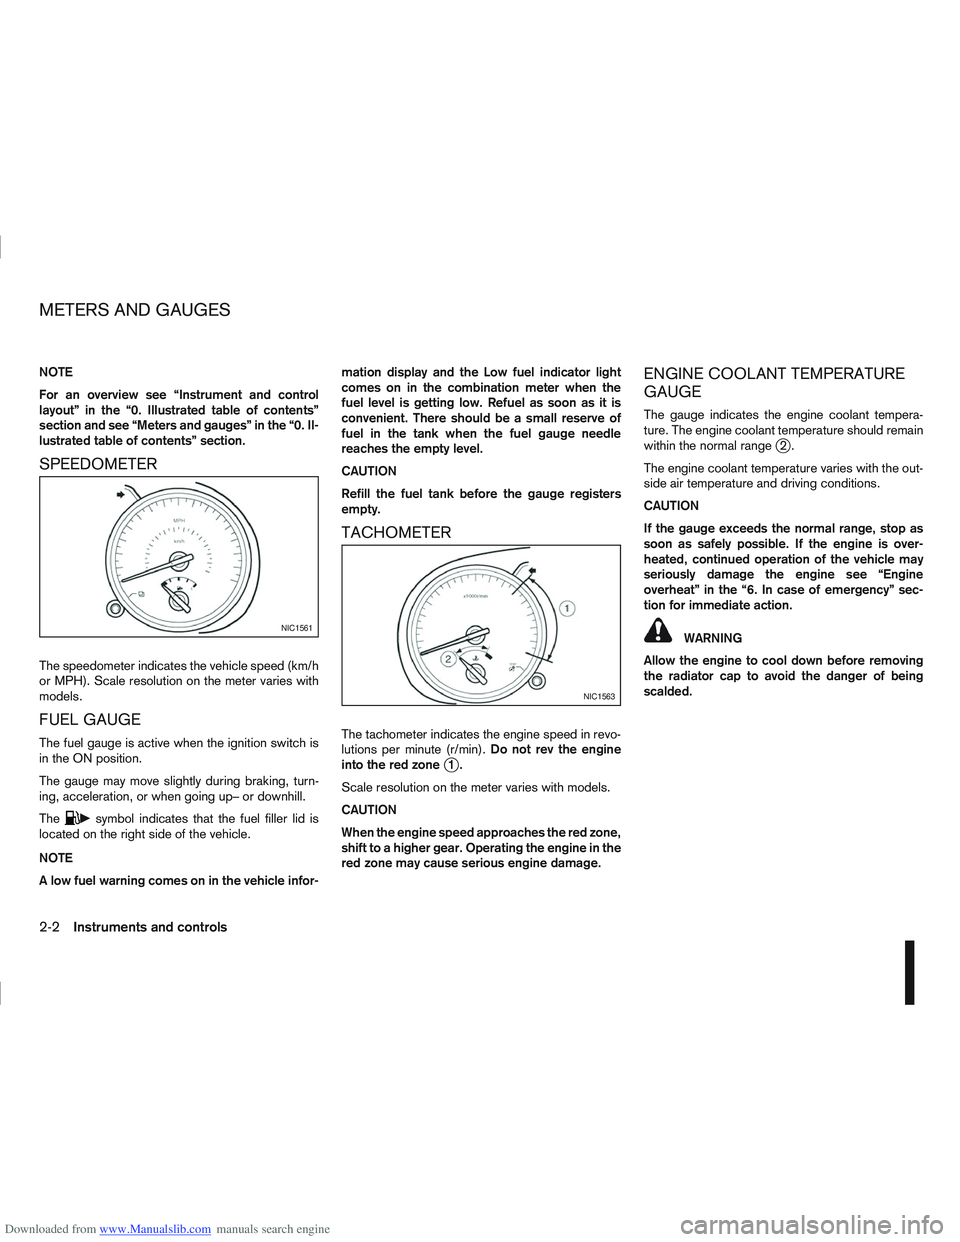
SPEEDOMETER
The speedometer indicates the vehicle speed (km/h
or MPH). Scale resolution on the meter varies with
models.
FUEL GAUGE
The fuel gauge is active when the ignition switch is
in the ON position.
The gauge may move slightly during braking, turn-
ing, acceleration, or when going up– or downhill.
The
csymbol indicates that the fuel filler lid is
located on the right side of the vehicle.
NOTE
A low fuel warning comes on in the vehicle infor- mation display and the Low fuel indicator light
comes on in the combination meter when the
fuel level is getting low. Refuel as soon as it is
convenient. There should be a small reserve of
fuel in the tank when the fuel gauge needle
reaches the empty level.
CAUTION
Refill the fuel tank before the gauge registers
empty.
TACHOMETER
The tachometer indicates the engine speed in revo-
lutions per minute (r/min).
Do not rev the engine
into the red zone
j1.
Scale resolution on the meter varies with models.
CAUTION
When the engine speed approaches the red zone,
shift to a higher gear. Operating the engine in the
red zone may cause serious engine damage.
ENGINE COOLANT TEMPERATURE
GAUGE
The gauge indicates the engine coolant tempera-
ture. The engine coolant temperature should remain
within the normal range
j2.
The engine coolant temperature varies with the out-
side air temperature and driving conditions.
CAUTION
If the gauge exceeds the normal range, stop as
soon as safely possible. If the engine is over-
heated, continued operation of the vehicle may
seriously damage the engine see “Engine
overheat” in the “6. In case of emergency” sec-
tion for immediate action.
WARNING
Allow the engine to cool down before removing
the radiator cap to avoid the danger of being
scalded.NIC1561
NIC1563
METERS AND GAUGES
2-2Instruments and controls
Page 53 of 297

Downloaded from www.Manualslib.com manuals search engine If the light comes on while the engine is running, it
may indicate that the anti-lock portion of the braking
system is not functioning properly. Have the system
checked by a NISSAN dealer or qualified workshop.
Brake warning light
This light functions for both the handbrake and the
footbrake systems.
Handbrake indicator:
The light comes on when the handbrake is applied.
Low brake fluid warning:
The light warns of a low brake fluid level. If the light
comes on while the engine is running with the hand-
brake not applied, stop the vehicle and perform the
following procedure:
1. Check the brake fluid level. Add brake fluid asnecessary. See “Brake and clutch fluid” in the
“8. Maintenance and do-it-yourself” section.
WARNING
If the level is below the MIN (minimum) mark
on the brake fluid reservoir, do not drive until
the brake system has been checked at a
NISSAN dealer or qualified workshop.
2. If the brake fluid level is correct: Have the warning system checked by a NISSAN
dealer or qualified workshop.
WARNING
Driving your vehicle could be dangerous. Have
it towed to the nearest NISSAN dealer or quali-
fied workshop.
Depressing the brake pedal with the engine
stopped could increase your stopping dis-
tance and require greater pedal travel dis-
tance and effort.
Charge warning light
If the light comes on while the engine is running, it
may indicate that the charging system is not func-
tioning properly. Turn the engine off and check the
alternator belt. If the belt is loose, broken, missing
or if the light remains on, see a NISSAN dealer or
qualified workshop immediately.
CAUTION
Do not continue driving if the alternator belt is
loose, broken or missing.
Diesel Particulate Filter (DPF)
warning light (where fitted)
WARNING
Be careful not to burn yourself with exhaust
gases.
Do not park the vehicle over flammable mate-
rials such as dry grass, waste paper or rags,
as they may burn easily.
If the vehicle continues to be driven at a low
speed with the DPF warning light illuminated,
the fail-safe will limit engine revolutions and/
or torque. In this case, the engine oil must be
replaced and the process of burning accumu-
lated particulate matter must be carried out
by a NISSAN dealer or qualified workshop.
Service regeneration is a maintenance item
and is not covered by the NISSAN warranty.
Use engine oil for DPF equipped models. For
details, see “Capacities and recommended
fuel/lubricants” in the “9. Technical
information” section.
CAUTION
The DPF becomes extremely hot after burning
particulate matter.
M9R engine only:
When the ignition switch is turned to the ON posi-
tion, the Diesel Particulate Filter (DPF) warning light
illuminates for a few seconds and then goes out.
This indicates that the system is operational.
All diesel engines:
NISSAN GREEN PROGRAM
Some diesel engine models are fitted with a Diesel
Particulate Filter (DPF), which is a device that re-
moves carbon (soot) from the exhaust gas. To oper-
ate effectively, the DPF system must routinely con-
duct a cleaning operation, called regeneration, that
2-4Instruments and controls
Page 54 of 297

Downloaded from www.Manualslib.com manuals search engine burns-off the accumulated carbon. This regenera-
tion process is normally automatic and not visible to
the driver.
Regeneration restrictions:
Driving conditions such as frequent short journeys
or stop/start driving can result in excessive build up
of carbon in the filter. When this happens the DPF
warning light will illuminate (and a message will ap-
pear in the vehicle information display, see “Vehicle
information display” later in this section) to inform
you that the vehicle must be driven in a particular
manner to begin regeneration.
When the DPF warning light is illuminated, provided
that legal and safety conditions allow, the vehicle
should be driven at a speed of over 60 km/h (37.5
MPH) until the DPF warning light turns off. This pro-
cess can take up to 30 minutes to complete.
If regeneration fails:
Failure to react to the DPF warning light may lead to
saturation of the DPF system. If this happens the
Malfunction Indicator (MI)
will illuminate indi-
cating that a Service Regeneration by a NISSAN
dealer or qualified workshop is required. The engine
speed may also be limited to 3,000 rpm to protect
the DPF system.
NOTE
Contact a NISSAN dealer or qualified workshop
to perform a forced regeneration.
Electronic Power Assisted
Steering (EPAS) warning light
When the ignition switch is turned to the ON posi-
tion, the EPAS warning light illuminates. This means
the system is operational.
If the warning light remains illuminated after the en-
gine has been started, there will be no power steer-
ing assistance: the vehicle may be driven using the
mechanical steering system although it is not rec-
ommended as the effort required to turn the steer-
ing wheel will be significantly increased compared
to normal operation.
WARNING
If the EPAS warning light illuminates while
driving, stop as soon as safely possible.
In certain circumstances, factors external to
the EPAS system may contribute to the illumi-
nation of the warning light. If the warning light
illuminates, stop the vehicle as soon as safely
possible if driving, turn the ignition switch to
the “OFF” position for approximately 20 sec-
onds and then turn the ignition switch to the
ON position again. If the light remains illumi-
nated, we recommend that you contact a
NISSAN dealer or qualified workshop.
See “Power steering system” in the “5. Starting and
driving” section for further details on the EPAS sys-
tem.
Engine oil pressure warning light
This light warns of low engine oil pressure. If the
light flickers or comes on during normal driving, or
stays on once the engine is started, pull off the road
at a safe area, stop the engine immediatelyand call
a NISSAN dealer or qualified workshop.
CAUTION
Running the engine with the engine oil pressure
warning light on could cause serious damage to
the engine.
NOTE
The [Оil lеvеll оw] message indication is dis-
played for 5 seconds after the ignition switch has
been turned to the ON position. See “Vehicle in-
formation display” later in this section.
Front passenger air bag
deactivated (OFF) warning light
When the ignition switch is turned to the ON posi-
tion the front passenger air bag deactivated (OFF)
warning light
, located in the combination
meter, illuminates for approximately 7 seconds and
then goes off. This means the system is operational.
The light warns of front passenger air bag status. If
the front passenger air bag has been deactivated,
the light comes on and stays on as long as the front
passenger air bag switch remains in the OFF posi-
tion.
Instruments and controls2-5
Page 57 of 297

Downloaded from www.Manualslib.com manuals search engine When the ESP OFF indicator light and SLIP indica-
tor light come on with the ESP system turned on, it
alerts the driver to the fact that the system’s fail-safe
mode is operating. This means that the system may
not be functioning properly. Have the system
checked by your NISSAN dealer or qualified work-
shop.
If an abnormality occurs in the system, the ESP sys-
tem function will be cancelled, but the vehicle is still
driveable. For additional information, see “Electronic
Stability Programme (ESP) system (where fitted)” in
the “5. Starting and driving” section.
4WD mode indicator light
(AUTO) (4WD models)
This light comes on briefly when the ignition is turned
to the ON position. If the engine is running, this light
will illuminate when the 4WD AUTO mode is se-
lected.
See “Four-wheel Drive (4WD) (where fitted)” in the
“5. Starting and driving” section.
4WD mode indicator light
(LOCK) (4WD models)
This light comes on briefly when the ignition is turned
to the ON position.
If the engine is running, this light and the 4WD mode
indicator light (AUTO) will be lit when the 4WD
LOCK mode is selected.
See “Four-wheel Drive (4WD) (where fitted)” in the
“5. Starting and driving” section.
Glow plug indicator light (Diesel
engines)
This light comes on when the ignition switch is in the
ON position and goes out when the glow plugs have
been pre-heated. When the engine is cold, the glow
plug warm-up time will be longer.
Low fuel indicator light
When the fuel level is getting low, the low fuel warn-
ing light will switch on to alert the driver. Refuel as
soon as it is convenient. There should be a small
reserve of fuel in the tank when the fuel gauge
reaches the empty level. See also “Vehicle informa-
tion display” later in this section.
Malfunction Indicator light
When the ignition switch is turned to the ON posi-
tion, the orange Malfunction Indicator light illumi-
nates. This means that the system is operational.
If the orange Malfunction Indicator light comes on
steady or blinks (where fitted) while the engine is
running, it may indicate an engine control system
malfunction.
See “Malfunction warning light (red) (where fitted)”
earlier in this section for details of the red malfunc-
tion warning light (where fitted).On steady (orange):
An engine malfunction has been detected. Have the
vehicle inspected by a NISSAN dealer or qualified
workshop. You do not need to have your vehicle
towed to the dealer.
Blinking (orange) (where fitted):
An engine misfire has been detected which may
damage the engine control system.
To reduce or avoid engine control system dam-
age:
Do not drive at speeds above 70 km/h (43
MPH).
Avoid hard acceleration or deceleration.
Avoid steep uphill grades.
If possible, reduce the load being carried or
towed.
The Malfunction Indicator light may stop blinking
and come on steady.
Have the vehicle inspected by a NISSAN dealer or
qualified workshop. You do not need to have your
vehicle towed to the dealer.
CAUTION
Continued vehicle operation without having the
engine control system checked and repaired as
necessary could lead to poor driveability,
reduced fuel economy and possible damage to
the engine control system, which may affect your
warranty coverage.
2-8Instruments and controls