2008 NISSAN QASHQAI Instrument panel
[x] Cancel search: Instrument panelPage 25 of 297
Downloaded from www.Manualslib.com manuals search engine ACTIVE HEAD RESTRAINTS (front
seats)
WARNING
Always adjust the head restraints properly as
specified in the previous section. Failure to do
so can reduce the effectiveness of the active
head restraint.
Active head restraints are designed to supple-
ment other safety systems. Always wear seat
belts. No system can prevent all injuries in an
accident.
Do not attach anything to the head restraint
stalks. Doing so could impair the active head
restraint’s function.
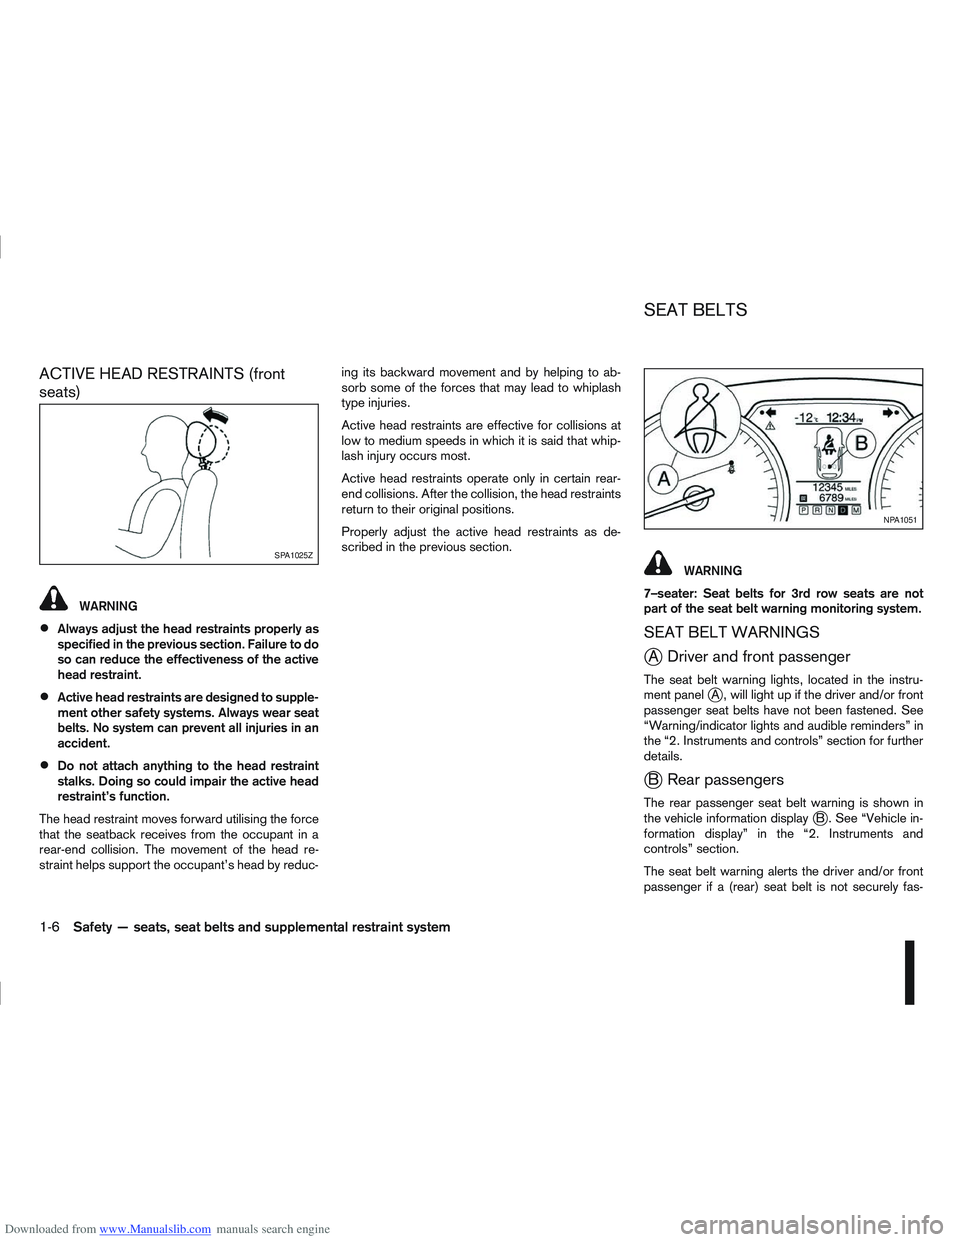
The head restraint moves forward utilising the force
that the seatback receives from the occupant in a
rear-end collision. The movement of the head re-
straint helps support the occupant’s head by reduc- ing its backward movement and by helping to ab-
sorb some of the forces that may lead to whiplash
type injuries.
Active head restraints are effective for collisions at
low to medium speeds in which it is said that whip-
lash injury occurs most.
Active head restraints operate only in certain rear-
end collisions. After the collision, the head restraints
return to their original positions.
Properly adjust the active head restraints as de-
scribed in the previous section.
WARNING
7–seater: Seat belts for 3rd row seats are not
part of the seat belt warning monitoring system.
SEAT BELT WARNINGS
jA Driver and front passenger
The seat belt warning lights, located in the instru-
ment paneljA , will light up if the driver and/or front
passenger seat belts have not been fastened. See
“Warning/indicator lights and audible reminders” in
the “2. Instruments and controls” section for further
details.
jB Rear passengers
The rear passenger seat belt warning is shown in
the vehicle information displayjB . See “Vehicle in-
formation display” in the “2. Instruments and
controls” section.
The seat belt warning alerts the driver and/or front
passenger if a (rear) seat belt is not securely fas-
SPA1025Z
NPA1051
SEAT BELTS
1-6Safety — seats, seat belts and supplemental restraint system
Page 32 of 297
Downloaded from www.Manualslib.com manuals search engine This Supplemental Restraint System (SRS) section
contains important information concerning the driver
and front passenger air bags, side air bags, curtain
air bags and pre-tensioner seat belt system.
Front air bag system:this system can help cushion
the impact force to the face and chest of the driver
and front passenger in certain frontal collisions.
NOTE
For further information about the front passen-
ger air bag deactivation system see “Front pas-
senger air bag deactivation system” later in this
section.
Side air bag system: this system can help cushion
the impact force to the chest area of the driver and
front passenger in certain side impact collisions.
The side air bag is designed to inflate on the side
where the vehicle is impacted.
Curtain air bag system: this system can help cush-
ion the impact force to the head of an occupant in
the front and rear outer seating position. Curtain air
bags are designed to inflate on the side where the
vehicle is impacted.
SRS is designed to supplementthe crash protec-
tion provided by the driver and front passenger seat
belts and is not designed to substitute them. Seat
belts should always be correctly worn and the driver
and front passenger seated a suitable distance away
from the steering wheel, instrument panel and front
door finishers. For additional information, see “Seat
belts” earlier in this section.
After turning the ignition switch to the ON or START position, the air bag warning light will illu-
minate. The air bag warning light will turn off
after approximately 7 seconds if the system is
operational. See “Warning/indicator lights and
audible reminders” in the “2. Instruments and
controls” section
for further details.
The air bag will operate only when the ignition
switch is in the ON or START position.
WARNING
Driver and front passenger air bags:
The air bags ordinarily will not inflate in the
event of a side impact, rear impact, roll over,
or lower severity frontal collision. Always wear
your seat belts to help reduce the risk or se-
verity of injury in various kinds of accidents.
The seat belts and the air bags are most ef-
fective when you are sitting back and upright
in the seat. Air bags inflate with great force. If
you are unrestrained, leaning forward, sitting
sideways or out of position in any way, you
are at greater risk of injury or death in a crash
and may also receive serious or fatal injuries
from the air bag if you are up against it when
it inflates.
WARNING
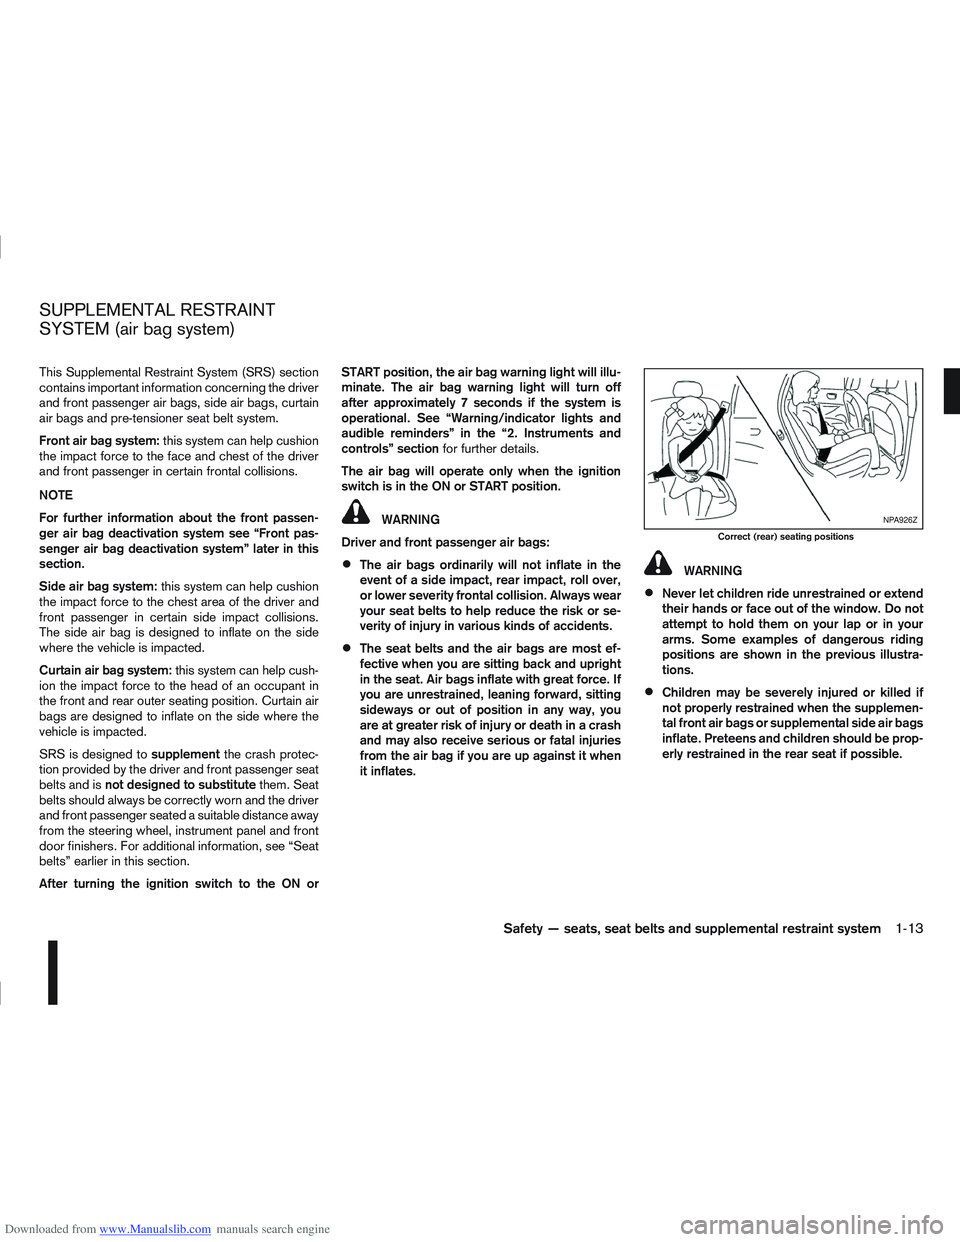
Never let children ride unrestrained or extend
their hands or face out of the window. Do not
attempt to hold them on your lap or in your
arms. Some examples of dangerous riding
positions are shown in the previous illustra-
tions.
Children may be severely injured or killed if
not properly restrained when the supplemen-
tal front air bags or supplemental side air bags
inflate. Preteens and children should be prop-
erly restrained in the rear seat if possible.
NPA926Z
Correct (rear) seating positions
SUPPLEMENTAL RESTRAINT
SYSTEM (air bag system)
Safety — seats, seat belts and supplemental restraint system1-13
Page 34 of 297
Downloaded from www.Manualslib.com manuals search engine forces in another type of collision are similar to those
of a higher severity side impact. They are designed
to inflate on the side where the vehicle is impacted.
They may not inflate in certain side collisions. Ve-
hicle damage (or lack of it) is not always an indica-
tion of proper supplemental side air bag operation.
When the supplemental side air bag and curtain air
bag inflate, a fairly loud noise may be heard, fol-
lowed by a release of smoke. This smoke is not
harmful and does not indicate a fire. However, care
should be taken not to inhale it, as it may cause irri-
tation and choking. Occupants with a history of
breathing difficulties, such as asthma, should get
fresh air promptly.
Supplemental side air bags, along with the use of
seat belts, help to cushion the impact force on the
chest of the front occupants. Curtain air bags help
to cushion the impact force to the head of occu-
pants in the front and rear outer seating positions.
They can help save lives and reduce serious inju-
ries. However, an inflating side air bag and curtain
air bag may cause abrasions or other injuries.
Supplemental side air bags and curtain air bags do
not provide restraint to the lower body.
The seat belts should be correctly worn and the
driver and passenger seated upright, and as far as
is practical, away from the side air bag. Rear seat
passengers should be seated as far away as practi-
cal from the door finishers and side roof rails. The
side air bags and curtain air bags inflate quickly in
order to help protect the front occupants. Because
of this, the force of the side air bag and curtain air
bag inflating can increase the risk of injury if theoccupant is too close to, or is against, these air bag
modules during inflation. The side air bag and cur-
tain air bag will deflate quickly after the collision is
over.
WARNING
Directly after inflation, several air bag system
components will be hot. Do not touch them;
you may severely burn yourself.
No unauthorised changes should be made to
any components or wiring of the air bag sys-
tem. This is to prevent accidental inflation of
the air bag or damage to the air bag system.
Tampering with the air bag system may result
in serious personal injury. Tampering includes
making changes to the steering wheel and
the instrument panel assembly by placing ma-
terial over the steering pad and above the
dashboard, or by installing additional trim ma-
terial around the air bag system.
Do not attach any objects to the steering
wheel pad or to the instrument panel. Objects
attached to the steering wheel pad and in-
strument panel may become dangerous pro-
jectiles and cause injury if the air bag inflates.
Work on and around the air bag system should
be done by a NISSAN dealer or qualified work-
shop. Installation of electrical equipment
should be done by a NISSAN dealer or quali-
fied workshop. The yellow SRS wiring har-
nesses* should not be modified or discon-
nected. Unauthorised electrical test equip-
ment and probing devices should not be used
on the air bag system.
* SRS wiring harnesses are covered with yellow insulation either just before the harness con-
nectors or on the complete harness, for easy
identification.
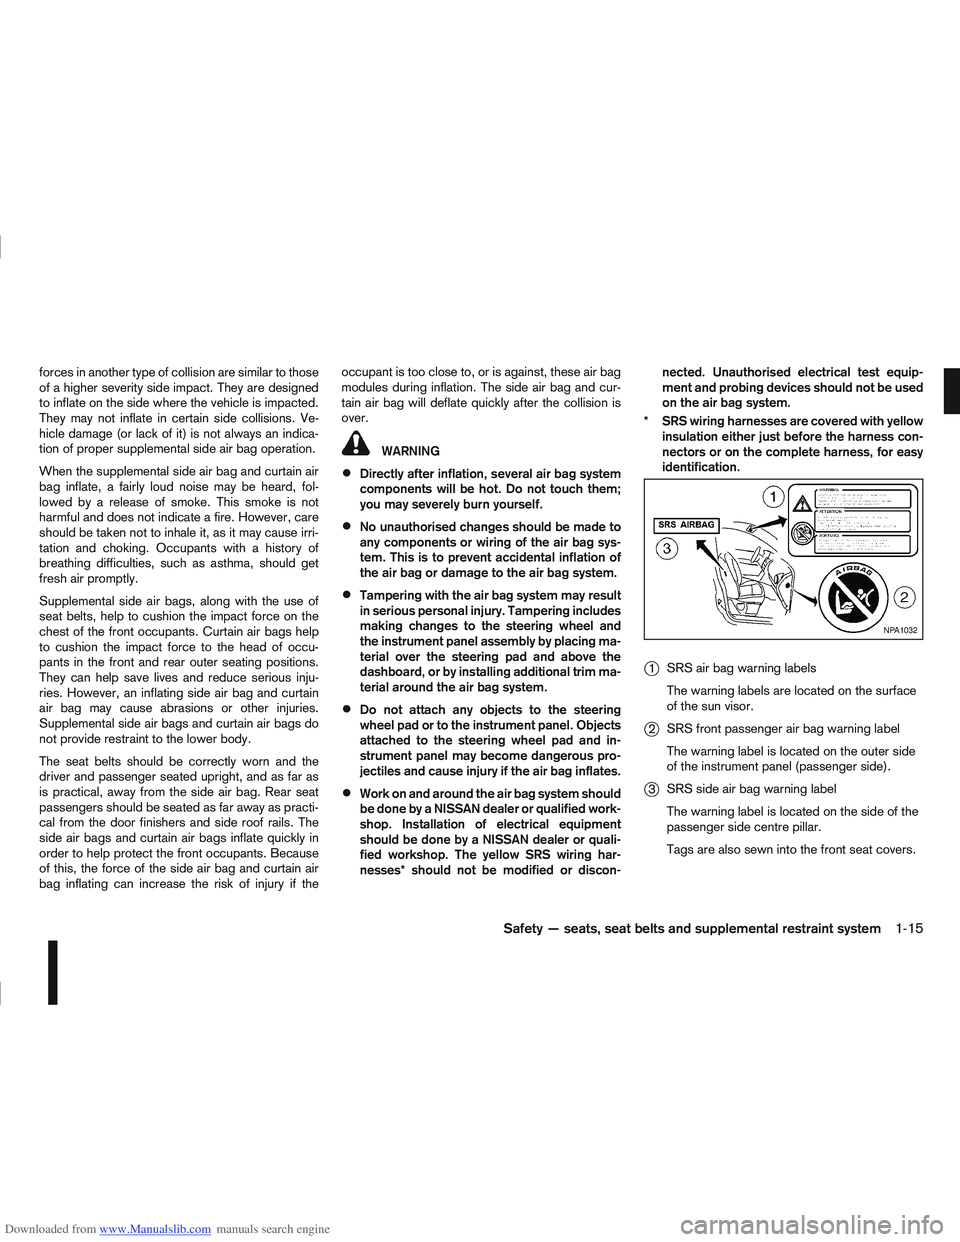
j1 SRS air bag warning labels
The warning labels are located on the surface
of the sun visor.
j2SRS front passenger air bag warning label
The warning label is located on the outer side
of the instrument panel (passenger side).
j3SRS side air bag warning label
The warning label is located on the side of the
passenger side centre pillar.
Tags are also sewn into the front seat covers.
NPA1032
Safety — seats, seat belts and supplemental restraint system1-15
Page 35 of 297
Downloaded from www.Manualslib.com manuals search engine AIR BAG WARNING LABELS
Warning labels about the air bag system are placed
in the vehicle. Warning labels are for your safety and
the safety of your passengers; do not remove them.
Child restraint on front passenger seat
NISSAN recommends that infants or small children
be seated in a child restraint system on the rear seat
if available. According to accident statistics, chil-
dren are safer when properly restrained in the rear
seat rather than in the front seat.
Front passenger air bag:
Your vehicle is equipped with a front passenger air
bag, you will find an air bag warning label attached
to the passenger side of the instrument panel as
shown in the previous illustration.
This label warns:
“Extreme Hazard! Do not use a rearward facing
child restraint on a seat protected by an air bag
in front of it!”
This label warns NOT to fit a rearward facing child
restraint on the front passenger seat without first
deactivating the front passenger air bag.
For instructions on deactivating the front passenger
air bag see “Front passenger air bag deactivation
system” later in this section.
When installing child restraints in your vehicle, al-
ways carefully observe the manufacturer’s instruc-
tions.For more details on the installation of child restraints,
see also “Child restraints” later in this section.
Side air bags:
Your vehicle is equipped with side air bags. You will
find a side air bag warning label attached to the
vehicle’s interior as shown in the previous illustra-
tion.
This label warns you not to let infants or small chil-
dren sit on the front passenger seat as the air bag
may cause serious injury in case of deployment dur-
ing a collision.
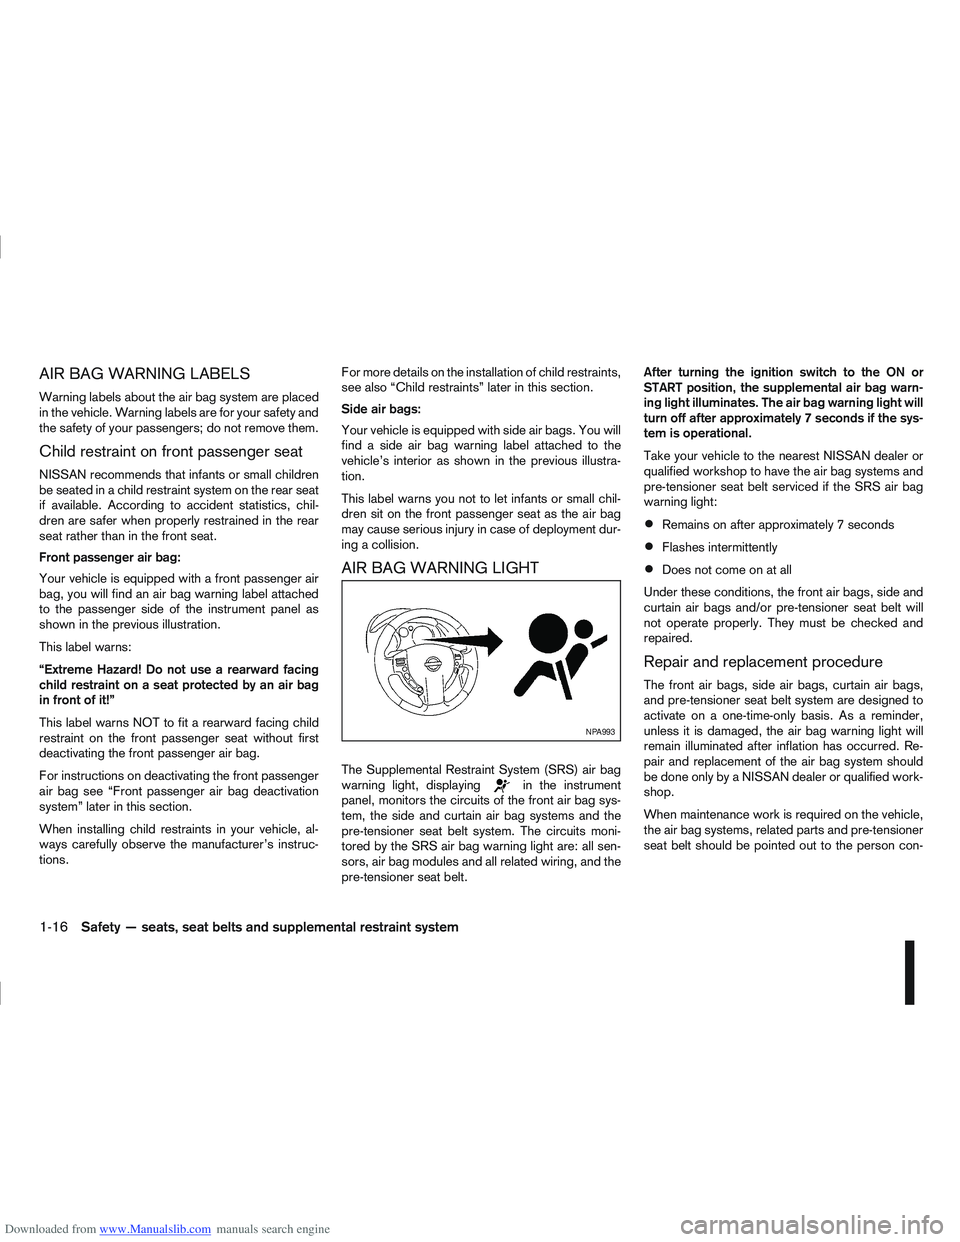
AIR BAG WARNING LIGHT
The Supplemental Restraint System (SRS) air bag
warning light, displayingin the instrument
panel, monitors the circuits of the front air bag sys-
tem, the side and curtain air bag systems and the
pre-tensioner seat belt system. The circuits moni-
tored by the SRS air bag warning light are: all sen-
sors, air bag modules and all related wiring, and the
pre-tensioner seat belt. After turning the ignition switch to the ON or
START position, the supplemental air bag warn-
ing light illuminates. The air bag warning light will
turn off after approximately 7 seconds if the sys-
tem is operational.
Take your vehicle to the nearest NISSAN dealer or
qualified workshop to have the air bag systems and
pre-tensioner seat belt serviced if the SRS air bag
warning light:
Remains on after approximately 7 seconds
Flashes intermittently
Does not come on at all
Under these conditions, the front air bags, side and
curtain air bags and/or pre-tensioner seat belt will
not operate properly. They must be checked and
repaired.
Repair and replacement procedure
The front air bags, side air bags, curtain air bags,
and pre-tensioner seat belt system are designed to
activate on a one-time-only basis. As a reminder,
unless it is damaged, the air bag warning light will
remain illuminated after inflation has occurred. Re-
pair and replacement of the air bag system should
be done only by a NISSAN dealer or qualified work-
shop.
When maintenance work is required on the vehicle,
the air bag systems, related parts and pre-tensioner
seat belt should be pointed out to the person con-
NPA993
1-16Safety — seats, seat belts and supplemental restraint system
Page 73 of 297
Downloaded from www.Manualslib.com manuals search engine OUTSIDE MIRROR DEFOGGER
(where fitted)
The outside rear-view mirrors will be defogged when
the defogger switch is activated.
XENON HEADLIGHTS (where fitted)
WARNING
HIGH VOLTAGE
When xenon headlights are on, they produce
a high voltage. To prevent an electric shock,
never attempt to modify or disassemble. Al-
ways have your xenon headlights replaced at
an authorised NISSAN dealer or qualified
workshop.
Xenon headlights provide considerably more
light than conventional headlights. If they are
not correctly aimed, they might temporarily
blind an oncoming driver or the driver ahead
of you and cause a serious accident. If head-
lights are not aimed correctly, immediately
take your vehicle to a NISSAN dealer or quali-
fied workshop and have the headlights ad-
justed correctly.
When the xenon headlight is initially turned on, its
brightness or colour varies slightly. However, the
colour and brightness will soon stabilise.
The life of xenon headlights will be shortened by
frequent on-off operation. It is generally desir-
able not to turn off the headlights for short inter-
vals (for example, when the vehicle stops at a
traffic signal).
If the xenon headlight bulb is close to burning
out, the brightness will drastically decrease, the
light will start blinking, or the colour of the light will become reddish. If one or more of the above
signs occur, contact a NISSAN dealer or quali-
fied workshop.
NISSAN recommends you to consult the local regu-
lations concerning the use of lights.
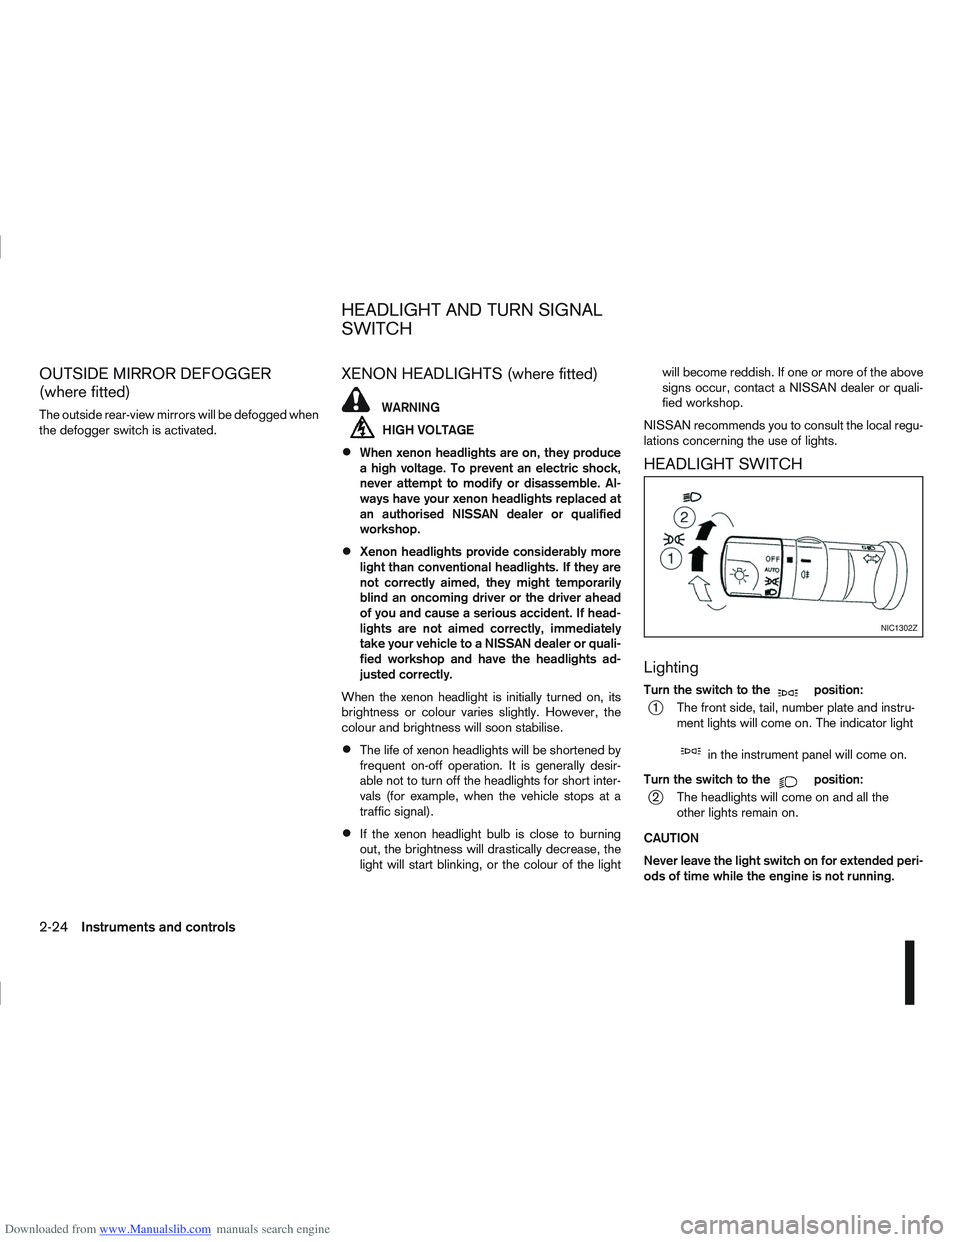
HEADLIGHT SWITCH
Lighting
Turn the switch to themposition:
j1 The front side, tail, number plate and instru- ment lights will come on. The indicator light
min the instrument panel will come on.
Turn the switch to the
mposition:
j2 The headlights will come on and all the other lights remain on.
CAUTION
Never leave the light switch on for extended peri-
ods of time while the engine is not running.
NIC1302Z
HEADLIGHT AND TURN SIGNAL
SWITCH
2-24Instruments and controls
Page 74 of 297
Downloaded from www.Manualslib.com manuals search engine Daytime light system (where fitted)
Even if the headlight switch is off, the headlight low
beam, front side, rear combination and number plate
lights will come on after starting the engine. How-
ever, you cannot change low beam to high beam
when the light switch is off.
When the light switch is turned to the
position,
the headlight low beam will turn off.
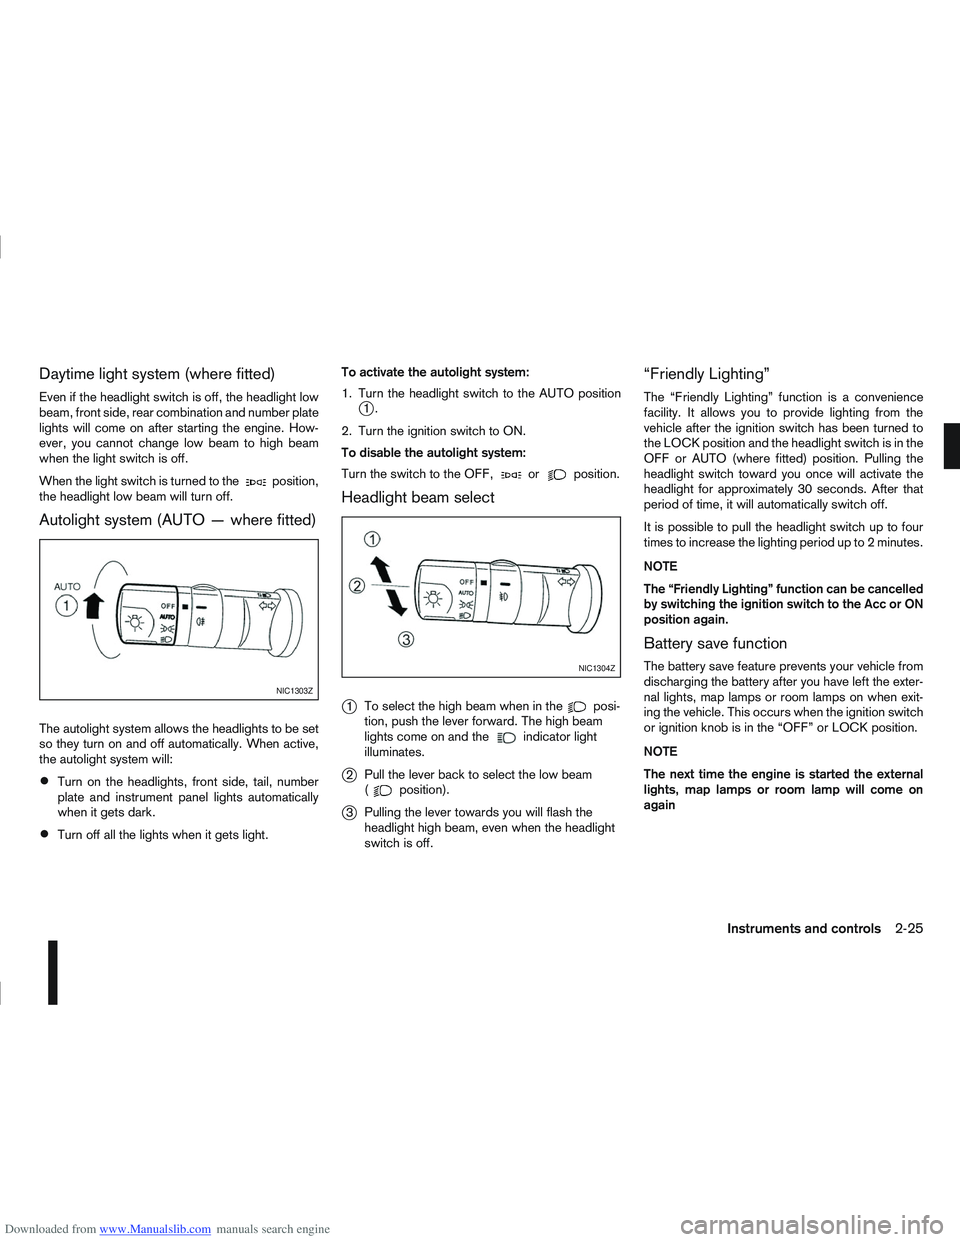
Autolight system (AUTO — where fitted)
The autolight system allows the headlights to be set
so they turn on and off automatically. When active,
the autolight system will:
Turn on the headlights, front side, tail, number
plate and instrument panel lights automatically
when it gets dark.
Turn off all the lights when it gets light. To activate the autolight system:
1. Turn the headlight switch to the AUTO position
j1.
2. Turn the ignition switch to ON.
To disable the autolight system:
Turn the switch to the OFF,
orposition.
Headlight beam select
j
1 To select the high beam when in theposi-
tion, push the lever forward. The high beam
lights come on and the
indicator light
illuminates.
j2 Pull the lever back to select the low beam
(position).
j3Pulling the lever towards you will flash the
headlight high beam, even when the headlight
switch is off.
“Friendly Lighting”
The “Friendly Lighting” function is a convenience
facility. It allows you to provide lighting from the
vehicle after the ignition switch has been turned to
the LOCK position and the headlight switch is in the
OFF or AUTO (where fitted) position. Pulling the
headlight switch toward you once will activate the
headlight for approximately 30 seconds. After that
period of time, it will automatically switch off.
It is possible to pull the headlight switch up to four
times to increase the lighting period up to 2 minutes.
NOTE
The “Friendly Lighting” function can be cancelled
by switching the ignition switch to the Acc or ON
position again.
Battery save function
The battery save feature prevents your vehicle from
discharging the battery after you have left the exter-
nal lights, map lamps or room lamps on when exit-
ing the vehicle. This occurs when the ignition switch
or ignition knob is in the “OFF” or LOCK position.
NOTE
The next time the engine is started the external
lights, map lamps or room lamp will come on
again
NIC1303Z
NIC1304Z
Instruments and controls2-25
Page 76 of 297
Downloaded from www.Manualslib.com manuals search engine tion and turn the fog light switch to thepositionj1 . The front fog lights and indicator light will come
on. For additional information, see “Warning/indica-
tor lights and audible reminders” earlier in this sec-
tion.
To turn the front fog lights off, turn the fog light
switch to the OFF position.
REAR FOG LIGHT
The rear fog light should only be used when visibility
is seriously reduced – generally, to less than 100 m
(328 ft).
TypejA (without front fog lights)
To turn the rear fog light on:
1. Turn the headlight switch to the
position.
2. Turn the fog light switch to the
positionj1:
– The rear fog light and indicator light will come on
– The fog light switch will return to the “OFF” posi- tion ( —)
To turn the rear fog light off:
Turn the fog light switch to the
positionj1 again:
– The rear fog light and indicator light will switch off
– The fog light switch will return to the “OFF” posi- tion ( —) NOTE
If the headlight switch is turned from the
position, the rear fog light will switch off auto-
matically.
TypejB (with front fog lights)
To turn the rear fog light on:
1. Turn the headlight switch to the
orposition.
2. Turn the fog light switch to the
positionj2:
– The rear and front fog lights and both indicator lights will come on
– The fog light switch will return to the
positionj1
To turn the rear fog light off:
Turn the fog light switch to the
positionj2
again:
– The rear fog light and indicator light will switch off
– The fog light switch will return to the
position
NOTE
If the headlight switch is turned to the OFF posi-
tion, the rear fog light will switch off automati-
cally.
For additional information, see “Warning/indicator
lights and audible reminders” earlier in this section.
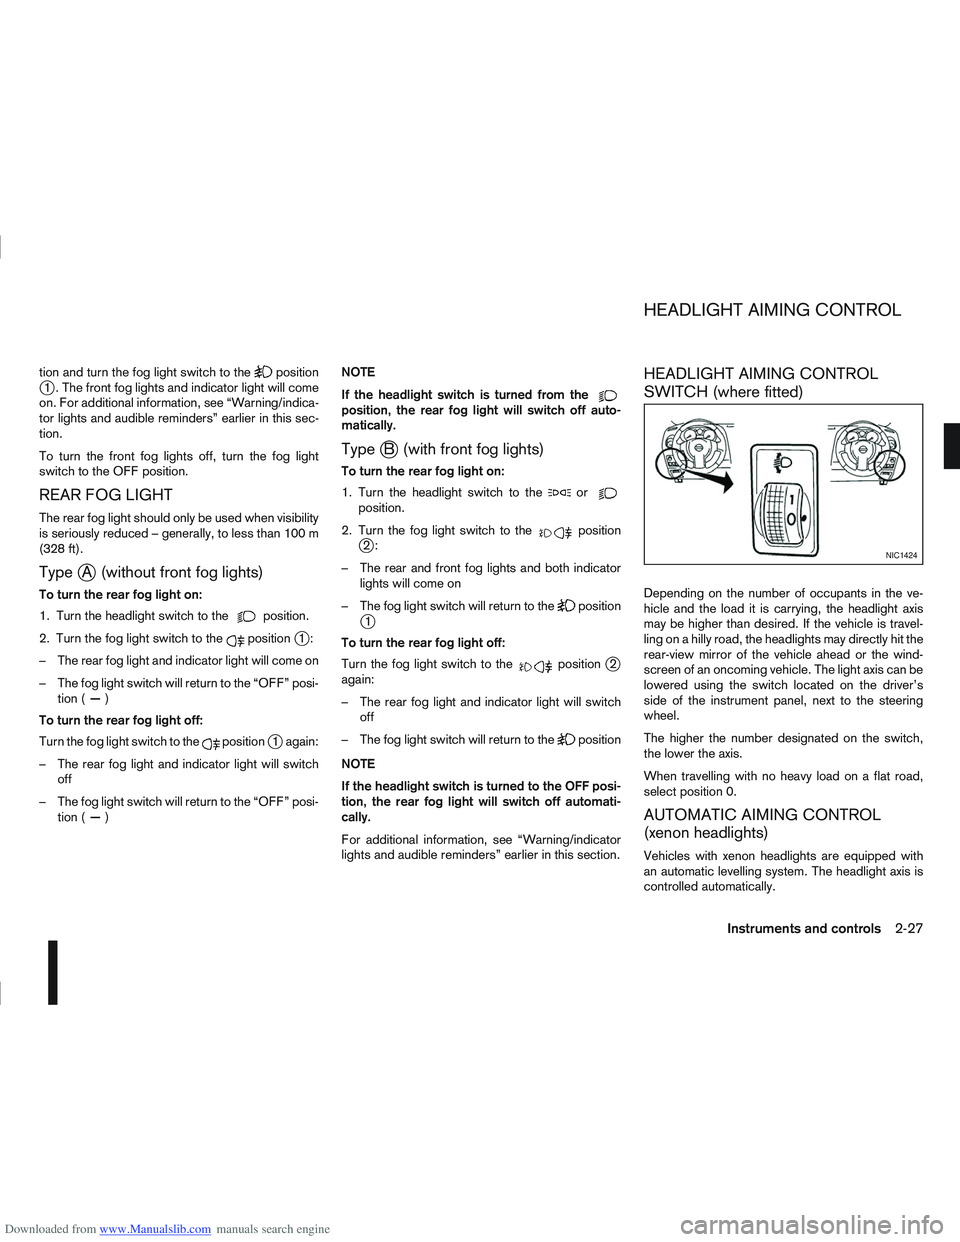
HEADLIGHT AIMING CONTROL
SWITCH (where fitted)
Depending on the number of occupants in the ve-
hicle and the load it is carrying, the headlight axis
may be higher than desired. If the vehicle is travel-
ling on a hilly road, the headlights may directly hit the
rear-view mirror of the vehicle ahead or the wind-
screen of an oncoming vehicle. The light axis can be
lowered using the switch located on the driver’s
side of the instrument panel, next to the steering
wheel.
The higher the number designated on the switch,
the lower the axis.
When travelling with no heavy load on a flat road,
select position 0.
AUTOMATIC AIMING CONTROL
(xenon headlights)
Vehicles with xenon headlights are equipped with
an automatic levelling system. The headlight axis is
controlled automatically.
NIC1424
HEADLIGHT AIMING CONTROL
Instruments and controls2-27
Page 83 of 297
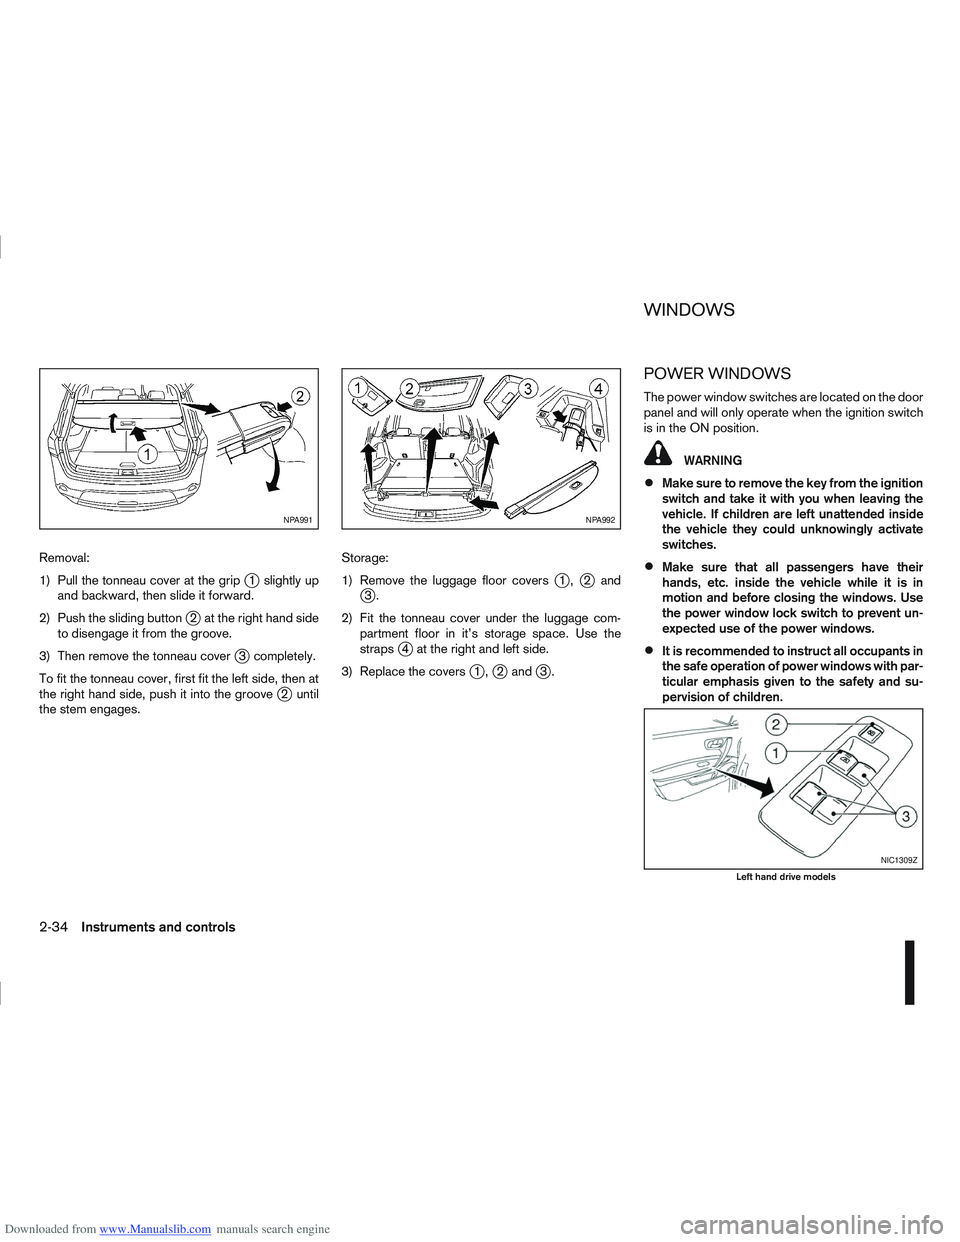
Downloaded from www.Manualslib.com manuals search engine Removal:
1) Pull the tonneau cover at the grip
j1 slightly up
and backward, then slide it forward.
2) Push the sliding button
j2 at the right hand side
to disengage it from the groove.
3) Then remove the tonneau cover
j3 completely.
To fit the tonneau cover, first fit the left side, then at
the right hand side, push it into the groove
j2 until
the stem engages. Storage:
1) Remove the luggage floor covers
j1,j2andj3.
2) Fit the tonneau cover under the luggage com- partment floor in it’s storage space. Use the
straps
j4 at the right and left side.
3) Replace the covers
j1,j2 andj3.
POWER WINDOWS
The power window switches are located on the door
panel and will only operate when the ignition switch
is in the ON position.
WARNING
Make sure to remove the key from the ignition
switch and take it with you when leaving the
vehicle. If children are left unattended inside
the vehicle they could unknowingly activate
switches.
Make sure that all passengers have their
hands, etc. inside the vehicle while it is in
motion and before closing the windows. Use
the power window lock switch to prevent un-
expected use of the power windows.
It is recommended to instruct all occupants in
the safe operation of power windows with par-
ticular emphasis given to the safety and su-
pervision of children.
NPA991NPA992
NIC1309Z
Left hand drive models
WINDOWS
2-34Instruments and controls