2008 NISSAN MURANO tow
[x] Cancel search: towPage 21 of 444
Black plate (18,1)
Model "Z51-D" EDITED: 2008/ 6/ 26
SSS0795
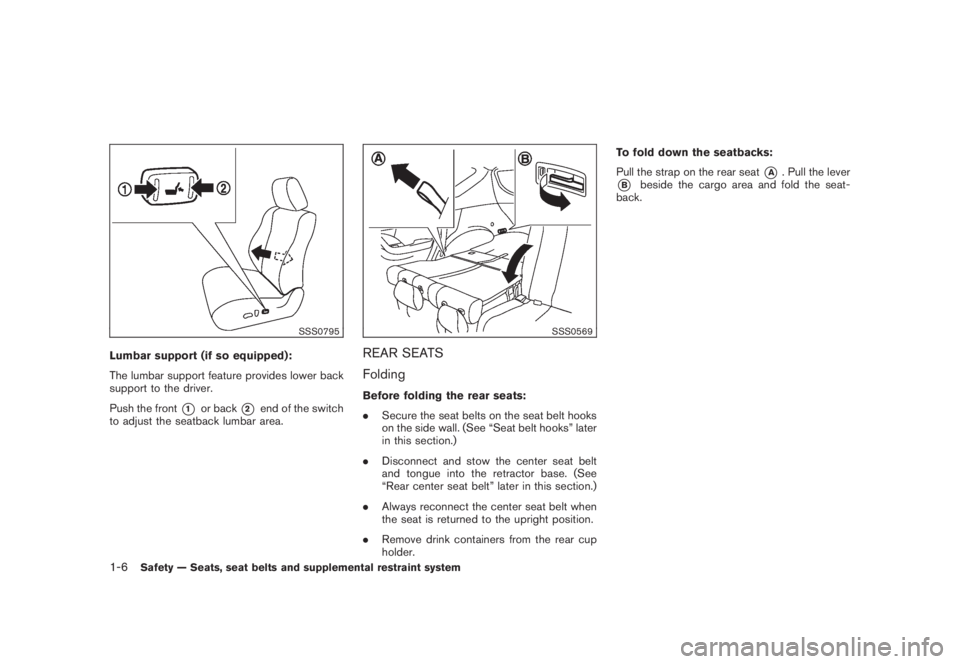
Lumbar support (if so equipped):
The lumbar support feature provides lower back
support to the driver.
Push the front
*1
or back
*2
end of the switch
to adjust the seatback lumbar area.
SSS0569
REAR SEATS
FoldingBefore folding the rear seats:
.Secure the seat belts on the seat belt hooks
on the side wall. (See “Seat belt hooks” later
in this section.)
.Disconnect and stow the center seat belt
and tongue into the retractor base. (See
“Rear center seat belt” later in this section.)
.Always reconnect the center seat belt when
the seat is returned to the upright position.
.Remove drink containers from the rear cup
holder.To fold down the seatbacks:
Pull the strap on the rear seat
*A
. Pull the lever
*B
beside the cargo area and fold the seat-
back.
1-6
Safety — Seats, seat belts and supplemental restraint system
Page 31 of 444
Black plate (28,1)
Model "Z51-D" EDITED: 2008/ 6/ 26
SSS0290
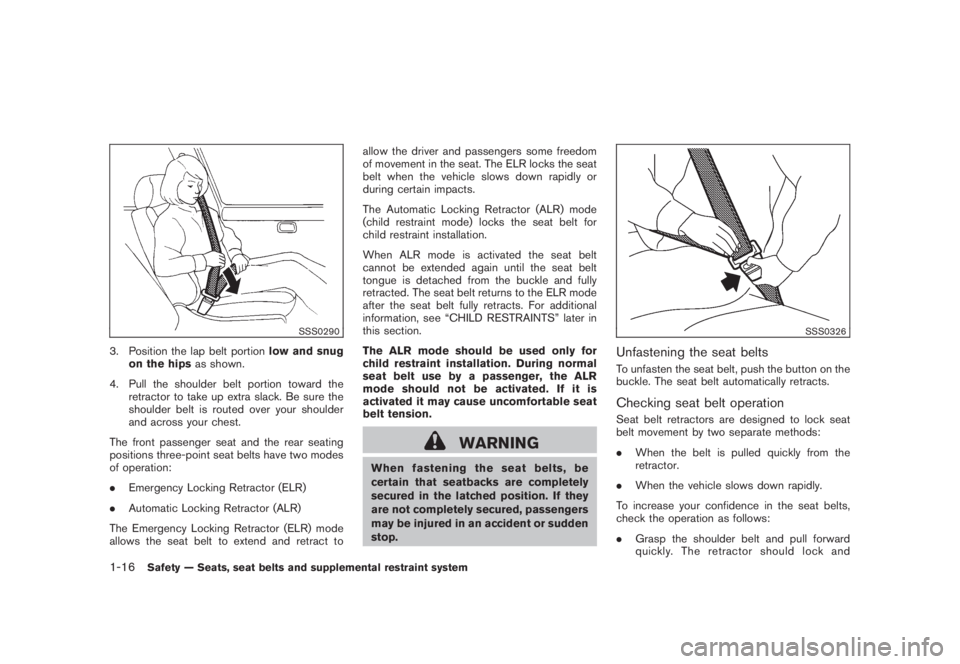
3. Position the lap belt portionlow and snug
on the hipsas shown.
4. Pull the shoulder belt portion toward the
retractor to take up extra slack. Be sure the
shoulder belt is routed over your shoulder
and across your chest.
The front passenger seat and the rear seating
positions three-point seat belts have two modes
of operation:
.Emergency Locking Retractor (ELR)
.Automatic Locking Retractor (ALR)
The Emergency Locking Retractor (ELR) mode
allows the seat belt to extend and retract toallow the driver and passengers some freedom
of movement in the seat. The ELR locks the seat
belt when the vehicle slows down rapidly or
during certain impacts.
The Automatic Locking Retractor (ALR) mode
(child restraint mode) locks the seat belt for
child restraint installation.
When ALR mode is activated the seat belt
cannot be extended again until the seat belt
tongue is detached from the buckle and fully
retracted. The seat belt returns to the ELR mode
after the seat belt fully retracts. For additional
information, see “CHILD RESTRAINTS” later in
this section.
The ALR mode should be used only for
child restraint installation. During normal
seat belt use by a passenger, the ALR
mode should not be activated. If it is
activated it may cause uncomfortable seat
belt tension.
WARNING
When fastening the seat belts, be
certain that seatbacks are completely
secured in the latched position. If they
are not completely secured, passengers
may be injured in an accident or sudden
stop.
SSS0326
Unfastening the seat beltsTo unfasten the seat belt, push the button on the
buckle. The seat belt automatically retracts.Checking seat belt operationSeat belt retractors are designed to lock seat
belt movement by two separate methods:
.When the belt is pulled quickly from the
retractor.
.When the vehicle slows down rapidly.
To increase your confidence in the seat belts,
check the operation as follows:
.Grasp the shoulder belt and pull forward
quickly. The retractor should lock and
1-16
Safety — Seats, seat belts and supplemental restraint system
Page 34 of 444

Black plate (31,1)
Model "Z51-D" EDITED: 2008/ 6/ 26
SSS0703
The center seat belt buckle and the tongue are
identified by the CENTER mark. The center seat
belt tongue can be fastened only into the center
seat belt buckle.
SSS0225
Stowing rear center seat belt:
When folding down the rear seat, the rear center
seat belt can be retracted into a stowed position
as follows:
1. Hold the connector tongue
*1
so that the
seat belt does not retract suddenly when the
tongue is released from the connector
buckle. Release the connector tongue by
inserting a suitable tool such as key
*A
into
the connector buckle.
2. Insert the seat belt tongue into the retractor
base first
*2.
3. Then secure the connector tongue into the
retractor base*3.WARNING
.Do not unfasten the rear center seat
belt connector except when folding
down the rear seat.
.When attaching the rear center seat
belt connector, be certain that the
seatbacks are completely secured in
the latched position and the rear
center seat belt connector is com-
pletely secured.
.If the rear center seat belt connector
and the seatbacks are not secured
Safety — Seats, seat belts and supplemental restraint system
1-19
Page 52 of 444
Black plate (49,1)
Model "Z51-D" EDITED: 2008/ 6/ 26
7. Check that the retractor is in the ALR mode
by trying to pull more seat belt out of the
retractor. If you cannot pull any more seat
belt webbing out of the retractor, the
retractor is in the ALR mode.
8. Check to make sure that the child restraint is
properly secured prior to each use. If the
belt is not locked, repeat steps 3 through 7.
After the child restraint is removed and the seat
belt fully retracted, the ALR mode (child restraint
mode) is canceled.
SSS0099
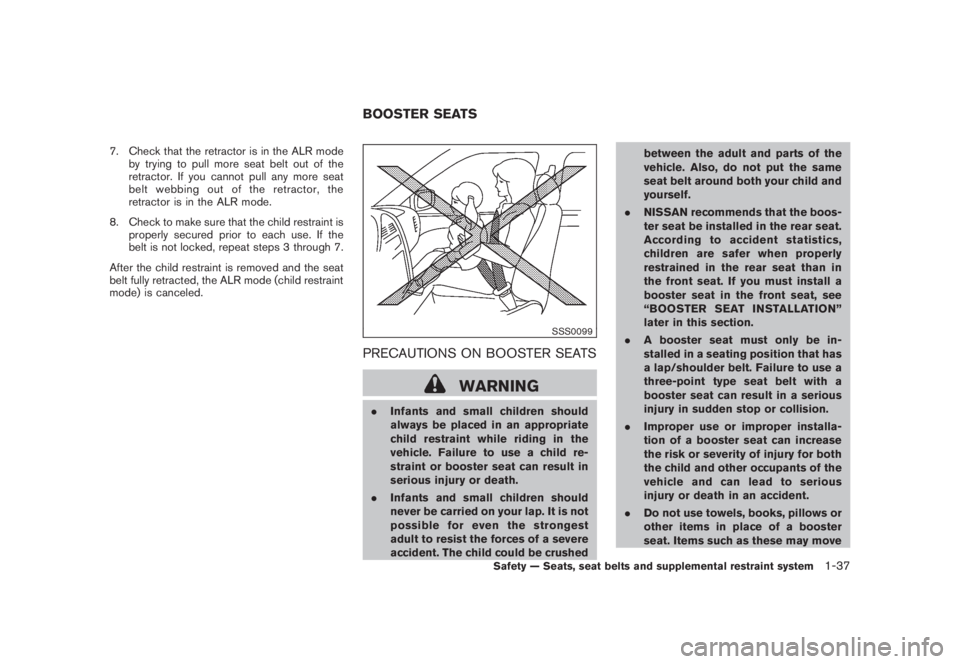
PRECAUTIONS ON BOOSTER SEATS
WARNING
.Infants and small children should
always be placed in an appropriate
child restraint while riding in the
vehicle. Failure to use a child re-
straint or booster seat can result in
serious injury or death.
.Infants and small children should
never be carried on your lap. It is not
possible for even the strongest
adult to resist the forces of a severe
accident. The child could be crushedbetween the adult and parts of the
vehicle. Also, do not put the same
seat belt around both your child and
yourself.
.NISSAN recommends that the boos-
ter seat be installed in the rear seat.
According to accident statistics,
children are safer when properly
restrained in the rear seat than in
the front seat. If you must install a
booster seat in the front seat, see
“BOOSTER SEAT INSTALLATION”
later in this section.
.A booster seat must only be in-
stalled in a seating position that has
a lap/shoulder belt. Failure to use a
three-point type seat belt with a
booster seat can result in a serious
injury in sudden stop or collision.
.Improper use or improper installa-
tion of a booster seat can increase
the risk or severity of injury for both
the child and other occupants of the
vehicle and can lead to serious
injury or death in an accident.
.Do not use towels, books, pillows or
other items in place of a booster
seat. Items such as these may moveBOOSTER SEATS
Safety — Seats, seat belts and supplemental restraint system
1-37
Page 55 of 444
Black plate (52,1)
Model "Z51-D" EDITED: 2008/ 6/ 26
SSS0640
Front passenger seat
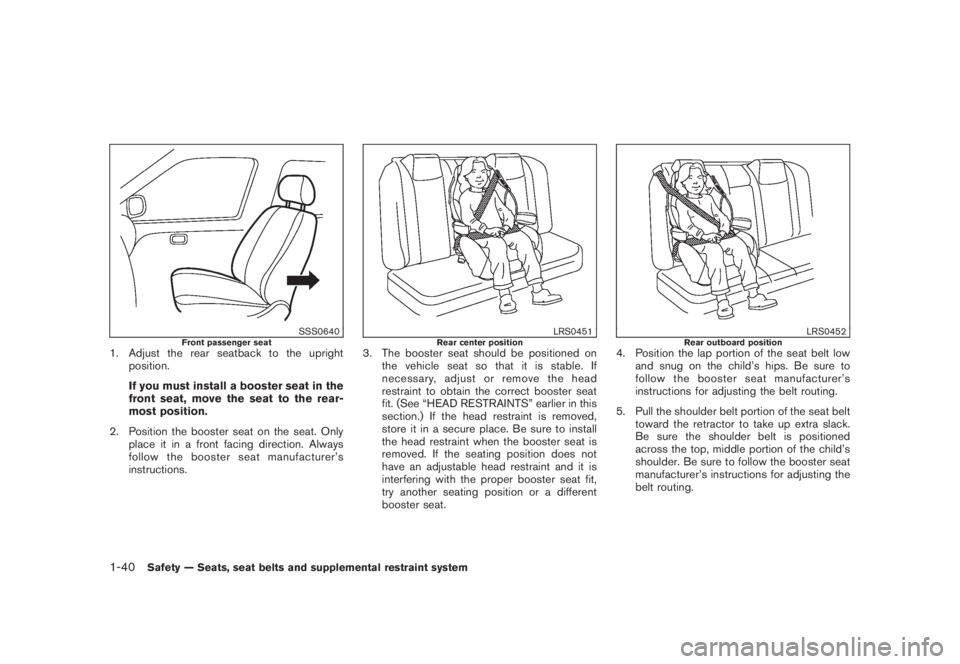
1. Adjust the rear seatback to the upright
position.
If you must install a booster seat in the
front seat, move the seat to the rear-
most position.
2. Position the booster seat on the seat. Only
place it in a front facing direction. Always
follow the booster seat manufacturer’s
instructions.
LRS0451
Rear center position
3. The booster seat should be positioned on
the vehicle seat so that it is stable. If
necessary, adjust or remove the head
restraint to obtain the correct booster seat
fit. (See “HEAD RESTRAINTS” earlier in this
section.) If the head restraint is removed,
store it in a secure place. Be sure to install
the head restraint when the booster seat is
removed. If the seating position does not
have an adjustable head restraint and it is
interfering with the proper booster seat fit,
try another seating position or a different
booster seat.
LRS0452
Rear outboard position
4. Position the lap portion of the seat belt low
and snug on the child’s hips. Be sure to
follow the booster seat manufacturer’s
instructions for adjusting the belt routing.
5. Pull the shoulder belt portion of the seat belt
toward the retractor to take up extra slack.
Be sure the shoulder belt is positioned
across the top, middle portion of the child’s
shoulder. Be sure to follow the booster seat
manufacturer’s instructions for adjusting the
belt routing.
1-40
Safety — Seats, seat belts and supplemental restraint system
Page 66 of 444

Black plate (63,1)
Model "Z51-D" EDITED: 2008/ 6/ 26
placing material over the steering
wheel pad and above the instrument
panel or by installing additional trim
material around the air bag system.
.Modifying or tampering with the
front passenger seat may result in
serious personal injury. For exam-
ple, do not change the front seats by
placing material on the seat cushion
or by installing additional trim ma-
terial, such as seat covers, on the
seat that is not specifically designed
to assure proper air bag operation.
Additionally, do not stow any ob-
jects under the front passenger seat
or the seat cushion and seatback.
Such objects may interfere with the
proper operation of the occupant
classification sensor.
.No unauthorized changes should be
made to any components or wiring
of the seat belt system. This may
affect the front air bag system.
Tampering with the seat belt system
may result in serious personal in-
jury.
.Work on and around the front air
bag system should be done by a
NISSAN dealer. Installation of elec-trical equipment should also be
done by a NISSAN dealer. The
Supplemental Restraint System
(SRS) wiring should not be modified
or disconnected. Unauthorized elec-
trical test equipment and probing
devices should not be used on the
air bag system.
.A cracked windshield should be
replaced immediately by a qualified
repair facility. A cracked windshield
could affect the function of the
supplemental air bag system.
.The SRS wiring harness connectors
are yellow and orange for easy
identification.
When selling your vehicle, we request that you
inform the buyer about the front air bag system
and guide the buyer to the appropriate sections
in this Owner’s Manual.
SSS0848
FRONT SEAT-MOUNTED SIDE-IM-
PACT SUPPLEMENTAL AIR BAG AND
ROOF-MOUNTED CURTAIN SIDE-IM-
PACT AND ROLLOVER SUPPLEMEN-
TAL AIR BAG SYSTEMSThe side air bags are located in the outside of
the seatback of the front seats. The curtain and
rollover air bags are located in the side roof rails.
These systems are designed to meet voluntary
guidelines to help reduce the risk of injury to out-
of-position occupants.However, all of the
information, cautions and warnings in this
manual still apply and must be followed.
The side air bags and curtain and rollover air
bags are designed to inflate in higher severity
Safety — Seats, seat belts and supplemental restraint system
1-51
Page 81 of 444
Black plate (77,1)
Model "Z51-D" EDITED: 2008/ 6/ 26
ZONE VARIATION CHANGE PROCE-
DUREThe difference between magnetic north and
geographical north is known as variance. In
some areas, this difference can sometimes be
great enough to cause false compass readings.
Follow these instructions to set the variance for
your particular location if this happens:
1. Push the
switch for more than 3
seconds. The current zone number will
appear in the display.
2. Find your current location and variance
number on the zone map.
NOTE:
Use zone number 5 for Hawaii.
3. Push theswitch repeatedly until the
new zone number appears in the display,
then release the switch. After you release
the switch, the display will show a compass
direction within a few seconds.
.If the compass deviates from the correct
indication soon after repeated adjust-
ment, have the compass checked at a
NISSAN dealer.
.The compass may not indicate the
correct compass point in tunnels or
while driving up or down a steep hill.
(The compass returns to the correct com-pass point when the vehicle moves to an
area where the geomagnetism is stabilized.)
CAUTION
.Do not install a ski rack, antenna,
etc., which are attached to the
vehicle by means of a magnet. They
affect the operation of the compass.
.When cleaning the mirror, use a
paper towel or similar material
dampened with glass cleaner. Do
not spray glass cleaner directly on
the mirror as it may cause the liquid
cleaner to enter the mirror housing.
Instruments and controls
2-9
Page 84 of 444
Black plate (80,1)
Model "Z51-D" EDITED: 2008/ 6/ 26
earlier in this section.)
WARNING
.Your brake system may not be
working properly if the warning light
is on. Driving could be dangerous. If
you judge it to be safe, drive care-
fully to the nearest service station
for repairs. Otherwise, have your
vehicle towed because driving it
could be dangerous.
.Pressing the brake pedal with the
engine stopped and/or low brake
fluid level may increase your stop-
ping distance and braking will re-
quire greater pedal effort as well as
pedal travel.
.If the brake fluid level is below the
minimum or MIN mark on the brake
fluid reservoir, do not drive until the
brake system has been checked at a
NISSAN dealer.
Charge warning light
If the light comes on while the engine is running,
it may indicate the charging system is not
functioning properly. Turn the engine off and
check the alternator belt. If the belt is loose,
broken, missing or if the light remains on, see a
NISSAN dealer immediately.
CAUTION
Do not continue driving if the alternator
belt is loose, broken or missing.
Engine oil pressure warning light
This light warns of low engine oil pressure. If the
light flickers or comes on during normal driving,
pull off the road in a safe area, stop the engine
immediatelyand call a NISSAN dealer or other
authorized repair shop.
The engine oil pressure warning light is
not designed to indicate a low oil level.
Use the dipstick to check the oil level.(See
“ENGINE OIL” in the “8. Maintenance and do-it-
yourself” section.)
CAUTION
Running the engine with the engine oil
pressure warning light on could cause
serious damage to the engine almost
immediately. Such damage is not cov-
ered by warranty. Turn off the engine as
soon as it is safe to do so.
Intelligent Key warning light (if so
equipped)
After the ignition switch is pushed to the ON
position, this light comes on for about 2 seconds
and then turns off.
This light warns of a malfunction with the
electrical steering lock system or the Intelligent
Key system.
If the light comes on while the engine is
stopped, it may be impossible to free the
steering lock or to start the engine. If the light
comes on while the engine is running, you can
drive the vehicle. However in these cases,
contact a NISSAN dealer for repair as soon as
possible.
2-12
Instruments and controls