2008 NISSAN MURANO lock
[x] Cancel search: lockPage 349 of 444
Black plate (347,1)
Model "Z51-D" EDITED: 2008/ 6/ 26
.Never change tires if oncoming
traffic is close to your vehicle. Wait
for professional road assistance.
MCE0001A
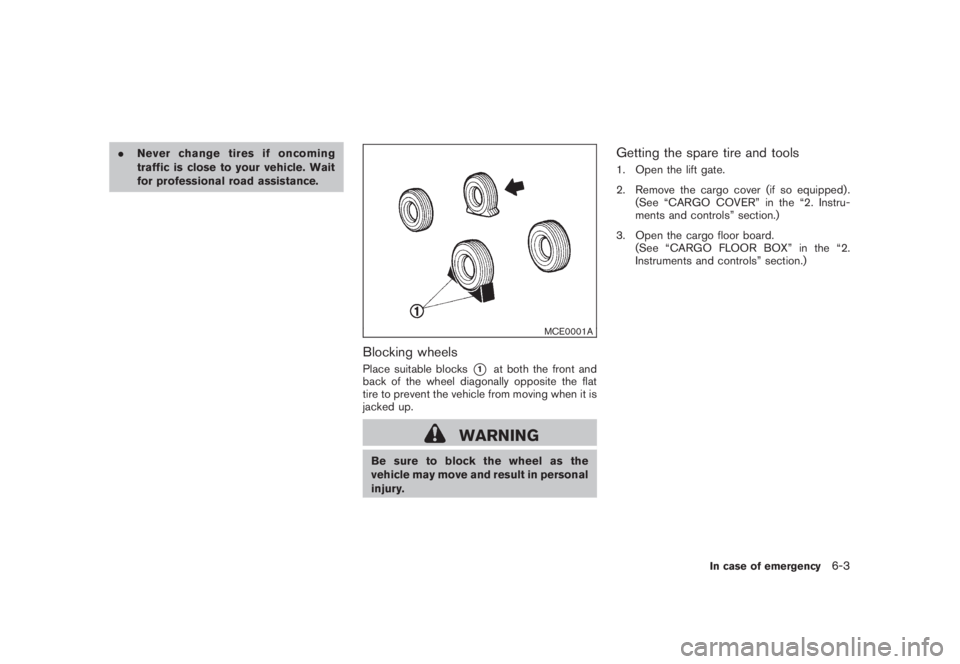
Blocking wheelsPlace suitable blocks
*1
at both the front and
back of the wheel diagonally opposite the flat
tire to prevent the vehicle from moving when it is
jacked up.
WARNING
Be sure to block the wheel as the
vehicle may move and result in personal
injury.
Getting the spare tire and tools1. Open the lift gate.
2. Remove the cargo cover (if so equipped) .
(See “CARGO COVER” in the “2. Instru-
ments and controls” section.)
3. Open the cargo floor board.
(See “CARGO FLOOR BOX” in the “2.
Instruments and controls” section.)
In case of emergency
6-3
Page 350 of 444
Black plate (348,1)
Model "Z51-D" EDITED: 2008/ 6/ 26
SCE0728
Type A
SCE0715
Type B
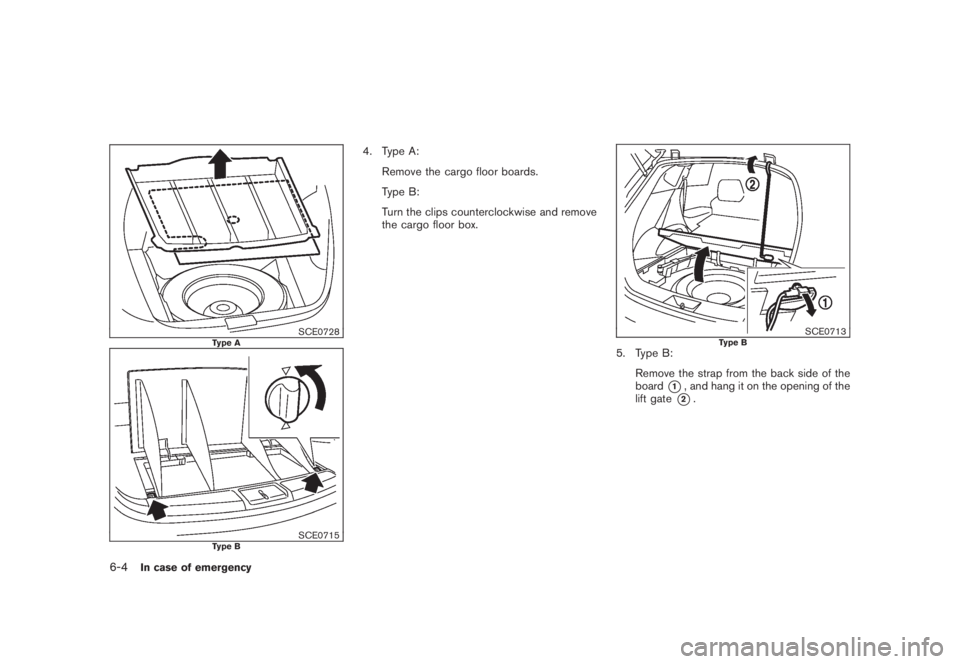
4. Type A:
Remove the cargo floor boards.
Type B:
Turn the clips counterclockwise and remove
the cargo floor box.
SCE0713
Type B
5. Type B:
Remove the strap from the back side of the
board
*1, and hang it on the opening of the
lift gate*2.
6-4
In case of emergency
Page 352 of 444
Black plate (350,1)
Model "Z51-D" EDITED: 2008/ 6/ 26
Jacking up the vehicle and removing the
damaged tire
WARNING
.Never get under the vehicle while it
is supported only by the jack. If it is
necessary to work under the vehicle,
support it with safety stands.
.Use only the jack provided with your
vehicle to lift the vehicle. Do not use
the jack provided with your vehicle
on other vehicles. The jack is de-
signed for lifting only your vehicle
during a tire change.
.Use the correct jack-up points.
Never use any other part of the
vehicle for jack support.
.Never jack up the vehicle more than
necessary.
.Never use blocks on or under the
jack.
.Do not start or run the engine while
vehicle is on the jack, as it may
cause the vehicle to move.
.Do not allow passengers to stay in
the vehicle while it is on the jack.Carefully read the caution label attached
to the jack body and the following instruc-
tions.
SCE0572
Jack-up point
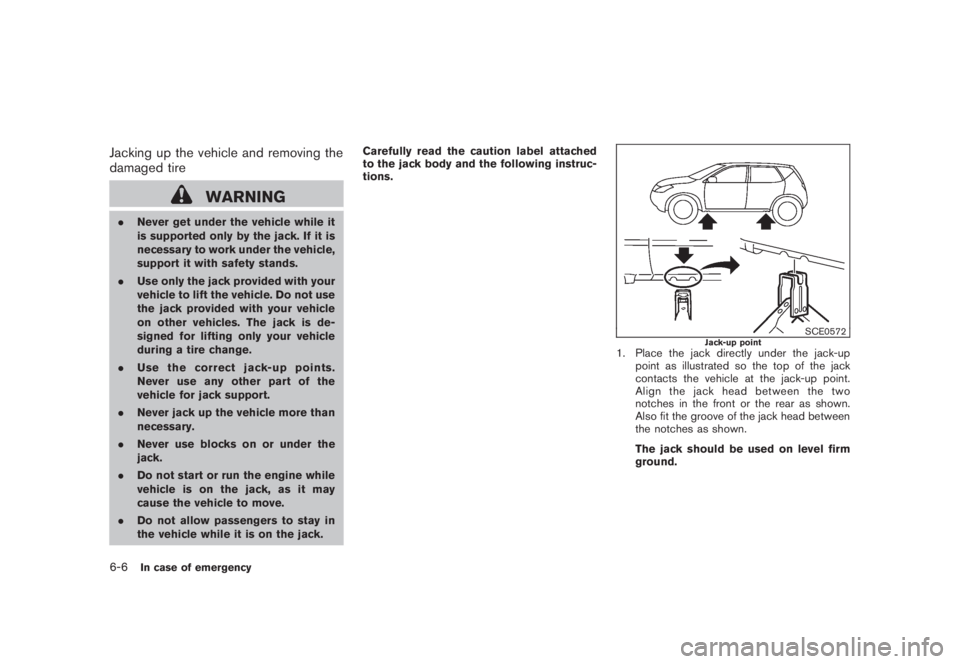
1. Place the jack directly under the jack-up
point as illustrated so the top of the jack
contacts the vehicle at the jack-up point.
Align the jack head between the two
notches in the front or the rear as shown.
Also fit the groove of the jack head between
the notches as shown.
The jack should be used on level firm
ground.
6-6
In case of emergency
Page 353 of 444
Black plate (351,1)
Model "Z51-D" EDITED: 2008/ 6/ 26
SCE0751
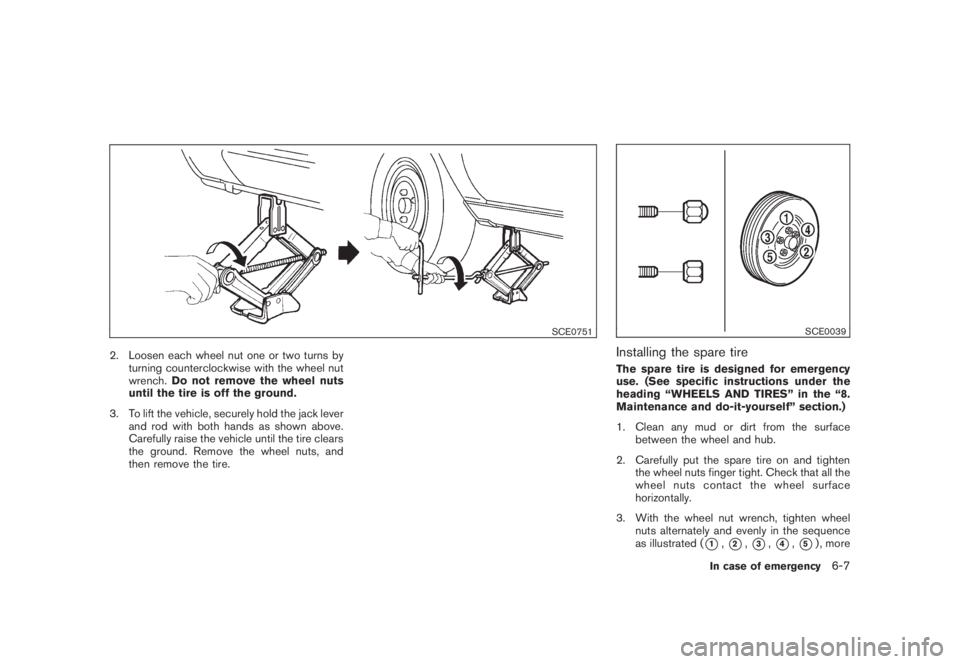
2. Loosen each wheel nut one or two turns by
turning counterclockwise with the wheel nut
wrench.Do not remove the wheel nuts
until the tire is off the ground.
3. To lift the vehicle, securely hold the jack lever
and rod with both hands as shown above.
Carefully raise the vehicle until the tire clears
the ground. Remove the wheel nuts, and
then remove the tire.
SCE0039
Installing the spare tireThe spare tire is designed for emergency
use. (See specific instructions under the
heading “WHEELS AND TIRES” in the “8.
Maintenance and do-it-yourself” section.)
1. Clean any mud or dirt from the surface
between the wheel and hub.
2. Carefully put the spare tire on and tighten
the wheel nuts finger tight. Check that all the
wheel nuts contact the wheel surface
horizontally.
3. With the wheel nut wrench, tighten wheel
nuts alternately and evenly in the sequence
as illustrated (
*1,*2,*3,*4,*5) , more
In case of emergency
6-7
Page 356 of 444
Black plate (354,1)
Model "Z51-D" EDITED: 2008/ 6/ 26
unnecessary electrical systems (lights, hea-
ter, air conditioner, etc.) .
3. Remove vent caps on the battery (if so
equipped) . Cover the battery with a firmly
wrung out moist cloth to reduce explosion
hazard.
4. Connect jumper cables in the sequence as
illustrated (
*1
?
*2
?
*3
?
*4).
If the battery is disconnected or dis-
charged, the steering wheel will lock
and cannot be turned. Supply power
using jumper cables before pushing
the ignition switch and disengaging
the steering lock.
CAUTION
.Always connect positive (+) to posi-
tive (+) and negative (�) to body
ground (for example, as illustrated) ,
not to the battery.
.Make sure the jumper cables do not
touch moving parts in the engine
compartment and that the cable
clamps do not contact any other
metal.
5. Start the engine of the booster vehicle
*B
and let it run for a few minutes.6. Keep the engine speed of the booster
vehicle
*B
at about 2,000 rpm, and start
the engine of the vehicle
*A
being jump
started.
CAUTION
Do not keep the starter motor engaged
for more than 10 seconds. If the engine
does not start right away, turn the
ignition switch to the OFF position
and wait 10 seconds before trying
again.
7. After starting your engine, carefully discon-
nect the negative cable and then the positive
cable (
*4
?
*3
?
*2
?
*1).
8. Replace the vent caps (if so equipped) . Be
sure to dispose of the cloth used to cover
the vent holes as it may be contaminated
with corrosive acid.Do not attempt to start the engine by pushing.
CAUTION
Continuously Variable Transmission
(CVT) models cannot be push-started
or tow-started. Attempting to do so may
cause transmission damage.PUSH STARTING
6-10
In case of emergency
Page 359 of 444
Black plate (357,1)
Model "Z51-D" EDITED: 2008/ 6/ 26
SCE0438
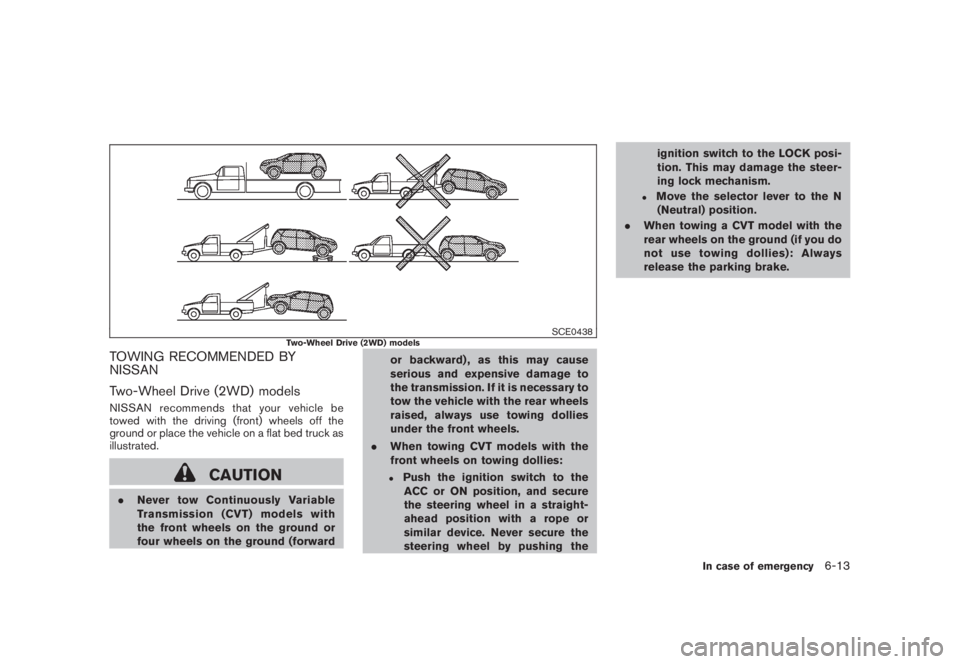
Two-Wheel Drive (2WD) models
TOWING RECOMMENDED BY
NISSAN
Two-Wheel Drive (2WD) modelsNISSAN recommends that your vehicle be
towed with the driving (front) wheels off the
ground or place the vehicle on a flat bed truck as
illustrated.
CAUTION
.Never tow Continuously Variable
Transmission (CVT) models with
the front wheels on the ground or
four wheels on the ground (forwardor backward) , as this may cause
serious and expensive damage to
the transmission. If it is necessary to
tow the vehicle with the rear wheels
raised, always use towing dollies
under the front wheels.
.When towing CVT models with the
front wheels on towing dollies:
.
Push the ignition switch to the
ACC or ON position, and secure
the steering wheel in a straight-
ahead position with a rope or
similar device. Never secure the
steering wheel by pushing theignition switch to the LOCK posi-
tion. This may damage the steer-
ing lock mechanism.
.
Move the selector lever to the N
(Neutral) position.
.When towing a CVT model with the
rear wheels on the ground (if you do
not use towing dollies): Always
release the parking brake.
In case of emergency
6-13
Page 370 of 444
Black plate (368,1)
Model "Z51-D" EDITED: 2008/ 6/ 26
Your new NISSAN has been designed to have
minimum maintenance requirements with long
service intervals to save you both time and
money. However, some day-to-day and regular
maintenance is essential to maintain your
NISSAN’s fine mechanical condition, as well
as its emission and engine performance.
It is the owner’s responsibility to make sure that
the scheduled maintenance, as well as general
maintenance, is performed.
As the vehicle owner, you are the only one who
can ensure that your vehicle receives the proper
maintenance. You are a vital link in the main-
tenance chain.SCHEDULED MAINTENANCEFor your convenience, both required and op-
tional scheduled maintenance items are de-
scribed and listed in your “NISSAN Service and
Maintenance Guide”. You must refer to that
guide to ensure that necessary maintenance is
performed on your NISSAN at regular intervals.GENERAL MAINTENANCEGeneral maintenance includes those items
which should be checked during normal day-
to-day operation. They are essential for proper
vehicle operation. It is your responsibility to
perform these procedures regularly as pre-
scribed.Performing general maintenance checks re-
quires minimal mechanical skill and only a few
general automotive tools.
These checks or inspections can be done by
yourself, a qualified technician or, if you prefer, a
NISSAN dealer.
WHERE TO GO FOR SERVICEIf maintenance service is required or your vehicle
appears to malfunction, have the systems
checked and serviced by a NISSAN dealer.
NISSAN technicians are well-trained specialists
and are kept up-to-date with the latest service
information through technical bulletins, service
tips, and in-dealership information systems.
They are completely qualified to work on
NISSAN vehiclesbeforework begins.
You can be confident that a NISSAN dealer’s
service department performs the best job to
meet the maintenance requirements on your
vehicle — in a reliable and economical way.During the normal day-to-day operation of the
vehicle, general maintenance should be per-
formed regularly as prescribed in this section. If
you detect any unusual sounds, vibrations or
smell, be sure to check for the cause or have a
NISSAN dealer do it promptly. In addition, you
should notify a NISSAN dealer if you think that
repairs are required.
When performing any checks or maintenance
work, see “MAINTENANCE PRECAUTIONS”
later in this section.
EXPLANATION OF MAINTENANCE
ITEMSAdditional information on the following
items with “*” is found later in this section.Outside the vehicleThe maintenance items listed here should be
performed from time to time, unless otherwise
specified.
Doors and engine hood:Check that all doors
and the engine hood operate properly. Also
ensure that all latches lock securely. Lubricate
hinges, latches, latch pins, rollers and links if
necessary. Make sure that the secondary latch
keeps the hood from opening when the primary
latch is released.
When driving in areas using road salt or other
corrosive materials, check lubrication frequently.
MAINTENANCE REQUIREMENT GENERAL MAINTENANCE8-2
Maintenance and do-it-yourself
Page 371 of 444
Black plate (369,1)
Model "Z51-D" EDITED: 2008/ 6/ 26
Lights*:Clean the headlights on a regular basis.
Make sure that the headlights, stop lights, tail
lights, turn signal lights, and other lights are all
operating properly and installed securely. Also
check headlight aim.
Road wheel nuts (lug nuts)*:When checking
the tires, make sure no wheel nuts are missing,
and check for any loose wheel nuts. Tighten if
necessary.
Tire rotation*:Tires should be rotated every
7,500 miles (12,000 km).
Tires*:Check the pressure with a gauge often
and always prior to long distance trips. If
necessary, adjust the pressure in all tires,
including the spare, to the pressure specified.
Check carefully for damage, cuts or excessive
wear.
Tire Pressure Monitoring System (TPMS)
transmitter components:Replace the TPMS
transmitter grommet seal, valve core and cap
when the tires are replaced due to wear or age.
Wheel alignment and balance:If the vehicle
should pull to either side while driving on a
straight and level road, or if you detect uneven or
abnormal tire wear, there may be a need for
wheel alignment.
If the steering wheel or seat vibrates at normal
highway speeds, wheel balancing may be
needed.For additional information regarding tires, refer
to “Important Tire Safety Information” (US) or
“Tire Safety Information” (Canada) in the War-
ranty Information Booklet.
Windshield:Clean the windshield on a regular
basis. Check the windshield at least every six
months for cracks or other damage. Have a
damaged windshield repaired by a qualified
repair facility.
Windshield wiper blades*:Check for cracks
or wear if they do not wipe properly.
Inside the vehicleThe maintenance items listed here should be
checked on a regular basis, such as when
performing scheduled maintenance, cleaning
the vehicle, etc.
Accelerator pedal:Check the pedal for
smooth operation and make sure the pedal
does not catch or require uneven effort. Keep
the floor mat away from the pedal.
Brake pedal:Check the pedal for smooth
operation. If the brake pedal suddenly goes
down further than normal, the pedal feels
spongy or the vehicle seems to take longer to
stop, see a NISSAN dealer immediately. Keep
the floor mat away from the pedal.
Brakes:Check that the brakes do not pull the
vehicle to one side when applied.Continuously Variable Transmission (CVT)
P (Park) position mechanism:On a fairly
steep hill, check that the vehicle is held securely
with the selector lever in the P (Park) position
without applying any brakes.
Parking brake:Check the parking brake
operation regularly. The vehicle should be
securely held on a fairly steep hill with only the
parking brake applied. If the parking brake needs
adjustment, see a NISSAN dealer.
Seat belts:Check that all parts of the seat belt
system (for example, buckles, anchors, adjusters
and retractors) operate properly and smoothly,
and are installed securely. Check the belt
webbing for cuts, fraying, wear or damage.
Seats:Check seat position controls such as
seat adjusters, seatback recliner, etc. to ensure
they operate smoothly and that all latches lock
securely in every position. Check that the head
restraints move up and down smoothly and that
the locks (if so equipped) hold securely in all
latched positions.
Steering wheel:Check for changes in the
steering conditions, such as excessive free play,
hard steering or strange noises.
Warning lights and chimes:Make sure that
all warning lights and chimes are operating
properly.
Maintenance and do-it-yourself
8-3