Page 277 of 328
Replacement procedures
All other lights are either type A, B, C or D. When
replacing a bulb, first remove the lens, lamp
and/or cover.
Indicates bulb removal
Indicates bulb installationUse a cloth
s1to protect the housing. Use a cloths1to protect the housing.
WDI0263Front personal/map lights – Type A
LDI0338
Front personal/map lights – Type B
LDI0339
Maintenance and do-it-yourself8-29
ZREVIEW COPYÐ2008 Maxima(max)
Owners ManualÐUSA_English(nna)
06/08/07Ðdebbie
X
Page 278 of 328
Use a cloths1to protect the housing.
Use a cloths1to protect the housing.
Use a cloth
s1to protect the housing.
Vanity mirror light
WDI0340
Step light
LDI0341
Rear personal lightWDI0342
8-30Maintenance and do-it-yourself
ZREVIEW COPYÐ2008 Maxima(max)
Owners ManualÐUSA_English(nna)
06/08/07Ðdebbie
X
Page 279 of 328

If you have a flat tire, see the “In case of
emergency” section of this manual.
TIRE PRESSURE
Tire Pressure Monitoring System
(TPMS)
This vehicle is equipped with the Tire
Pressure Monitoring System (TPMS) . It
monitors tire pressure of all tires except
the spare. When the low tire pressure
warning light is lit, one or more of your
tires is significantly under-inflated. If
equipped, the system also displays pres-
sure of all tires (except the spare tire) on
the display screen by sending a signal
from a sensor that is installed in each
wheel.
The TPMS will activate only when the
vehicle is driven at speeds above 16 MPH
(25 km/h) . Also, this system may not de-
tect a sudden drop in tire pressure (for
example a flat tire while driving) .
For more details, refer to “Low tire pres-
sure warning light” in the “Instruments and
controls” section, “Tire pressure informa-
tion” in the “Display screen, heater, air
High-mounted stop light (if so equipped)
WDI0344
Trunk light
WDI0343
WHEELS AND TIRES
Maintenance and do-it-yourself8-31
ZREVIEW COPYÐ2008 Maxima(max)
Owners ManualÐUSA_English(nna)
06/08/07Ðdebbie
X
Page 280 of 328

conditioner and audio and phone sys-
tems” section, “Tire Pressure Monitoring
System (TPMS)” in the “Starting and driv-
ing” section, and “Flat tire” in the “In case
of emergency” section.
Tire inflation pressure
Check the tire pressures (including the
spare) often and always prior to long dis-
tance trips. The recommended tire pres-
sure specifications are shown on the
F.M.V.S.S./C.M.V.S.S. certification label
or the Tire and Loading Information label
under the9Cold Tire Pressure9heading.
The Tire and Loading Information label is
affixed to the driver side center pillar. Tire
pressures should be checked regularly
because:
cMost tires naturally lose air over time.
cTires can lose air suddenly when
driven over potholes or other objects
or if the vehicle strikes a curb while
parking.The tire pressures should be checked
when the tires are cold. The tires are
considered COLD after the vehicle has
been parked for 3 or more hours, or driven
less than 1 mile (1.6 km) at moderate
speeds.
If the tires are used at speeds above 100
mph (162 km/h) where it is legal to do so
(on a race track for example) , the cold tire
inflation pressure must be increased. Re-
fer to9Checking tire pressure9later in this
section.
Set the tire pressure to the normal cold
tire inflation pressure when the vehicle
speed or load is reduced.
Incorrect tire pressure, including un-
der inflation, may adversely affect
tire life and vehicle handling.
WARNING
cImproperly inflated tires can fail
suddenly and cause an accident.
cThe Gross Vehicle Weight Rating
(GVWR) is located on the
F.M.V.S.S./C.M.V.S.S. certifica-
tion label. The vehicle weight ca-
pacity is indicated on the Tire and
Loading Information label (if so
equipped) . Do not load your ve-
hicle beyond this capacity. Over-
loading your vehicle may result in
reduced tire life, unsafe operat-
ing conditions due to premature
tire failure, or unfavorable han-
dling characteristics and could
also lead to a serious accident.
Loading beyond the specified ca-
pacity may also result in failure of
other vehicle components.
cBefore taking a long trip, or
whenever you heavily load your
vehicle, use a tire pressure gauge
to ensure that the tire pressures
are at the specified level.
8-32
Maintenance and do-it-yourself
ZREVIEW COPYÐ2008 Maxima(max)
Owners ManualÐUSA_English(nna)
06/08/07Ðdebbie
X
Page 281 of 328

cDo not drive your vehicle over 85
MPH (137 km/h) unless it is
equipped with high speed rated
tires. Driving faster than 85 MPH
(137 km/h) may result in tire fail-
ure, loss of control and possible
injury.
cIncrease the cold tire inflation
pressure as indicated in(Check-
ing tire pressure(later in this sec-
tion when using the tires speci-
fied by NISSAN above 100 MPH
(162 km/h) where it is legal to do
so (on a race track for example) .
Failure to increase the cold tire
inflation pressure may result in
tire failure, loss of control and
possible injury. After such use,
readjust tire pressure.
cFor additional information re-
garding tires, refer to “Important
Tire Safety Information” (US) or
“Tire Safety Information”
(Canada) in the Warranty Infor-
mation Booklet.
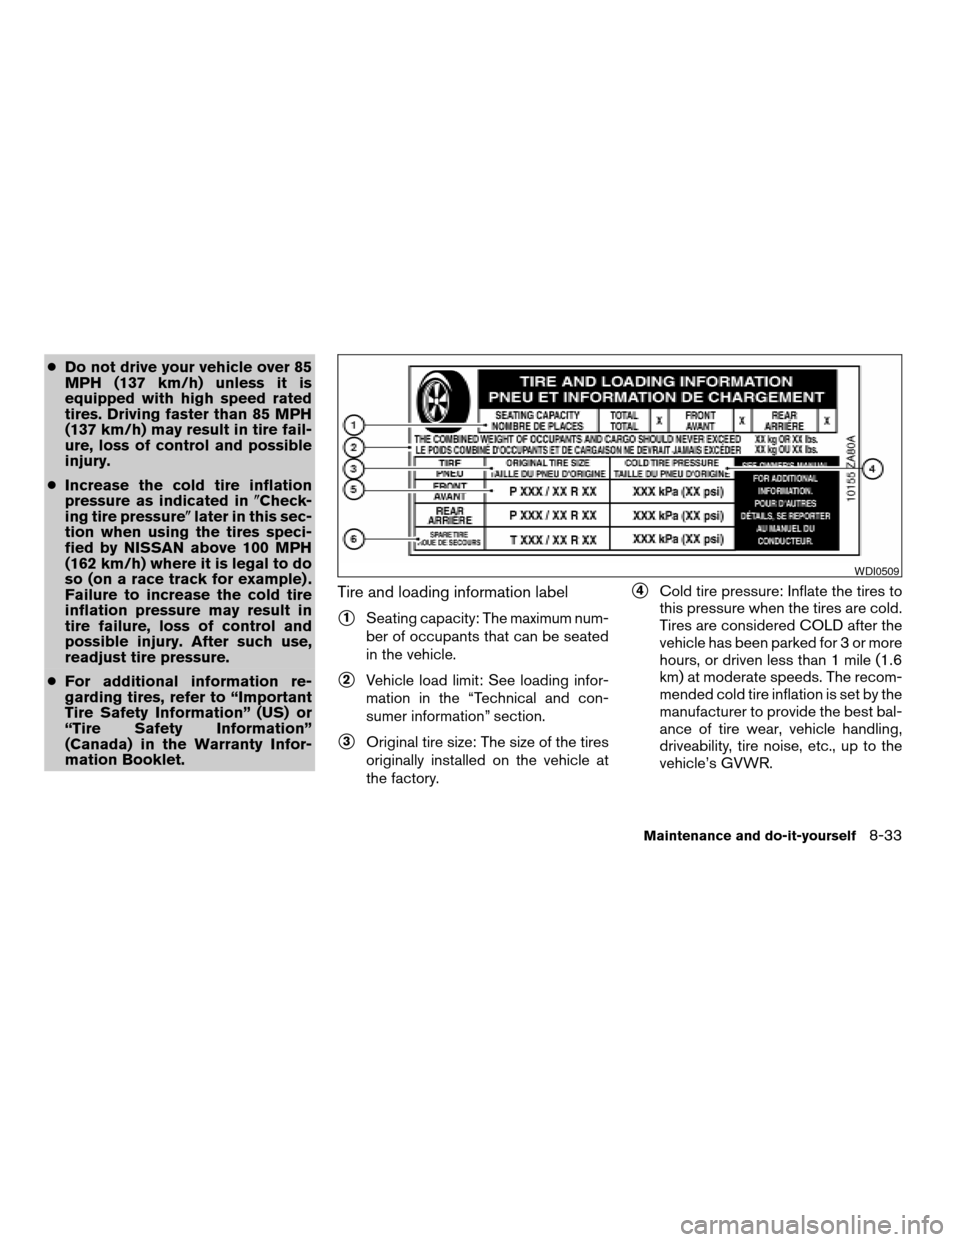
Tire and loading information label
s1Seating capacity: The maximum num-
ber of occupants that can be seated
in the vehicle.
s2Vehicle load limit: See loading infor-
mation in the “Technical and con-
sumer information” section.
s3Original tire size: The size of the tires
originally installed on the vehicle at
the factory.
s4Cold tire pressure: Inflate the tires to
this pressure when the tires are cold.
Tires are considered COLD after the
vehicle has been parked for 3 or more
hours, or driven less than 1 mile (1.6
km) at moderate speeds. The recom-
mended cold tire inflation is set by the
manufacturer to provide the best bal-
ance of tire wear, vehicle handling,
driveability, tire noise, etc., up to the
vehicle’s GVWR.
WDI0509
Maintenance and do-it-yourself8-33
ZREVIEW COPYÐ2008 Maxima(max)
Owners ManualÐUSA_English(nna)
06/08/07Ðdebbie
X
Page 282 of 328

s5Tire size – refer to “Tire labeling” later
in this section.
s6Spare tire size (if so equipped) .
Checking tire pressure
1. Remove the valve stem cap from the
tire.
2. Press the pressure gauge squarely
onto the valve stem. Do not press too
hard or force the valve stem side-
ways, or air will escape. If the hissing
sound of air escaping from the tire is
heard while checking the pressure,
reposition the gauge to eliminate this
leakage.
3. Remove the gauge.4. Read the tire pressure on the gauge
stem and compare to the specifica-
tion shown on the Tire and Loading
Information label.
5. Add air to the tire as needed. If too
much air is added, press the core of
the valve stem briefly with the tip of
the gauge stem to release pressure.
Recheck the pressure and add or
release air as needed.
6. Install the valve stem cap.
7. Check the pressure of all other tires,
including the spare.
LDI0393
8-34Maintenance and do-it-yourself
ZREVIEW COPYÐ2008 Maxima(max)
Owners ManualÐUSA_English(nna)
06/08/07Ðdebbie
X
Page 283 of 328
Size Cold Tire Inflation
PressureHigh Speed/
Maximum Load
Cold Tire Inflation
Pressure
Front Original TireP225/55R17 95V 230 kPa, 33 PSI 240 kPa, 35 PSI
P245/45R18 96V 220 kPa, 32 PSI 260 kPa, 38 PSI
Rear Original TireP225/55R17 95V 230 kPa, 33 PSI 240 kPa, 35 PSI
P245/45R18 96V 220 kPa, 32 PSI 260 kPa, 38 PSI
Spare Tire T145/80*17 420 kPa, 60 PSI N/A
*: “R” or “D” depending on tire manufacturer
TIRE LABELING
Federal law requires tire manufacturers to
place standardized information on the
sidewall of all tires. This information iden-
tifies and describes the fundamental
characteristics of the tire and also pro-
vides the tire identification number (TIN)
for safety standard certification. The TIN
can be used to identify the tire in case of a
recall.
Example
WDI0394
Maintenance and do-it-yourself8-35
ZREVIEW COPYÐ2008 Maxima(max)
Owners ManualÐUSA_English(nna)
06/08/07Ðdebbie
X
Page 284 of 328
s1Tire size (example: P215/65R15 95H)
1. P: The9P9indicates the tire is de-
signed for passenger vehicles (not all
tires have this information) .
2. Three-digit number (215): This num-
ber gives the width in millimeters of
the tire from sidewall edge to side-
wall edge.
3. Two-digit number (65): This number,
known as the aspect ratio, gives the
tire’s ratio of height to width.4. R: The9R9stands for radial.
5. Two-digit number (15): This number
is the wheel or rim diameter in inches.
6. Two- or three-digit number (95): This
number is the tire’s load index. It is a
measurement of how much weight
each tire can support. You may not
find this information on all tires be-
cause it is not required by law.7. H: Tire speed rating. You should not
drive the vehicle faster than the tire
speed rating.
Example
WDI0395
8-36Maintenance and do-it-yourself
ZREVIEW COPYÐ2008 Maxima(max)
Owners ManualÐUSA_English(nna)
06/08/07Ðdebbie
X