2008 NISSAN MAXIMA warning
[x] Cancel search: warningPage 33 of 328
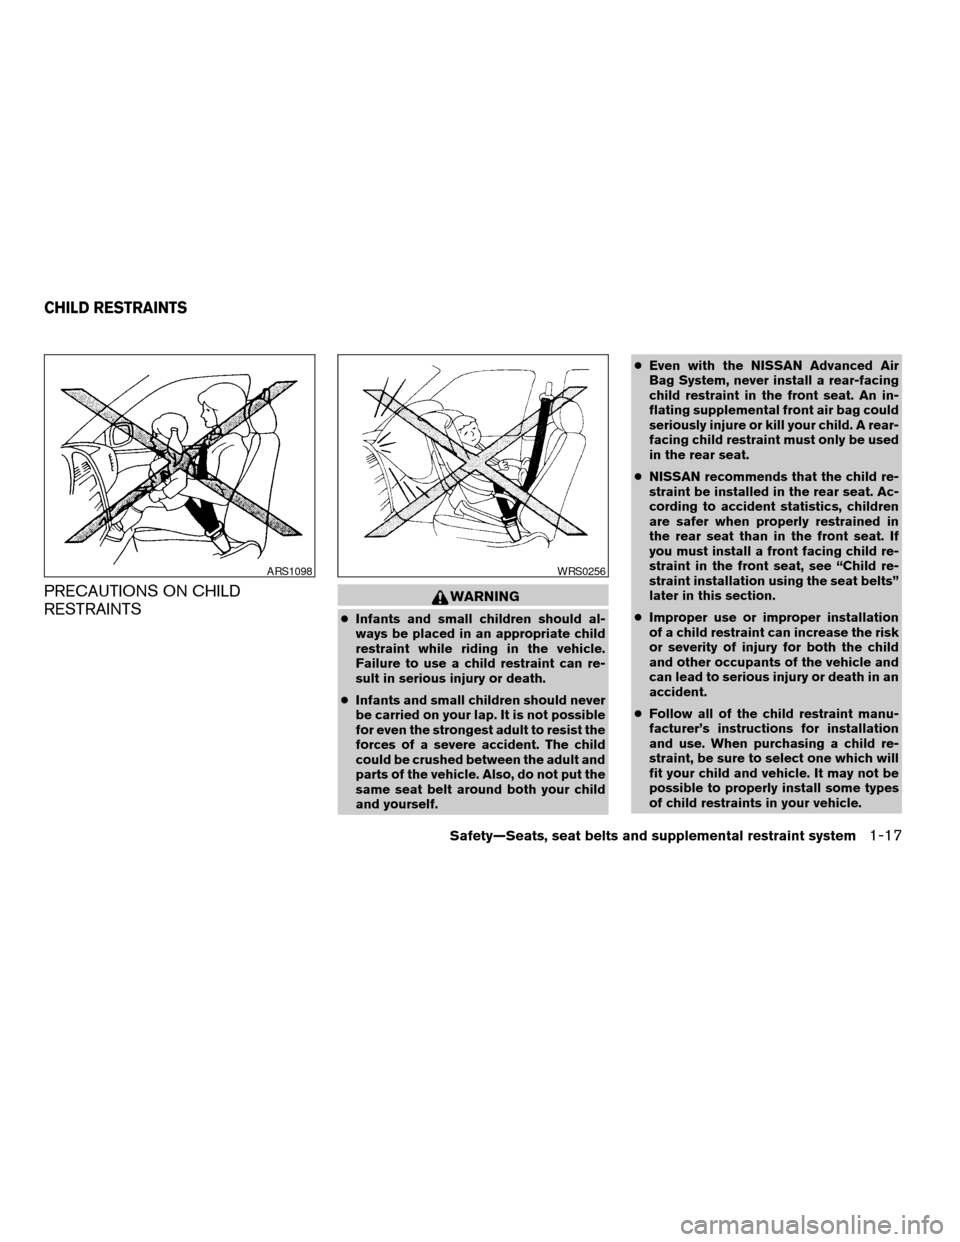
PRECAUTIONS ON CHILD
RESTRAINTSWARNING
cInfants and small children should al-
ways be placed in an appropriate child
restraint while riding in the vehicle.
Failure to use a child restraint can re-
sult in serious injury or death.
cInfants and small children should never
be carried on your lap. It is not possible
for even the strongest adult to resist the
forces of a severe accident. The child
could be crushed between the adult and
parts of the vehicle. Also, do not put the
same seat belt around both your child
and yourself.cEven with the NISSAN Advanced Air
Bag System, never install a rear-facing
child restraint in the front seat. An in-
flating supplemental front air bag could
seriously injure or kill your child. A rear-
facing child restraint must only be used
in the rear seat.
cNISSAN recommends that the child re-
straint be installed in the rear seat. Ac-
cording to accident statistics, children
are safer when properly restrained in
the rear seat than in the front seat. If
you must install a front facing child re-
straint in the front seat, see “Child re-
straint installation using the seat belts”
later in this section.
cImproper use or improper installation
of a child restraint can increase the risk
or severity of injury for both the child
and other occupants of the vehicle and
can lead to serious injury or death in an
accident.
cFollow all of the child restraint manu-
facturer’s instructions for installation
and use. When purchasing a child re-
straint, be sure to select one which will
fit your child and vehicle. It may not be
possible to properly install some types
of child restraints in your vehicle.
ARS1098WRS0256
CHILD RESTRAINTS
Safety—Seats, seat belts and supplemental restraint system1-17
ZREVIEW COPYÐ2008 Maxima(max)
Owners ManualÐUSA_English(nna)
06/08/07Ðdebbie
X
Page 35 of 328
LOWER ANCHORS AND TETHERS
FOR CHILDREN SYSTEM (LATCH)
Your vehicle is equipped with special anchor
points that are used with Lower Anchors and
Tethers for CHildren System (LATCH) compat-
ible child restraints. This system may also be
referred to as the ISOFIX or ISOFIX compatible
system. With this system, you do not have to use
a vehicle seat belt to secure the child restraint.
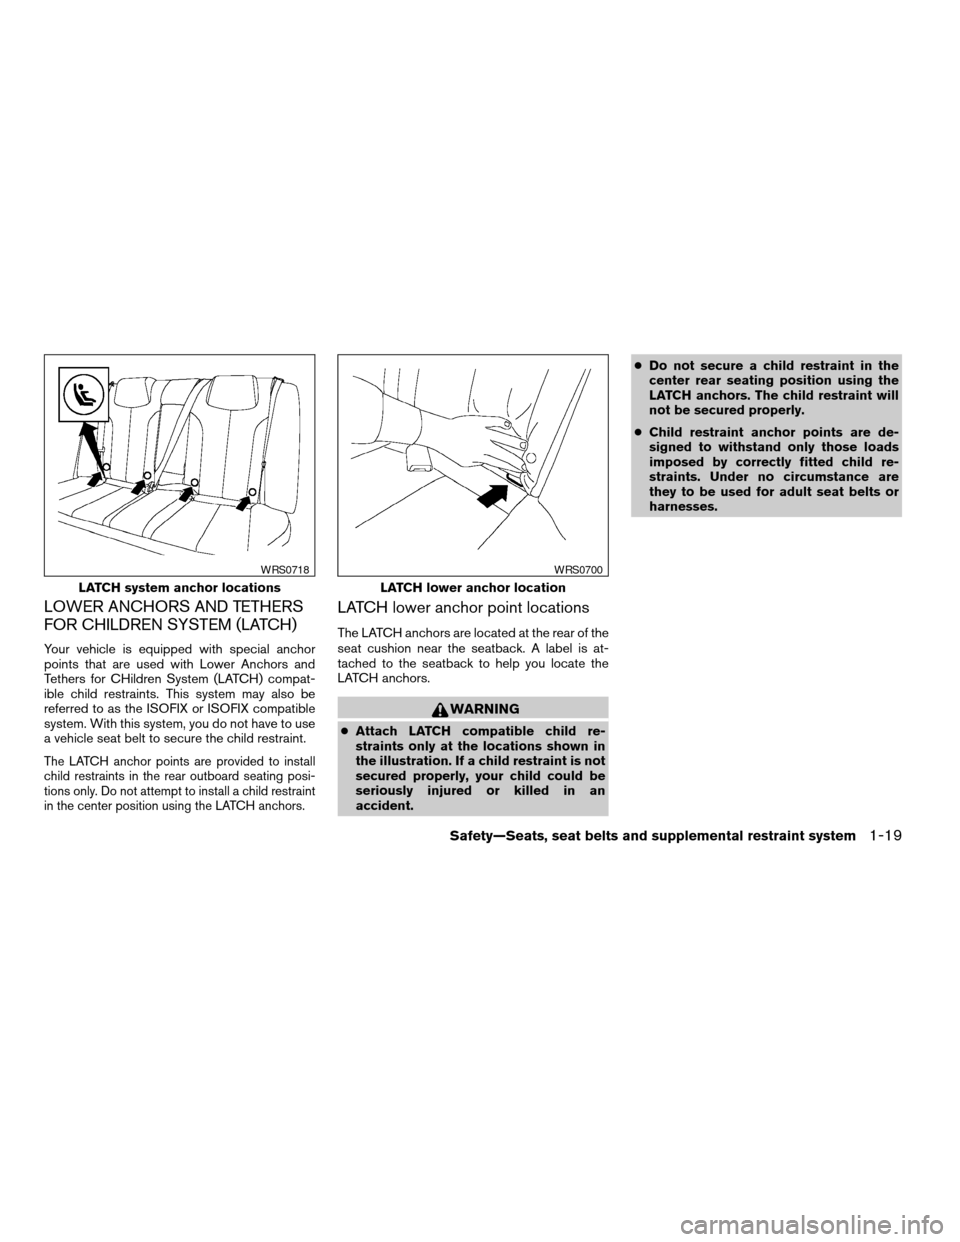
The LATCH anchor points are provided to install
child restraints in the rear outboard seating posi-
tions only. Do not attempt to install a child restraint
in the center position using the LATCH anchors.
LATCH lower anchor point locations
The LATCH anchors are located at the rear of the
seat cushion near the seatback. A label is at-
tached to the seatback to help you locate the
LATCH anchors.
WARNING
cAttach LATCH compatible child re-
straints only at the locations shown in
the illustration. If a child restraint is not
secured properly, your child could be
seriously injured or killed in an
accident.cDo not secure a child restraint in the
center rear seating position using the
LATCH anchors. The child restraint will
not be secured properly.
cChild restraint anchor points are de-
signed to withstand only those loads
imposed by correctly fitted child re-
straints. Under no circumstance are
they to be used for adult seat belts or
harnesses.
LATCH system anchor locations
WRS0718
LATCH lower anchor location
WRS0700
Safety—Seats, seat belts and supplemental restraint system1-19
ZREVIEW COPYÐ2008 Maxima(max)
Owners ManualÐUSA_English(nna)
06/08/07Ðdebbie
X
Page 36 of 328
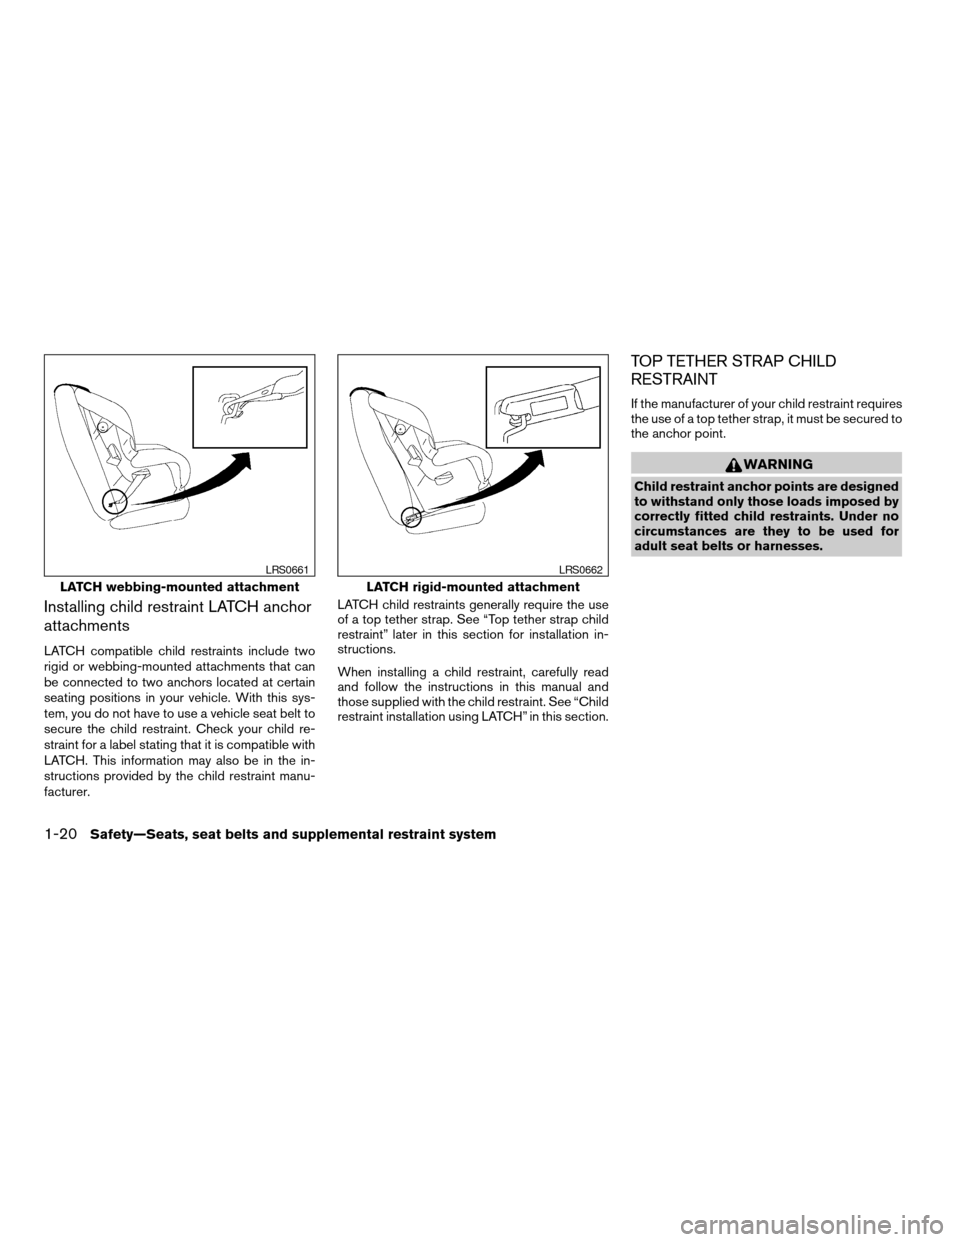
Installing child restraint LATCH anchor
attachments
LATCH compatible child restraints include two
rigid or webbing-mounted attachments that can
be connected to two anchors located at certain
seating positions in your vehicle. With this sys-
tem, you do not have to use a vehicle seat belt to
secure the child restraint. Check your child re-
straint for a label stating that it is compatible with
LATCH. This information may also be in the in-
structions provided by the child restraint manu-
facturer.LATCH child restraints generally require the use
of a top tether strap. See “Top tether strap child
restraint” later in this section for installation in-
structions.
When installing a child restraint, carefully read
and follow the instructions in this manual and
those supplied with the child restraint. See “Child
restraint installation using LATCH” in this section.
TOP TETHER STRAP CHILD
RESTRAINT
If the manufacturer of your child restraint requires
the use of a top tether strap, it must be secured to
the anchor point.
WARNING
Child restraint anchor points are designed
to withstand only those loads imposed by
correctly fitted child restraints. Under no
circumstances are they to be used for
adult seat belts or harnesses.
LATCH webbing-mounted attachment
LRS0661
LATCH rigid-mounted attachment
LRS0662
1-20Safety—Seats, seat belts and supplemental restraint system
ZREVIEW COPYÐ2008 Maxima(max)
Owners ManualÐUSA_English(nna)
06/08/07Ðdebbie
X
Page 37 of 328
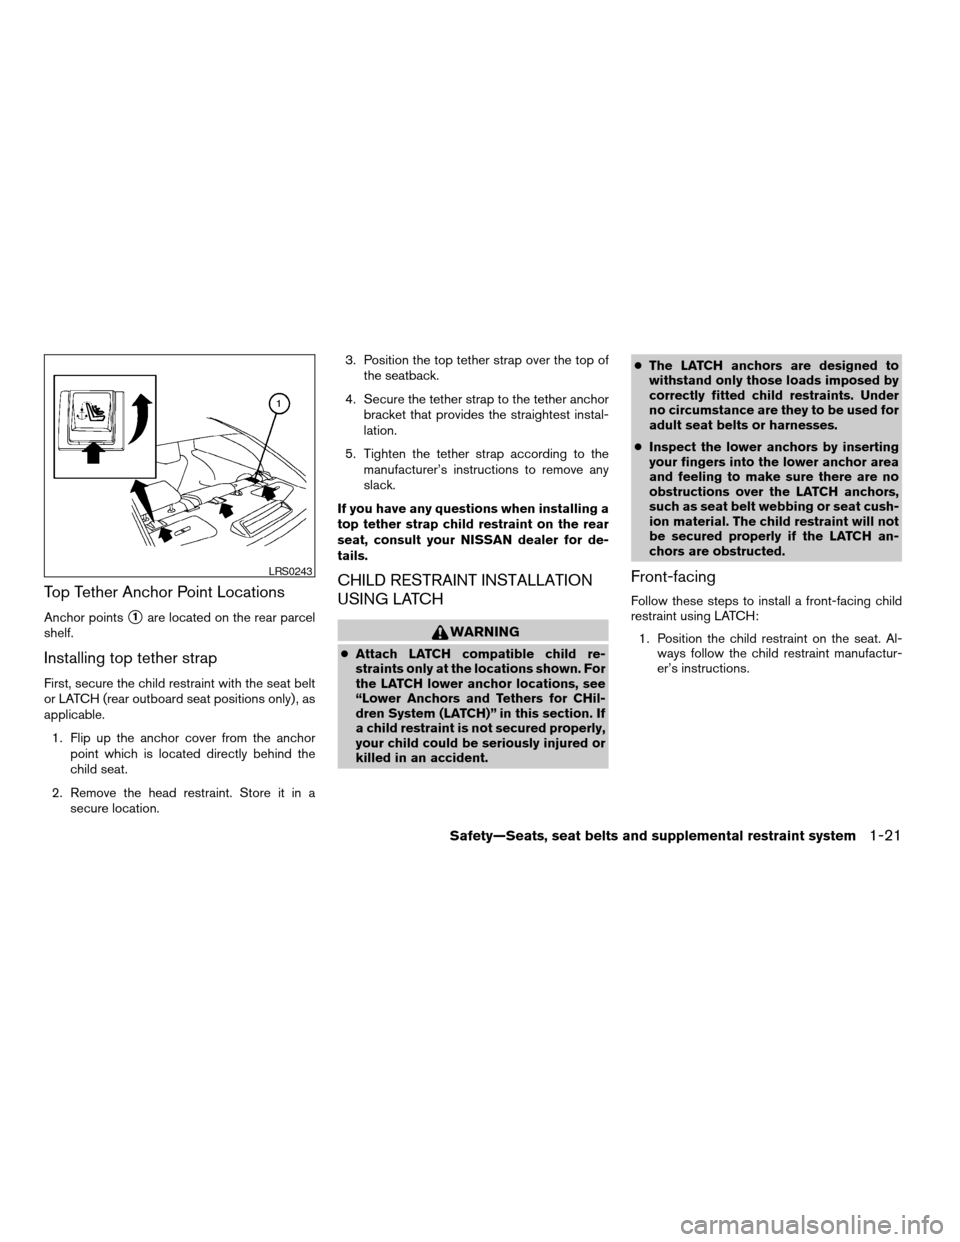
Top Tether Anchor Point Locations
Anchor pointss1are located on the rear parcel
shelf.
Installing top tether strap
First, secure the child restraint with the seat belt
or LATCH (rear outboard seat positions only) , as
applicable.
1. Flip up the anchor cover from the anchor
point which is located directly behind the
child seat.
2. Remove the head restraint. Store it in a
secure location.3. Position the top tether strap over the top of
the seatback.
4. Secure the tether strap to the tether anchor
bracket that provides the straightest instal-
lation.
5. Tighten the tether strap according to the
manufacturer’s instructions to remove any
slack.
If you have any questions when installing a
top tether strap child restraint on the rear
seat, consult your NISSAN dealer for de-
tails.
CHILD RESTRAINT INSTALLATION
USING LATCH
WARNING
cAttach LATCH compatible child re-
straints only at the locations shown. For
the LATCH lower anchor locations, see
“Lower Anchors and Tethers for CHil-
dren System (LATCH)” in this section. If
a child restraint is not secured properly,
your child could be seriously injured or
killed in an accident.cThe LATCH anchors are designed to
withstand only those loads imposed by
correctly fitted child restraints. Under
no circumstance are they to be used for
adult seat belts or harnesses.
cInspect the lower anchors by inserting
your fingers into the lower anchor area
and feeling to make sure there are no
obstructions over the LATCH anchors,
such as seat belt webbing or seat cush-
ion material. The child restraint will not
be secured properly if the LATCH an-
chors are obstructed.
Front-facing
Follow these steps to install a front-facing child
restraint using LATCH:
1. Position the child restraint on the seat. Al-
ways follow the child restraint manufactur-
er’s instructions.
LRS0243
Safety—Seats, seat belts and supplemental restraint system1-21
ZREVIEW COPYÐ2008 Maxima(max)
Owners ManualÐUSA_English(nna)
06/08/07Ðdebbie
X
Page 41 of 328
CHILD RESTRAINT INSTALLATION
USING THE SEAT BELTS
WARNING
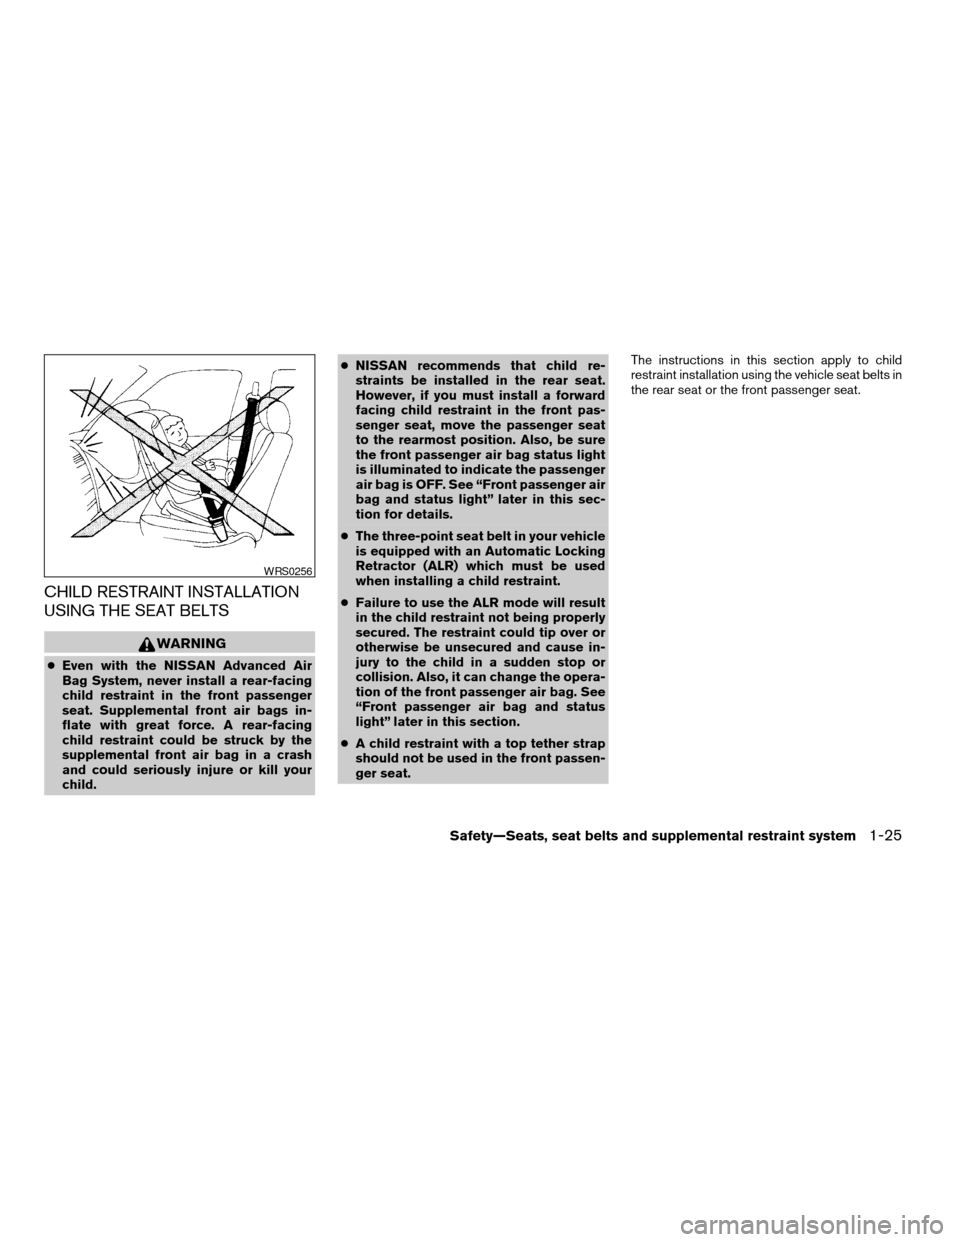
cEven with the NISSAN Advanced Air
Bag System, never install a rear-facing
child restraint in the front passenger
seat. Supplemental front air bags in-
flate with great force. A rear-facing
child restraint could be struck by the
supplemental front air bag in a crash
and could seriously injure or kill your
child.cNISSAN recommends that child re-
straints be installed in the rear seat.
However, if you must install a forward
facing child restraint in the front pas-
senger seat, move the passenger seat
to the rearmost position. Also, be sure
the front passenger air bag status light
is illuminated to indicate the passenger
air bag is OFF. See “Front passenger air
bag and status light” later in this sec-
tion for details.
cThe three-point seat belt in your vehicle
is equipped with an Automatic Locking
Retractor (ALR) which must be used
when installing a child restraint.
cFailure to use the ALR mode will result
in the child restraint not being properly
secured. The restraint could tip over or
otherwise be unsecured and cause in-
jury to the child in a sudden stop or
collision. Also, it can change the opera-
tion of the front passenger air bag. See
“Front passenger air bag and status
light” later in this section.
cA child restraint with a top tether strap
should not be used in the front passen-
ger seat.The instructions in this section apply to child
restraint installation using the vehicle seat belts in
the rear seat or the front passenger seat.
WRS0256
Safety—Seats, seat belts and supplemental restraint system1-25
ZREVIEW COPYÐ2008 Maxima(max)
Owners ManualÐUSA_English(nna)
06/08/07Ðdebbie
X
Page 47 of 328
7. Check that the retractor is in the Automatic
Locking Retractor mode by trying to pull
more seat belt out of the retractor. If you
cannot pull any more seat belt webbing out
of the retractor, the retractor is in the Auto-
matic Locking Retractor mode
8. Check to make sure that the child restraint is
properly secured prior to each use. If the belt
is not locked, repeat steps 3 through 6.
After the child restraint is removed and the seat
belt fully retracted, the Automatic Locking Re-
tractor mode (child restraint mode) is canceled.
PRECAUTIONS ON BOOSTER
SEATS
WARNING
cInfants and small children should al-
ways be placed in an appropriate child
restraint while riding in the vehicle.
Failure to use a child restraint or
booster seat can result in serious injury
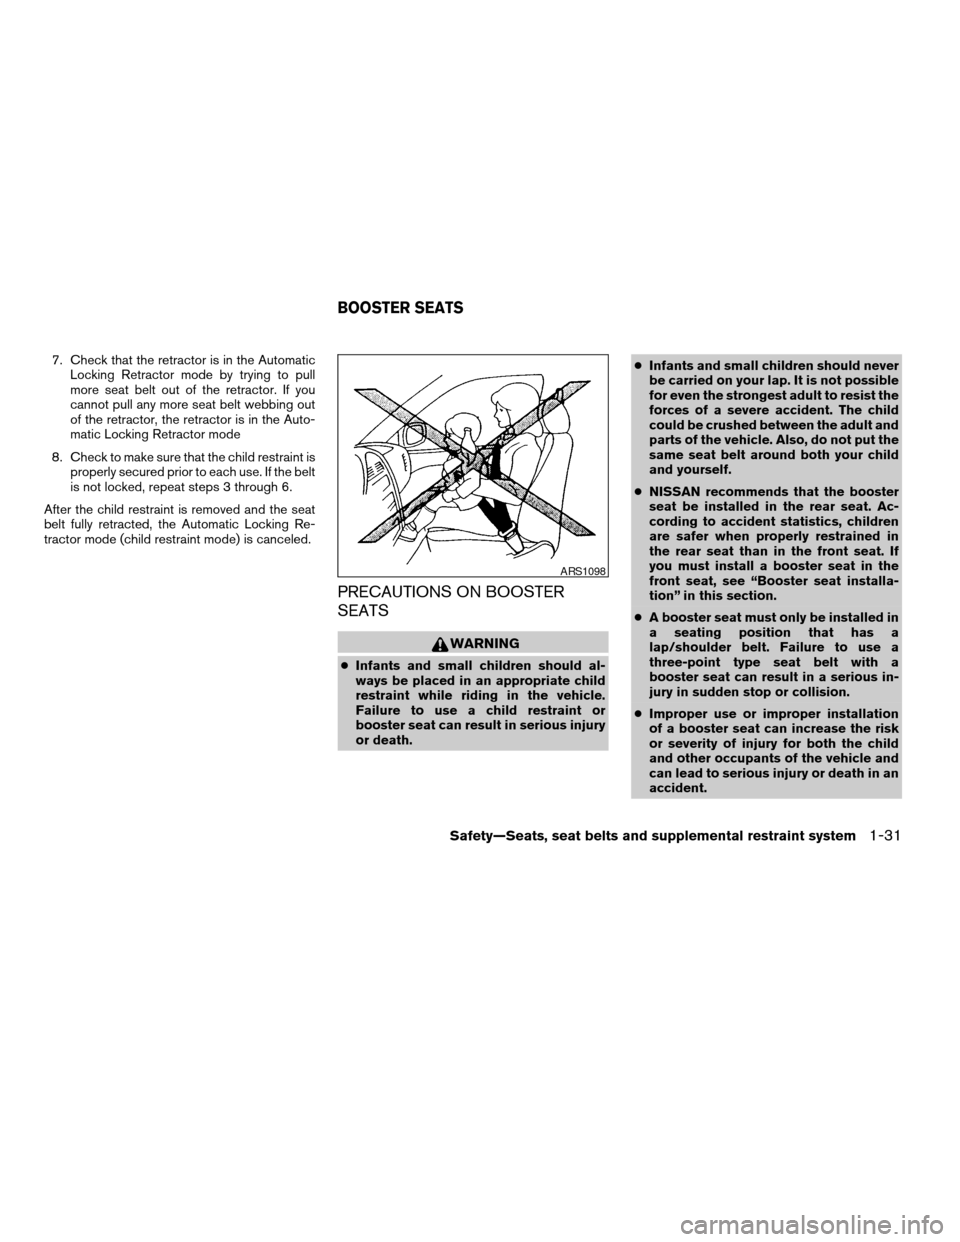
or death.cInfants and small children should never
be carried on your lap. It is not possible
for even the strongest adult to resist the
forces of a severe accident. The child
could be crushed between the adult and
parts of the vehicle. Also, do not put the
same seat belt around both your child
and yourself.
cNISSAN recommends that the booster
seat be installed in the rear seat. Ac-
cording to accident statistics, children
are safer when properly restrained in
the rear seat than in the front seat. If
you must install a booster seat in the
front seat, see “Booster seat installa-
tion” in this section.
cA booster seat must only be installed in
a seating position that has a
lap/shoulder belt. Failure to use a
three-point type seat belt with a
booster seat can result in a serious in-
jury in sudden stop or collision.
cImproper use or improper installation
of a booster seat can increase the risk
or severity of injury for both the child
and other occupants of the vehicle and
can lead to serious injury or death in an
accident.
ARS1098
BOOSTER SEATS
Safety—Seats, seat belts and supplemental restraint system1-31
ZREVIEW COPYÐ2008 Maxima(max)
Owners ManualÐUSA_English(nna)
06/08/07Ðdebbie
X
Page 49 of 328
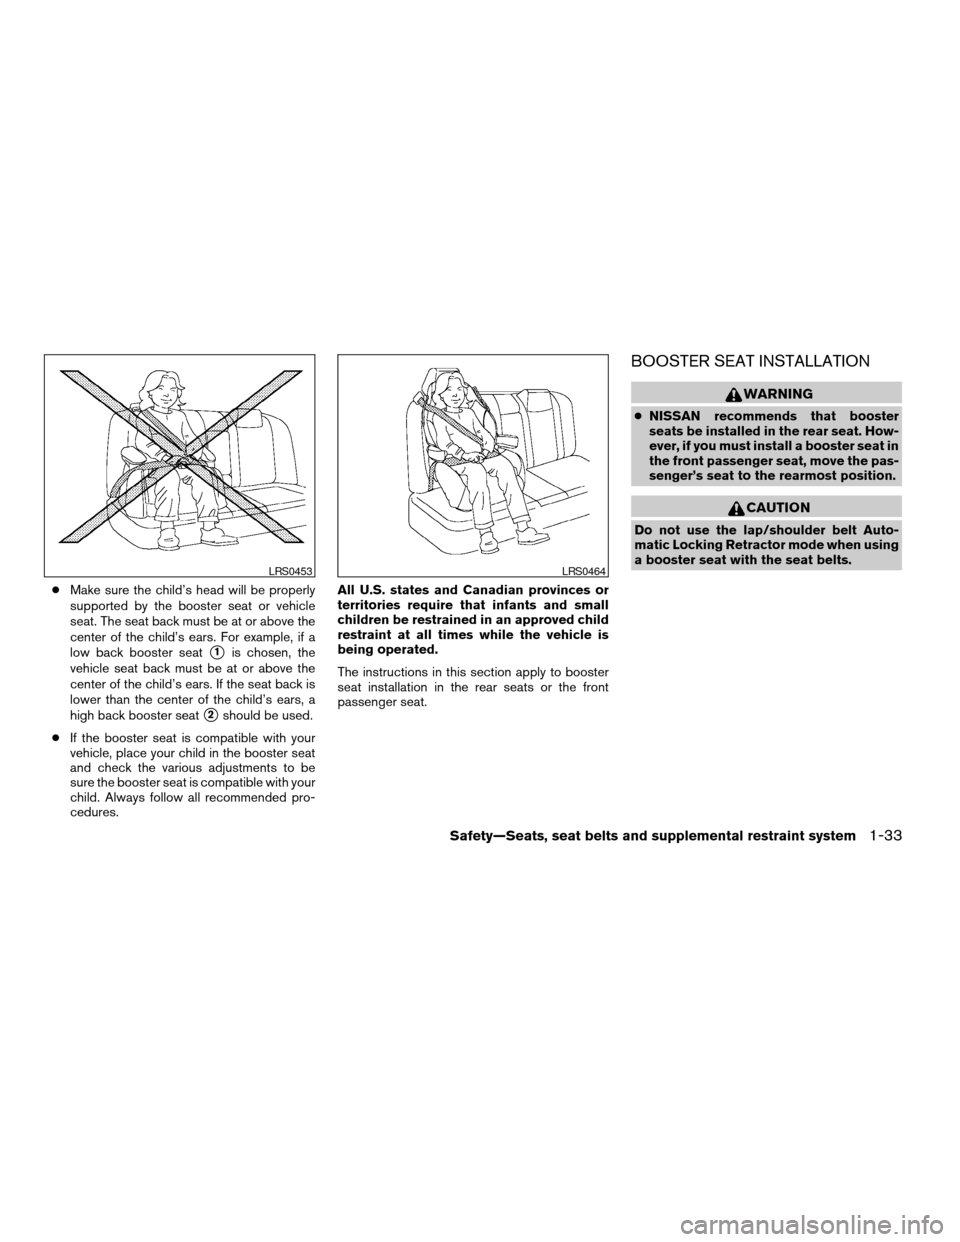
cMake sure the child’s head will be properly
supported by the booster seat or vehicle
seat. The seat back must be at or above the
center of the child’s ears. For example, if a
low back booster seat
s1is chosen, the
vehicle seat back must be at or above the
center of the child’s ears. If the seat back is
lower than the center of the child’s ears, a
high back booster seat
s2should be used.
cIf the booster seat is compatible with your
vehicle, place your child in the booster seat
and check the various adjustments to be
sure the booster seat is compatible with your
child. Always follow all recommended pro-
cedures.All U.S. states and Canadian provinces or
territories require that infants and small
children be restrained in an approved child
restraint at all times while the vehicle is
being operated.
The instructions in this section apply to booster
seat installation in the rear seats or the front
passenger seat.
BOOSTER SEAT INSTALLATION
WARNING
cNISSAN recommends that booster
seats be installed in the rear seat. How-
ever, if you must install a booster seat in
the front passenger seat, move the pas-
senger’s seat to the rearmost position.
CAUTION
Do not use the lap/shoulder belt Auto-
matic Locking Retractor mode when using
a booster seat with the seat belts.
LRS0453LRS0464
Safety—Seats, seat belts and supplemental restraint system1-33
ZREVIEW COPYÐ2008 Maxima(max)
Owners ManualÐUSA_English(nna)
06/08/07Ðdebbie
X
Page 51 of 328

4. Position the lap portion of the seat belt low
and snug on the child’s hips. Be sure to
follow the booster seat manufacturer’s in-
structions for adjusting the belt routing.
5. Pull the shoulder belt portion of the seat belt
toward the retractor to take up extra slack.
Be sure the shoulder belt is positioned
across the top, middle portion of the child’s
shoulder. Be sure to follow the booster seat
manufacturer’s instructions for adjusting the
belt routing.
6. Follow the warnings, cautions and instruc-
tions for properly fastening a seat belt
shown in the “Three-point seat belt with
retractor” earlier in this section.
7. If the booster seat is installed in the front
passenger seat, turn the ignition switch to
the ON position. The front passenger air bag
status light
may or may not illuminate,
depending on the size of the child and the
type of booster seat being used. See “Front
passenger air bag and status light” later in
this section.
PRECAUTIONS ON
SUPPLEMENTAL RESTRAINT
SYSTEM
This Supplemental Restraint System (SRS) sec-
tion contains important information concerning
the driver and passenger supplemental front air
bags (NISSAN Advanced Air Bag System) , front
seat-mounted side-impact supplemental air
bags, roof-mounted curtain side-impact supple-
mental air bag and seat belt pretensioners.
Supplemental front impact air bag system:
The NISSAN Advanced Air Bag System can help
cushion the impact force to the head and chest of
the driver and front passenger in certain frontal
collisions.
Front seat-mounted side-impact supple-
mental air bag system:This system can help
cushion the impact force to the chest and pelvic
area of the driver and front passenger in certain
side impact collisions. The front seat side-impact
supplemental side air bags are designed to in-
flate on the side where the vehicle is impacted.
Roof-mounted curtain side-impact supple-
mental air bag system:This system can help
cushion the impact force to the head of occu-
pants in front and rear outboard seating positions
in certain side impact collisions. The curtain side-
Front passenger position
LRS0454
SUPPLEMENTAL RESTRAINT
SYSTEM
Safety—Seats, seat belts and supplemental restraint system1-35
ZREVIEW COPYÐ2008 Maxima(max)
Owners ManualÐUSA_English(nna)
06/08/07Ðdebbie
X