2008 NISSAN FRONTIER tow
[x] Cancel search: towPage 154 of 352

Electric control type (if so equipped)
The outside mirror remote control will operate
only when the ignition switch is in the ACC or ON
position.
Move the small switch
s1to select the right or left
mirror. Adjust each mirror to the desired position
using the large switch
s2.
Manual control type
The outside mirror can be moved in any direction
for a better rear view.
Heated mirrors (if so equipped)
Some outside mirrors can be heated to defrost,
defog, or de-ice for improved visibility. For addi-
tional information, see “Rear window and outside
mirror defroster switch” in the “Instrument and
controls” section of this manual.
Foldable outside mirrors
Pull the outside mirror toward the door to fold it.
LPD0237WPD0170LPD0259
3-14Pre-driving checks and adjustments
ZREVIEW COPYÐ2008 08+ Truck/Frontier(fro)
Owners ManualÐUSA_English(nna)
06/30/07Ðdebbie
X
Page 156 of 352

2. Hold the tailgate at a 45 degree angle.
3. Pull the tailgate out from the right side hinge.
4. Slide the tailgate out of the left side hinge.
Installing the tailgate
1. Insert the tailgate into the left side hinge.
2. Hold the tailgate at a 45 degree angle and
insert into the right side hinge.
3. Continue to hold the tailgate at a 45 degree
angle and attach the tailgate support cables.
4. Close the tailgate securely.
Locking the tailgate
To lock the tailgate, turn the key toward the pas-
senger side of the vehicle
s1. To unlock, turn the
key toward the driver side
s2.
Both the master key and the valet key can be
used to lock and unlock the tailgate.
TIE DOWN HOOKS (if so equipped)
For your convenience, tie down hooks are placed
at each corner of the truck box. These may be
used to help secure cargo loaded into the truck
box.
cThe weight of the cargo load must be evenly
distributed over both the front and the rear
axles.
cAll cargo should be securely fastened with
ropes or straps to prevent it from shifting or
sliding within the vehicle.
LPD0272LTI0102
3-16Pre-driving checks and adjustments
ZREVIEW COPYÐ2008 08+ Truck/Frontier(fro)
Owners ManualÐUSA_English(nna)
06/30/07Ðdebbie
X
Page 203 of 352

cDo not stop or park the vehicle over
flammable materials such as dry grass,
waste paper or rags. They may ignite
and cause a fire.
CAUTION
cDo not use leaded gasoline. Deposits
from leaded gasoline will seriously re-
duce the three-way catalyst’s ability to
help reduce exhaust pollutants.
cKeep your engine tuned up. Malfunc-
tions in the ignition, fuel injection, or
electrical systems can cause overrich
fuel flow into the three-way catalyst,
causing it to overheat. Do not keep driv-
ing if the engine misfires, or if notice-
able loss of performance or other un-
usual operating conditions are
detected. Have the vehicle inspected
promptly by a NISSAN dealer.
cAvoid driving with an extremely low fuel
level. Running out of fuel could cause
the engine to misfire, damaging the
three-way catalyst.
cDo not race the engine while warming it
up.
cDo not push or tow your vehicle to start
the engine.
TIRE PRESSURE MONITORING
SYSTEM (TPMS)
Each tire, including the spare (if provided) ,
should be checked monthly when cold and in-
flated to the inflation pressure recommended by
the vehicle manufacturer on the vehicle placard
or tire inflation pressure label. (If your vehicle has
tires of a different size than the size indicated on
the vehicle placard or tire inflation pressure label,
you should determine the proper tire inflation
pressure for those tires.)
As an added safety feature, your vehicle has been
equipped with a Tire Pressure Monitoring System
(TPMS) that illuminates a low tire pressure telltale
when one or more of your tires is significantly
under-inflated. Accordingly, when the low tire
pressure telltale illuminates, you should stop and
check your tires as soon as possible, and inflate
them to the proper pressure. Driving on a signifi-
cantly under-inflated tire causes the tire to over-
heat and can lead to tire failure. Under-inflation
also reduces fuel efficiency and tire tread life, and
may affect the vehicle’s handling and stopping
ability.
Please note that the TPMS is not a substitute for
proper tire maintenance, and it is the driver’s
responsibility to maintain correct tire pressure,even if under-inflation has not reached the level to
trigger illumination of the TPMS low tire pressure
telltale.
Your vehicle has also been equipped with a
TPMS malfunction indicator to indicate when the
system is not operating properly. The TPMS mal-
function indicator is combined with the low tire
pressure telltale. When the system detects a
malfunction, the telltale will flash for approxi-
mately one minute and then remain continuously
illuminated. This sequence will continue upon
subsequent vehicle start-ups as long as the mal-
function exists. When the malfunction indicator is
illuminated, the system may not be able to detect
or signal low tire pressure as intended. TPMS
malfunctions may occur for a variety of reasons,
including the installation of replacement or alter-
nate tires or wheels on the vehicle that prevent
the TPMS from functioning properly. Always
check the TPMS malfunction telltale after replac-
ing one or more tires or wheels on your vehicle to
ensure that the replacement or alternate tires and
wheels allow the TPMS to continue to function
properly.
Additional information:
cThe TPMS does not monitor the tire pres-
sure of the spare tire.
cThe TPMS will activate only when the vehicle
is driven at speeds above 16 MPH (25
Starting and driving5-3
ZREVIEW COPYÐ2008 08+ Truck/Frontier(fro)
Owners ManualÐUSA_English(nna)
06/30/07Ðdebbie
X
Page 209 of 352

To remove the key from the ignition switch:
1. Shift the selector lever to the P (Park) posi-
tion with the key in the ON position.
2. Turn the key to the LOCK position.
3. Remove the key from the ignition.
If the selector lever is shifted to the P (Park)
position after the key is turned to the OFF posi-
tion or when the key cannot be turned to the
LOCK position, proceed as follows to remove the
key.
1. Move the shift selector lever into the P (Park)
position.
2. Turn the ignition key slightly toward the ON
position.
3. Turn the key to the LOCK position.
4. Remove the key.
The shift selector lever is designed so it cannot
moved out of P (Park) and into any of the other
gear positions if the ignition key is turned to OFF
position or if the key is removed from the switch.
The shift selector lever can be moved if the
ignition switch is in the ON position and the
foot brake pedal is depressed.There is an OFF position between the
LOCK and ACC positions. The OFF position
is indicated by a “1” on the key cylinder.
When the ignition is in the OFF position,
the steering wheel is not locked.
In order for the steering wheel to be locked, it
must be turned about 1/8 of a turn clockwise
from the straight up position.
To lock the steering wheel, turn the key to
the LOCK position. Remove the key. To
unlock the steering wheel, insert the key
and turn it gently while rotating the steer-
ing wheel slightly right and left.
If the key will not turn from the LOCK posi-
tion, turn the steering wheel to the left or
right while turning the key to unlock the
key cylinder.
MANUAL TRANSMISSION
The ignition switch includes a device that helps
prevent accidental removal of the key while driv-
ing.
The key can only be removed when the ignition
switch is in the LOCK position.
On manual transmission models, to turn the igni-
tion key to LOCK position from ACC or ON
position, turn the key to OFF, push the key in, then
turn the key to LOCK.
In order for the steering wheel to be locked, it
must be turned about 1/8 of a turn clockwise
from the straight up position.
WSD0058
Starting and driving5-9
ZREVIEW COPYÐ2008 08+ Truck/Frontier(fro)
Owners ManualÐUSA_English(nna)
06/30/07Ðdebbie
X
Page 220 of 352

cThe vehicle may not maintain the set speed
when going up or down steep hills. If this
happens, drive without the cruise control.
To cancel the preset speed,use one of the
following three methods.
cPush the CANCEL button; the SET indicator
light in the instrument panel goes out.
cTap the brake pedal; the SET indicator light
goes out.
cTurn the main switch off. Both the CRUISE
indicator light and SET indicator light in the
instrument panel go out.
The cruise control is automatically canceled and
the SET light in the instrument panel goes out if:
cyou depress the brake or clutch pedal while
pushing the ACCEL/RES or COAST/SET
switch. The preset speed is deleted from
memory.
cthe vehicle slows down more than 8 MPH
(13 km/h) below the set speed.
cyou depress the clutch pedal (manual trans-
mission) , or move the shift selector lever to N
(Neutral) (automatic transmission) .To reset at a faster cruising speed,use one
of the following three methods.
cDepress the accelerator pedal. When the
vehicle attains the desired speed, push and
release the COAST/SET switch.
cPush and hold the ACCEL/RES switch.
When the vehicle attains the speed you de-
sire, release the switch.
cPush and release the ACCEL/RES switch.
Each time you do this, the set speed in-
creases by about 1 MPH (1.6 km/h) .
To reset at a slower cruising speed,use one
of the following three methods.
cLightly tap the brake pedal. When the ve-
hicle attains the desired speed, push the
COAST/SET switch and release it.
cPush and hold the COAST/SET switch. Re-
lease the switch when the vehicle slows to
the desired speed.
cPush and release the COAST/SET switch.
Each time you do this, the set speed de-
creases by about 1 MPH (1.6 km/h) .
To resume the preset speed,push and re-
lease the ACCEL/RES switch. The vehicle re-
turns to the last set cruising speed when the
vehicle speed is over 25 MPH (40 km/h) .CAUTION
During the first 1,200 miles (2,000 km) ,
follow these recommendations to obtain
maximum engine performance and en-
sure the future reliability and economy of
your new vehicle. Failure to follow these
recommendations may result in short-
ened engine life and reduced engine
performance.
cAvoid driving for long periods at constant
speed, either fast or slow, and do not run the
engine over 4,000 rpm.
cDo not accelerate at full throttle in any gear.
cAvoid quick starts.
cAvoid hard braking as much as possible.
cDo not tow a trailer for the first 500 miles
(800 km) . Your engine, axle or other parts
could be damaged.
BREAK-IN SCHEDULE
5-20Starting and driving
ZREVIEW COPYÐ2008 08+ Truck/Frontier(fro)
Owners ManualÐUSA_English(nna)
06/30/07Ðdebbie
X
Page 229 of 352

WARNING
cDo not stop or park the vehicle over
flammable materials such as dry grass,
waste paper or rags. They may ignite
and cause a fire.
cSafe parking procedures require that
both the parking brake be set and the
transmission placed into P (Park) for
automatic transmission models or in an
appropriate gear for manual transmis-
sion models. Failure to do so could
cause the vehicle to move unexpectedly
or roll away and result in an accident.Make sure the shift lever has been
pushed as far forward as it can go and
cannot be moved without depressing
the foot brake pedal.
cNever leave the engine running while
the vehicle is unattended.
cDo not leave children unattended inside
the vehicle. They could unknowingly ac-
tivate switches or controls. Unattended
children could become involved in seri-
ous accidents.
1. Firmly apply the parking brake.
2.Manual transmission models:Place the shift lever in the R (Reverse) posi-
tion. When parking on an uphill grade, place
the shift lever in 1st gear.
Automatic transmission models:
Move the shift selector lever to the P (Park)
position.
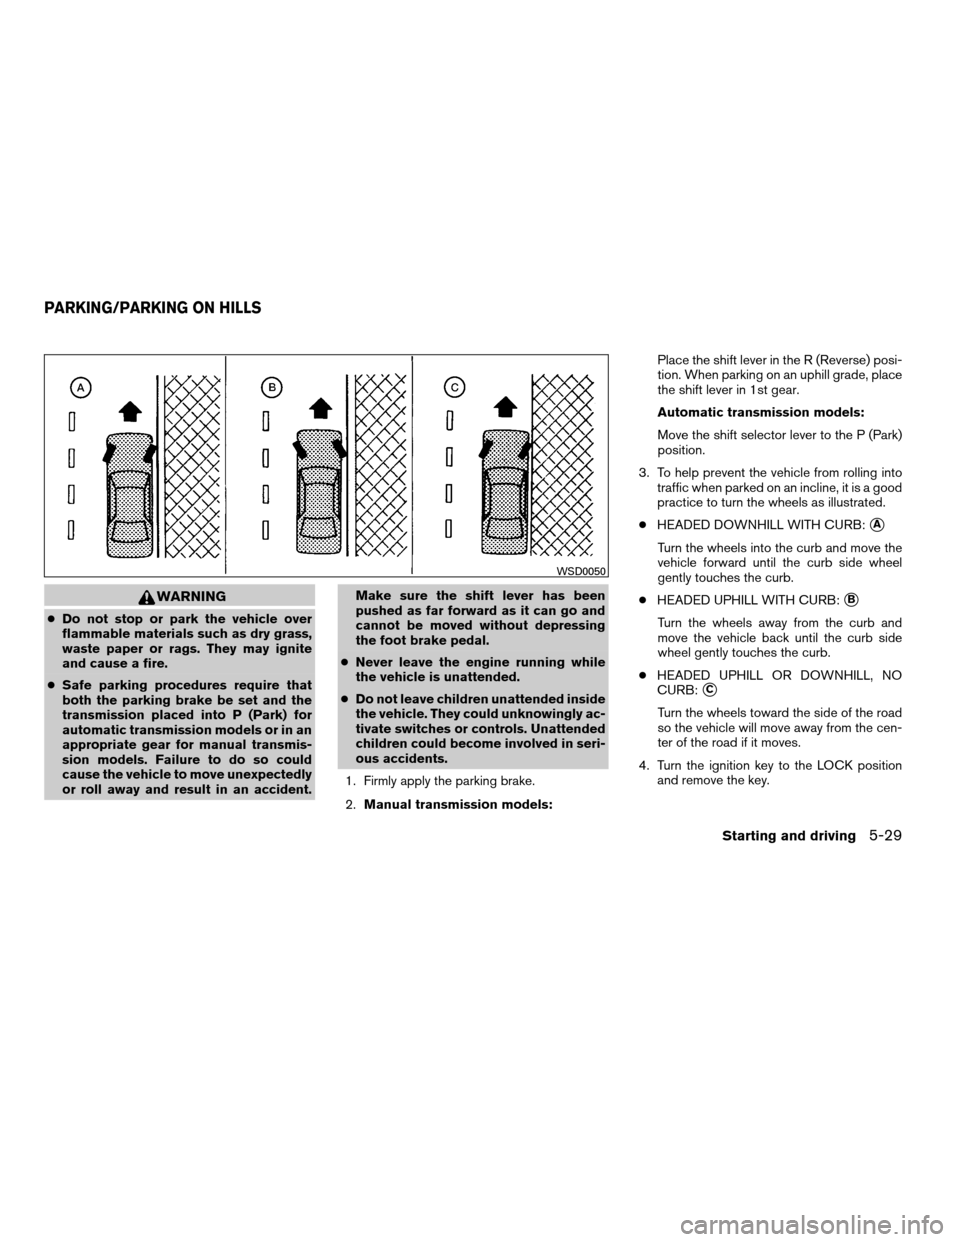
3. To help prevent the vehicle from rolling into
traffic when parked on an incline, it is a good
practice to turn the wheels as illustrated.
cHEADED DOWNHILL WITH CURB:
sA
Turn the wheels into the curb and move the
vehicle forward until the curb side wheel
gently touches the curb.
cHEADED UPHILL WITH CURB:
sB
Turn the wheels away from the curb and
move the vehicle back until the curb side
wheel gently touches the curb.
cHEADED UPHILL OR DOWNHILL, NO
CURB:
sC
Turn the wheels toward the side of the road
so the vehicle will move away from the cen-
ter of the road if it moves.
4. Turn the ignition key to the LOCK position
and remove the key.
WSD0050
PARKING/PARKING ON HILLS
Starting and driving5-29
ZREVIEW COPYÐ2008 08+ Truck/Frontier(fro)
Owners ManualÐUSA_English(nna)
06/30/07Ðdebbie
X
Page 239 of 352

6 In case of emergency
First aid kit (if so equipped).........................6-2
Flat tire...........................................6-3
Tire Pressure Monitoring System (TPMS)..........6-3
Changing a flat tire.............................6-3
Jump starting.....................................6-9Push starting.....................................6-11
If your vehicle overheats...........................6-11
Towing your vehicle...............................6-12
Towing recommended by NISSAN..............6-13
Vehicle recovery (freeing a stuck vehicle).........6-15
ZREVIEW COPYÐ2008 08+ Truck/Frontier(fro)
Owners ManualÐUSA_English(nna)
06/30/07Ðdebbie
X
Page 243 of 352

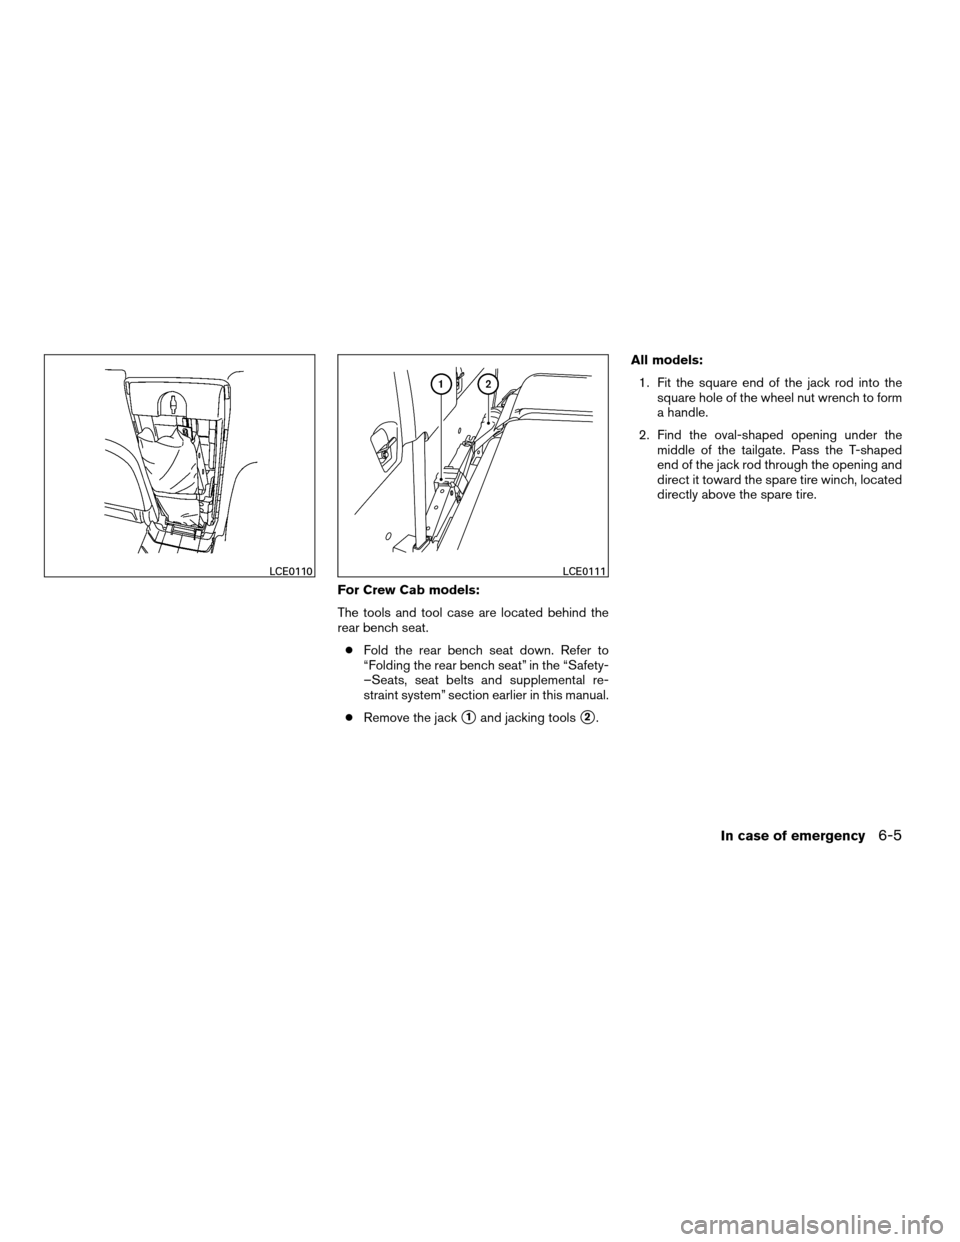
For Crew Cab models:
The tools and tool case are located behind the
rear bench seat.
cFold the rear bench seat down. Refer to
“Folding the rear bench seat” in the “Safety-
–Seats, seat belts and supplemental re-
straint system” section earlier in this manual.
cRemove the jack
s1and jacking toolss2.All models:
1. Fit the square end of the jack rod into the
square hole of the wheel nut wrench to form
a handle.
2. Find the oval-shaped opening under the
middle of the tailgate. Pass the T-shaped
end of the jack rod through the opening and
direct it toward the spare tire winch, located
directly above the spare tire.
LCE0110LCE0111
In case of emergency6-5
ZREVIEW COPYÐ2008 08+ Truck/Frontier(fro)
Owners ManualÐUSA_English(nna)
06/30/07Ðdebbie
X