2008 NISSAN FRONTIER key battery
[x] Cancel search: key batteryPage 176 of 352

for 5 seconds. When scanning, SCAN illumi-
nates in the display and the radio station blinks.
When temporarily stopped on a station, SCAN
blinks and the radio station display is solid.
Pressing the SEEK/TRACK button
oragain during this 5 second period stops
scan tuning and the radio remains tuned to that
radio station.
Station memory operations:
18 stations can be set for the FM and AM radio to
the A, B and C preset button in any combination
of AM or FM stations.
1. Press the PRESET A·B·C button to change
between storage banks. The radio displays
the icon A, B or C to indicate which set of
presets are active.
2. Tune to the desired station using manual
TUNE or SEEK tuning. Press and hold any of
the desired station memory buttons (1 – 6)
until a beep sound is heard. (The radio mutes
when the select button is pressed.)
3. The channel indicator will then come on and
the sound will resume. Programming is now
complete.
4. Other buttons can be set in the same man-
ner.If the battery cable is disconnected, or if the fuse
opens, the radio memory will be canceled. In that
case, reset the desired stations.
Compact disc (CD) player operation
Turn the ignition key to the ACC or ON position,
and carefully insert the compact disc into the slot
with the label side up. The compact disc is auto-
matically pulled into the slot and starts to play.
If the radio is already operating, it automatically
turns off and the compact disc begins to play.
CD button:
When the CD button is pressed with a compact
disc loaded and the radio playing, the radio turns
off and the compact disc starts to play.
SEEK/TRACK button:
When the SEEK/TRACK button
is
pressed while the compact disc is playing, the
next track following the present one starts to play
from the beginning. Press SEEK/TRACK
button
several times to skip several tracks.
Each time the button is pressed, the CD ad-
vances 1 additional track. The track number ap-
pears in the display window. (When the last track
on the compact disc is skipped, the first track is
played.)When SEEK/TRACK button
is pressed,
the track being played returns to the beginning.
Press SEEK/TRACK button
several times
to skip back several tracks. Each time the button
is pressed the CD moves back 1 track.
SEEK/TRACK (FF/REV)
button:
Press and hold the SEEK/TRACK button
orwhile a compact disc is playing, the
compact disc plays at an increased speed while
fast forwarding or rewinding. When the button is
released, the compact disc returns to normal play
speed.
MENU button:
When the MENU button is pressed while the
compact disc is playing, the play pattern changes
as follows:
RPTÃ!MIXÃ!Normal
RPT: The track that is currently playing will be
repeated.
MIX: The order of the tracks on the disc will be
mixed during play, not following the sequence on
the compact disc. The same track may be re-
peated twice. Press the
button while in the
MIX mode and tracks will be chosen at random.
When a new compact disc is inserted, the play
pattern automatically changes to normal.
4-18Heater, air conditioner, audio and phone systems
ZREVIEW COPYÐ2008 08+ Truck/Frontier(fro)
Owners ManualÐUSA_English(nna)
06/30/07Ðdebbie
X
Page 181 of 352

5. Other buttons can be set in the same man-
ner.
If the battery cable is disconnected, or if the fuse
opens, the radio memory will be canceled. In that
case, reset the desired stations.
Radio data system (RDS):
RDS stands for Radio Data System, and is a data
information service transmitted by some radio
stations on the FM band (not AM band) . Cur-
rently, most RDS stations are in large cities, but
many stations are now considering broadcasting
RDS data.
RDS can display:
cStation call sign, such as “WHFR 98.3”.
cStation name, such as “The Groove”.
cMusic or programming type such as “Clas-
sical”, “Country”, or “Rock”.
cArtist and song information.
If the station broadcasts RDS information, the
RDS icon is displayed.
Compact disc (CD) changer operation
Turn the ignition key to the ACC or ON position
and insert the compact disc into the slot with the
label side facing up. The compact disc will beguided automatically into the slot and start play-
ing. To insert the disc, first press the
LOAD
button.
If the radio is already operating, it will automati-
cally turn off and the compact disc will play.
If the system has been turned off while the com-
pact disc was playing, pressing the PWR/VOL
control knob will start the compact disc.
Do not use 3.1 in (8 cm) diameter compact discs
in the CD changer.
LOAD button:
To insert a CD in the CD changer, press the load
button
for less than 1.5 seconds. Select
the loading slot by pressing the CD insert select
button (1 – 6) , then insert the CD.
To insert 6 CDs to the CD changer, press the
load button for more than 1.5 seconds.
The slot numbers (1 – 6) will illuminate on the
display when CDs are loaded into the changer.
CD button:
When the CD button is pressed with the system
off and the compact disc loaded, the system will
turn on and the compact disc will start to play.When the CD button is pressed with the com-
pact disc loaded with the radio playing, the radio
will automatically be turned off and the compact
disc will start to play.
SEEK/TRACK button:
When the
button is pressed for less than
1.5 seconds while a compact disc is playing, the
track being played returns to its beginning. Press
several times to skip back through tracks. The
compact disc will go back the number of times
the button is pressed.
When the
button is pressed for less than
1.5 seconds while the compact disc is playing,
the next track will start to play from its beginning.
Press several times to skip through tracks. The
compact disc will advance the number of times
the button is pressed. (When the last track on the
compact disc is skipped through, the first track
will be played.)
CAT FOLDER button:
While playing a CD, press the CAT FOLDER
button
orto fast forward or rewind a
track on a CD.
Heater, air conditioner, audio and phone systems4-23
ZREVIEW COPYÐ2008 08+ Truck/Frontier(fro)
Owners ManualÐUSA_English(nna)
06/30/07Ðdebbie
X
Page 201 of 352

5 Starting and driving
Precautions when starting and driving................5-2
Exhaust gas (carbon monoxide)..................5-2
Three-way catalyst..............................5-2
Tire Pressure Monitoring System (TPMS)..........5-3
On-pavement and off-road driving
precautions....................................5-5
Avoiding collision and rollover....................5-5
Drinking alcohol/drugs and driving................5-6
Driving safety precautions.......................5-6
Ignition switch.....................................5-8
Automatic transmission..........................5-8
Manual transmission............................5-9
Key positions.................................5-10
Nissan vehicle immobilizer system...............5-10
Before starting the engine.........................5-10
Starting the engine...............................5-11
Driving the vehicle................................5-12
Automatic transmission.........................5-12
Manual transmission (if so equipped)............5-16
Parking brake....................................5-18
Cruise control (if so equipped).....................5-19
Precautions on cruise control...................5-19
Cruise control operations.......................5-19
Break-in schedule................................5-20Increasing fuel economy...........................5-21Using four wheel drive (4WD).............5-21
Transfer case shifting procedures...............5-22
Electronic locking rear differential (E-Lock) system
(if so equipped)..................................5-27
Parking/parking on hills............................5-29
Power steering...................................5-30
Brake system....................................5-30
Brake precautions.............................5-30
Anti-lock Braking System (ABS).................5-31
Active brake limited slip (ABLS) system
(if so equipped)..................................5-32
Vehicle Dynamic Control (VDC) system
(if so equipped)..................................5-32
Hill descent control system (if so equipped).........5-34
Hill start assist system (if so equipped)..............5-34
Cold weather driving..............................5-35
Freeing a frozen door lock......................5-35
Anti-freeze....................................5-35
Battery.......................................5-35
Draining of coolant water.......................5-35
Tire equipment................................5-35
Special winter equipment.......................5-36
Driving on snow or ice.........................5-36
Engine block heater (if so equipped).............5-36
ZREVIEW COPYÐ2008 08+ Truck/Frontier(fro)
Owners ManualÐUSA_English(nna)
06/30/07Ðdebbie
X
Page 214 of 352

Do not downshift into the 1 position at speeds
over the following and do not exceed the follow-
ing speeds in the 1 position.
2WD and AUTO:
43 MPH (70 km/h)
4H:
43 MPH (70 km/h)
4LO:
31 MPH (50 km/h)
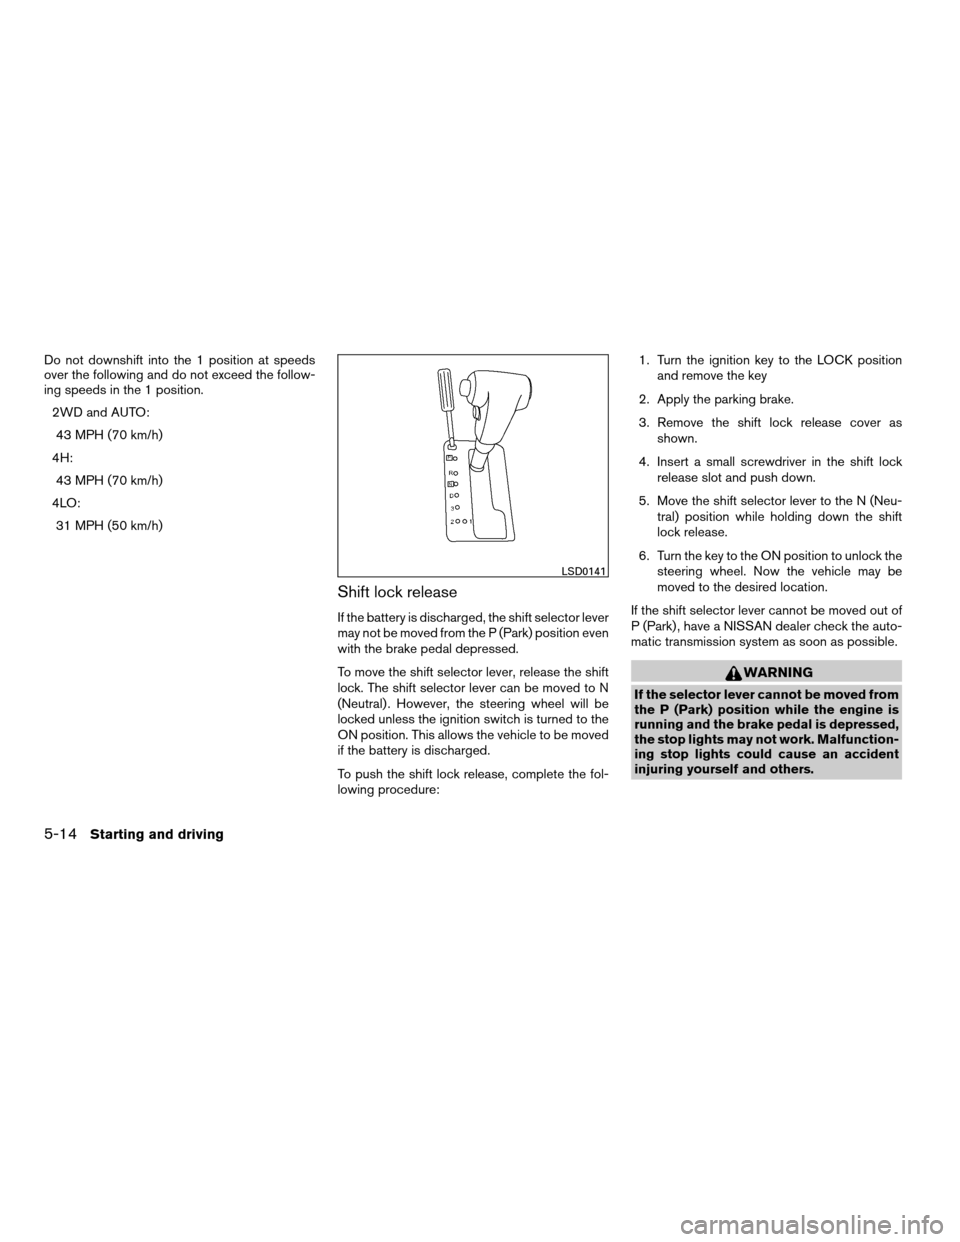
Shift lock release
If the battery is discharged, the shift selector lever
may not be moved from the P (Park) position even
with the brake pedal depressed.
To move the shift selector lever, release the shift
lock. The shift selector lever can be moved to N
(Neutral) . However, the steering wheel will be
locked unless the ignition switch is turned to the
ON position. This allows the vehicle to be moved
if the battery is discharged.
To push the shift lock release, complete the fol-
lowing procedure:1. Turn the ignition key to the LOCK position
and remove the key
2. Apply the parking brake.
3. Remove the shift lock release cover as
shown.
4. Insert a small screwdriver in the shift lock
release slot and push down.
5. Move the shift selector lever to the N (Neu-
tral) position while holding down the shift
lock release.
6. Turn the key to the ON position to unlock the
steering wheel. Now the vehicle may be
moved to the desired location.
If the shift selector lever cannot be moved out of
P (Park) , have a NISSAN dealer check the auto-
matic transmission system as soon as possible.
WARNING
If the selector lever cannot be moved from
the P (Park) position while the engine is
running and the brake pedal is depressed,
the stop lights may not work. Malfunction-
ing stop lights could cause an accident
injuring yourself and others.
LSD0141
5-14Starting and driving
ZREVIEW COPYÐ2008 08+ Truck/Frontier(fro)
Owners ManualÐUSA_English(nna)
06/30/07Ðdebbie
X
Page 235 of 352

The hill start assist system automatically keeps
the brakes applied to help prevent the vehicle
from rolling backwards in the time it takes the
driver to release the brake pedal and apply the
accelerator when the vehicle is stopped on a hill.
Hill start assist will operate automatically under
the following conditions:
cThe selector lever is shifted to a forward or
reverse gear.
cThe vehicle is stopped completely on a hill
by applying the brake.
The maximum holding time is 2 seconds. After 2
seconds the vehicle will begin to roll back and hill
start assist will stop operating completely.
Hill start assist will not operate when the selector
lever is shifted to N or P or on a flat and level road.FREEING A FROZEN DOOR LOCK
To prevent a door lock from freezing, apply de-
icer through the key hole. If the lock becomes
frozen, heat the key before inserting it into the key
hole or use the remote keyless entry keyfob (if so
equipped) .
ANTI-FREEZE
In the winter when it is anticipated that the tem-
perature will drop below 32°F (0°C) , check the
anti-freeze to assure proper winter protection.
For details, see “Engine cooling system” in the
“Maintenance and do-it-yourself” section of this
manual.
BATTERY
If the battery is not fully charged during extremely
cold weather conditions, the battery fluid may
freeze and damage the battery. To maintain maxi-
mum efficiency, the battery should be checked
regularly. For details, see “Battery” in the “Main-
tenance and do-it-yourself” section of this
manual.
DRAINING OF COOLANT WATER
If the vehicle is to be left outside without anti-
freeze, drain the cooling system, including the
engine block. Refill before operating the vehicle.
For details, see “Changing engine coolant” in the
“Maintenance and do-it-yourself” section of this
manual.
TIRE EQUIPMENT
1. SUMMER tires have a tread designed to
provide superior performance on dry pave-
ment. However, the performance of these
tires will be substantially reduced in snowy
and icy conditions. If you operate your ve-
hicle on snowy or icy roads, NISSAN recom-
mends the use of MUD & SNOW or ALL
SEASON TIRES on all four wheels. Please
consult a NISSAN dealer for the tire type,
size, speed rating and availability informa-
tion.
2. For additional traction on icy roads, studded
tires may be used. However, some U.S.
states and Canadian provinces prohibit their
use. Check local, state and provincial laws
before installing studded tires.
Skid and traction capabilities of studded
snow tires on wet or dry surfaces may be
poorer than that of non-studded snow tires.
COLD WEATHER DRIVING
Starting and driving5-35
ZREVIEW COPYÐ2008 08+ Truck/Frontier(fro)
Owners ManualÐUSA_English(nna)
06/30/07Ðdebbie
X
Page 248 of 352

WARNING
Always follow the instructions below.
Failure to do so could result in damage to
the charging system and cause personal
injury.
1. If the booster battery is in another vehicle,
position the two vehicles to bring their bat-
teries near each other.
Do not allow the two vehicles to touch.2. Apply the parking brake. Move the shift lever
to N (Neutral) (manual transmission) or to P
(Park) (automatic transmission) . Switch off
all unnecessary electrical systems (lights,
heater, air conditioner, etc.) .
3. Remove vent caps on the battery (if so
equipped) . Cover the battery with an old
cloth to reduce explosion hazard.
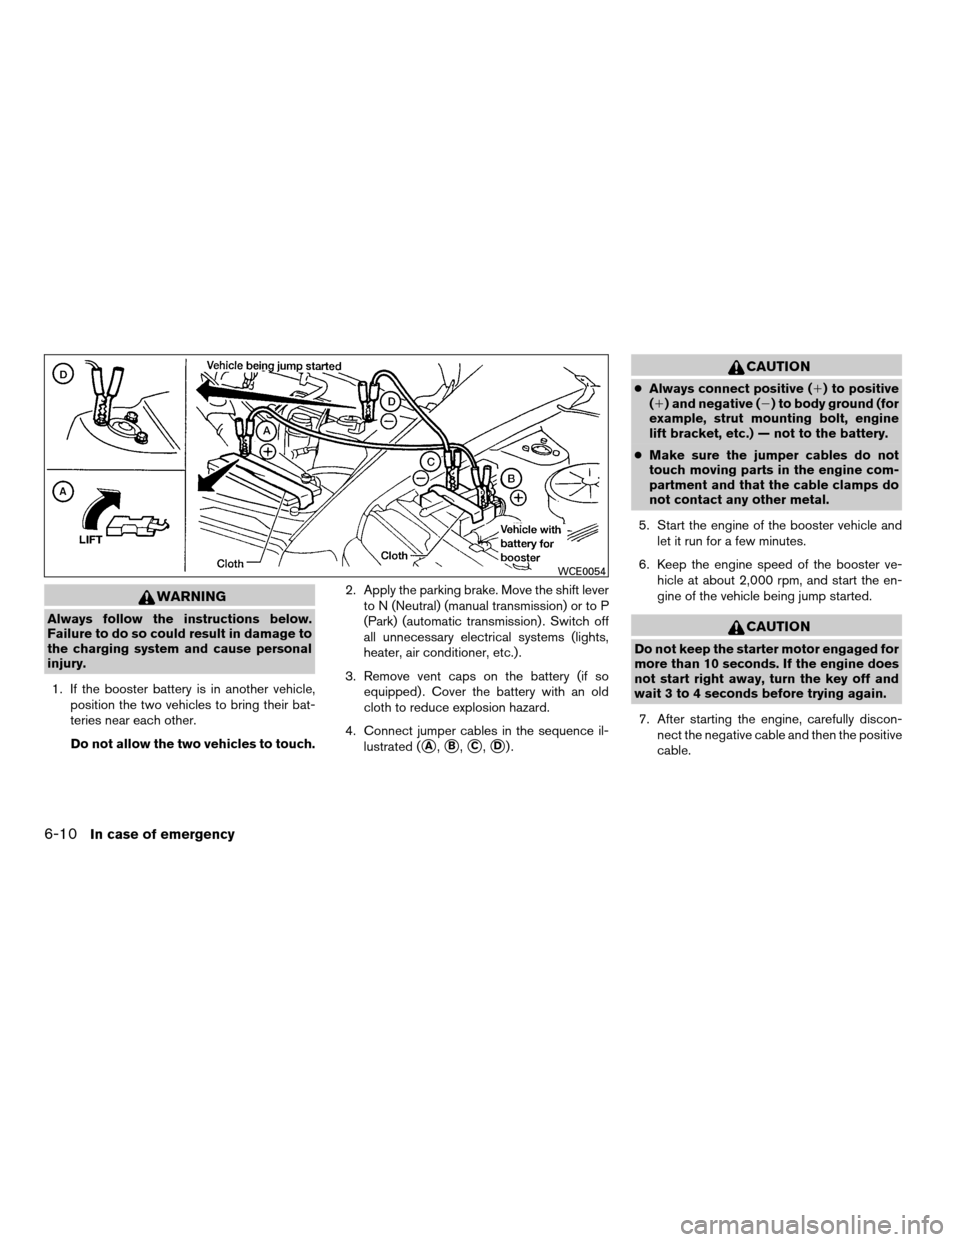
4. Connect jumper cables in the sequence il-
lustrated (
sA,sB,sC,sD).
CAUTION
cAlways connect positive (1) to positive
(1) and negative (2) to body ground (for
example, strut mounting bolt, engine
lift bracket, etc.) — not to the battery.
cMake sure the jumper cables do not
touch moving parts in the engine com-
partment and that the cable clamps do
not contact any other metal.
5. Start the engine of the booster vehicle and
let it run for a few minutes.
6. Keep the engine speed of the booster ve-
hicle at about 2,000 rpm, and start the en-
gine of the vehicle being jump started.
CAUTION
Do not keep the starter motor engaged for
more than 10 seconds. If the engine does
not start right away, turn the key off and
wait 3 to 4 seconds before trying again.
7. After starting the engine, carefully discon-
nect the negative cable and then the positive
cable.
WCE0054
6-10In case of emergency
ZREVIEW COPYÐ2008 08+ Truck/Frontier(fro)
Owners ManualÐUSA_English(nna)
06/30/07Ðdebbie
X
Page 261 of 352

8 Maintenance and do-it-yourself
Maintenance requirements..........................8-2
General maintenance..............................8-2
Explanation of general maintenance items.........8-2
Maintenance precautions...........................8-5
Engine compartment check locations................8-6
Engine cooling system.............................8-8
Checking engine coolant level...................8-8
Changing engine coolant........................8-9
Engine oil.........................................8-9
Checking engine oil level........................8-9
Changing engine oil...........................8-10
Changing engine oil filter.......................8-12
5-speed automatic transmission fluid...............8-13
Power steering fluid...............................8-13
Brake and clutch fluid.............................8-14
Brake fluid....................................8-14
Clutch fluid...................................8-14
Window washer fluid.............................8-15
Window washer fluid reservoir..................8-15
Battery..........................................8-15
Jump starting.................................8-17
Variable Voltage Control System...................8-17Drive belt........................................8-18
Spark plugs......................................8-19
Replacing spark plugs.........................8-19
Air cleaner.......................................8-20
In-cabin microfilter.............................8-21
Windshield wiper blades..........................8-22
Cleaning.....................................8-22
Replacing....................................8-22
Brakes..........................................8-23
Fuses...........................................8-24
Engine compartment...........................8-25
Passenger compartment.......................8-26
Keyfob battery replacement........................8-27
Lights...........................................8-28
Headlights....................................8-28
Exterior and interior lights.......................8-30
Wheels and tires.................................8-33
Tire pressure..................................8-33
Tire labeling...................................8-36
Types of tires..................................8-39
Tire chains....................................8-40
Changing wheels and tires.....................8-40
ZREVIEW COPYÐ2008 08+ Truck/Frontier(fro)
Owners ManualÐUSA_English(nna)
06/30/07Ðdebbie
X
Page 265 of 352

When performing any inspection or maintenance
work on your vehicle, always take care to prevent
serious accidental injury to yourself or damage to
the vehicle. The following are general precau-
tions which should be closely observed.
WARNING
cPark the vehicle on a level surface, ap-
ply the parking brake securely and
block the wheels to prevent the vehicle
from moving. Move the shift selector
lever to P (Park) .
cBe sure the ignition key is in the OFF or
LOCK position when performing any
parts replacement or repairs.
cIf you must work with the engine run-
ning, keep your hands, clothing, hair
and tools away from moving fans, belts
and any other moving parts.
cIt is advisable to secure or remove any
loose clothing and remove any jewelry,
such as rings, watches, etc. before
working on your vehicle.
cAlways wear eye protection whenever
you work on your vehicle.cYour vehicle is equipped with an auto-
matic engine cooling fan. It may come
on at any time without warning, even if
the ignition key is in the OFF position
and the engine is not running. To avoid
injury, always disconnect the negative
battery cable before working near the
fan.
cIf you must run the engine in an en-
closed space such as a garage, be sure
there is proper ventilation for exhaust
gases to escape.
cNever get under the vehicle while it is
supported only by a jack. If it is neces-
sary to work under the vehicle, support
it with safety stands.
cKeep smoking materials, flame and
sparks away from the fuel tank and
battery.
cOn gasoline engine models, the fuel
filter or fuel lines should be serviced by
a NISSAN dealer because the fuel lines
are under high pressure even when the
engine is off.
CAUTION
cDo not work under the hood while the
engine is hot. Turn the engine off and
wait until it cools down.
cAvoid contact with used engine oil and
coolant. Improperly disposed engine
oil, engine coolant and/or other vehicle
fluids can damage the environment. Al-
ways conform to local regulations for
disposal of vehicle fluid.
cNever leave the engine or automatic
transmission related component har-
nesses disconnected while the ignition
switch is in the ON position.
cNever connect or disconnect the battery
or any transistorized component while
the ignition switch is in the ON position.
This “Maintenance and do-it-yourself” section
gives instructions regarding only those items
which are relatively easy for an owner to perform.
A genuine NISSAN service manual is also avail-
able. See “Owner’s Manual/Service Manual or-
der information” in the “Technical and consumer
information” section of this manual.
You should be aware that incomplete or improper
servicing may result in operating difficulties or
excessive emissions, and could affect warranty
coverage.If in doubt about any servicing,
have it done by a NISSAN dealer.
MAINTENANCE PRECAUTIONS
Maintenance and do-it-yourself8-5
ZREVIEW COPYÐ2008 08+ Truck/Frontier(fro)
Owners ManualÐUSA_English(nna)
06/30/07Ðdebbie
X