2008 NISSAN ARMADA seats
[x] Cancel search: seatsPage 268 of 456
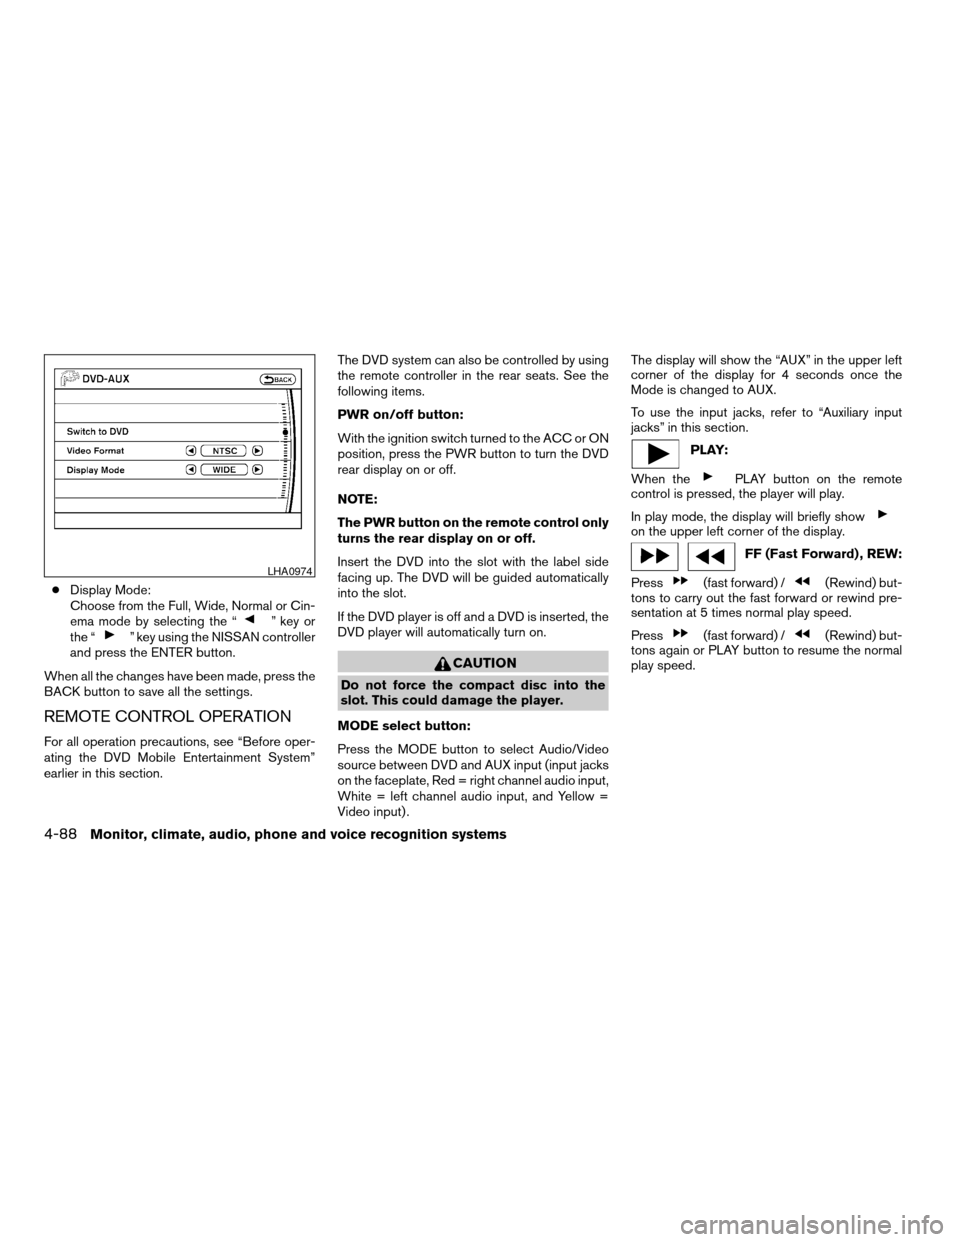
cDisplay Mode:
Choose from the Full, Wide, Normal or Cin-
ema mode by selecting the “
” key or
the “” key using the NISSAN controller
and press the ENTER button.
When all the changes have been made, press the
BACK button to save all the settings.
REMOTE CONTROL OPERATION
For all operation precautions, see “Before oper-
ating the DVD Mobile Entertainment System”
earlier in this section.The DVD system can also be controlled by using
the remote controller in the rear seats. See the
following items.
PWR on/off button:
With the ignition switch turned to the ACC or ON
position, press the PWR button to turn the DVD
rear display on or off.
NOTE:
The PWR button on the remote control only
turns the rear display on or off.
Insert the DVD into the slot with the label side
facing up. The DVD will be guided automatically
into the slot.
If the DVD player is off and a DVD is inserted, the
DVD player will automatically turn on.
CAUTION
Do not force the compact disc into the
slot. This could damage the player.
MODE select button:
Press the MODE button to select Audio/Video
source between DVD and AUX input (input jacks
on the faceplate, Red = right channel audio input,
White = left channel audio input, and Yellow =
Video input) .The display will show the “AUX” in the upper left
corner of the display for 4 seconds once the
Mode is changed to AUX.
To use the input jacks, refer to “Auxiliary input
jacks” in this section.
PLAY:
When the
PLAY button on the remote
control is pressed, the player will play.
In play mode, the display will briefly show
on the upper left corner of the display.
FF (Fast Forward) , REW:
Press
(fast forward) /(Rewind) but-
tons to carry out the fast forward or rewind pre-
sentation at 5 times normal play speed.
Press
(fast forward) /(Rewind) but-
tons again or PLAY button to resume the normal
play speed.
LHA0974
4-88Monitor, climate, audio, phone and voice recognition systems
ZREVIEW COPYÐ2008 Armada(wzw)
Owners ManualÐUSA_English(nna)
03/05/07Ðarosenma
X
Page 319 of 456
cWhen a spare tire is mounted or a wheel
is replaced, tire pressure will not be
indicated, the TPMS will not function
and the low tire pressure warning light
will flash for approximately 1 minute.
The light will remain on after 1 minute.
Contact your NISSAN dealer as soon as
possible for tire replacement and/or
system resetting.
cReplacing tires with those not originally
specified by NISSAN could affect the
proper operation of the TPMS.
cDo not inject any tire liquid or aerosol
tire sealant into the tires, as this may
cause a malfunction of the tire pressure
sensors.
CAUTION
Do not place metalized film or any metal
parts (antenna, etc.) on the windows. This
may cause poor reception of the signals
from the tire pressure sensors, and the
TPMS will not function properly.
Some devices and transmitters may temporarily
interfere with the operation of the TPMS and
cause the low tire pressure warning light to illu-
minate.Some examples are:
– Facilities or electric devices using similar radio
frequencies are near the vehicle.
– If a transmitter set to similar frequencies is
being used in or near the vehicle.
– If a computer (or similar equipment) or a
DC/AC converter is being used in or near the
vehicle.
FCC Notice:
Changes or modifications not expressly ap-
proved by the party responsible for compli-
ance could void the user’s authority to op-
erate the equipment.
This device complies with Part 15 of the
FCC Rules and RSS-210 of Industry
Canada.
Operation is subject to the following two
conditions: (1) This device may not cause
harmful interference, and (2) this device
must accept any interference received, in-
cluding interference that may cause undes-
ired operation of the device.
AVOIDING COLLISION AND
ROLLOVER
WARNING
Failure to operate this vehicle in a safe
and prudent manner may result in loss of
control or an accident.
Be alert and drive defensively at all times. Obey
all traffic regulations. Avoid excessive speed,
high speed cornering, or sudden steering ma-
neuvers, because these driving practices could
cause you to lose control of your vehicle.As with
any vehicle, loss of control could result in a
collision with other vehicles or objects, or
cause the vehicle to roll over, particularly if
the loss of control causes the vehicle to
slide sideways.
Be attentive at all times, and
avoid driving when tired. Never drive when under
the influence of alcohol or drugs (including pre-
scription or over-the-counter drugs which may
cause drowsiness) . Always wear your seat belt as
outlined in the “Safety – Seats, seat belts and
supplemental restraint system” section of this
manual, and also instruct your passengers to do so.
Seat belts help reduce the risk of injury in colli-
sions and rollovers.In a rollover crash, an
unbelted or improperly belted person is
Starting and driving5-5
ZREVIEW COPYÐ2008 Armada(wzw)
Owners ManualÐUSA_English(nna)
03/05/07Ðarosenma
X
Page 366 of 456
Occasionally remove loose dust from the interior
trim, plastic parts and seats using a vacuum
cleaner or soft bristled brush. Wipe the vinyl and
leather surfaces with a clean, soft cloth damp-
ened in mild soap solution, then wipe clean with a
dry, soft cloth.
Regular care and cleaning is required in order to
maintain the appearance of the leather.
Before using any fabric protector, read the manu-
facturer’s recommendations. Some fabric pro-
tectors contain chemicals that may stain or
bleach the seat material.
Use a cloth dampened only with water to clean
the meter and gauge lens.
CAUTION
cNever use benzine, thinner or any simi-
lar material.
cSmall dirt particles can be abrasive and
damaging to leather surfaces and
should be removed promptly. Do not
use saddle soap, car waxes, polishes,
oils, cleaning fluids, solvents, deter-
gents or ammonia-based cleaners as
they may damage the leather’s natural
finish.cNever use fabric protectors unless rec-
ommended by the manufacturer.
cDo not use glass or plastic cleaner on
meter or gauge lens covers. It may dam-
age the lens cover.
FLOOR MATS
The use of genuine NISSAN floor mats can ex-
tend the life of your vehicle carpet and make it
easier to clean the interior.No matter what
mats are used, be sure they are fitted for
your vehicle and are properly positioned in
the footwell to prevent interference with
pedal operation.Mats should be maintained
with regular cleaning and replaced if they be-
come excessively worn.
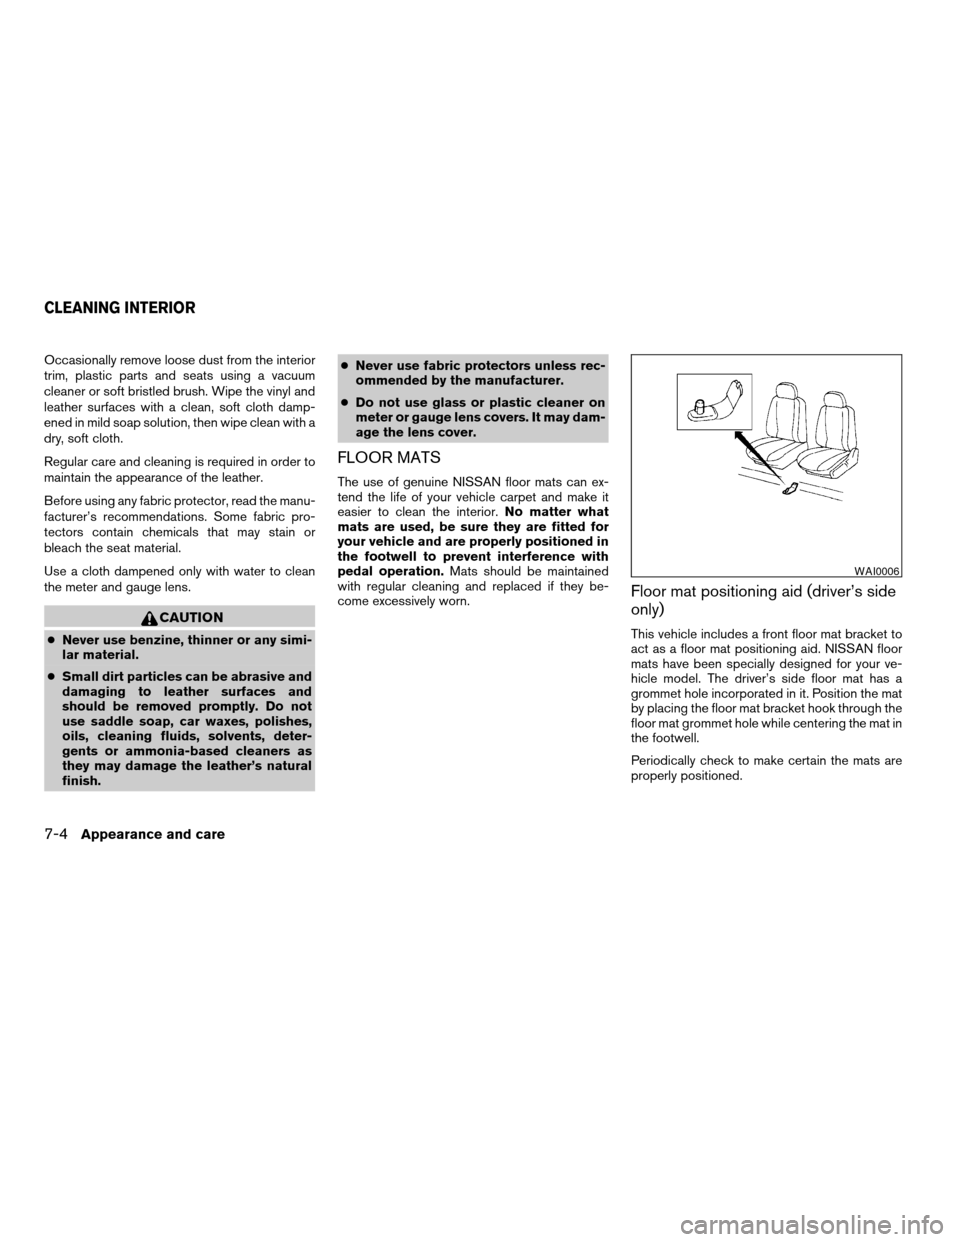
Floor mat positioning aid (driver’s side
only)
This vehicle includes a front floor mat bracket to
act as a floor mat positioning aid. NISSAN floor
mats have been specially designed for your ve-
hicle model. The driver’s side floor mat has a
grommet hole incorporated in it. Position the mat
by placing the floor mat bracket hook through the
floor mat grommet hole while centering the mat in
the footwell.
Periodically check to make certain the mats are
properly positioned.
WAI0006
CLEANING INTERIOR
7-4Appearance and care
ZREVIEW COPYÐ2008 Armada(wzw)
Owners ManualÐUSA_English(nna)
03/05/07Ðarosenma
X
Page 367 of 456
SEAT BELTS
The seat belts can be cleaned by wiping them
with a sponge dampened in a mild soap solution.
Allow the belts to dry completely in the shade
before using them. See “Seat belt maintenance”
in the “Safety – Seats, seat belts and supplemen-
tal restraint system” section of this manual.
WARNING
Do not allow wet seat belts to roll up in the
retractor. NEVER use bleach, dye or
chemical solvents to clean the seat belts,
since these materials may severely
weaken the seat belt webbing.
MOST COMMON FACTORS
CONTRIBUTING TO VEHICLE
CORROSION
cThe accumulation of moisture-retaining dirt
and debris in body panel sections, cavities,
and other areas.
cDamage to paint and other protective coat-
ings caused by gravel and stone chips or
minor traffic accidents.
ENVIRONMENTAL FACTORS
INFLUENCE THE RATE OF
CORROSION
Moisture
Accumulation of sand, dirt and water on the ve-
hicle body underside can accelerate corrosion.
Wet floor coverings will not dry completely inside
the vehicle, and should be removed for drying to
avoid floor panel corrosion.
Relative humidity
Corrosion will be accelerated in areas of high
relative humidity, especially those areas where
the temperatures stay above freezing and where
atmospheric pollution exists and road salt is
used.
Temperature
High temperatures accelerate the rate of corro-
sion to those parts which are not well ventilated.
Air pollution
Industrial pollution, the presence of salt in the air
in coastal areas, or heavy road salt use acceler-
ates the corrosion process. Road salt also accel-
erates the disintegration of paint surfaces.
TO PROTECT YOUR VEHICLE
FROM CORROSION
cWash and wax your vehicle often to keep the
vehicle clean.
cAlways check for minor damage to the paint
and repair it as soon as possible.
cKeep drain holes at the bottom of the doors
open to avoid water accumulation.
cCheck the underbody for accumulation of
sand, dirt or salt. If present, wash with water
as soon as possible.
CAUTION
cNEVER remove dirt, sand or other de-
bris from the passenger compartment
by washing it out with a hose. Remove
dirt with a vacuum cleaner or broom.
CORROSION PROTECTION
Appearance and care7-5
ZREVIEW COPYÐ2008 Armada(wzw)
Owners ManualÐUSA_English(nna)
03/05/07Ðarosenma
X
Page 371 of 456

When driving in areas using road salt or other
corrosive materials, check lubrication frequently.
Lights*Clean the headlights on a regular basis.
Make sure that the headlights, stop lights, tail
lights, turn signal lights, and other lights are all
operating properly and installed securely. Also
check headlight aim.
Road wheel nuts*When checking the tires,
make sure no wheel nuts are missing, and check
for any loose wheel nuts. Tighten if necessary.
Tire rotation*Tires should be rotated every
7,500 miles (12,000 km) .
Tires*Check the pressure with a gauge often
and always prior to long distance trips. If neces-
sary, adjust the pressure in all tires, including the
spare, to the pressure specified. Check carefully
for damage, cuts or excessive wear.
Tire Pressure Monitoring System (TPMS)
transmitter componentsReplace the grom-
met seal, valve core and cap of the transmitter in
vehicles equipped with TPMS at every tire re-
placement or when reaching the wear limit of the
tires.
Wheel alignment and balanceIf the vehicle
should pull to either side while driving on a
straight and level road, or if you detect uneven or
abnormal tire wear, there may be a need for wheelalignment. If the steering wheel or seat vibrates at
normal highway speeds, wheel balancing may be
needed.
cFor additional information regarding tires,
refer to “Important Tire Safety Information”
(US) or “Tire Safety Information” (Canada) in
the Warranty Information Booklet .
WindshieldClean the windshield on a regular
basis. Check the windshield at least every six
months for cracks or other damage. Have a dam-
aged windshield repaired by a qualified repair
facility.
Windshield wiper blades*Check for cracks or
wear if they do not wipe properly.
Inside the vehicle
The maintenance items listed here should be
checked on a regular basis, such as when per-
forming periodic maintenance, cleaning the ve-
hicle, etc.
Additional information on the following
items with an “*” is found later in this sec-
tion.
Accelerator pedalCheck the pedal for smooth
operation and make sure the pedal does not bind
or require uneven effort. Keep the floor mat away
from the pedal.Automatic transmission P (Park) position
mechanismOn a fairly steep hill check that your
vehicle is held securely with the selector lever in
the P (Park) position without applying any brakes.
Brake pedalCheck the pedal for smooth opera-
tion and keep the floor mat away from the pedal.
BrakesCheck that the brakes do not pull the
vehicle to one side when applied.
Parking brakeConfirm that your vehicle is held
securely on a fairly steep hill with only the parking
brake applied.
SeatsCheck seat position controls such as seat
adjusters, seatback recliner, etc. to ensure they
operate smoothly and all latches lock securely in
every position. Check that the head restraints
move up and down smoothly and the locks (if so
equipped) hold securely in all latched positions.
Seat beltsCheck that all parts of the seat belt
system (for example, buckles, anchors, adjusters
and retractors) operate properly and smoothly,
and are installed securely. Check the belt web-
bing for cuts, fraying, wear or damage.
Steering wheelCheck for changes in the steer-
ing system, such as excessive freeplay, hard
steering or strange noises.
Warning lights and chimesMake sure all
warning lights and chimes are operating properly.
Maintenance and do-it-yourself8-3
ZREVIEW COPYÐ2008 Armada(wzw)
Owners ManualÐUSA_English(nna)
03/05/07Ðarosenma
X
Page 425 of 456
WARNING
cIt is extremely dangerous to ride
in a cargo area inside a vehicle. In
a collision, people riding in these
areas are more likely to be seri-
ously injured or killed.
cDo not allow people to ride in any
area of your vehicle that is not
equipped with seats and seat
belts.
cBe sure everyone in your vehicle
is in a seat and using a seat belt
properly.
TERMS
It is important to familiarize yourself with
the following terms before loading your
vehicle:
cCurb Weight (actual weight of your
vehicle) - vehicle weight including:
standard and optional equipment, flu-
ids, emergency tools, and spare tire
assembly. This weightdoes notin-
clude passengers and cargo.cGVW (Gross Vehicle Weight) - curb
weight plus the combined weight of
passengers and cargo.
cGVWR (Gross Vehicle Weight Rat-
ing) - maximum total combined
weight of the unloaded vehicle, pas-
sengers, luggage, hitch, trailer
tongue load and any other optional
equipment. This information is lo-
cated on the F.M.V.S.S./C.M.V.S.S.
certification label.
cGAWR (Gross Axle Weight Rating) -
maximum weight (load) limit specified
for the front or rear axle. This informa-
tion is located on the
F.M.V.S.S./C.M.V.S.S. certification
label.
cGCWR (Gross Combined Weight
rating) - The maximum total weight
rating of the vehicle, passengers,
cargo, and trailer.
cVehicle Capacity Weight, Load limit,
Total load capacity - maximum total
weight limit specified of the load
(passengers and cargo) for the ve-hicle. This is the maximum combined
weight of occupants and cargo that
can be loaded into the vehicle. If the
vehicle is used to tow a trailer, the
trailer tongue weight must be in-
cluded as part of the cargo load. This
information is located on the Tire and
Loading Information label (if so
equipped) .
cCargo capacity - permissible weight
of cargo, the subtracted weight of
occupants from the load limit.
VEHICLE LOAD CAPACITY
Do not exceed the load limit of your ve-
hicle shown as “The combined weight of
occupants and cargo” on the Tire and
Loading Information label. Do not exceed
the number of occupants shown as
“Seating Capacity” on the Tire and Load-
ing Information label.
To get “the combined weight of occu-
pants and cargo”, add the weight of all
occupants, then add the total luggage
weight. Examples are shown in the follow-
ing illustration.
VEHICLE LOADING INFORMATION
Technical and consumer information9-13
ZREVIEW COPYÐ2008 Armada(wzw)
Owners ManualÐUSA_English(nna)
03/05/07Ðarosenma
X
Page 447 of 456

10 Index
4WD warning light...............2-16
A
Active Head Restraint..............1-9
Adjusting pedal position............3-27
Air bag (See supplemental restraint
system).....................1-48
Air bag system
Front (See supplemental front impact
air bag system)...............1-55
Air bag warning labels.............1-63
Air bag warning light...........1-63, 2-18
Air cleaner housing filter............8-17
Air conditioner
Air conditioner service...........4-41
Air conditioner specification label.....9-12
Air conditioner system refrigerant and
oil recommendations.............9-7
Heater and air conditioner controls. . . .4-38
Rear seat air conditioner..........4-40
Servicing air conditioner..........4-41
Alarm system
(See vehicle security system).........2-27
Anchor point locations.............1-31
Antenna.....................4-77
Anti-lock brake warning light......2-13, 2-14
Anti-lock Braking System (ABS)........5-28
Audible reminders................2-20
Audio system..................4-41
Compact Disc (CD) changer.......4-52Compact disc (CD) player.........4-60
Audio System
CompactFlash (CF) player.........4-62
Audio system
FM/AM/SAT radio with compact disc (CD)
changer...................4-49
FM/AM/SAT radio with compact disc (CD)
player....................4-57
Audio System
Music Box hard-disk drive audio
system....................4-64
Audio system
Radio....................4-41
Rear audio controls.............4-77
Audio System
Settings................4-49, 4-57
Audio system
Steering wheel audio control switch. . . .4-75
Autolight switch.................2-33
Automatic
Automatic drive positioner.........3-31
Automatic power window switch.....2-55
Automatic transmission position indicator
light.....................2-27
Driving with automatic
transmission.............5-12, 5-13
Transmission selector lever lock
release....................5-15
Automatic anti-glare inside mirror.......3-29
Automatic transmission fluid temperature
gauge.......................2-8AUX jack.................4-55, 4-62
B
Battery......................8-13
Charge warning light............2-15
Before starting the engine...........5-11
Belt (See drive belt)..............8-15
Block heater
Engine....................5-34
BluetoothThands-free phone
system..................4-94, 4-108
Booster seats..................1-43
Brake
Anti-lock Braking System (ABS)......5-28
Brake fluid..................8-12
Brake light (See stop light).........8-30
Brake system................5-27
Brake warning light.............2-14
Brake wear indicators........2-20, 8-22
Parking brake operation..........5-16
Self-adjusting brakes............8-22
Brakes......................8-22
Break-in schedule................5-19
Brightness control
Instrument panel..............2-35
Brightness/contrast button.......4-16, 4-34
Bulb check/instrument panel..........2-13
Bulb replacement................8-30
ZREVIEW COPYÐ2008 Armada(wzw)
Owners ManualÐUSA_English(nna)
03/05/07Ðarosenma
X
Page 449 of 456

Eyeglass case..................2-44
F
Flashers
(See hazard warning flasher switch)......2-36
Flat tire......................6-2
Floor mat positioning aid.............7-4
Fluid
Brake fluid..................8-12
Capacities and recommended
fuel/lubricants.................9-2
Engine coolant................8-7
Engine oil...................8-8
Power steering fluid.............8-11
Window washer fluid............8-12
F.M.V.S.S. certification label..........9-11
Fog light switch.................2-35
Front air bag system
(See supplemental restraint system).....1-55
Front seats....................1-2
Front sonar system............2-39, 5-31
Fuel
Capacities and recommended
fuel/lubricants.................9-2
Fuel economy................5-19
Fuel gauge..................2-7
Fuel octane rating..............9-4
Fuel recommendation............9-3
Fuel-filler door and cap...........3-25
Fuses......................8-22
Fusible links...................8-24G
Garage door opener, HomeLinkTUniversal
Transceiver...................2-60
Gascap.....................3-25
Gauge
Automatic transmission fluid temperature
gauge.....................2-8
Engine coolant temperature gauge.....2-6
Engine oil pressure gauge..........2-7
Fuel gauge..................2-7
Odometer...................2-5
Speedometer.................2-5
Tachometer..................2-6
Trip odometer.................2-5
Voltmeter...................2-8
General maintenance..............8-2
Glass hatch...................3-25
Glove box....................2-44
Glove box lock.................2-44
H
Hands-free phone system,
BluetoothT...............4-94, 4-108
Hazard warning flasher switch.........2-36
Head restraints..................1-8
Active Head Restraint............1-9
Headlight and turn signal switch........2-32
Headlight control switch............2-32
Headlights....................8-28
Headphones (See NISSAN mobile
entertainment system).............4-81
Heated seats..................2-37Heated steering wheel.............2-37
Heater
Heater and air conditioner controls. . . .4-38
Heater operation..............4-39
Rear seat air conditioner..........4-40
HomeLinkTUniversal Transceiver.......2-60
Hood release..................3-20
Hook
Luggage hook................2-50
Horn.......................2-36
I
Ignition switch..................5-8
Immobilizer system.........2-29, 3-3, 5-11
Important vehicle information label.......9-11
In-cabin microfilter...............8-17
Increasing fuel economy............5-19
Indicator lights and audible reminders
(See warning/indicator lights and audible
reminders)....................2-13
Inside automatic anti-glare mirror.......3-29
Instrument brightness control.........2-35
Instrument panel..............0-6, 2-2
Instrument panel dimmer switch........2-35
Intelligent Key system..............3-10
Key operating range............3-12
Key operation................3-13
Mechanical key................3-3
Remote keyless entry operation......3-16
Troubleshooting guide...........3-18
Warning signals...............3-18
Interior light...................2-58
ISOFIX child restraints.............1-28
10-3
ZREVIEW COPYÐ2008 Armada(wzw)
Owners ManualÐUSA_English(nna)
03/05/07Ðarosenma
X