2008 NISSAN ALTIMA HYBRID trunk
[x] Cancel search: trunkPage 147 of 351

TROUBLESHOOTING GUIDE
Verify the location of all Intelligent Keys that are
programmed for the vehicle. If another Intelligent
Key is in range or inside the vehicle, the vehicle
system may respond differently than expected.
Symptom Possible Cause Remedy
When pushing the ignition switch to
stop the Hybrid SystemThe SHIFT P warning appears on the display and the
inside warning chime sounds continuously.The selector lever is not in the P
position.Shift the selector lever to the P
position.
When opening the driver’s door to get
out of the vehicleThe inside warning chime sounds continuously.The ignition switch is in the ACC
position.Push the ignition switch to the OFF
position.
The Intelligent Key is in the Intelligent
Key port.Remove the Intelligent Key from the
Intelligent Key port.
When closing the door after getting out
of the vehicleThe NO KEY warning appears on the display, the out-
side chime sounds 3 times and the inside warning chime
sounds for approximately 3 seconds.The ignition switch is in the ACC or ON
position.Push the ignition switch to the OFF
position.
The NO KEY warning appears on the display and the
outside chime sounds continuously.The ignition switch is in the ACC posi-
tion and the selector lever is not in the
“P” (Park) position.Move the selector lever to the “P”
(Park) position and push the ignition
switch to the OFF position.
When closing the door with the inside
lock knob turned to LOCKThe outside chime sounds for approximately 3 seconds
and all the doors unlock.The Intelligent Key is inside the vehicle
or trunk.Carry the Intelligent Key with you.
When pushing the door handle request
switch to lock the doorThe outside chime sounds for approximately 2 seconds.The Intelligent Key is inside the vehicle
or trunk.Carry the Intelligent Key with you.
A door is not closed securely. Close the door securely.
The door handle request switch is
pushed before the door is closed.Push the door handle request switch
after the door is closed.
When closing the trunk lidThe outside chime sounds for approximately 10 seconds
and the trunk lid opens.The Intelligent Key is inside the trunk.Carry the Intelligent Key with you.
3-16Pre-driving checks and adjustments
ZREVIEW COPYÐ2008 Altima Hybrid Electric
(ahv)
Owners ManualÐUSA_English(nna)
05/31/07Ðdebbie
X
Page 148 of 351
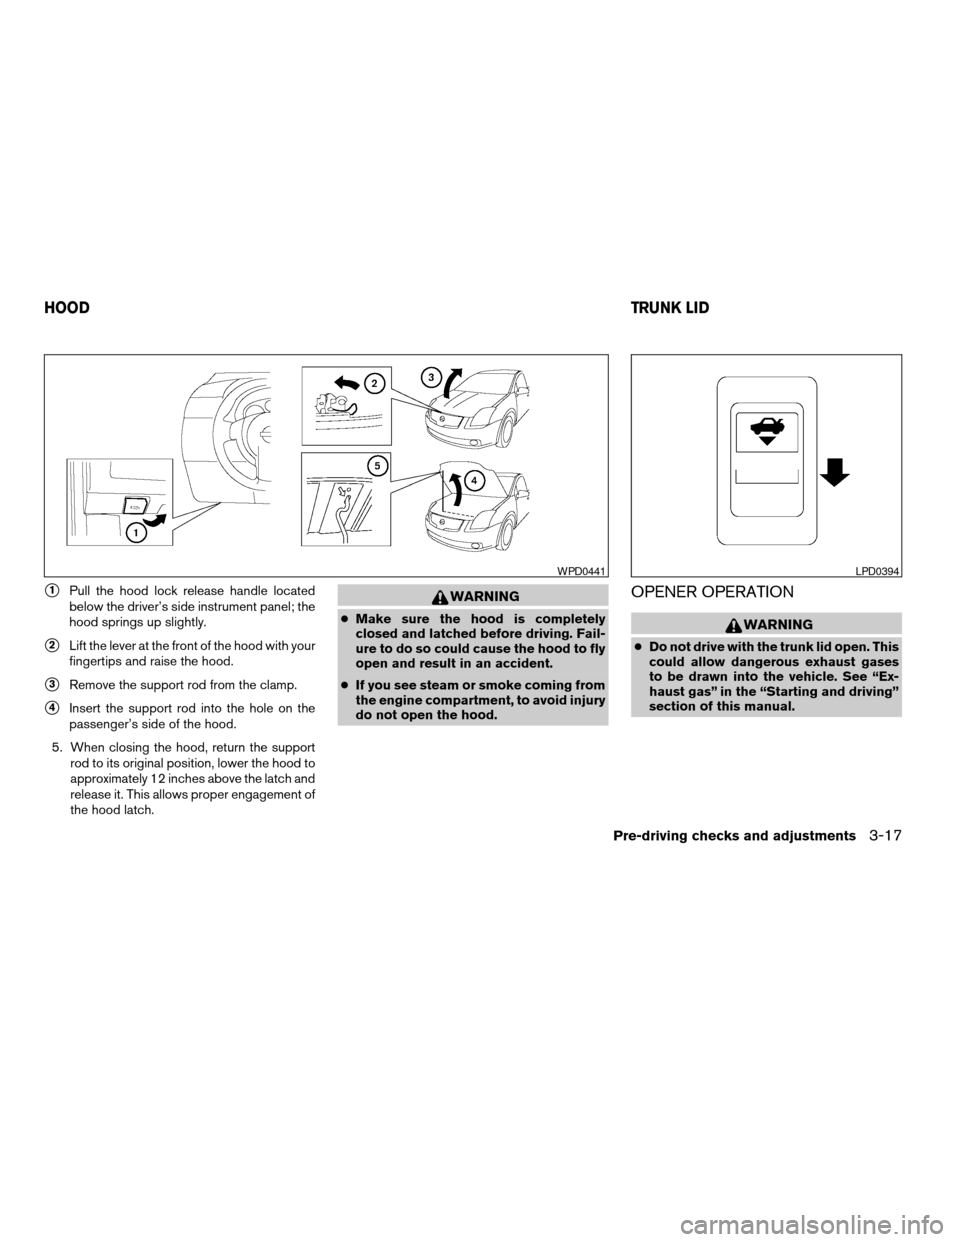
s1Pull the hood lock release handle located
below the driver’s side instrument panel; the
hood springs up slightly.
s2Lift the lever at the front of the hood with your
fingertips and raise the hood.
s3Remove the support rod from the clamp.
s4Insert the support rod into the hole on the
passenger’s side of the hood.
5. When closing the hood, return the support
rod to its original position, lower the hood to
approximately 12 inches above the latch and
release it. This allows proper engagement of
the hood latch.
WARNING
cMake sure the hood is completely
closed and latched before driving. Fail-
ure to do so could cause the hood to fly
open and result in an accident.
cIf you see steam or smoke coming from
the engine compartment, to avoid injury
do not open the hood.
OPENER OPERATION
WARNING
cDo not drive with the trunk lid open. This
could allow dangerous exhaust gases
to be drawn into the vehicle. See “Ex-
haust gas” in the “Starting and driving”
section of this manual.
WPD0441LPD0394
HOODTRUNK LID
Pre-driving checks and adjustments3-17
ZREVIEW COPYÐ2008 Altima Hybrid Electric
(ahv)
Owners ManualÐUSA_English(nna)
05/31/07Ðdebbie
X
Page 149 of 351
cClosely supervise children when they
are around cars to prevent them from
playing and becoming locked in the
trunk where they could be seriously in-
jured. Keep the car locked, with the rear
seatback and trunk lid securely latched
when not in use, and prevent children’s
access to car keys.
To open the trunk lid, push the opener lever down.
To close the trunk lid, lower and push the trunk lid
down securely.
NOTE:
You can open the trunk lid with the Intelli-
gent Key. Refer to “Intelligent Key system”
earlier in this section.
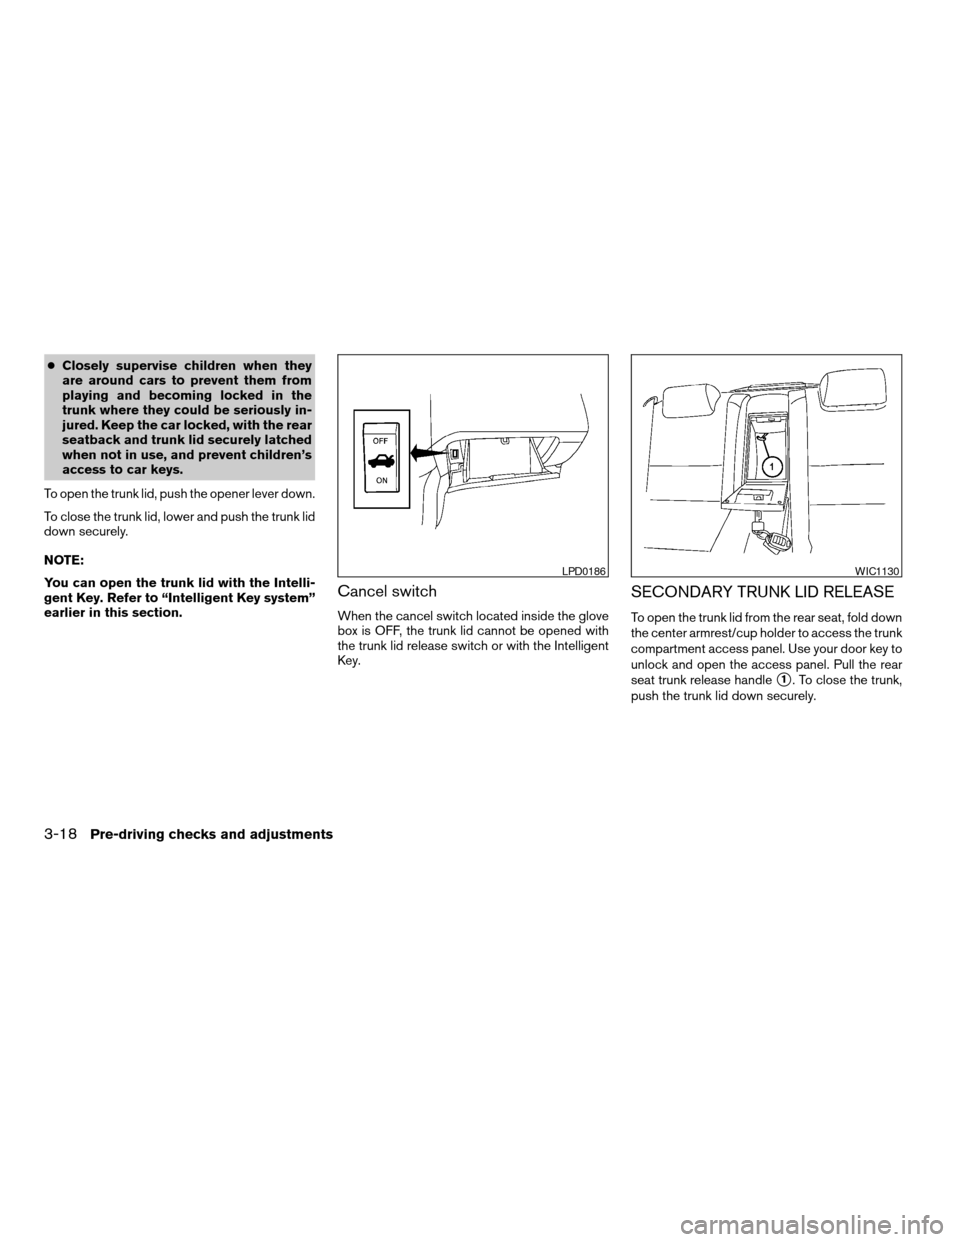
Cancel switch
When the cancel switch located inside the glove
box is OFF, the trunk lid cannot be opened with
the trunk lid release switch or with the Intelligent
Key.
SECONDARY TRUNK LID RELEASE
To open the trunk lid from the rear seat, fold down
the center armrest/cup holder to access the trunk
compartment access panel. Use your door key to
unlock and open the access panel. Pull the rear
seat trunk release handle
s1. To close the trunk,
push the trunk lid down securely.
LPD0186WIC1130
3-18Pre-driving checks and adjustments
ZREVIEW COPYÐ2008 Altima Hybrid Electric
(ahv)
Owners ManualÐUSA_English(nna)
05/31/07Ðdebbie
X
Page 150 of 351
NOTE:
In order to remove your key from trunk
compartment access panel, you must close
and lock the panel.
CAUTION
Do not leave the access panel open. Do
not store or place any items in the area
behind the seats. This area contains the
high voltage battery and other high volt-
age components. Storage of items in this
area could possibly short out the high
voltage battery and lead to Hybrid System
failure.
INTERIOR TRUNK LID RELEASE
WARNING
Closely supervise children when they are
around cars to prevent them from playing
and becoming locked in the trunk where
they could be seriously injured. Keep the
car locked, with the rear seatback and
trunk lid securely latched when not in use,
and prevent children’s access to car keys.
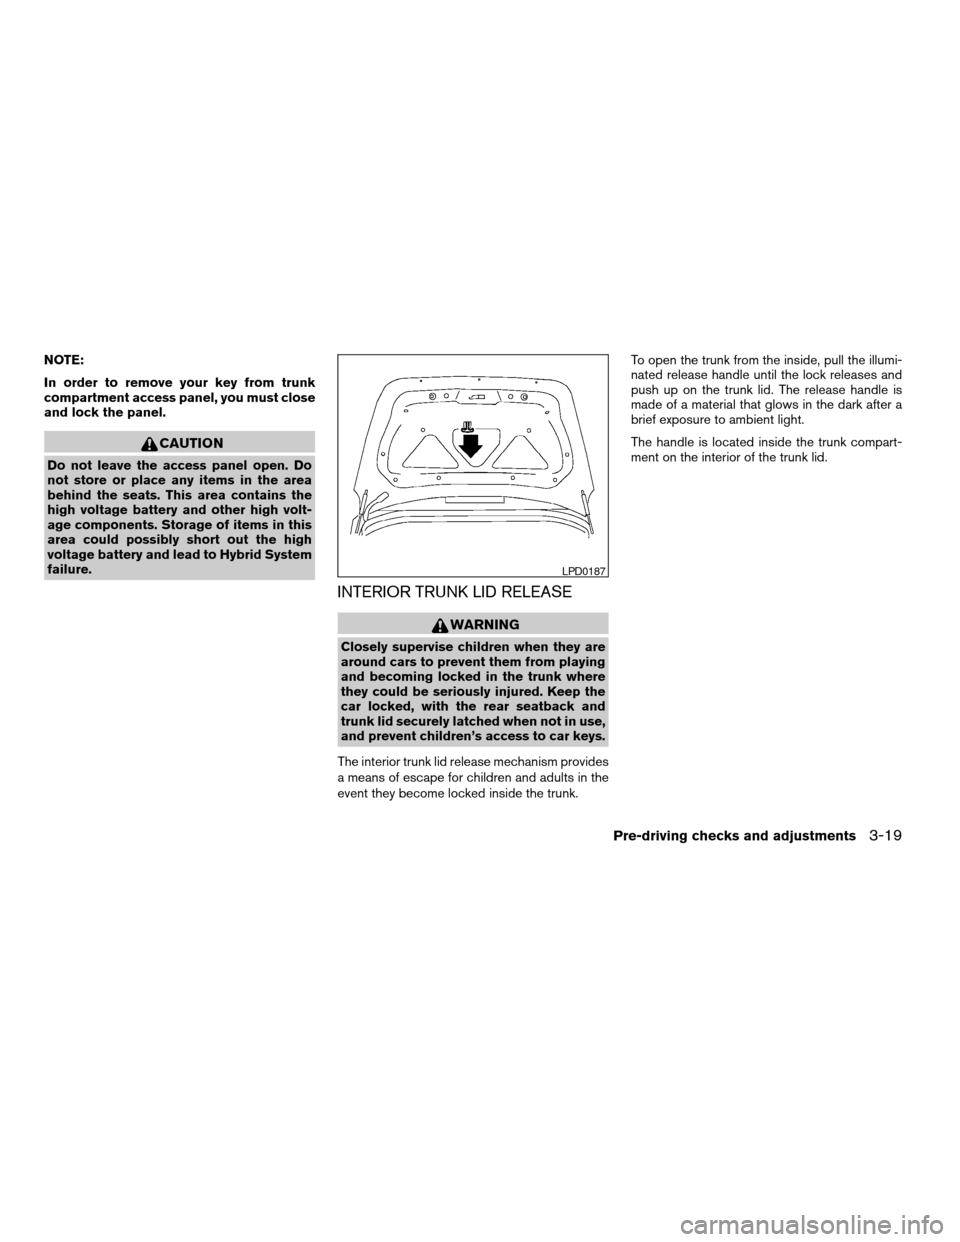
The interior trunk lid release mechanism provides
a means of escape for children and adults in the
event they become locked inside the trunk.To open the trunk from the inside, pull the illumi-
nated release handle until the lock releases and
push up on the trunk lid. The release handle is
made of a material that glows in the dark after a
brief exposure to ambient light.
The handle is located inside the trunk compart-
ment on the interior of the trunk lid.
LPD0187
Pre-driving checks and adjustments3-19
ZREVIEW COPYÐ2008 Altima Hybrid Electric
(ahv)
Owners ManualÐUSA_English(nna)
05/31/07Ðdebbie
X
Page 165 of 351
When the selector lever is shifted into the R
(Reverse) position, the monitor display shows the
view directly to the rear of the vehicle.
WARNING
cThe system is designed as an aid to the
driver in detecting large stationary ob-
jects to help avoid damaging the ve-
hicle. The system will not detect small
objects below the bumper, and may not
detect objects close to the bumper or
on the ground.
cThe rearview camera is a convenience
but it is not a substitute for proper back-
ing. Always turn and check that it is safe
to do so before backing up. Always
back up slowly.
cObjects viewed in the rearview monitor
differ from actual distance because a
wide-angle lens is used.
cMake sure that the trunk is securely
closed when backing up.
cDo not put anything on the rearview
camera. The rearview camera is in-
stalled beside the license plate light.cWhen washing the vehicle with high-
pressure water, be sure not to spray it
around the camera. Otherwise, water
may enter the camera unit causing wa-
ter condensation on the lens, a mal-
function, fire or an electric shock.
cDo not strike the camera. It is a preci-
sion instrument. Otherwise, it may mal-
function or cause damage resulting in a
fire or an electric shock.
CAUTION
There is a plastic cover over the camera.
Do not scratch the cover when cleaning
dirt or snow from the cover.
HOW TO READ THE DISPLAYED
LINES
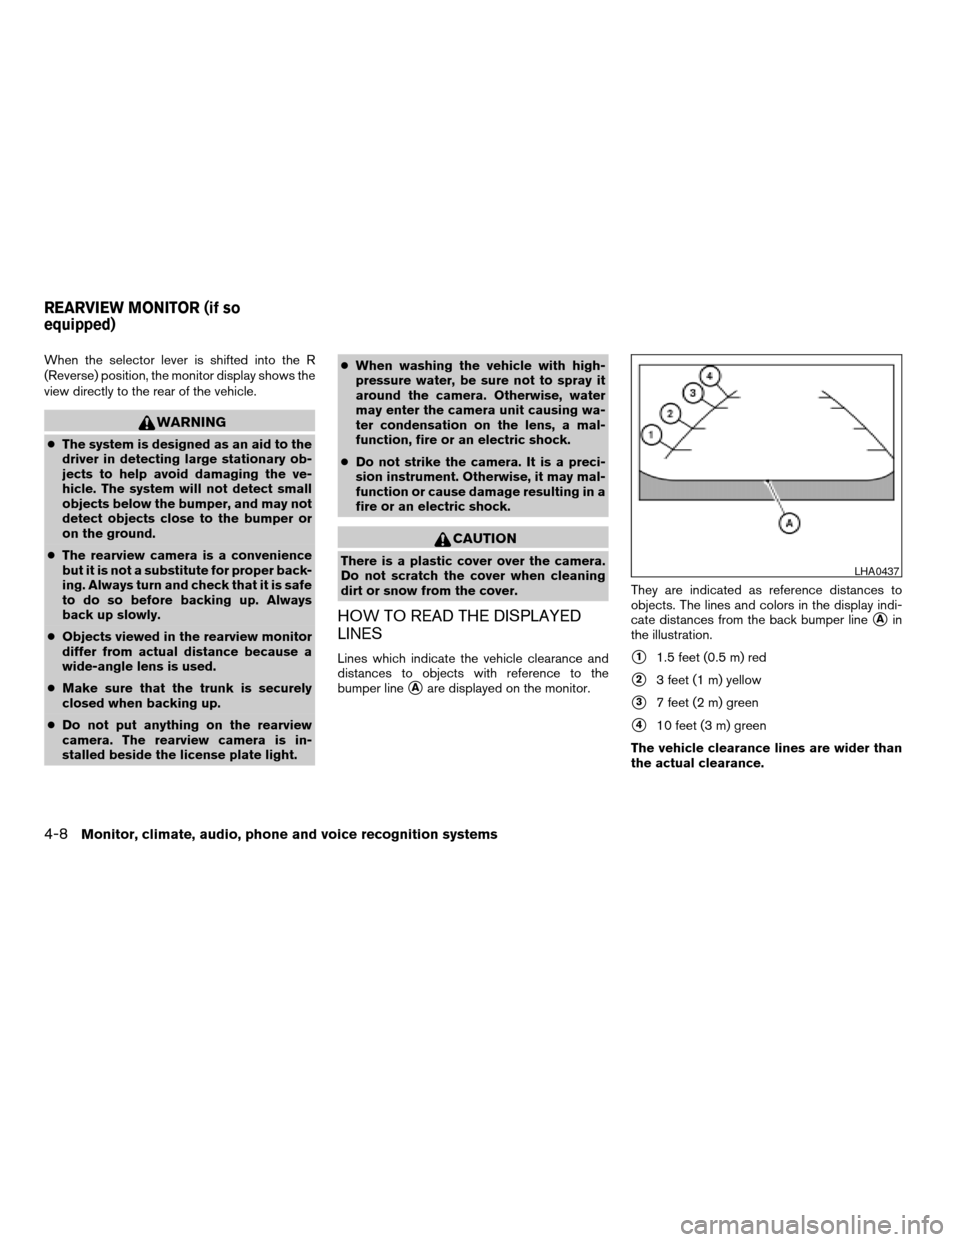
Lines which indicate the vehicle clearance and
distances to objects with reference to the
bumper line
sAare displayed on the monitor.They are indicated as reference distances to
objects. The lines and colors in the display indi-
cate distances from the back bumper line
sAin
the illustration.
s11.5 feet (0.5 m) red
s23 feet (1 m) yellow
s37 feet (2 m) green
s410 feet (3 m) green
The vehicle clearance lines are wider than
the actual clearance.
LHA0437
REARVIEW MONITOR (if so
equipped)
4-8Monitor, climate, audio, phone and voice recognition systems
ZREVIEW COPYÐ2008 Altima Hybrid Electric
(ahv)
Owners ManualÐUSA_English(nna)
05/31/07Ðdebbie
X
Page 225 of 351
WARNING
cDo not leave children or adults who
would normally require the assistance
of others alone in your vehicle. Pets
should also not be left alone. They
could accidentally injure themselves or
others through inadvertent operation of
the vehicle. Also, on hot, sunny days,
temperatures in a closed vehicle could
quickly become high enough to cause
severe or possibly fatal injuries to
people or animals.
cClosely supervise children when they
are around cars to prevent them from
playing and becoming locked in the
trunk where they could be seriously in-
jured. Keep the car locked and the trunk
lid securely latched when not in use,
and prevent children’s access to car
keys.cDo not attempt to test the vehicle on a
dynamometer (such as the dynamom-
eters used by some states for emissions
testing) , or similar equipment. Doing so
may cause damage to the drivetrain or
the high voltage battery. Make sure you
inform test facility personnel that your
vehicle is a hybrid. Using the wrong test
equipment may result in drivetrain dam-
age or unexpected vehicle movement
which could result in serious vehicle
damage or personal injury.
EXHAUST GAS (carbon monoxide)
WARNING
cDo not breathe exhaust gases; they
contain colorless and odorless carbon
monoxide. Carbon monoxide is danger-
ous. It can cause unconsciousness or
death.
cIf you suspect that exhaust fumes are
entering the vehicle, drive with all win-
dows fully open, and have the vehicle
inspected immediately.
cDo not run the engine in closed spaces
such as a garage.cDo not park the vehicle with the ignition
switch in the ON position and the Hy-
brid System in the READY mode for any
extended length of time.
cKeep the trunk lid closed while driving,
otherwise exhaust gases could be
drawn into the passenger compart-
ment. If you must drive with the trunk lid
open, follow these precautions:
1. Open all the windows.
2. Set the
air recirculation but-
ton to off and the fan control dial to
high to circulate the air.
cIf electrical wiring or other cable con-
nections must pass to a trailer through
the seal on the trunk lid or the body,
follow the manufacturer’s recommen-
dation to prevent carbon monoxide en-
try into the vehicle.
cThe exhaust system and body should be
inspected by a qualified mechanic
whenever:
a. The vehicle is raised for service.
b. You suspect that exhaust fumes are
entering into the passenger
compartment.
PRECAUTIONS WHEN STARTING
AND DRIVING
5-2Starting and driving
ZREVIEW COPYÐ2008 Altima Hybrid Electric
(ahv)
Owners ManualÐUSA_English(nna)
05/31/07Ðdebbie
X
Page 250 of 351
WARNING
cMake sure the parking brake is securely
applied and the transmission is shifted
into P (Park) .
cNever change tires when the vehicle is
on a slope, ice or slippery areas. This is
hazardous.
cNever change tires if oncoming traffic is
close to your vehicle. Wait for profes-
sional road assistance.
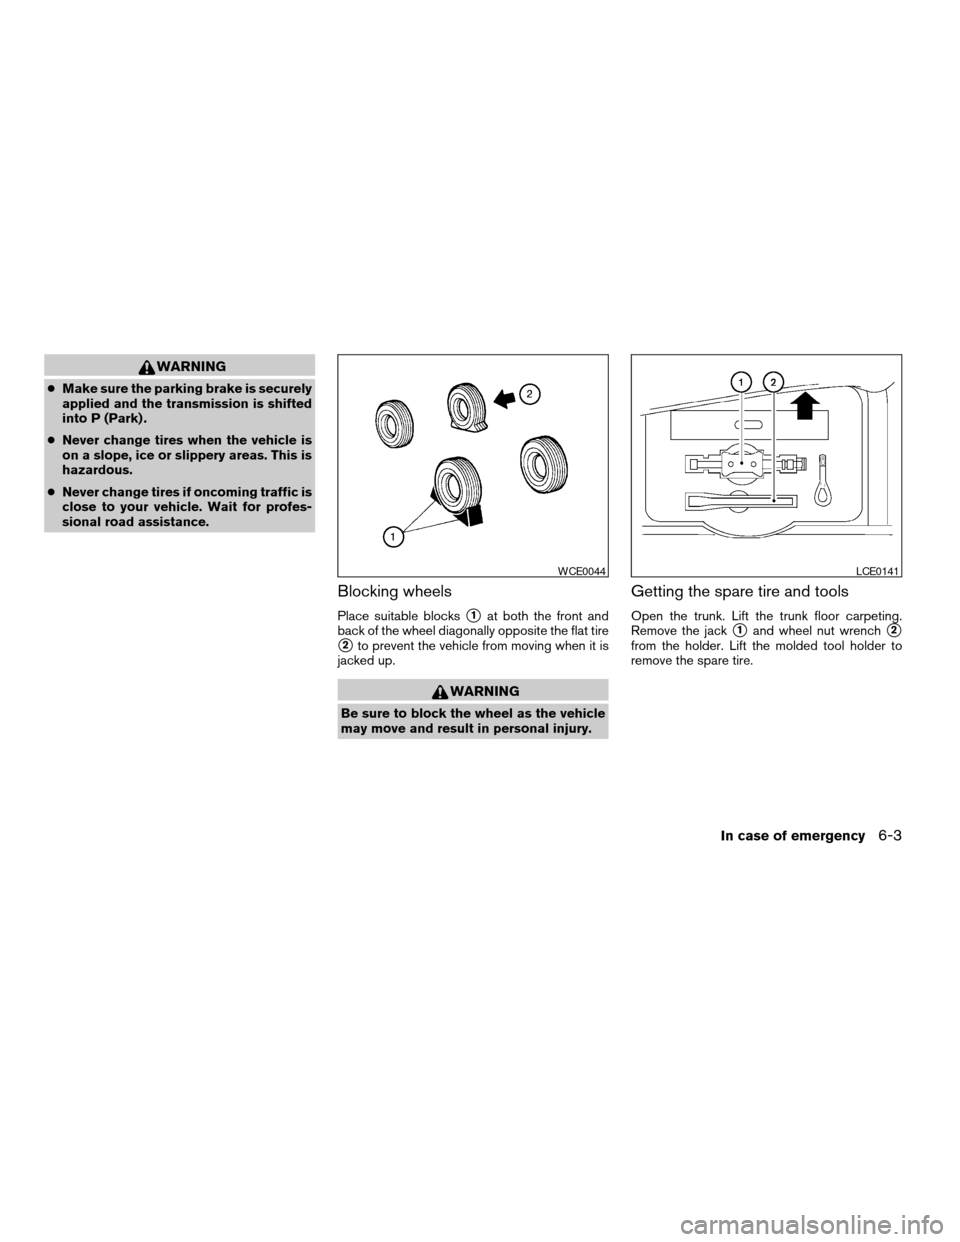
Blocking wheels
Place suitable blockss1at both the front and
back of the wheel diagonally opposite the flat tire
s2to prevent the vehicle from moving when it is
jacked up.
WARNING
Be sure to block the wheel as the vehicle
may move and result in personal injury.
Getting the spare tire and tools
Open the trunk. Lift the trunk floor carpeting.
Remove the jack
s1and wheel nut wrenchs2
from the holder. Lift the molded tool holder to
remove the spare tire.
WCE0044LCE0141
In case of emergency6-3
ZREVIEW COPYÐ2008 Altima Hybrid Electric
(ahv)
Owners ManualÐUSA_English(nna)
05/31/07Ðdebbie
X
Page 253 of 351
4. Lower the vehicle slowly until the tire
touches the ground. Then, with the wheel
nut wrench, tighten the wheel nuts securely
in the sequence illustrated (
sA,sB,sC,sD,
sE) . Lower the vehicle completely.
WARNING
cIncorrect wheel nuts or improperly
tightened wheel nuts can cause the
wheel to become loose or come off.
This could cause an accident.
cDo not use oil or grease on the wheel
studs or nuts. This could cause the nuts
to become loose.
cRetighten the wheel nuts when the ve-
hicle has been driven for 600 miles
(1,000 km) (also in cases of a flat tire,
etc.) .
As soon as possible, tighten the wheel nuts
to the specified torque with a torque
wrench.
Wheel nut tightening torque:
83 ft-lb (112 N·m)
The wheel nuts must be kept tightened to
specification at all times. It is recom-
mended that wheel nuts be tightened to
specifications at each lubrication interval.Adjust tire pressure to the COLD pressure.
COLD pressure: After vehicle has been
parked for three hours or more or driven
less than 1 mile (1.6 km) .
COLD tire pressures are shown on the tire
and loading information label affixed to the
driver side center pillar.
5. Securely store the flat tire and jacking equip-
ment in the vehicle.
6. Place the spare tire cover and the trunk floor
carpeting over the damaged tire.
7. Close the trunk.
WARNING
cAlways make sure that the spare tire
and jacking equipment are properly se-
cured after use. Such items can become
dangerous projectiles in an accident or
sudden stop.
cThe spare tire is designed for emer-
gency use. See specific instructions un-
der the heading “Wheels and tires” in
the “Maintenance and do-it-yourself”
section of this manual.
WARNING
cIf the Hybrid System stops operating
while driving, the power assist for the
brakes and steering will not work. Brak-
ing and steering will be harder.
cIf the Hybrid System stops operating
while driving, do not open any door until
the vehicle comes to a complete stop.
Opening a door will lock the steering
wheel. This may cause the driver to lose
control of the vehicle and could result in
serious vehicle damage or personal
injury.
The Hybrid System may stop operating while
driving if the high voltage battery becomes dis-
charged, the 12-volt battery becomes dis-
charged or the fuel tank is empty. If the Hybrid
System stops operating while driving, perform
the following:
1. Reduce your speed gradually. Pull to the
side of the road to a safe area.
2. Turn on the hazard warning flashers.
3. Set the “POWER” switch at ACC or OFF,
and try to start the Hybrid System.
4. If the Hybrid System will not start, see “Ve-
hicle does not start” in this section.
HYBRID SYSTEM STOPS
OPERATING WHILE DRIVING
6-6In case of emergency
ZREVIEW COPYÐ2008 Altima Hybrid Electric
(ahv)
Owners ManualÐUSA_English(nna)
05/31/07Ðdebbie
X