Page 104 of 313

When the switch is in the DOOR position, the
light will illuminate when a door is opened.
The light will stay on for about")
ROOM LIGHTThe interior light has a two-position switch. (
�A:
DOOR,
�B: OFF)
When the switch is in the DOOR position, the
light will illuminate when a door is opened.
The light will stay on for about 30 seconds when:
�The doors are unlocked by the keyfob, a key
or the power door lock switch while all doors
are closed.
�The driver’s door is opened and then closed
while the key is removed from the ignition
switch.�The key is removed from the ignition switch
while all doors are closed.
The interior light will turn off while the 30 second
timer is activated, when:
�The driver’s door is locked either with the
keyfob, a key or the power door lock switch.
�The ignition switch is turned ON.
MAP LIGHTSTo turn on the light, push the plastic surface
�C
of the light. Push it again to turn off the light.
When the map light stays on, it will auto-
matically turn off 30 minutes after theignition switch has been turned to the OFF
position. To turn on the light again, turn the
ignition switch to the ON position.
The map and vanity mirror lights will automati-
cally turn off 30 minutes after the latest operation
of the following with the ignition switch in the
ACC or OFF position:
�Opening or closing any door
�Locking or unlocking with the keyfob, a key or
the power door lock switch
�Inserting or removing a key from the ignition
switch
These lights will turn on again when any of the
above operations is performed after the lights
have turned off automatically. (The lights will turn
off 30 minutes after the latest operation of the
above as well.)
CAUTION
�Turn off the lights when you leave the
vehicle.
�Do not use for extended periods of
time with the engine stopped. This
could result in a discharged battery.
SIC1980A
Coupe models
SIC2238
Roadster models
INTERIOR LIGHTS
Instruments and controls
2-41
�
07.7.25/Z33-D/V5.0
�
Page 105 of 313
The light on the vanity mirror will turn on when
the cover on the vanity mirror is opened.
When the vanity mirror light stays on, it will
automatically turn off 30 minutes after the
ignition switch has been turned to the OFF
position. To turn on the light again, turn the
ignition switch to the ON position.The light illuminates when the rear hatch is
opened. When the rear hatch is closed, the light
will go off.The light illuminates when the trunk lid is
opened. When the trunk lid is closed, the light
will go off.
SIC1859
VANITY MIRROR LIGHT
LUGGAGE COMPARTMENT LIGHT
(Coupe models)TRUNK LIGHT (Roadster models)2-42
Instruments and controls
�
07.7.25/Z33-D/V5.0
�
Page 112 of 313

3 Pre-driving checks and adjustmentsKeys ......................................................................................... 3-2
NISSAN Vehicle Immobilizer System keys ................ 3-2
Doors ....................................................................................... 3-3
Locking with key ............................................................. 3-3
Locking with inside lock knob ..................................... 3-4
Locking with power door lock switch ....................... 3-4
Remote keyless entry system ............................................ 3-5
How to use remote keyless entry system ................ 3-5
Hood ........................................................................................ 3-8
Rear hatch (Coupe models) .............................................. 3-9
Opener operation ........................................................... 3-9
Secondary rear hatch release .................................... 3-10
Trunk lid (Roadster models) ............................................ 3-10
Opener operation ......................................................... 3-10
Interior trunk lid release ............................................... 3-11
Secondary trunk lid release ........................................ 3-12
Soft top (Roadster models) .............................................. 3-13Before operating the top ............................................. 3-13
When operating the top .............................................. 3-15
Opening the top ............................................................ 3-18
Closing the top .............................................................. 3-19
If the top does not open or close electrically ........ 3-19
Care of the soft top and the vehicle body.............. 3-22
Fuel-filler door ..................................................................... 3-23
Opener operation ......................................................... 3-23
Fuel-filler cap ................................................................. 3-23
Steering wheel .................................................................... 3-25
Tilt operation .................................................................. 3-25
Sun visors.............................................................................. 3-25
Mirrors ................................................................................... 3-26
Inside mirror .................................................................... 3-26
Automatic anti-glare inside mirror
(if so equipped) ............................................................ 3-26
Outside mirrors ............................................................. 3-27
�
07.7.25/Z33-D/V5.0
�
Page 137 of 313
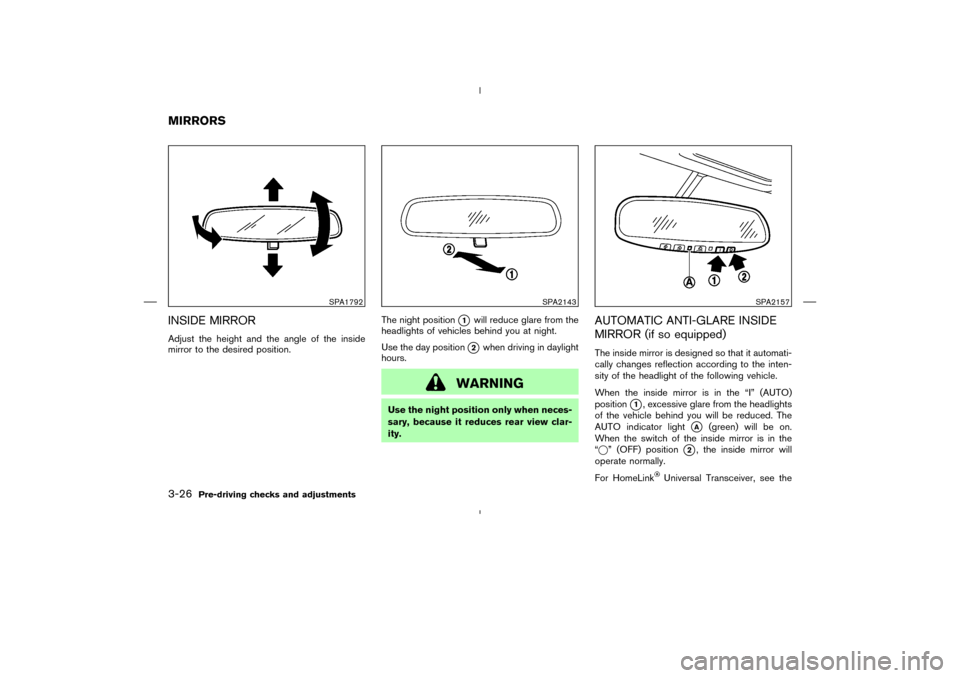
INSIDE MIRRORAdjust the height and the angle of the inside
mirror to the desired position.The night position
�1
will reduce glare from the
headlights of vehicles behind you at night.
Use the day position�2when driving in daylight
hours.
WARNING
Use the night position only when neces-
sary, because it reduces rear view clar-
ity.
AUTOMATIC ANTI-GLARE INSIDE
MIRROR (if so equipped)The inside mirror is designed so that it automati-
cally changes reflection according to the inten-
sity of the headlight of the following vehicle.
When the inside mirror is in the “I” (AUTO)
position
�1, excessive glare from the headlights
of the vehicle behind you will be reduced. The
AUTO indicator light
�A
(green) will be on.
When the switch of the inside mirror is in the
“�” (OFF) position
�2, the inside mirror will
operate normally.
For HomeLink
Universal Transceiver, see the
SPA1792
SPA2143
SPA2157
MIRRORS3-26
Pre-driving checks and adjustments
�
07.7.25/Z33-D/V5.0
�
Page 138 of 313
description in the “2. Instruments and controls”
section.
OUTSIDE MIRRORS
WARNING
Objects viewed in the outside mirror on
the passenger side are closer than they
appear. Be careful when moving to the
right. Using only this mirror could cause
an accident. Use the inside mirror or
glance over your shoulder to properly
judge distances to other objects.The outside mirror will operate only when the
ignition switch is in the ACC or ON position.
Turn the control knob (located on the driver side
door armrest) to right or left to select the right or
left outside mirror, then adjust using the knob.
SPA1390
Pre-driving checks and adjustments
3-27
�
07.7.25/Z33-D/V5.0
�
Page 139 of 313
Foldable outside mirrorsFold the outside mirror by pushing it toward the
rear of the vehicle.
IC0565
3-28
Pre-driving checks and adjustments
�
07.7.25/Z33-D/V5.0
�
Page 194 of 313

�Make sure the area around the vehicle is
clear.
�Maintenance items should be checked peri-
odically, for example, each time you check
engine oil.
�Check that all windows and lights are clean.
�Visually inspect tires for their appearance and
condition. Also check tires for proper infla-
tion.
�Lock all doors.
�Position seat and adjust head restraints.
�Adjust inside and outside mirrors.
�Fasten seat belts and ask all passengers to
do likewise.
�Check the operation of warning lights when
the ignition key is turned to the ON position.
See “Warning/indicator lights and audible
reminders” in the “2. Instruments and con-
trols” section.1. Apply the parking brake.
2.Automatic transmission:
Move the selector lever to P (Park) or N
(Neutral). (P preferred.)
The starter is designed not to operate if the
selector lever is in one of the driving posi-
tions.
Manual transmission:
Move the shift lever to N (Neutral) position,
and depress the clutch pedal to the floor
while cranking the engine.
The starter is designed not to operate unless
the clutch pedal is fully depressed.
3. Crank the enginewith your foot off the
accelerator pedalby turning the ignition
key to START. Release the key when the
engine starts. If the engine starts, but fails to
run, repeat the above procedure.
�If the engine is very hard to start in extremely
cold weather or when restarting, depress the
accelerator pedal a little (approximately 1/3
to the floor) and hold it then crank the engine.
Release the key and the accelerator pedal
when the engine starts.
�If the engine is very hard to start because it is
flooded, depress the accelerator pedal all theway to the floor and hold it. Crank the engine
for 5 to 6 seconds. After cranking the engine,
release the accelerator pedal. Crank the en-
ginewith your foot off the accelerator
pedalby turning the ignition key to START.
Release the key when the engine starts. If the
engine starts, but fails to run, repeat the
above procedure.
CAUTION
Do not operate the starter for more than
15 seconds at a time. If the engine does
not start, turn the key off and wait 10
seconds before cranking again, other-
wise the starter could be damaged.
4.Warm-up
Allow the engine to idle for at least 30
seconds after starting. Do not race the en-
gine while warming it up. Drive at moderate
speed for a short distance first, especially in
cold weather.
In cold weather, keep the engine running for
a minimum of 2 to 3 minutes before shutting
it off. Starting and stopping the engine over a
short period of time may make the vehicle
more difficult to start.
BEFORE STARTING THE ENGINE STARTING THE ENGINE
Starting and driving
5-9
�
07.7.25/Z33-D/V5.0
�
Page 263 of 313
EXTERIOR AND INTERIOR LIGHTS
Item Wattage (W) Bulb No.
Front turn signal light* 28/8 3457NA
Front park light* 5 T10
Front side marker light* (LED) —
Rear combination light (Upper)
Stop/Tail* (LED) —
Side marker* (LED) —
Rear combination light (Lower)
Back-up* 21 T20
Turn signal* 21 T20
License plate light (x 2) 5 T10
High-mounted stop light* (LED) —
Spot light 8 —
Luggage compartment light (Coupe) 5 —
Trunk light (Roadster)* 3.4 —
Vanity mirror light 1.8 —
Cup holder light* 1.1 —
Rear floor box light* 1.4 —
*: See a NISSAN dealer for replacement.
NOTE: Always check with the Parts Department at a NISSAN dealer for the latest information about parts.
Replacement proceduresAll other lights are either type A, B, C or D. When
replacing a bulb, first remove the lens and/or
cover.
MDI0006
8-28
Maintenance and do-it-yourself
�
07.7.25/Z33-D/V5.0
�


 Bulb No.
Front turn signal light* 28/8 3457NA
Front park light* 5 T10
Front side marker light* (LED) —
Rear combination light (Upper)
Stop/Tail* (LED) �")