Page 233 of 450
For pleasant driving5-17
5
Air conditioning switchE00703500798
Push the switch, and the air conditioning compressor will start
working. The air conditioning indicator lamp (A) will come on.
Push the switch agai n and the air conditioning compressor will
stop working and the indicator lamp goes off.
Operating the air conditioning systemE00704100078
Heating
Set the mode selection dial to the “ ” position and set the air
selection switch (A) to the outside position.
Turn the temperature control dial clockwise or anticlockwise to
the desired temperature. Sel ect the desired blower speed.
NOTE●For maximum heat, set the bl ower speed at the 3rd posi-
tion.
CAUTION!
● When using the air conditi oning, the idling speed
may increase slightly as the air conditioning com-
pressor is switched on/off automatically. While the
vehicle with an automated manual transmission is
stationary, fully depress th e brake pedal to prevent
the vehicle from creeping.
Page 235 of 450
For pleasant driving5-19
5
NOTE●If the outside air is dusty or otherwise contaminated, or if
high cooling performance is desired, set air selection
switch to the recirculation position and the temperature
control dial all the way to the left.
Switch to the outside position periodically to increase
ventilation so that the windows do not become fogged up.
Combination of unheated air and heated airE00722100012
Select the mode selection dial to the position shown in the
illustration and set the air selection switch (A) to the outside
position.
The air flow will be directed to the leg area and the upper part
of the passenger compartment. Select desired blower speed.
Warm air flows to the leg area and unheated or slightly warm
air (depending upon temperature setting) flows to the upper
part of the passenger compartment.
Page 250 of 450

5-34 For pleasant driving
5
1. NEWS
2. AFFAIRS (Current affairs)
3. INFO (Information)
4. SPORT
5. EDUCATE (Education)
6. DRAMA
7. CULTURE
8. SCIENCE
9. VARIED
10. POP M (Pop music) 11. ROCK M (Rock music)
12. EASY M (Easy music)
13. LIGHT M (Light classics)
14. CLASSICS
15. OTHER M (Other music)
16. WEATHER (Weather information)
17. FINANCE
18. CHILDREN
19. SOCIAL
20. RELIGION
21. PHONE IN
22. TRAVEL
23. LEISURE
24. JAZZ
25. COUNTRY
26. NATION M (National music)
27. OLDIES
28. FOLK M (Folk music)
29. DOCUMENT To search for a broadcast of desired program type:
1. Press the PTY button (7).
2. Press the TUNE/SEEK button (3 or 4) for less than 1 sec- ond at a time to select your desired PTY.
3. Two seconds after a desired PTY has been selected, the radio will begin to search for a broadcast of your selected
PTY. During search, the selected PTY on the display
blinks and the radio will begin to search for a broadcast of
your selected PTY.
4. When the radio picks up a station with your desired PTY, the display will show the name of the station.
Page 259 of 450

For pleasant driving5-43
5
To repeat the same track or change the order of tracks
for playback
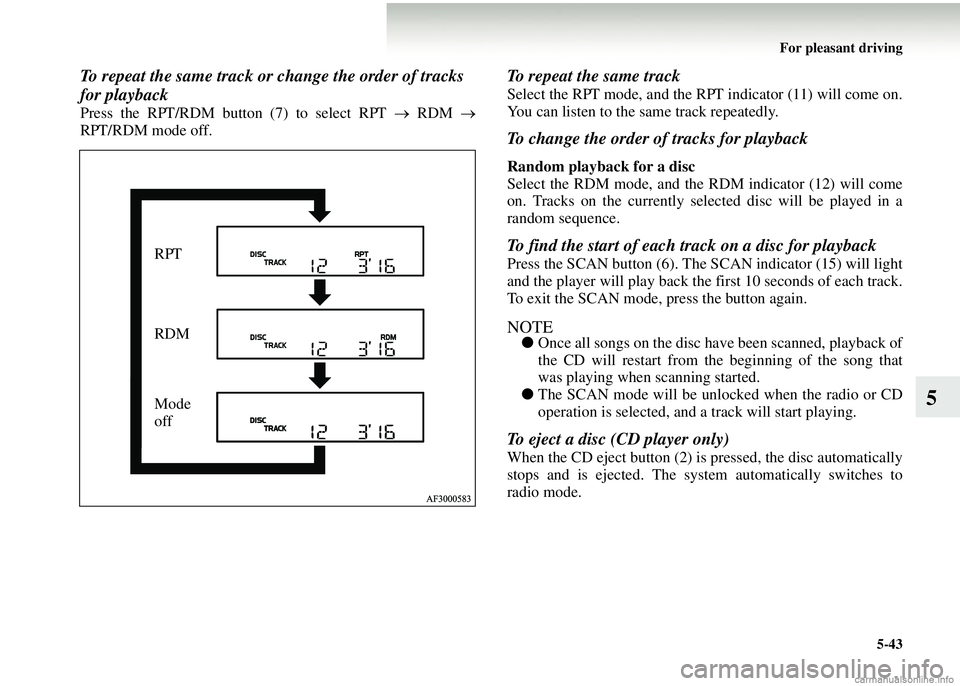
Press the RPT/RDM button (7) to select RPT → RDM →
RPT/RDM mode off.
To repeat the same track
Select the RPT mode, and the RPT indicator (11) will come on.
You can listen to the same track repeatedly.
To change the order of tracks for playback
Random playback for a disc
Select the RDM mode, and the RDM indicator (12) will come
on. Tracks on the currently select ed disc will be played in a
random sequence.
To find the start of each track on a disc for playback
Press the SCAN button (6). The SCAN indicator (15) will light
and the player will play back the first 10 seconds of each track.
To exit the SCAN mode, press the button again.
NOTE● Once all songs on the disc have been scanned, playback of
the CD will restart from the beginning of the song that
was playing when scanning started.
● The SCAN mode will be unlocked when the radio or CD
operation is selected, and a track will start playing.
To eject a disc (CD player only)
When the CD eject button (2) is pressed, the disc automatically
stops and is ejected. The syst em automatically switches to
radio mode.
RPT
RDM
Mode
off
Page 269 of 450

For pleasant driving5-53
5
To turn on the power
PWR ON button — 4
When the power is off, press this button to turn the power on.
To adjust the volume
Volume up button — 2
The volume will increase when this button is pressed.
Volume down button — 6
The volume will decrease when this button is pressed.
To listen to the audio system
Select the desired mode by lightly pressing the mode change
button (4).
The mode switches between the radio and CD with each push
of the button.
To listen to the radio
To select AM/FM mode
Mode change button — 4
Select the desired band by pressing this button.
The order is: FM1 → FM2 → FM3 → MW → LW → CD →
FM1.
Automatic radio tuning
Seek up button — 1/S eek down button — 5
After pressing these buttons, th e reception of the selected sta-
tion will begin.
To select the preset memory
Preset change button — 3
When the radio is on and this bu tton is pressed, the preset sta-
tion frequencies are sequentiall y selected each time the button
is pressed: 1, 2, 3, 4, 5, 6, 1, 2, etc.
To listen to a CD
To select a desired track
Track up button — 1
Press the button repeatedly until the desired track number
appears on the display. If you press the button for 1 second or
longer, the track number will keep rising as long as you keep
the button pressed. The currentl y playing track will continue
playing normally while you keep the button pressed; only the
indicated track number will change. When you release the but-
ton, the player will jump to the indicated track.
Track down button — 5
Press the button repeatedly until the desired track number
appears on the display.
To select a desired folder (MP3 CDs only)
Folder up button — 3
Press this button until the desired folder is reached.
Page 273 of 450

For pleasant driving5-57
5
●In the following circumstan ces, moisture can form on
discs and inside the audio system, preventing normal
operation. • When there is high humidity (for example, when it is raining).
• When the temperature suddenly rises, such as right after
the heater is turned on in cold weather.
In this case, wait until the moisture has had time to dry
out.
● When the CD player is subj ected to violent vibrations,
such as during off-road dr iving, the tracking may not
work.
● When storing compact discs, always store them in their
separate cases. Never place compact discs in direct sun-
light, or in any place where th e temperature or humidity is
high.
● Never touch the flat surface of the disc where there isn’t a
label. This will damage the disc surface and could affect
the sound quality. When handling a compact disc, always
hold it by the outer edge and the centre hole. ●
To clean a disc, use a soft, cl ean, dry cloth. Wipe directly
from the centre hole towards the outer edge. Do not wipe
in a circle. Never use any chemicals such as benzine, paint
thinner, a disc spray cleaner, or an anti-static agent on the
disc.
● Do not use a ball point pen, felt pen, pencil, etc. to write
on the label surface of the disc.
Page 280 of 450
5-64 For pleasant driving
5Storage spaces
E00713100931
NOTE●
Do not leave valuables in an y storage space when leaving
the vehicle.
CAUTION!
● Never leave lighters, cans of carbonated drink, and
spectacles in the cabin wh en parking the vehicle in
hot sunshine. The cabin wi ll become extremely hot,
so lighters and other fla mmable items may catch fire
and unopened drink cans (including beer cans) may
rupture. The heat may also deform or crack plastic
spectacle lenses and other spectacle parts that are
made of plastic.
● Keep the lids of storage spaces closed while driving
the vehicle. The lid or co ntents of a storage space
could otherwise cause an injury.
1- Luggage floor boxes
2- Glove box, Cool box*
3-door models
5-door models
Page 315 of 450

For emergencies6-25
6
8. Slowly turn the jack handle until the tyre is raised slightlyoff the ground surface. Spare wheel*
E00801101206
Check the air pressure of the spare tyre frequently and make
sure it is ready for emergency use at any time.
Maintaining the spare wheel at the highest specified air pres-
sure will ensure that it can al ways be used under any conditions
(city/high-speed driving, varying load weight, etc.).
The spare wheel is stored ben eath the luggage floor board of
the luggage compartment.
Compact spare wheel
The compact spare tyre is desi gned to save space in the lug-
gage compartment and its lighter weight makes it easier to use
if a flat tyre occurs.
WARNING!
● Stop jacking up the vehicle as soon as the tyre is
raised off the ground. It is dangerous to raise the
vehicle any higher.
● Do not get under your vehi cle while using the jack.
●Do not bump the raised vehicle or leave it sitting on
the jack for a long time. Both are very dangerous.
●Do not use a jack except th e one that came with your
vehicle.
● The jack should not be us ed for any purpose other
than to change a tyre.
● No one should be in you r vehicle when using the
jack.
● Do not start or run the en gine while your vehicle is
on the jack.
● Do not turn the raised wh eel. The tyres still on the
ground could turn and make your vehicle fall off the
jack.
CAUTION!
● The pressure should be periodically checked and
maintained at the specified pressure while the tyre is
stowed.
Driving with insufficient ty re pressure can lead to an
accident. If you have no choice but to drive with
insufficient tyre pressure , keep your speed down and
inflate the tyre to the correct pressure as soon as
possible. (Refer to “Tyre inflation pressures” on
page 8-19.)
● The compact spare wheel is for temporary use only
and should be removed as soon as the original wheel
can be repaired or replaced.