2008 MINI Clubman page 49
[x] Cancel search: page 49Page 41 of 164

ReferenceAt a glance Controls Driving tips Mobility
39
Driving
Ignition lock
Inserting the key into the ignition lock
Insert the key all the way into the ignition lock.
Radio readiness
Individual electrical consumers can operate.
Removing the key from the ignition lock
Press in the key briefly. It is ejected slightly.
At the same time:
>The ignition is switched off if it was on
beforehand.
Automatic transmission
You cannot take out the key unless the selector
lever is in the P position: interlock.
Start/stop button
Press the start/stop button to switch radio readi-
ness or the ignition on and off. Do not depress
the brake or clutch while doing so.When you press the start/stop button and
depress the clutch if the car has manual
transmission or the brake if the car has auto-
matic transmission, the engine starts.<
Radio readiness
Individual electrical consumers can operate. The
time and outside temperature are displayed in
the tachometer.
Radio readiness is switched off automatically:
>When the key is removed from the ignition
lock
>When using convenient access
* by pushing
the button on the door handle or the
button on the remote control, refer to Lock-
ing on page26
Ignition on
Most indicator and warning lamps in indicator
area 1, page13, light up for varying lengths of
time.
When the engine is off, switch off the igni-
tion and any unnecessary electrical con-
sumers in order to preserve the battery.<
Radio readiness and ignition off
All indicator and warning lamps in the displays
go out.
The ignition is switched off automatically when
the driver's door is opened. Pressing the start/
stop button again switches the ignition back on.
The ignition is not switched off in situations such
as the following:
>The clutch or brake is depressed
>The low beams are switched on
Starting the engine
Do not allow the engine to run in enclosed
spaces; otherwise inhalation of the nox-
ious exhaust gases can lead to unconsciousness
Page 42 of 164

Driving
40
and death. Exhaust gases contain carbon mon-
oxide, an odorless and colorless, but highly toxic
gas. Never leave an unattended vehicle with the
engine running, otherwise such a vehicle repre-
sents a potential safety hazard.
Before leaving the car while the engine is run-
ning, place the transmission in neutral or move
the selector lever to position P and forcefully
apply the parking brake to prevent the car from
moving.<
Avoid frequent starting in quick succes-
sion or repeated start attempts in which
the engine does not start. Otherwise, the fuel is
not burned or inadequately burned and there is
a danger of overheating and damaging the cat-
alytic converter.<
Do not let the engine warm up with the vehicle
at a standstill. Move off immediately at a moder-
ate engine speed.
When starting the engine, do not depress the
accelerator pedal.
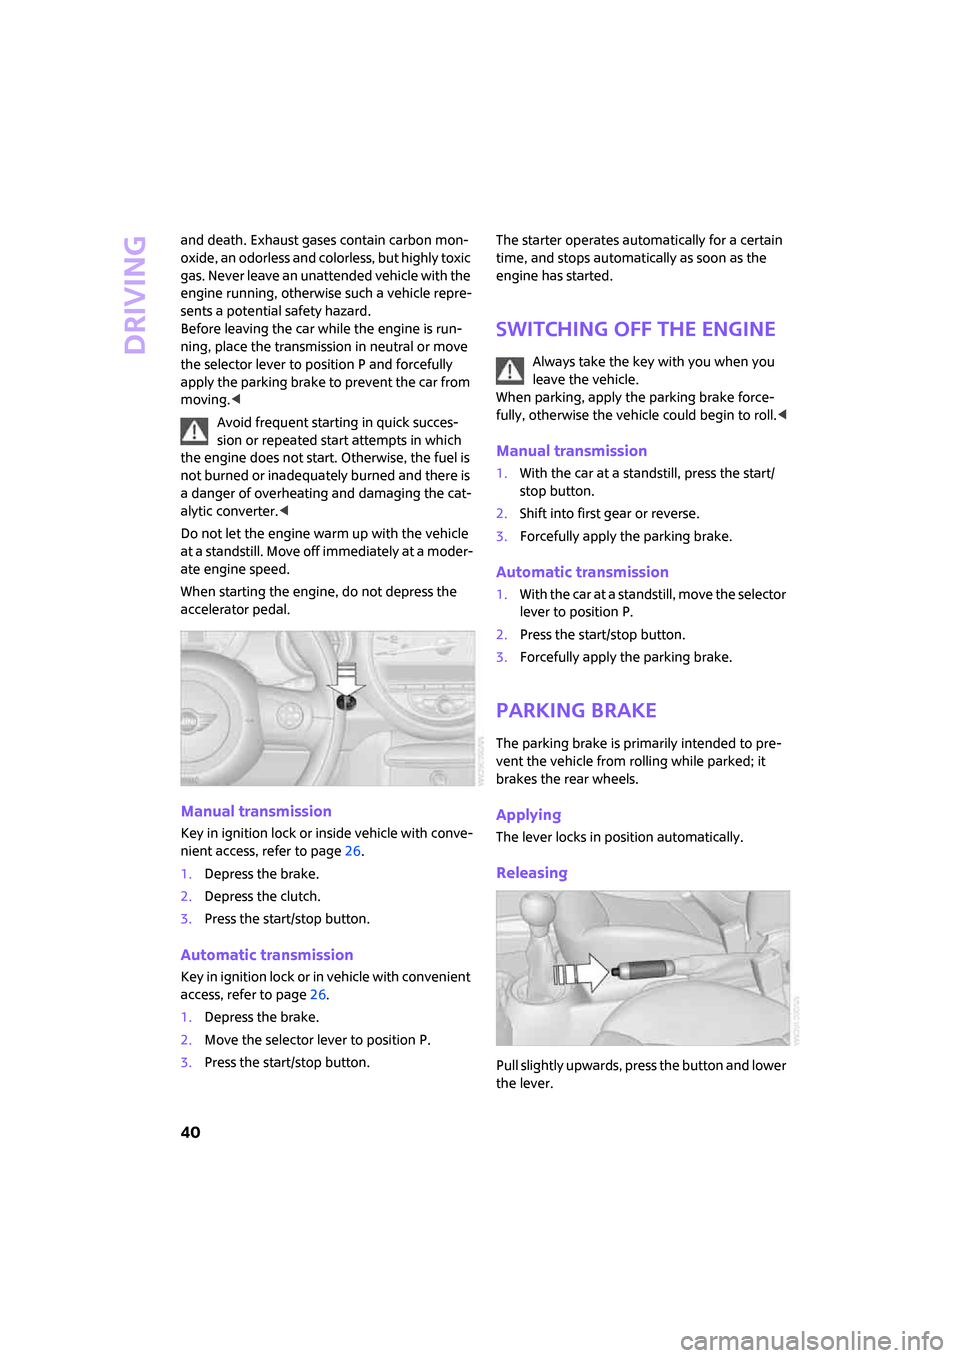
Manual transmission
Key in ignition lock or inside vehicle with conve-
nient access, refer to page26.
1.Depress the brake.
2.Depress the clutch.
3.Press the start/stop button.
Automatic transmission
Key in ignition lock or in vehicle with convenient
access, refer to page26.
1.Depress the brake.
2.Move the selector lever to position P.
3.Press the start/stop button.The starter operates automatically for a certain
time, and stops automatically as soon as the
engine has started.
Switching off the engine
Always take the key with you when you
leave the vehicle.
When parking, apply the parking brake force-
fully, otherwise the vehicle could begin to roll.<
Manual transmission
1.With the car at a standstill, press the start/
stop button.
2.Shift into first gear or reverse.
3.Forcefully apply the parking brake.
Automatic transmission
1.With the car at a standstill, move the selector
lever to position P.
2.Press the start/stop button.
3.Forcefully apply the parking brake.
Parking brake
The parking brake is primarily intended to pre-
vent the vehicle from rolling while parked; it
brakes the rear wheels.
Applying
The lever locks in position automatically.
Releasing
Pull slightly upwards, press the button and lower
the lever.
Page 43 of 164

ReferenceAt a glance Controls Driving tips Mobility
41
In exceptional cases, if the parking brake
has to be used to slow or stop the car, do
not pull the lever up too hard. In doing so, con-
tinuously press the button of the parking brake
lever.
Otherwise, excessive force could lead to over-
braking and loss of traction, i.e. fishtailing, at the
rear axle.<
Manual transmission
When shifting into 5th or 6th gear, press
the gearshift lever to the right. Otherwise
the engine could be damaged if you inadvert-
ently shift into 3rd or 4th gear.<
Reverse gear
Select this only when the vehicle is stationary.
When the gearshift lever is pressed to the left, a
slight resistance has to be overcome.
Automatic transmission*
with Steptronic
In addition to the fully automatic mode, you can
shift gears manually using Steptronic, page42.
Parking the vehicle
To prevent the vehicle from rolling, always
select position P and apply the parking
brake before leaving the vehicle with the engine
running.<
Removing the key
1.Move the selector lever to position P.
2.Switch off the engine.3.Remove the key.
Selector lever positions
P R N D M/S + –
Displays in the tachometer
P R N D DS M1 to M6
The selector lever position is displayed, or the
current gear in the manual mode.
Changing selector lever positions
>The selector lever can only be moved out of
position P if the ignition is switched on or the
engine is running: interlock.
>Before moving the lever away from P or N
with the vehicle stationary, first depress the
brake; otherwise the selector lever will
refuse to move: shiftlock.
To prevent the vehicle from creeping
after you select a driving position,
depress the brake until you are ready to
start.<
A lock prevents accidental shifting into selector
lever positions R and P.
Page 45 of 164

ReferenceAt a glance Controls Driving tips Mobility
43
>Pull one of the shift paddles.
Transmission shifts up.
>Push one of the shift paddles.
Transmission shifts down.
M1 to M6 is displayed in the gear indicator.
Overriding the selector lever lock
Should the selector lever refuse to move out of
position P although the button on the selector
lever is pressed, the selector lever lock can be
overridden:
1.Unclip the sleeve of the selector lever.
2.Pull the sleeve up over the selector lever
until the sleeve is inside out. Disconnect the
cable connector if necessary.
3.Take the hub cover remover1 out of the
onboard tool kit and insert it in the loop on
the front passenger side.
4.Pull the loop up.
5.Move the selector lever into the desired
position by pressing the button on the front
of the selector lever.
Turn signals/
headlamp flasher
1Turn signal indicator
2Headlamp flasher
Using turn signals
Press the lever beyond the resistance point.
To turn off manually, press the lever to the resis-
tance point.
Unusually rapid flashing of the indicator
lamp indicates that an indicator bulb has
failed.<
Indicating a turn briefly
Press the lever as far as the resistance point for
as long as you wish to indicate a turn.
Triple turn signal activation
Press the lever as far as the resistance point.
You can set whether the turn signal is to flash
once or three times.
1.Switch on the ignition, refer to page39.
2.Briefly press the button in the turn indicator
lever repeatedly until "SET/INFO" is dis-
played.
Page 47 of 164

ReferenceAt a glance Controls Driving tips Mobility
45
Deactivate the rain sensor before entering
an automatic car wash. Failure to do so
could result in damage caused by undesired
wiper activation.<
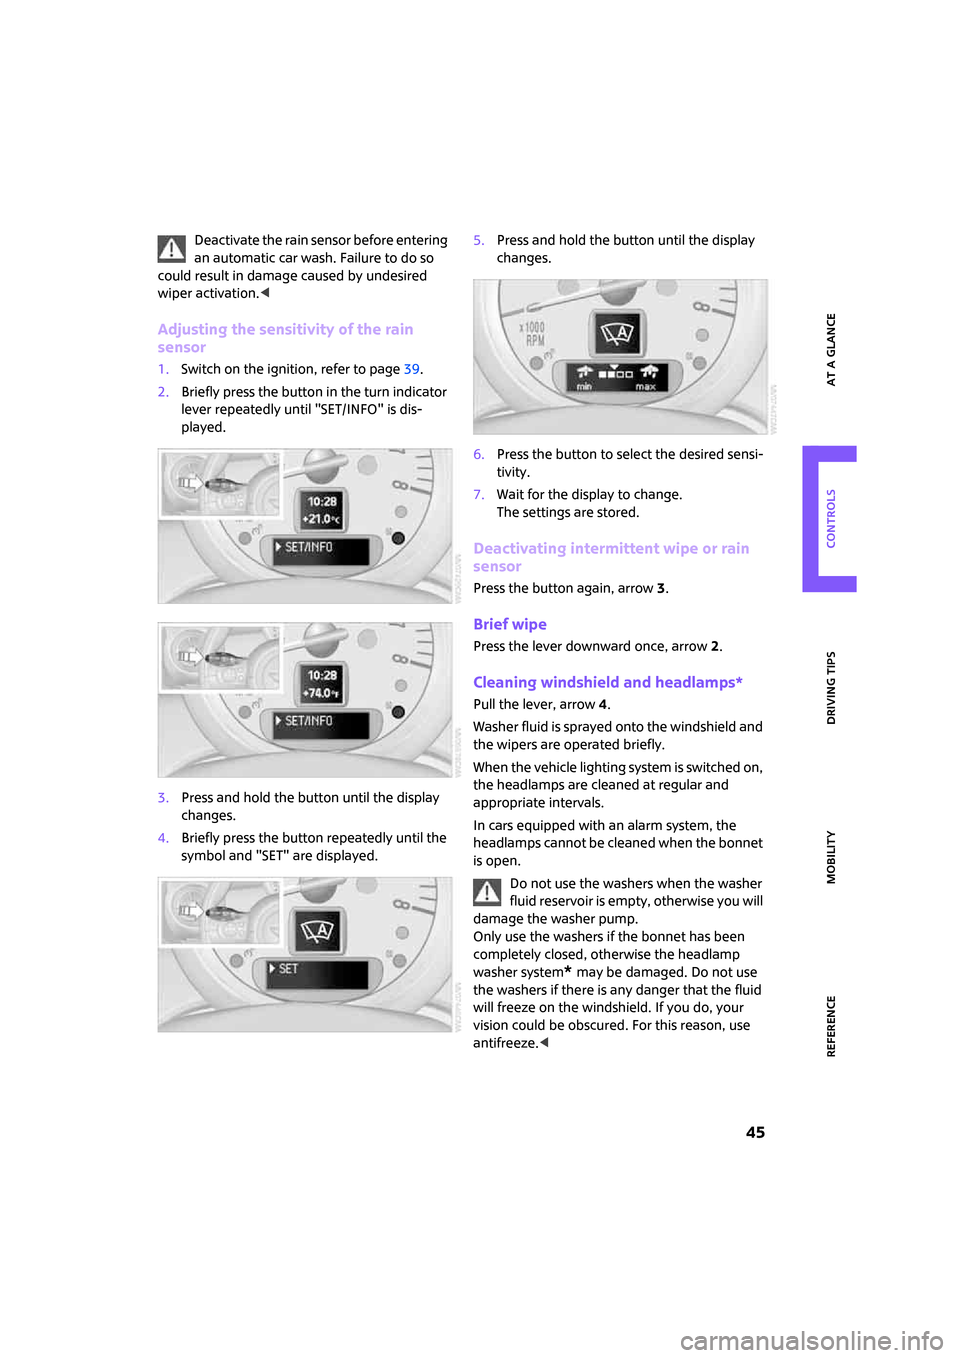
Adjusting the sensitivity of the rain
sensor
1.Switch on the ignition, refer to page39.
2.Briefly press the button in the turn indicator
lever repeatedly until "SET/INFO" is dis-
played.
3.Press and hold the button until the display
changes.
4.Briefly press the button repeatedly until the
symbol and "SET" are displayed.5.Press and hold the button until the display
changes.
6.Press the button to select the desired sensi-
tivity.
7.Wait for the display to change.
The settings are stored.
Deactivating intermittent wipe or rain
sensor
Press the button again, arrow3.
Brief wipe
Press the lever downward once, arrow2.
Cleaning windshield and headlamps*
Pull the lever, arrow 4.
Washer fluid is sprayed onto the windshield and
the wipers are operated briefly.
When the vehicle lighting system is switched on,
the headlamps are cleaned at regular and
appropriate intervals.
In cars equipped with an alarm system, the
headlamps cannot be cleaned when the bonnet
is open.
Do not use the washers when the washer
fluid reservoir is empty, otherwise you will
damage the washer pump.
Only use the washers if the bonnet has been
completely closed, otherwise the headlamp
washer system
* may be damaged. Do not use
the washers if there is any danger that the fluid
will freeze on the windshield. If you do, your
vision could be obscured. For this reason, use
antifreeze.<
Page 50 of 164

Everything under control
48
Everything under control
Odometer, outside tem-
perature display, clock
1Outside temperature display and clock or
current speed
2Odometer and trip odometer
3Resetting the trip odometer
Units of measure
Select the respective units of measure, miles or
km for the odometer as well as 7 or 6 for the
outside temperature, page51.
Outside temperature display, time
Setting the time, refer to page54.
Outside temperature warning
When the displayed temperature sinks to
approx. +377/+36, a signal sounds and a
warning lamp lights up. There is an increased
risk of black ice.
Black ice can also form at temperatures
above +377/+36. You should therefore
drive carefully on bridges and shaded roads, for
example, otherwise there is an increased risk of
an accident.<
Current vehicle speed
To have the current speed shown in the upper
display otherwise serving for the outside tem-
perature display and clock.1.Press the button in the turn indicator lever
repeatedly until the current speed appears
in the lower display.
2.Wait for the speed display to automatically
move to the upper display.
The outside temperature then appears in the
lower display.
Odometer and trip odometer
Resetting the trip odometer
With the ignition switched on, press knob 3 in
the tachometer.
When the vehicle is parked
To display the time, outside temperature and
odometer briefly after the key is removed from
the ignition lock:
Press knob 3 in the tachometer.
Tachometer
Never operate the engine with the needle in the
red overspeed zone of the gauge. In this range,
the fuel supply is interrupted to protect the
engine.
Coolant temperature
A warning lamp will come on if the coolant, and
therefore the engine, becomes too hot.
Check coolant level, refer to page108.
Page 51 of 164

ReferenceAt a glance Controls Driving tips Mobility
49
Fuel gauge
Fuel tank capacity
You can find information on refueling on
page94.
If the tilt of the vehicle varies for a longer period,
when you are driving in mountainous areas, for
example, the indicator may fluctuate slightly.
MINI Cooper, MINI Cooper S
Approx. 13.2 US gallons/50 liters.
Reserve
Once the fuel level has fallen to the reserve zone
of approx. 2.1 gallons/8 liters, the remaining
indicator lamps change from orange to red,
arrow. The tachometer displays the remaining
cruising range. An indicator lamp comes on
when the remaining range is less than approx.
30 miles/50 km.
If the range displayed is less than
30 miles/50 km, be sure to refuel; other-
wise engine functions are not guaranteed and
damage could occur.<
Computer*
Displays in tachometer
Press the button in the turn indicator lever
repeatedly to call up various items of informa-
tion.
The following items of information are displayed
in the order listed:
>Cruising range
>Average fuel consumption
>Current fuel consumption
>Average speed
>Current vehicle speed
To set the corresponding units of measure, refer
to Formats and units of measure on page51.
Cruising range
Displays the estimated cruising range available
with the remaining fuel. The range is calculated
on the basis of the way the car has been driven
over the last 18 miles/30 km and the amount of
fuel currently in the tank.
If the range displayed is less than
30 miles/50 km, be sure to refuel; other-
wise engine functions are not guaranteed and
damage could occur.<
Average fuel consumption
Calculated for the time the engine has been run-
ning.
To reset average fuel consumption: press the
button in the turn indicator lever for approx.
2seconds.
Page 53 of 164

ReferenceAt a glance Controls Driving tips Mobility
51
6Adjusting settings
>Confirmation signals when locking and
unlocking the vehicle20
>Response during unlocking
procedure19
>Automatic locking22
>Pathway lighting66
>Daytime running lamps67
>Triple turn signal activation437Setting the time54
8Setting the date55
9Exiting the menu
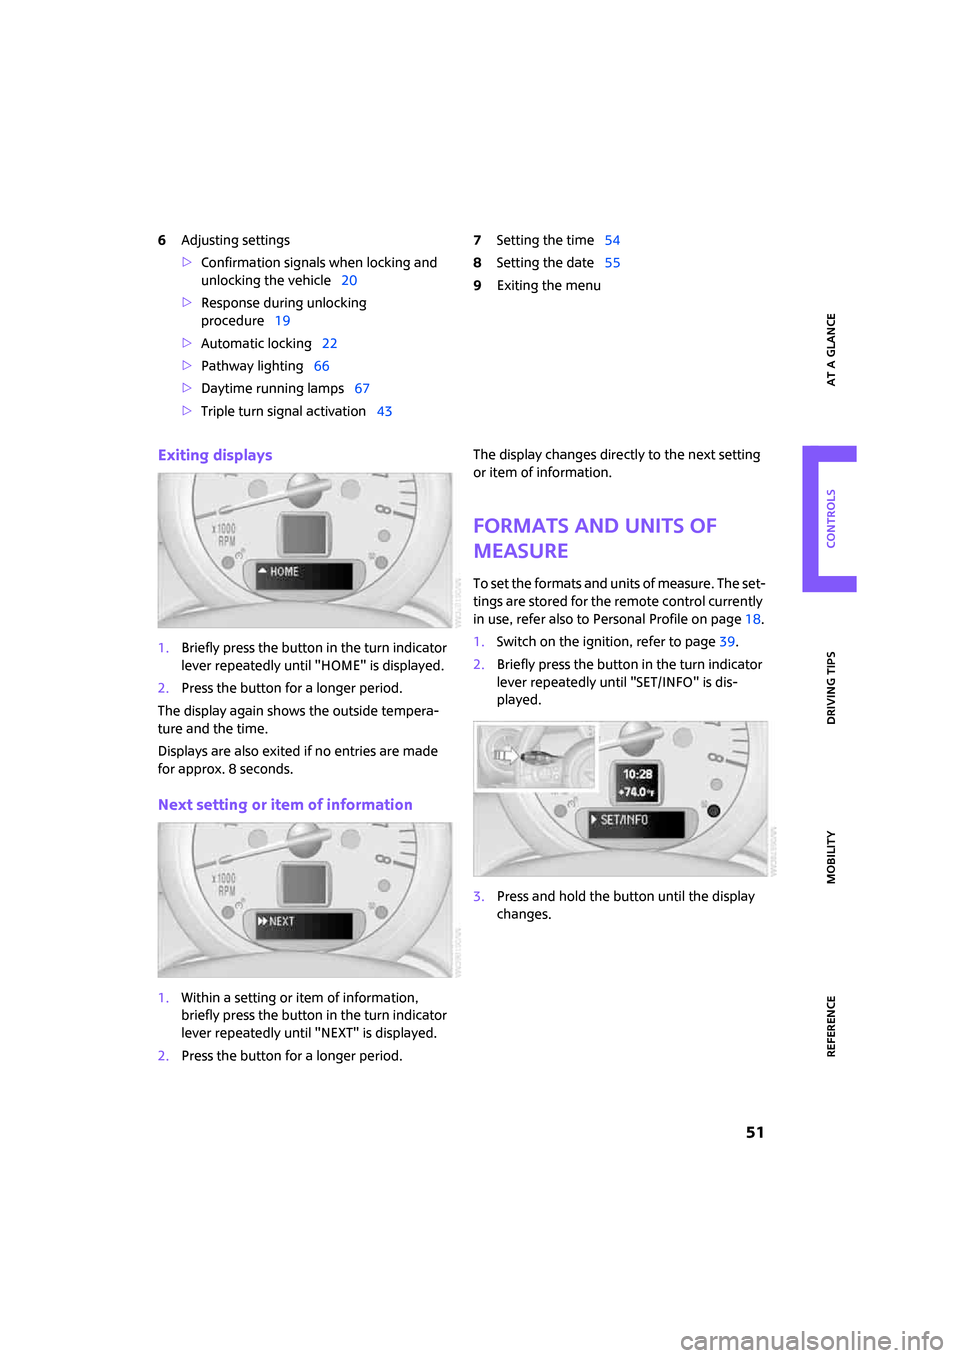
Exiting displays
1.Briefly press the button in the turn indicator
lever repeatedly until "HOME" is displayed.
2.Press the button for a longer period.
The display again shows the outside tempera-
ture and the time.
Displays are also exited if no entries are made
for approx. 8 seconds.
Next setting or item of information
1.Within a setting or item of information,
briefly press the button in the turn indicator
lever repeatedly until "NEXT" is displayed.
2.Press the button for a longer period.The display changes directly to the next setting
or item of information.
Formats and units of
measure
To set the formats and units of measure. The set-
tings are stored for the remote control currently
in use, refer also to Personal Profile on page18.
1.Switch on the ignition, refer to page39.
2.Briefly press the button in the turn indicator
lever repeatedly until "SET/INFO" is dis-
played.
3.Press and hold the button until the display
changes.