Page 114 of 474

�Turn the exterior lamp switch to
positionCorB (
�page 109).
�Pull out the exterior lamp switch to
second stop.
The front fog lam")
113 Controls in detail
Lighting
Rear fog lamp (driver’s side only)
�Turn the exterior lamp switch to
positionCorB (
�page 109).
�Pull out the exterior lamp switch to
second stop.
The front fog lamps and the rear fog
lamp switch on.
The yellow indicator lamp† in the
exterior lamp switch comes on
(
�page 109).
�Push in the exterior lamp switch to first
stop.
The rear fog lamp switches off.
The yellow indicator lamp† in the
exterior lamp switch goes out.
The front fog lamps remain lit.
Combination switch
1High beam
2High beam flasherHigh beam
�Turn the exterior lamp switch to
positionB (
�page 109).
�Push the combination switch in
direction of arrow1 to switch on the
high beam.
The high beam headlamp indicator
lampA in the instrument cluster
comes on (
�page 26).
�Pull the combination switch in direction
of arrow2 to its original position to
switch off the high beam.
The high beam headlamp indicator
lampA in the instrument cluster
goes out.
High beam flasher
�Pull the combination switch briefly in
direction of arrow2.
Page 144 of 474

143 Controls in detail
Control system
Lighting submenu
Access the
Lighting submenu via the
Settings menu. Use the Lighting sub-
menu to change the lamp and lighting
settings on your vehicle.
The following functions are available:Setting daytime running lamp mode
(USA only)
�Move the selection marker with
buttonæorç to the
Lighting
submenu.
�Press buttonjork repeatedly
until the message
Headlamp Mode
appears in the multifunction display.
The selection marker is on the current
setting.
�Press buttonæorç to select
manual operation (
Manual) or daytime
running lamp mode (
Constant).With daytime running lamp mode activated
and the exterior lamp switch at
positionMorU, the low beam
headlamps are switched on when the en-
gine is running.
In low ambient light conditions the follow-
ing lamps will switch on additionally:
�Parking lamps
�Tail lamps
�License plate lamps
�Side marker lamps
For more information on the daytime run-
ning lamp mode, see “Lighting”
(
�page 109).
FunctionPage
Setting daytime running lamp
mode (USA only)143
Setting locator lighting144
Setting night security
illumination144
Setting interior lighting delayed
shut-off 145
iThis function is not available in countries
where the daytime running lamp mode is manda-
tory and therefore in a constant mode.
iFor safety reasons, resetting all the func-
tions of all submenus to the factory settings
while driving (
�page 136) will not deactivate the
daytime running lamp mode.
The following message appears in the multifunc-
tion display:
Lighting Cannot be completely reset to
factory settings while driving
.
Page 362 of 474
361 Practical hints
What to do if …
On the pages that follow, you will find
a compilation of the most important warn-
ing and malfunction messages that may
appear in the multifunction display.
For your convenience the messages are
divided into two sections:
�Text messages (�page 362)
�Symbol messages (�page 371)
Warning!G
No messages will be displayed if either the
instrument cluster or the multifunction dis-
play is inoperative.
Contact your nearest authorized
Mercedes-Benz Center.
iSwitching on ignition (�page 37) causes all
instrument cluster lamps (except high beam
headlamp indicator lamp and turn signal indica-
tor lamps unless activated) as well as the multi-
function display to come on. Make sure the
lamps and multifunction display are in working
order before starting your journey.
Page 384 of 474
383 Practical hints
What to do if …
Display symbolDisplay messagePossible cause/consequencePossible solution
.High Beam
RightThe right high beam lamp (halogen
headlamps)/high beam flasher
lamp (Bi-Xenon* headlamps) is
malfunctioning.�Replace the bulb as soon as
possible (
�page 400).
License Plate Lamp
LeftThe left license plate lamp is
malfunctioning.�Replace the bulb as soon as
possible (
�page 400).
License Plate Lamp
RightThe right license plate lamp is
malfunctioning.�Replace the bulb as soon as
possible (
�page 400).
Reverse Lamp
LeftThe left backup lamp is malfunc-
tioning.�Replace the bulb as soon as
possible (
�page 400).
Reverse Lamp
RightThe right backup lamp is malfunc-
tioning.�Replace the bulb as soon as
possible (
�page 400).
Low Beam
LeftThe left low beam lamp is malfunc-
tioning.Halogen headlamp:
�Replace the bulb as soon as
possible (
�page 400).
Bi-Xenon* headlamp:
�Contact an authorized Mercedes-Benz
Center as soon as possible.
Page 385 of 474

384 Practical hints
What to do if …
Display symbolDisplay messagePossible cause/consequencePossible solution
.Low Beam
RightThe right low beam lamp is malfunc-
tioning.Halogen headlamp:
�Replace the bulb as soon as
possible (
�page 400).
Bi-Xenon* headlamp:
�Contact an authorized Mercedes-Benz
Center as soon as possible.
Parking lamp, Front Left
Auxiliary Bulb OnThe left front parking lamp is
malfunctioning. A backup bulb has
been brought into use.�Replace the bulb as soon as
possible (
�page 400).
Parking Lamp, Front Right
Auxiliary Bulb OnThe right front parking lamp is
malfunctioning. A backup bulb has
been brought into use.�Replace the bulb as soon as
possible (
�page 400).
Marker Lamp
Front LeftThe left front side marker lamp is
malfunctioning.�Contact an authorized Mercedes-Benz
Center as soon as possible.
Marker Lamp
Front RightThe right front side marker lamp is
malfunctioning.�Contact an authorized Mercedes-Benz
Center as soon as possible.
Marker Lamp
Rear LeftThe left rear side marker lamp is
malfunctioning. This message will
only appear if a critical number of
LEDs have stopped working.�Contact an authorized Mercedes-Benz
Center as soon as possible.
Page 402 of 474
401 Practical hints
Replacing bulbs
Front lamps
LampType
1Additional turn signal
lampLED
2Turn signal lamp3457 AK
3Halogen headlamp:
Low beam
H7 (55 W)
Bi-Xenon* headlamp:
Low and high beam1
1Vehicles with Bi-Xenon* headlamps: Low beam
and high beam use the same D2S-35W lamp. Do
not replace the Bi-Xenon* bulbs yourself. Contact
an authorized Mercedes-Benz Center.
D2S-35 W
4Front fog lampHB4 (51 W)
Front fog lamp
(vehicles with Sport
Package* and
SLK 55 AMG)H7 (55 W)
Corner illuminating
front fog lamp*H7 (55 W)
LampType
5Parking and standing
lampW5W
6Halogen headlamp:
High beam/high beam
flasher
H7 (55 W)
Bi-Xenon* headlamp:
High beam flasher
H7 (55 W)
7Side marker lampW5W
Page 404 of 474
403 Practical hints
Replacing bulbs
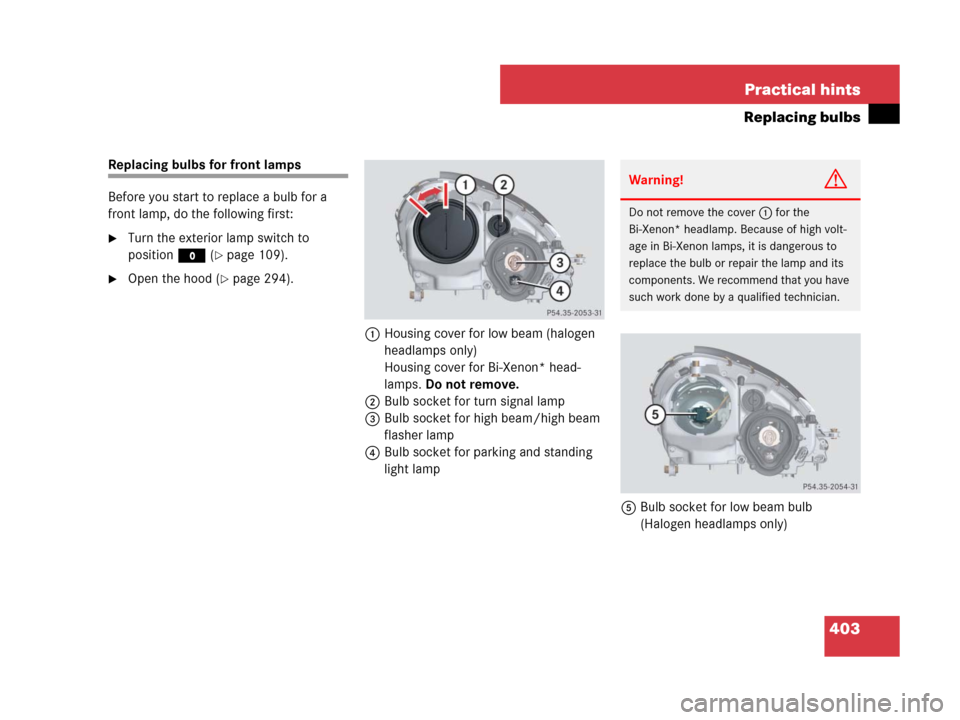
Replacing bulbs for front lamps
Before you start to replace a bulb for a
front lamp, do the following first:
�Turn the exterior lamp switch to
positionM (
�page 109).
�Open the hood (�page 294).
1Housing cover for low beam (halogen
headlamps only)
Housing cover for Bi-Xenon* head-
lamps. Do not remove.
2Bulb socket for turn signal lamp
3Bulb socket for high beam/high beam
flasher lamp
4Bulb socket for parking and standing
light lamp
5Bulb socket for low beam bulb
(Halogen headlamps only)
Warning!G
Do not remove the cover1 for the
Bi-Xenon* headlamp. Because of high volt-
age in Bi-Xenon lamps, it is dangerous to
replace the bulb or repair the lamp and its
components. We recommend that you have
such work done by a qualified technician.
Page 405 of 474

�Turn housing cover1 counterclock-
wise and remove.
�Turn bulb socket5 with the bulb
counterclockwise and remove.
�Pull the")
404 Practical hints
Replacing bulbs
Low beam bulb (Halogen headlamps
only)
�Turn housing cover1 counterclock-
wise and remove.
�Turn bulb socket5 with the bulb
counterclockwise and remove.
�Pull the bulb out of bulb socket5.
�Press the new bulb into bulb socket5.
�Place bulb socket5 back into the
lamp and turn it clockwise.
�Reinstall housing cover1.
High beam/high beam flasher bulb
(Halogen headlamps) / High beam
flasher bulb (Bi-Xenon* headlamps)
�Turn bulb socket3 with the bulb
counterclockwise and remove.
�Pull the bulb out of bulb socket3.
�Press the new bulb into bulb socket3.
�Place bulb socket3 back into the
lamp and turn it clockwise.Front turn signal bulb
�Turn bulb socket2 with the bulb
counterclockwise and remove.
�Press gently onto the bulb and turn it
counterclockwise out of bulb
socket2.
�Press the new bulb gently into bulb
socket2 and turn it clockwise.
�Place bulb socket2 back into the
lamp and turn it clockwise.
Parking and standing lamp bulb
�Turn bulb socket4 with the bulb
counterclockwise and remove.
�Pull the bulb out of bulb socket4.
�Press the new bulb into bulb socket4.
�Place bulb socket4 back into the
lamp and turn it clockwise.
Replacing bulbs for rear lamps
Before you start to replace a bulb for a rear
lamp, do the following first:
�Turn the exterior lamp switch to
positionM (
�page 109).
�Open the trunk lid (�page 99).
Tail lamp unit
1Bulb socket for rear fog lamp
(driver’s side only)
2Bulb socket for turn signal lamp
3Bulb socket for backup lamp

/high beam flasher
lamp (Bi")

Bi-Xenon* headlamp:
Low and high beam1
1Vehicle")