Page 5 of 474

Contents
Safety and Security........................... 63
Occupant safety................................... 64
Air bags .......................................... 66
Occupant Classification System ..... 71
Seat belts ....................................... 76
Children in the vehicle .................... 79
Panic alarm .......................................... 83
Activating ....................................... 83
Deactivating ................................... 83
Driving safety systems ......................... 84
ABS ................................................ 84
BAS ................................................ 86
ESP
®............................................... 86
Anti-theft systems................................ 90
Immobilizer..................................... 90
Anti-theft alarm system .................. 90
Tow-away alarm ............................. 91
Controls in detail............................... 93
Locking and unlocking ......................... 94
SmartKey ....................................... 94
Opening the doors from the
inside ............................................. 98
Opening the trunk .......................... 99
Closing the trunk.......................... 100
Valet locking ................................ 101
Trunk lid emergency release ........ 102
Automatic central locking ............ 102
Locking and unlocking from the
inside ........................................... 103
Seats ................................................. 104
Seat heating* ............................... 104
Lumbar support*.......................... 105
AIRSCARF neck-level heating* ..... 105
Memory function* ............................. 107
Storing positions into memory ..... 108
Recalling positions from
memory ........................................ 108Lighting ............................................. 109
Exterior lamp switch .................... 109
Combination switch ..................... 113
Corner-illuminating front
fog lamps* ................................... 114
Hazard warning flasher ................ 115
Interior lighting ............................ 116
Door entry lamps ......................... 117
Instrument cluster ............................. 118
Adjusting instrument cluster
illumination .................................. 118
Tachometer.................................. 119
Outside temperature indicator ..... 119
Resetting trip odometer ............... 120
Clock............................................ 120
Page 10 of 474

9
Product information
�
Introduction
Product information
Please observe the following in your own
best interest:
We recommend using Genuine
Mercedes-Benz Parts as well as conversion
parts and accessories explicitly approved
by us for your vehicle model.
We have tested these parts to determine
their reliability, safety and special
suitability for Mercedes-Benz vehicles.We are unable to make an assessment for
other products and therefore cannot be
held responsible for them, even if in
individual cases an official approval or
authorization by governmental or other
agencies should exist. Use of such parts
and accessories could adversely affect the
safety, performance or reliability of your
vehicle. Please do not use them.Genuine Mercedes-Benz Parts as well
as conversion parts and accessories
approved by us are available at any
authorized Mercedes-Benz Center where
you will receive comprehensive informa-
tion, also on permissible technical modifi-
cations, and where proper installation will
be performed.
Page 16 of 474

15 Introduction
Symbols
�Symbols
Trademarks:
�ESP® is a registered trademark of
DaimlerChrysler.
�HomeLink® is a registered trademark
of Prince, a Johnson Controls
Company.
�SIRIUS and related marks are trade-
marks of SIRIUS Satellite Radio Inc.The following symbols are found in this
Operator’s Manual:
* Optional equipment is identified
with an asterisk. Since standard
equipment varies between models,
the descriptions and illustrations in
this manual may differ slightly from
the actual equipment of your
vehicle.
�This symbol points to instructions for
you to follow.
�A number of these symbols appearing
in succession indicates a multiple-step
procedure.
� page This symbol tells you where to
look for further information on a
topic.
��This continuation symbol marks
a warning which is continued on
the next page.
��This continuation symbol marks
a procedure which is continued
on the next page.
-> This symbol is used to indicate
cross-references to term defini-
tions.
DisplayWords appearing in the multi-
function display are printed in
the type shown here.
Warning!G
Warning notices draw your attention to haz-
ards that may endanger your health or life,
or the health or life of others.
!Highlights hazards that may result in
damage to your vehicle.
iHelpful hints or further information you may
find useful.
Page 20 of 474

Please note that your vehicle")
19 Introduction
Vehicle data recording
�Vehicle data recording
Information regarding electronic
recording devices
(Including notice pursuant to California Code § 9951)
Please note that your vehicle is equipped with devices that can record vehicle systems data and, if equipped with the Tele Aid* system,
may transmit some data in certain accidents.
This information helps, for example, to diagnose vehicle systems after a collision and to continuously improve vehicle safety.
DaimlerChrysler may access the information and share it with others
�for safety research or vehicle diagnosis purposes
�with the consent of the vehicle owner or lessee
�in response to an official request by law enforcement or other government agency
�for use in dispute resolution involving DaimlerChrysler, its affiliates or sales/service organization and/or
�as otherwise required or permitted by law.
Please check the Tele Aid* subscription service agreement for details regarding the information that may be recorded or transmitted
via that system.
Page 28 of 474

27 At a glance
Instrument cluster
ItemPage
1Multifunction display
with:
Main odometer127
Trip odometer120,
127
Automatic transmission*:
Gear range indicator160
Automatic transmission*:
Program mode indicator161
Outside temperature
indicator (or digital speed-
ometer when selected)140
Set speed for cruise control249
2Tachometer with:
?Engine malfunction
indicator lamp,
USA only351
±Engine malfunction
indicator lamp,
Canada only351
ItemPage
353
HUSA only:
Combination low tire
pressure/TPMS mal-
function telltale317,
356
AHigh beam
headlamp indicator
lamp55,
113
3Fuel gauge with:
4Fuel reserve warning
lamp355
The arrow indicates that the
fuel filler flap is on the rear
right-hand side.291
4Clock120
5Speedometer with:
1Supplemental
Restraint System
(SRS) indicator lamp64,
355
ItemPage
-Antilock Brake
System (ABS)
indicator lamp84,
348
LLeft turn signal
indicator lamp
KRight turn signal
indicator lamp55
vElectronic Stability
Program (ESP®)
warning lamp
86,
352
;Brake warning lamp,
USA only59,
350
3Brake warning lamp,
Canada only59,
350
6Reset button for:
�Resetting trip odometer
�Resetting all settings
120
136
7Knobs for instrument
cluster illumination118
Page 30 of 474
29 At a glance
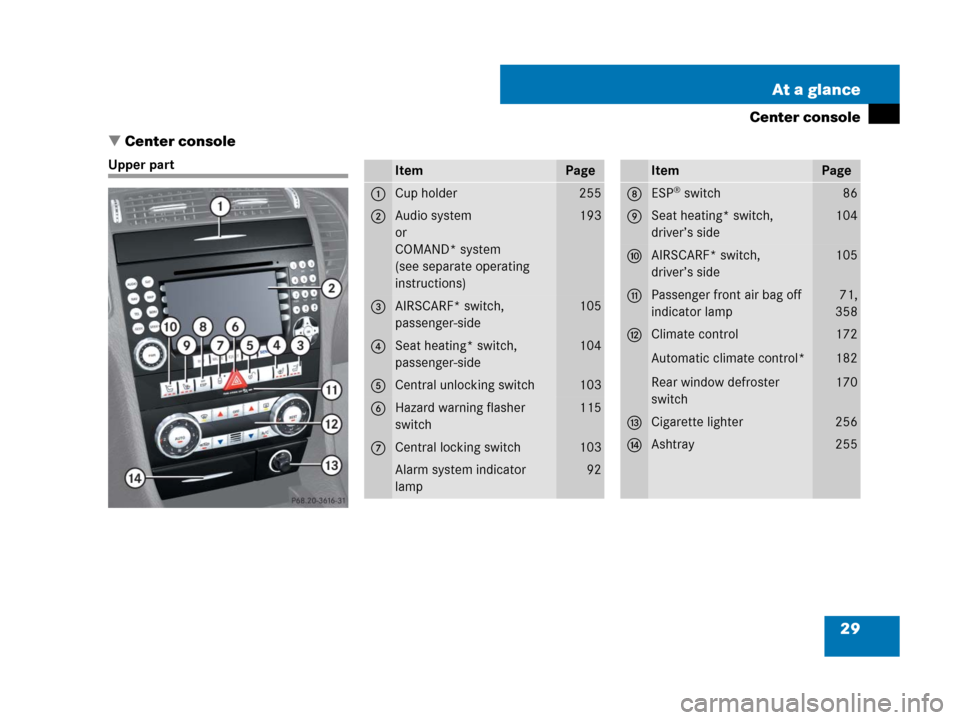
Center console
�Center console
Upper partItemPage
1Cup holder255
2Audio system
or
COMAND* system
(see separate operating
instructions)193
3AIRSCARF* switch,
passenger-side105
4Seat heating* switch,
passenger-side104
5Central unlocking switch103
6Hazard warning flasher
switch115
7Central locking switch103
Alarm system indicator
lamp92
ItemPage
8ESP® switch86
9Seat heating* switch,
driver’s side104
aAIRSCARF* switch,
driver’s side105
bPassenger front air bag off
indicator lamp71,
358
cClimate control
Automatic climate control*
Rear window defroster
switch172
182
170
dCigarette lighter256
eAshtray255
Page 37 of 474

36 Getting started
The “Getting started” section provides an
overview of the vehicle’s most basic func-
tions. First-time Mercedes-Benz owners
should pay special attention to the infor-
mation given here.
If you are already familiar with the basic
functions described here, the “Controls in
detail” section (
�page 93) will provide you
with further information. The correspond-
ing page references are located at the end
of each segment.
Unlocking
Unlocking with the SmartKey
SmartKey with remote control
1‹Lock button
2ŠUnlock button for trunk lid
3ŒUnlock button
4ÂPanic button (
�page 83)
�Press unlock buttonŒ on the
SmartKey.
�All turn signal lamps flash once.
�An acoustic warning sounds once.
�The locking knobs in the doors
move up.
�The anti-theft alarm system is
disarmed.
Warning!G
When leaving the vehicle, always remove the
SmartKey from the starter switch, take it
with you, and lock the vehicle. Do not leave
children unattended in the vehicle, or with
access to an unlocked vehicle.
A child’s unsupervised access to a vehicle
could result in an accident and/or serious
personal injury.
Page 39 of 474
.
iWhen you switch on ignition, the indicator
and warning lamps (except high beam headlamp
indicator lamp and tur")
38 Getting started
Unlocking
For information on starting the engine, see
(
�page 51).
iWhen you switch on ignition, the indicator
and warning lamps (except high beam headlamp
indicator lamp and turn signal indicator lamps
unless activated) in the instrument cluster come
on. The indicator and warning lamps (except high
beam headlamp indicator lamp and turn signal
indicator lamps if activated) will go out when the
engine is running. This indicates that the respec-
tive systems are operational.
iVehicles with automatic transmission*: The
SmartKey can only be removed from the starter
switch with the gear selector lever in positionP.
iIf the SmartKey is left in starter switch
position 0 for an extended period of time, it can
no longer be turned in the starter switch. In this
case the steering is locked. To unlock, remove
SmartKey from the starter switch and reinsert.
!If the SmartKey cannot be turned in the
starter switch, the vehicle battery may not be
sufficiently charged.
�Check the vehicle battery and charge it if
necessary (
�page 422).
�Get a jump start (�page 426).
To prevent accelerated vehicle battery discharge
or a completely discharged vehicle battery,
always remove the SmartKey from the starter
switch when the engine is not in operation.