Page 417 of 474
 from the
ground.Removing the wheel
4Alignment bolt
�Unscrew the upper-most wheel bolt
and remove.
�R")
416 Practical hints
Flat tire
�Jack up the vehicle until the wheel is a
maximum of 1.2 in (3 cm) from the
ground.Removing the wheel
4Alignment bolt
�Unscrew the upper-most wheel bolt
and remove.
�Replace this wheel bolt with alignment
bolt4 supplied in the vehicle tool
kit (
�page 389).
�Remove the remaining bolts.
�Remove the wheel.Mounting the spare wheel
1Wheel bolt for light alloy rims
2Wheel bolt for spare wheel with
collapsible tire (located under plastic
cover on the outside of spare wheel
rim)
Warning!G
The jack is intended only for lifting the
vehicle briefly for wheel changes. It is not
suited for performing maintenance work
under the vehicle.
�Never start the engine when the vehicle
is raised.
�Never lie down under the raised vehicle.
!Do not place wheel bolts in sand or dirt. This
could result in damage to the bolt and wheel hub
threads.
Warning!G
Inflate collapsible tire only after the wheel is
properly mounted.
Inflate the collapsible tire using the electric
pump (
�page 418) before lowering the
vehicle.
��
Page 418 of 474
417 Practical hints
Flat tire
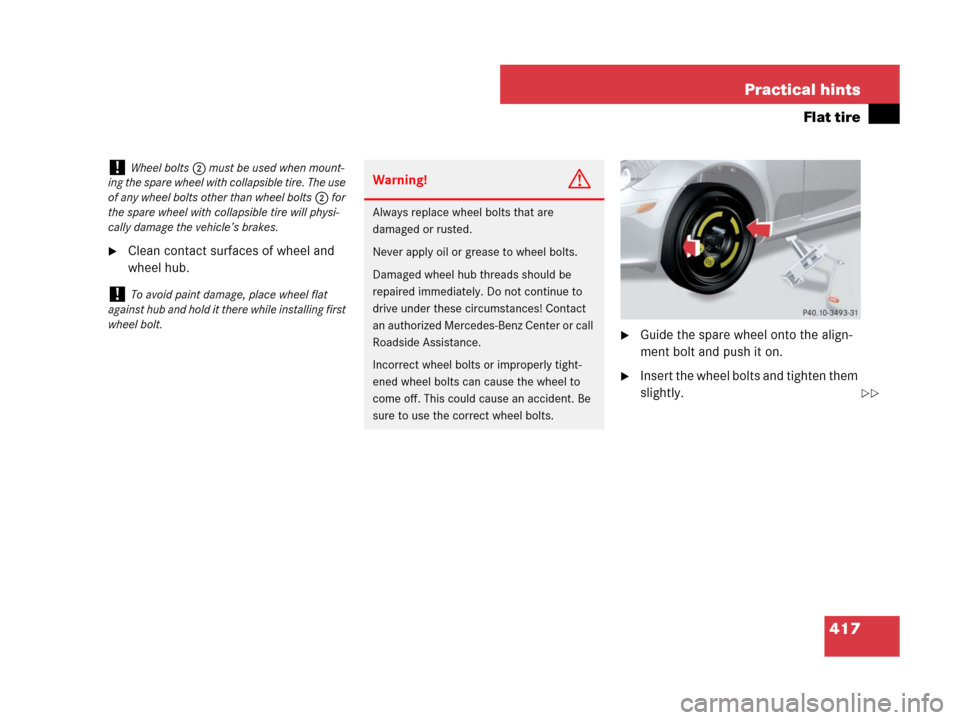
�Clean contact surfaces of wheel and
wheel hub.
�Guide the spare wheel onto the align-
ment bolt and push it on.
�Insert the wheel bolts and tighten them
slightly.
!Wheel bolts2 must be used when mount-
ing the spare wheel with collapsible tire. The use
of any wheel bolts other than wheel bolts2 for
the spare wheel with collapsible tire will physi-
cally damage the vehicle’s brakes.
!To avoid paint damage, place wheel flat
against hub and hold it there while installing first
wheel bolt.
Warning!G
Always replace wheel bolts that are
damaged or rusted.
Never apply oil or grease to wheel bolts.
Damaged wheel hub threads should be
repaired immediately. Do not continue to
drive under these circumstances! Contact
an authorized Mercedes-Benz Center or call
Roadside Assistance.
Incorrect wheel bolts or improperly tight-
ened wheel bolts can cause the wheel to
come off. This could cause an accident. Be
sure to use the correct wheel bolts.
��
Page 420 of 474

419 Practical hints
Flat tire
�PressI on electric air pump switch2.
The electric air pump switches on and
inflates the collapsible tire.
�Inflate the collapsible tire to approxi-
mately 51 psi (3.5 bar).
This takes about 5 minutes. Air
hose4 and union nut5 can become
hot during inflation. Exercise proper
caution to avoid burning yourself when
using the equipment.
�Press0 on electric air pump switch2.
�Turn the SmartKey in the starter switch
to position0.
The electric air pump is switched off.
�If the tire inflation pressure is above
51 psi (3.5 bar), release excess tire
inflation pressure using the vent screw
on air hose4.
�Detach the electric air pump.
�Reinstall tire valve cap.
�Store electrical plug3 and air
hose4 behind flap 1 and place the
electric air pump back in the trunk.
�Lower the vehicle (�page 420).
!Compare the recommended tire inflation
pressure for your vehicle with the tire inflation
pressure on the yellow label located on the spare
wheel rim.
If the tire inflation pressure on the yellow label
on the spare wheel rim differs from the values
given in this Operator’s Manual, inflate the
collapsible tire to the recommended tire inflation
pressure given on the yellow label on the spare
wheel rim.
!Do not operate the electric air pump longer
than 6 minutes without interruption. Otherwise it
may overheat.
You may operate the electric air pump again
after it has cooled off.Warning!G
Follow recommended tire inflation
pressures.
Do not underinflate tires. Underinflated tires
wear excessively and/or unevenly,
adversely affect handling and fuel economy,
and are more likely to fail from being over-
heated.
Do not overinflate tires. Overinflated tires
can adversely affect handling and ride
comfort, wear unevenly, increase stopping
distance, and result in sudden deflation
(blowout) because they are more likely to
become punctured or damaged by road
debris, potholes etc.
Page 421 of 474

420 Practical hints
Flat tire
Lowering the vehicle
�Lower vehicle by turning the crank
counterclockwise until vehicle is
resting fully on its own weight.
�Remove the jack.
1-5 Wheel bolts
�Tighten the five wheel bolts evenly in
the direction of the arrow, following the
diagonal sequence illustrated
(1to5), until all bolts are tight.
Observe a tightening torque of
80 lb-ft (110 Nm).
�Fully collapse the jack.
�Place the vehicle tool kit, electric air
pump, and the jack back in the storage
compartment underneath the trunk
floor.
�Wrap the damaged wheel in the protec-
tive sheet provided with the vehicle
tool kit and put the wheel in the trunk.
For information on storing the spare wheel
in the trunk after it has been replaced by a
regular road wheel, see “Storing the spare
wheel with collapsible tire” (
�page 392).
Warning!G
Inflate the collapsible tire using the electric
pump (
�page 418) before lowering the
vehicle.
Warning!G
Have the tightening torque checked after
changing a wheel. The wheels could come
loose if they are not tightened to a torque of
80 lb-ft (110 Nm).
iThe flat tire may be transported in the trunk
when the retractable hardtop is closed.
Page 448 of 474

Rim (light alloy)4.5 B x 17 H2
Wheel offset0.47 in (12 mm)
Collapsible tire145/70-17 92P1
1")
447 Technical data
Rims and tires
Spare wheel
ModelAll models
(except SLK 55 AMG with Performance Package*)
Rim (light alloy)4.5 B x 17 H2
Wheel offset0.47 in (12 mm)
Collapsible tire145/70-17 92P1
1Must not be used with snow chains.
!Please compare the recommended tire
inflation pressure for your vehicle with the tire
inflation pressure on the yellow label located on
the spare wheel rim.
If the tire inflation pressure on the yellow label
on the spare wheel rim differs from the values
given in this Operator’s Manual, inflate the
collapsible tire to the recommended tire inflation
pressure given on the yellow label on the spare
wheel rim.iPlease note that the tire inflation pressure of
the collapsible tire differs from the tire inflation
pressure of the road tires.
Inflate the collapsible tire to approximately
51 psi (3.5 bar).
iThe SLK 55 AMG with Performance
Package* does not have a spare wheel. The
SLK 55 AMG with Performance Package* is
equipped with TIREFIT (
�page 408).
Page 462 of 474

461 Index
Climate control 172
Air conditioning refrigerant 452
Air conditioning, Cooling 180
Air recirculation mode 178
Air vents 172
Air volume 177
Control panel 174
Defrosting 170, 177
Residual heat utilization 181
Switching on/off 175
Temperature 175
Clock 120
Cockpit 24
Cold tire inflation pressure 331
Collapsible tire (spare wheel) 447
Collapsible wheel chock 391
COMAND* system 29
Driving instructions 287
Navigation 135
Combination switch 113
High beam flasher 113
High beam headlamps 55, 113
Low beam headlamps 55
Turn signals 55
Windshield wipers 56
Control system 121Control system menus 124
AMG 128
AUDIO 133
NAV* 135
Settings 136
Standard display 127
TEL* 149
Trip computer 148
Vehicle status message memory 135
Control system submenus
Convenience* 147
Instrument cluster 139
Lighting 143
Time/Date 141
Vehicle 146
Convenience opening/closing*
Power windows 238
Retractable hardtop 244
Coolant 456
Adding water 293
Anticorrosion/antifreeze 457
Checking coolant level 300
Messages in the multifunction
display 374–376
Technical data 452
Temperature 289Temperature gauge (Multifunction
display) 127
Corner-illuminating front fog lamps* 114
Replacing bulbs 400
Cruise control 248
Messages in the multifunction
display 362
Cup holder 255
Curb weight 331
D
Date (Control system) 142
Daytime running lamp mode 111
Setting 143
Deep water see Standing water
Defrosting
Rear window 170
Windshield (Automatic climate
control*) 189
Windshield (Climate control) 177
Delayed shut-off
Exterior lamps 144
Interior lighting 145
Department of Transportation see DOT
Difficulties
Wile driving 58
With starting the engine 52
Page 464 of 474

463 Index
Emergency Tensioning Device see ETD
Emission control 289
Information label 439
System warranties 10
Engine
Cleaning 342
Compartment 294
Malfunction indicator lamp 27, 351
Number 439
Poly-V-belt layout 440
Starting 51
Tachometer 119
Technical data 441
Turning off 61
Engine oil 296, 453
Adding 299
Additives 453
Checking level (Control system) 296
Checking level (Dipstick) 298
Consumption 296
Messages in the multifunction
display 297, 377–379ESP®84, 86
Messages in the multifunction
display 362, 363
Warning lamp 352
ETD 79
Safety guidelines 68
Warning and indicator lamps 355
Exterior lamp switch 109
Exterior lighting
Lamps 400
Replacing bulbs 400
Exterior rear view mirrors see Mirrors
F
First aid kit 389
Flat tire 408
Inflating collapsible spare tire 418
Lifting vehicle 414
Lowering vehicle 420
Mounting spare wheel 414, 416
TIREFIT kit* 408
Floormat 258
Fog lamps 112, 401
Corner-illuminating front fog
lamps* 114
Footwell lighting* 117Fuel
Additives 455
Consumption statistics (Control
system) 148
Filler flap 291
Fuel tank capacity 452
MON 292, 455
Premium unleaded
gasoline 292, 454
Refueling 291
Requirements 292, 455
Reserve warning lamp 355
RON 292, 455
Technical data 451
Fuel filler flap 291
Fuel gauge (Instrument cluster) 27
Fuses 432
Replacing 432
Page 468 of 474

467 Index
O
Occupant Classification System see OCS
Occupant distribution 332
Occupant safety 64
OCS 71
Passenger front air bag off indicator
lamp 74
Seat belts 48, 68
SRS 64
OCS 71
Self-test 75
Oil see Engine oil
One-touch gearshifting
Gear selector lever 162
Steering wheel gearshift
control* 163
Operating safety 16, 193
Operating vehicle outside the USA and
Canada 13
Operator’s Manual 10
Ornamental moldings see Vehicle care
Outside temperature indicator 119, 128
Outside temperature/speed 140
Overhead control panel 31
Overspeed range 119P
Paintwork code 438
Paintwork see Vehicle care
Panic alarm 83
Parcel net (Storage compartment) 254
Parking 59, 282
Parking brake 53, 59
Parking lamps 109, 401
Parts service 436
PASS AIR BAG OFF indicator lamp see Pas-
senger front air bag off indicator lamp
Passenger air bag see Air bags
Passenger compartment 287
Passenger front air bag
Messages in the multifunction
display 365–368
Passenger front air bag off indicator
lamp 74, 358
Passenger safety see Occupant safety
Phone book see Telephone*
Plastic parts, cleaning 345
Poly-V-belt drive 440
Potential problems associated with under-
inflated and overinflated tires 320
Power outlet 257
Power seat* see SeatsPower washer see Vehicle care
Power windows 235
Operating rear side windows 237
Operating with retractable hardtop
switch 237
Summer opening/convenience
closing* 238
Synchronizing 239
Practical hints
Fuses 432
Lamps in instrument cluster 348
Spare wheel bolts 393
Towing vehicle 428
Vehicle jack 390
What to do if... 348
Premium unleaded gasoline 454
Problems
While driving 58
With vehicle 17
Product information 9
Production options weight 332
Program mode see Automatic transmis-
sion, Automatic shift program
Program mode selector switch
Automatic shift program 161
PSI 332