Page 385 of 474
384 Practical hints
What to do if …
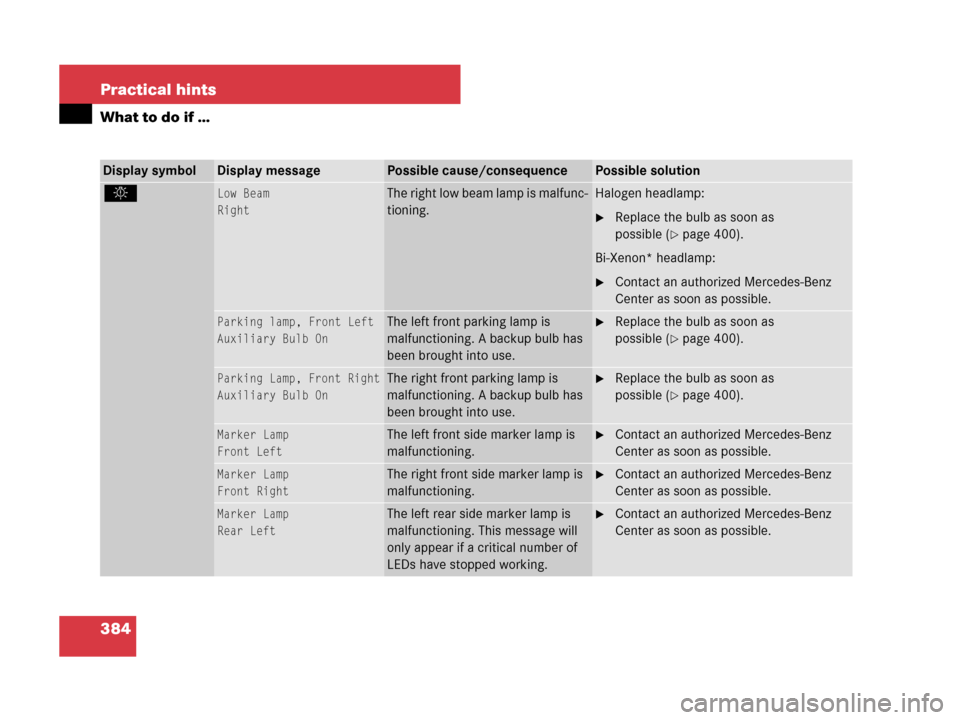
Display symbolDisplay messagePossible cause/consequencePossible solution
.Low Beam
RightThe right low beam lamp is malfunc-
tioning.Halogen headlamp:
�Replace the bulb as soon as
possible (
�page 400).
Bi-Xenon* headlamp:
�Contact an authorized Mercedes-Benz
Center as soon as possible.
Parking lamp, Front Left
Auxiliary Bulb OnThe left front parking lamp is
malfunctioning. A backup bulb has
been brought into use.�Replace the bulb as soon as
possible (
�page 400).
Parking Lamp, Front Right
Auxiliary Bulb OnThe right front parking lamp is
malfunctioning. A backup bulb has
been brought into use.�Replace the bulb as soon as
possible (
�page 400).
Marker Lamp
Front LeftThe left front side marker lamp is
malfunctioning.�Contact an authorized Mercedes-Benz
Center as soon as possible.
Marker Lamp
Front RightThe right front side marker lamp is
malfunctioning.�Contact an authorized Mercedes-Benz
Center as soon as possible.
Marker Lamp
Rear LeftThe left rear side marker lamp is
malfunctioning. This message will
only appear if a critical number of
LEDs have stopped working.�Contact an authorized Mercedes-Benz
Center as soon as possible.
Page 386 of 474
385 Practical hints
What to do if …
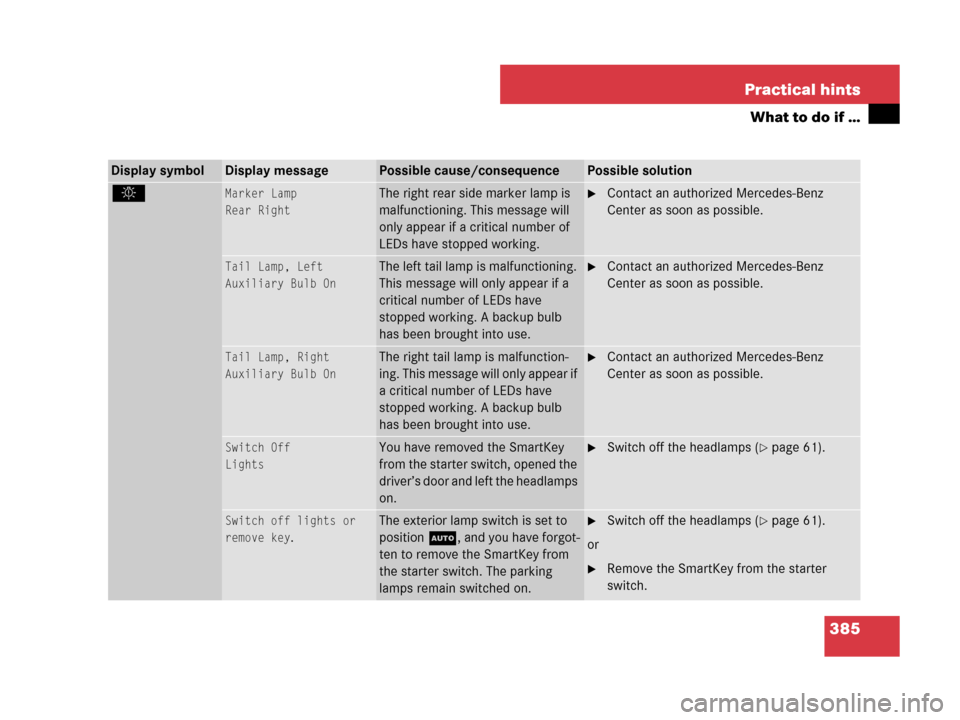
Display symbolDisplay messagePossible cause/consequencePossible solution
.Marker Lamp
Rear RightThe right rear side marker lamp is
malfunctioning. This message will
only appear if a critical number of
LEDs have stopped working.�Contact an authorized Mercedes-Benz
Center as soon as possible.
Tail Lamp, Left
Auxiliary Bulb OnThe left tail lamp is malfunctioning.
This message will only appear if a
critical number of LEDs have
stopped working. A backup bulb
has been brought into use.�Contact an authorized Mercedes-Benz
Center as soon as possible.
Tail Lamp, Right
Auxiliary Bulb OnThe right tail lamp is malfunction-
ing. This message will only appear if
a critical number of LEDs have
stopped working. A backup bulb
has been brought into use.�Contact an authorized Mercedes-Benz
Center as soon as possible.
Switch Off
LightsYou have removed the SmartKey
from the starter switch, opened the
driver’s door and left the headlamps
on.�Switch off the headlamps (�page 61).
Switch off lights or
remove key
.
The exterior lamp switch is set to
positionU, and you have forgot-
ten to remove the SmartKey from
the starter switch. The parking
lamps remain switched on.�Switch off the headlamps (�page 61).
or
�Remove the SmartKey from the starter
switch.
Page 387 of 474
386 Practical hints
What to do if …
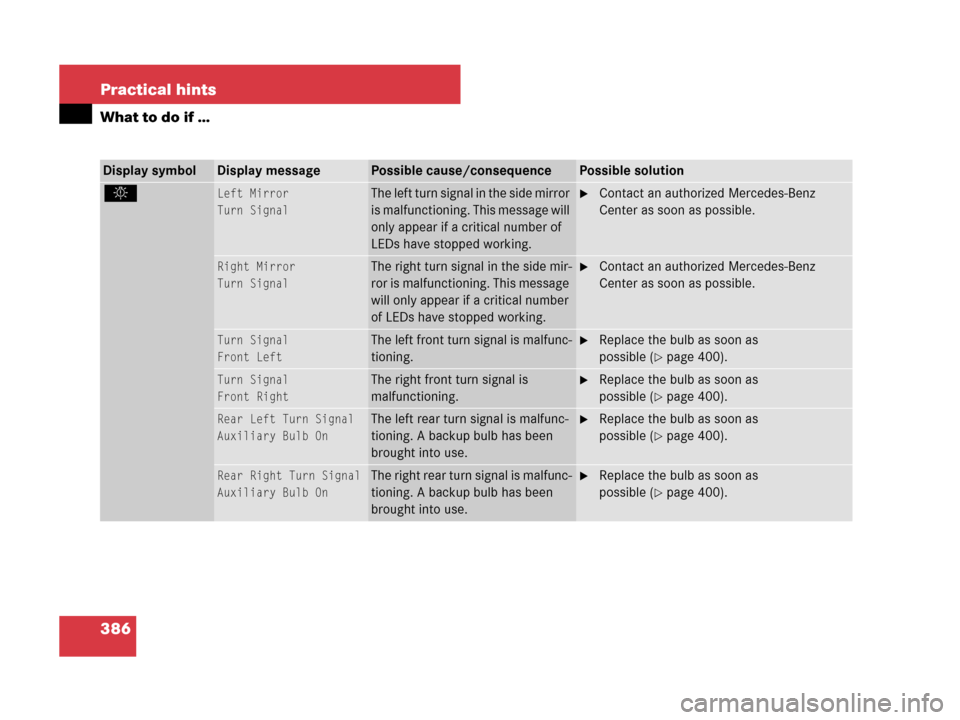
Display symbolDisplay messagePossible cause/consequencePossible solution
.Left Mirror
Turn SignalThe left turn signal in the side mirror
is malfunctioning. This message will
only appear if a critical number of
LEDs have stopped working.�Contact an authorized Mercedes-Benz
Center as soon as possible.
Right Mirror
Turn SignalThe right turn signal in the side mir-
ror is malfunctioning. This message
will only appear if a critical number
of LEDs have stopped working.�Contact an authorized Mercedes-Benz
Center as soon as possible.
Turn Signal
Front LeftThe left front turn signal is malfunc-
tioning.�Replace the bulb as soon as
possible (
�page 400).
Turn Signal
Front RightThe right front turn signal is
malfunctioning.�Replace the bulb as soon as
possible (
�page 400).
Rear Left Turn Signal
Auxiliary Bulb OnThe left rear turn signal is malfunc-
tioning. A backup bulb has been
brought into use.�Replace the bulb as soon as
possible (
�page 400).
Rear Right Turn Signal
Auxiliary Bulb OnThe right rear turn signal is malfunc-
tioning. A backup bulb has been
brought into use.�Replace the bulb as soon as
possible (
�page 400).
Page 388 of 474
387 Practical hints
What to do if …
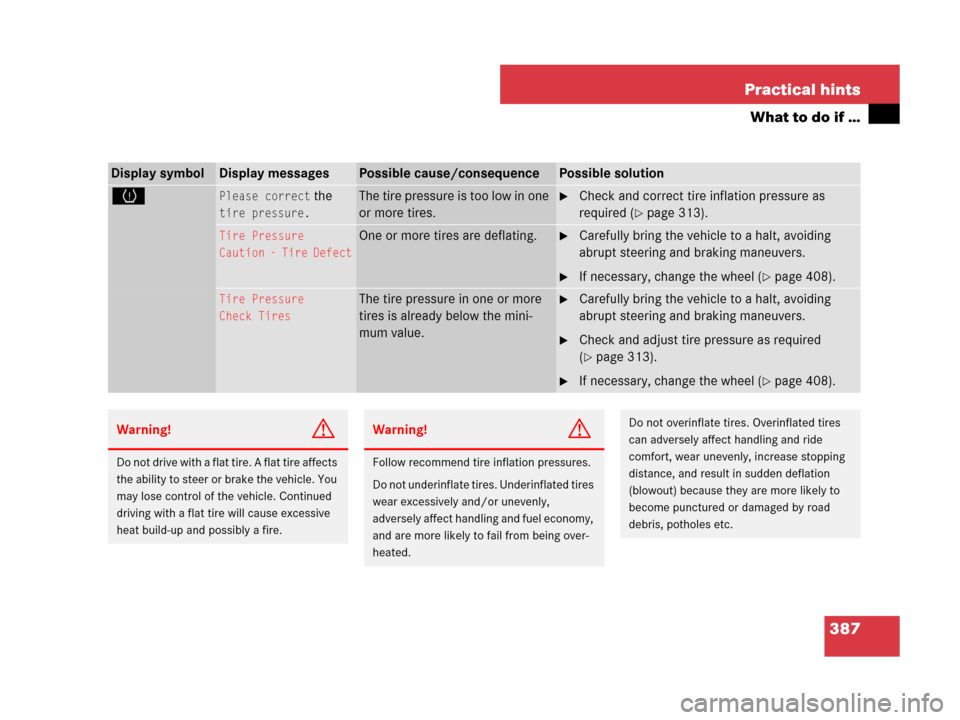
Display symbolDisplay messagesPossible cause/consequencePossible solution
HPlease correct the
tire pressure.
The tire pressure is too low in one
or more tires.�Check and correct tire inflation pressure as
required (
�page 313).
Tire Pressure
Caution - Tire DefectOne or more tires are deflating.�Carefully bring the vehicle to a halt, avoiding
abrupt steering and braking maneuvers.
�If necessary, change the wheel (�page 408).
Tire Pressure
Check TiresThe tire pressure in one or more
tires is already below the mini-
mum value.�Carefully bring the vehicle to a halt, avoiding
abrupt steering and braking maneuvers.
�Check and adjust tire pressure as required
(
�page 313).
�If necessary, change the wheel (�page 408).
Warning!G
Do not drive with a flat tire. A flat tire affects
the ability to steer or brake the vehicle. You
may lose control of the vehicle. Continued
driving with a flat tire will cause excessive
heat build-up and possibly a fire.
Warning!G
Follow recommend tire inflation pressures.
Do not underinflate tires. Underinflated tires
wear excessively and/or unevenly,
adversely affect handling and fuel economy,
and are more likely to fail from being over-
heated.
Do not overinflate tires. Overinflated tires
can adversely affect handling and ride
comfort, wear unevenly, increase stopping
distance, and result in sudden deflation
(blowout) because they are more likely to
become punctured or damaged by road
debris, potholes etc.
Page 389 of 474
388 Practical hints
What to do if …
Display symbolDisplay messagePossible cause/consequencePossible solution
tPHONE OFFThis display appears if buttons
ort on the multifunction steer-
ing wheel is pressed and the vehicle
is not equipped with a telephone*.
MTrunk Partition
OpenYou are trying to open or close the
retractable hardtop even though
the luggage cover in the trunk is not
closed and/or properly engaged.�Close the luggage cover (�page 241).
WTop Up
Washer FluidThe fluid level in the windshield
washer fluid reservoir has dropped
below its minimum mark.�Add washer fluid (�page 301).
Page 401 of 474
400 Practical hints
Replacing bulbs
Bulbs
Safe vehicle operation depends on proper
exterior lighting and signaling. It is there-
fore essential that all bulbs and lamp
assemblies are in good working order at
all times.
Correct headlamp adjustment is extremely
important. Have headlamps checked and
readjusted at regular intervals and when a
bulb has been replaced. Contact an
authorized Mercedes-Benz Center for
headlamp adjustment.
Warning!G
Bulbs and bulb sockets can be very hot. Al-
low the lamp to cool down before changing
a bulb.
Keep bulbs out of reach of children.
Halogen lamps contain pressurized gas.
A bulb can explode if you:
�touch or move it when hot
�drop the bulb
�scratch the bulb
Wear eye and hand protection.
Because of high voltage in Xenon lamps, it is
dangerous to replace the bulb or repair the
lamp and its components. We recommend
that you have such work done by a qualified
technician.
iIf the headlamps are fogged up on the inside
as a result of high humidity, driving the vehicle a
short distance with the lights on should clear up
the fogging.
iBackup bulbs will be brought into use
when lamps malfunction. Read and observe
the messages in the multifunction
display (
�page 381).
Page 412 of 474
411 Practical hints
Flat tire
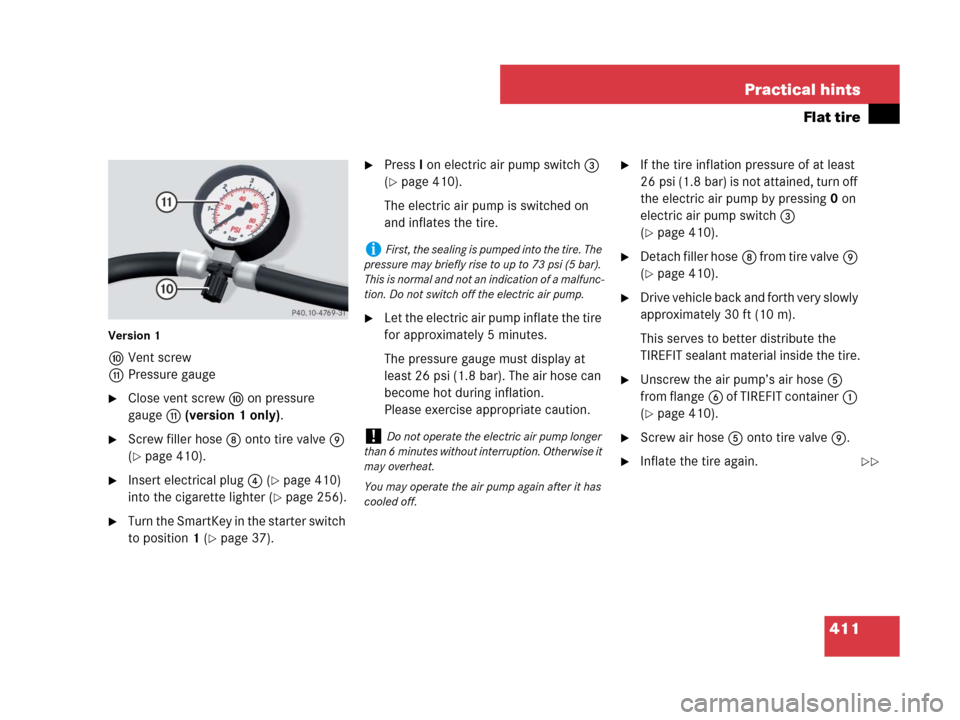
Version 1
aVent screw
bPressure gauge
�Close vent screwa on pressure
gaugeb (version 1 only).
�Screw filler hose8 onto tire valve9
(
�page 410).
�Insert electrical plug4 (�page 410)
into the cigarette lighter (
�page 256).
�Turn the SmartKey in the starter switch
to position1 (
�page 37).
�PressI on electric air pump switch3
(
�page 410).
The electric air pump is switched on
and inflates the tire.
�Let the electric air pump inflate the tire
for approximately 5 minutes.
The pressure gauge must display at
least 26 psi (1.8 bar). The air hose can
become hot during inflation.
Please exercise appropriate caution.
�If the tire inflation pressure of at least
26 psi (1.8 bar) is not attained, turn off
the electric air pump by pressing0 on
electric air pump switch3
(
�page 410).
�Detach filler hose8 f r o m t i r e v a l v e9
(
�page 410).
�Drive vehicle back and forth very slowly
approximately 30 ft (10 m).
This serves to better distribute the
TIREFIT sealant material inside the tire.
�Unscrew the air pump’s air hose5
from flange6 of TIREFIT container1
(
�page 410).
�Screw air hose5onto tire valve9.
�Inflate the tire again.
iFirst, the sealing is pumped into the tire. The
pressure may briefly rise to up to 73 psi (5 bar).
This is normal and not an indication of a malfunc-
tion. Do not switch off the electric air pump.
!Do not operate the electric air pump longer
than 6 minutes without interruption. Otherwise it
may overheat.
You may operate the air pump again after it has
cooled off.
��
Page 422 of 474
421 Practical hints
Flat tire
MOExtended system*
The MOExtended system allows you to
continue driving your vehicle even if there
is a total loss of pressure in one or more
tires.
You may only use the MOExtended system
in conjunction with the Run Flat Indicator*
(Canada vehicles) (
�page 315) or TPMS
(U. S. vehicles) (
�page 317).
!The maximum distance in emergency mode
depends on the vehicle’s load. It is 30 miles
(50 km) if the vehicle is partially loaded and
18 miles (30 km) if the vehicle is fully loaded.
The point at which the maximum driving distance
begins in emergency mode is when the warning
message appears in the multifunction display
indicating that there is a loss of tire inflation
pressure.
Do not exceed the maximum speed of
50 mph (80 km/h).
Warning!G
In emergency mode, your vehicle’s driving
characteristics are diminished in such situa-
tions as:
�driving around curves
�while braking
�while accelerating rapidly
Therefore, your driving style must be adapt-
ed accordingly. Avoid abrupt steering and
driving maneuvers, as well as driving over
obstacles (road curbs, potholes, or off-road
areas). This is especially important if the
vehicle is heavily loaded.
The emergency driving distance that can be
achieved greatly depends on the demands
placed on the vehicle. Depending on speed,
load, driving maneuvers, road conditions,
outside temperature, etc., the distance can
be significantly shorter or, if the vehicle is
driven cautiously, somewhat longer.
Do not continue driving in emergency mode
if
�you notice knocking sounds
�the vehicle starts to shake
�smoke develops and you smell rubber
�ESP® is intervening continuously
�you notice tears on the tire sidewalls
After driving in emergency mode, you must
have the rims inspected by an authorized
Mercedes-Benz Center to check if they are
suitable for further use. The failed tire must
be replaced in any case.
iWhen replacing individual or all tires on the
vehicle, make sure only tires marked
with“MOExtended” are mounted in the size
specified for your vehicle (
�page 442).