Page 284 of 474

283 Operation
Driving instructions
Tires
Treadwear indicators (TWI) are required by
law. These indicators are located in six
places on the tread circumference and
become visible at a tread depth of approx-
imately
1/16in (1.6 mm), at which point the
tire is considered worn and should be re-
placed.The treadwear indicator appears as a solid
band across the tread.
Specified tire inflation pressures must be
maintained. This applies particularly if the
tires are subject to high loads (e.g. high
speeds, heavy loads, high ambient temper-
atures).
�Slowly release brake pedal.
�When parked on an incline, turn front
wheels towards the road curb.
�Turn the SmartKey in the starter switch
to position0 and remove.
�Take the SmartKey with you and lock
vehicle when leaving.
Warning!G
If you feel a sudden significant vibration or
ride disturbance, or you suspect that possi-
ble damage to your vehicle has occurred,
you should turn on the hazard warning flash-
ers, carefully slow down, and drive with cau-
tion to an area which is a safe distance from
the road.
Inspect the tires and the vehicle undercar-
riage for possible damage. If the vehicle or
tires appear unsafe, have the vehicle towed
to the nearest Mercedes-Benz Center or tire
dealer for repairs.
Warning!G
Although the applicable federal motor vehi-
cle safety laws consider a tire to be worn
when the treadwear indicators (TWI) be-
come visible at approximately
1/16in
(1.6 mm), we recommend that you do not al-
low your tires to wear down to that level. As
tread depth approaches
1/8in (3.0 mm), the
adhesion properties on a wet road are
sharply reduced.
Depending upon the weather and/or road
surface (conditions), the tire traction varies
widely.
Page 344 of 474

343 Operation
Vehicle care
Ornamental moldings
For regular cleaning and care of very dirty
chrome-plated parts, use a chrome clean-
er.Headlamps, tail lamps, side makers,
turn signal lenses
�Use a mild car wash detergent, such as
Mercedes-Benz approved Car
Shampoo, with plenty of water.Cleaning the windows and the wiper
blades
�Make sure the hood is fully closed.
�Switch on the ignition (�page 37).
�Turn combination switch to wiper
settingII (
�page 56).
�With wiper arms in vertical position,
switch off the ignition (
�page 37).
iAfter running the vehicle through an
automatic car wash, wipe any wax off of the
windshield (
�page 343). This will prevent
smears and reduce wiping noise which can be
caused by residual wax on the windshield.
When leaving the car wash, make sure that the
mirrors are folded out. Otherwise they may
vibrate.
!Do not use chrome cleaner on ornamental
moldings. Although ornamental moldings may
have chrome appearance, they could be made of
anodized aluminum that will be damaged when
cleaned with chrome cleaner. Instead, use a
damp cloth to clean those ornamental moldings.
For very dirty ornamental moldings of which
you are sure are chrome-plated, use a chrome
cleaner. If in doubt whether an ornamental mold-
ing is chrome-plated, contact an authorized
Mercedes-Benz Center.
!Only use window cleaners that are suitable
for plastic lamp lenses. Window cleaning solu-
tions which are not suitable may damage the
plastic lamp lenses of the headlamps. Therefore,
do not use abrasives, solvents or cleaners that
contain solvents.
Never apply strong force and use only a soft,
non-scratchy cloth when cleaning the lenses. Do
not attempt to wipe dirty lenses with a dry cloth
or sponge.
Otherwise you may scratch or damage the lens
surface.
!The windshield wipers must be in a vertical
position before folding them away from the wind-
shield. They could otherwise damage the hood.
Never open the hood when the wiper arms are
folded forward.
Warning!G
For safety reasons, switch off wipers and
remove SmartKey from starter switch be-
fore cleaning the windshield and/or the wip-
er blades. Otherwise, the wiper motor could
suddenly turn on and cause injury.
��
Page 407 of 474

406 Practical hints
Replacing wiper blades
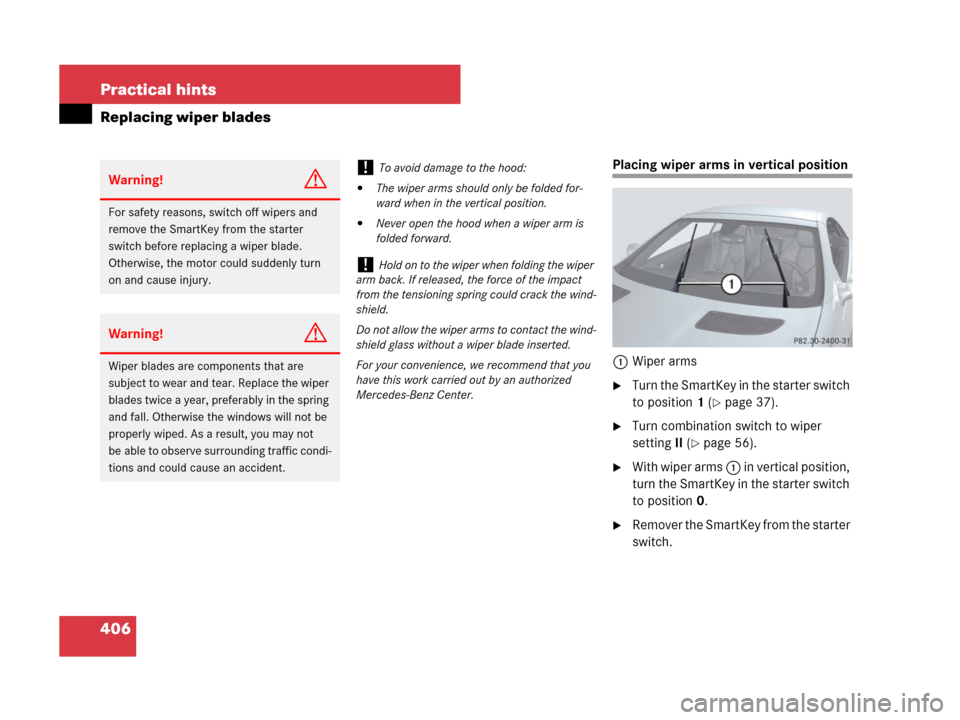
Placing wiper arms in vertical position
1Wiper arms
�Turn the SmartKey in the starter switch
to position1 (
�page 37).
�Turn combination switch to wiper
settingII (
�page 56).
�With wiper arms 1 in vertical position,
turn the SmartKey in the starter switch
to position0.
�Remover the SmartKey from the starter
switch.
Warning!G
For safety reasons, switch off wipers and
remove the SmartKey from the starter
switch before replacing a wiper blade.
Otherwise, the motor could suddenly turn
on and cause injury.
Warning!G
Wiper blades are components that are
subject to wear and tear. Replace the wiper
blades twice a year, preferably in the spring
and fall. Otherwise the windows will not be
properly wiped. As a result, you may not
be able to observe surrounding traffic condi-
tions and could cause an accident.
!To avoid damage to the hood:
�The wiper arms should only be folded for-
ward when in the vertical position.
�Never open the hood when a wiper arm is
folded forward.
!Hold on to the wiper when folding the wiper
arm back. If released, the force of the impact
from the tensioning spring could crack the wind-
shield.
Do not allow the wiper arms to contact the wind-
shield glass without a wiper blade inserted.
For your convenience, we recommend that you
have this work carried out by an authorized
Mercedes-Benz Center.
Page 449 of 474
448 Technical data
Electrical system
ModelSLK 280SLK 350SLK 55 AMG
Generator (alternator)14 V/150 A14 V/150 A14 V/150 A
Starter motor12 V/1.4 kW12 V/1.4 kW12 V/1.7 kW
Battery12 V/74 Ah12 V/74 Ah12 V/74 Ah
Spark plugsNGK PLKR 6ABosch Platin Y 7 MPP33
NGK PLKR 6ANGK IFR6D10
Electrode gap0.031 in (0.8 mm)0.031 in (0.8 mm)0.039 in (1.0 mm)
Tightening torque15 – 22 lb-ft (20 – 30 Nm)15 – 22 lb-ft (20 – 30 Nm)18 – 22 lb-ft (25 – 30 Nm)