Page 368 of 474
367 Practical hints
What to do if …
Display messagePossible cause/consequencePossible solution
Front-passenger
Airbag Disabled
See Operator’s
ManualThe passenger front air bag and the
passenger-side knee bag are
deactivated while driving even though
an adult or someone larger than a
small individual is occupying the front
passenger seat. Forces acting on the
seat may make the system sense a
decrease in weight.Stop the vehicle in a safe location as soon as possible and check the
passenger seat for the following:
�Switch off the ignition (�page 37).
�Apply the parking brake (�page 59).
�Have the passenger vacate the seat and exit the vehicle.
�Keep the seat unoccupied, close the passenger door and switch on
the ignition (
�page 37).
Monitor the 75indicator lamp on the center console
(
�page 29) and the multifunction display in the instrument cluster
(
�page 121) for the following:
(Continued on next page)
Page 369 of 474

368 Practical hints
What to do if …
Display messagePossible cause/consequencePossible solution
With the seat unoccupied and the ignition switched on,
�the 75indicator lamp on the center console
should illuminate and remain illuminated, indicating that the OCS has
deactivated the passenger front air bag and the passenger-side knee
bag.
�the message Front-passenger Airbag Enabled See Operator’s
Manual
or the message Front-passenger Airbag Disabled See
Operator’s Manual
should not appear in the multifunction display at
any time the seat is unoccupied. Wait at least 60 seconds for the sys-
tem to complete the necessary check cycles and to make sure neither
message appears in the multifunction display.
If above conditions are met, you can occupy the passenger seat again.
Depending on the passenger classification sensed by the
OCS (
�page 71), the 75indicator lamp will remain
illuminated or go out.
If above conditions are not met, the system is not working properly. Have
the system checked as soon as possible by an authorized Mercedes-Benz
Center.
Warning!G
If the 75indicator lamp
remains illuminated with an adult occupant
on the passenger seat even after performing
the above corrective steps, do not have any passenger use the passenger seat until the
system has been repaired.
Page 381 of 474

380 Practical hints
What to do if …
Display symbolDisplay messagePossible cause/consequencePossible solution
KRetractable Roof Operation
Please WaitThe on-board voltage is too low.�Start the engine.
The hardtop drive system was
shut down for safety reasons after
multiple, consecutive attempts to
raise or lower the hardtop.After about 10 minutes you can open or
close the retractable hardtop.
�Switch on the ignition (�page 37).
�Repeat the opening or closing
procedure.
Retractable Roof
LoweringThe retractable hardtop is not
completely opened or closed. The
roof hydraulics will start to lose
pressure.�Make sure the retractable hardtop is
completely opened or closed
(
�page 240).
Retractable Roof
Operation Only At StandstillYou have attempted to open the
retractable hardtop while driving.�Stop the vehicle in a safe location and try
to open the hardtop again.
Retractable Roof Not
Opened/Closed CompletelyYou are driving with the retract-
able hardtop not properly locked.�Stop the vehicle in a safe location. Ob-
serve the traffic situation around you.
�Push the retractable hardtop switch for-
ward or rearward until the retractable
hardtop is completely closed or open
(
�page 240).
Page 398 of 474

397 Practical hints
Opening/closing in an emergency
�Opening/closing in an emergency
Raising retractable hardtop manually
Warning!G
If the retractable hardtop does not com-
pletely open or close, the roof hydraulics will
lose pressure and the retractable hardtop is
lowered
�after approximately 7 minutes when the
ignition is switched on
�after approximately 15 seconds when
the ignition is switched off
Shortly before the hardtop is lowered, a
warning will sound. In the multifunction dis-
play you will seeK and the message
Retractable roof Lowering.
�Properly lock retractable hardtop before
continuing to drive (
�page 240).
Warning!G
Manually closing the retractable hardtop is a
complicated and technically demanding pro-
cedure and should only be performed by an
authorized Mercedes-Benz Center or quali-
fied technician. Attempting to manually
close the retractable hardtop may cause
damage to the retractable hardtop and/or
personal injury.
Warning!G
To prevent possible accidents, drive the
vehicle only with the retractable hardtop
either completely closed and locked, or fully
lowered into its storage compartment.
Page 430 of 474

429 Practical hints
Towing the vehicle
Installing towing eye bolt
The towing eye bolt is supplied with the ve-
hicle tool kit, located in the compartment
underneath the trunk floor (
�page 389).
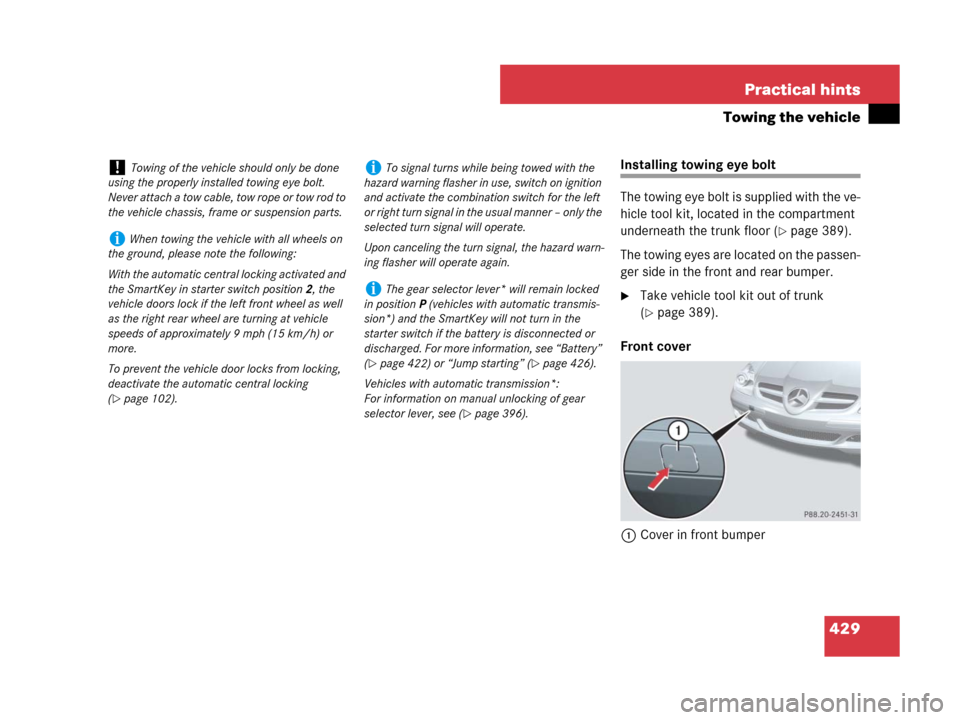
The towing eyes are located on the passen-
ger side in the front and rear bumper.
�Take vehicle tool kit out of trunk
(
�page 389).
Front cover
1Cover in front bumper
!Towing of the vehicle should only be done
using the properly installed towing eye bolt.
Never attach a tow cable, tow rope or tow rod to
the vehicle chassis, frame or suspension parts.
iWhen towing the vehicle with all wheels on
the ground, please note the following:
With the automatic central locking activated and
the SmartKey in starter switch position2, the
vehicle doors lock if the left front wheel as well
as the right rear wheel are turning at vehicle
speeds of approximately 9 mph (15 km/h) or
more.
To prevent the vehicle door locks from locking,
deactivate the automatic central locking
(
�page 102).
iTo signal turns while being towed with the
hazard warning flasher in use, switch on ignition
and activate the combination switch for the left
or right turn signal in the usual manner – only the
selected turn signal will operate.
Upon canceling the turn signal, the hazard warn-
ing flasher will operate again.
iThe gear selector lever* will remain locked
in positionP (vehicles with automatic transmis-
sion*) and the SmartKey will not turn in the
starter switch if the battery is disconnected or
discharged. For more information, see “Battery”
(
�page 422) or “Jump starting” (�page 426).
Vehicles with automatic transmission*:
For information on manual unlocking of gear
selector lever, see (
�page 396).
Page 465 of 474

464 Index
G
Garage door opener* 270
Gasoline see Fuel
GAWR 331
Gear range
Automatic transmission 160
Limiting 160
Shifting into optimal 163, 165
Gear selector lever 155
Gearshift pattern 155
Position 156, 157
Shifting procedure 156
Gear selector lever one-touch gearshifting
Automatic transmission 162
Global locking/unlocking see SmartKey
Glove box 253
Good visibility 168
GPS 90, 91
Tele Aid system* 262
Gross Axle Weight Rating see GAWR
Gross Vehicle Weight Rating see GVWR
Gross Vehicle Weight see GVW
GSM network phones (Telephone*) 219
GVW 331
GVWR 332H
Hard plastic trim items, cleaning 345
Hazard warning flasher 115, 116
Head restraint height (Seats) 42
Headlamps
Bi-Xenon* 401
Cleaning system* 168, 301, 458
Night security illumination
(Control system) 144
Switching off 61
Switching on 55
Headliner, cleaning 345
Head-thorax air bag 70
Heating
Seats* 104
Steering wheel* 276
High beam
Flasher 113
Headlamps 55, 113
Headlamps, bulbs 401
High beam headlamps 109
High mounted brake lamp 402
High-performance brake system 281
Hood 294
Horn 25
Hydroplaning 284I
Identification labels see Labels
Ignition (Position in starter switch) 37
Immobilizer see Anti-theft systems
Infant and child restraint systems see
Children in the vehicle
Instrument cluster 27, 118
Clock 120
Lamps, indicator and warning 348
Overview 26
Instruments and controls see Cockpit
Interior rear view mirror see Mirrors
Intermittent/interval wiping see
Windshield wipers
J
Jack (Vehicle tool kit) 389
Lifting vehicle 414
Lowering vehicle 420
Jump starting 426
K
Key, Mechanical
Valet locking 101
Kickdown 159
Kilopascal 332
Knee bag see Air bags