Page 257 of 474
.
N")
256 Controls in detail
Useful features
Removing ashtray insert
�Secure vehicle from movement by
setting the parking brake.
�Move the selector lever to positionN
(manual transmission: second gear).
Now you have more room to take out
the ashtray insert.
�Open the ashtray.
�Reach into both recesses on the left
and right side of the retainer and pull
out the ashtray insert.
Installing ashtray insert
�Place the ashtray insert into the
retainer.
�Push the ashtray insert down into the
retainer until it engages.
Cigarette lighter
�Switch on the ignition (�page 37).
Warning!G
Remove front ashtray only with vehicle
standing still. Set the parking brake to se-
cure vehicle from movement. Move gear
selector lever to positionN (manual trans-
mission: into second gear). With gear selec-
tor lever in positionN (manual transmission:
into second gear), turn off the engine.
Warning!G
Never touch the heating element or sides of
the cigarette lighter; they are extremely hot.
Hold the knob only.
Make sure that any children traveling with
you do not injure themselves or start a fire
with the hot cigarette lighter.
When leaving the vehicle, always remove the
SmartKey from the starter switch, take it
with you, and lock the vehicle. Do not leave
children unattended in the vehicle, or with
access to an unlocked vehicle.
A child’s unsupervised access to a vehicle
could result in an accident and/or serious
personal injury.
Page 259 of 474
258 Controls in detail
Useful features
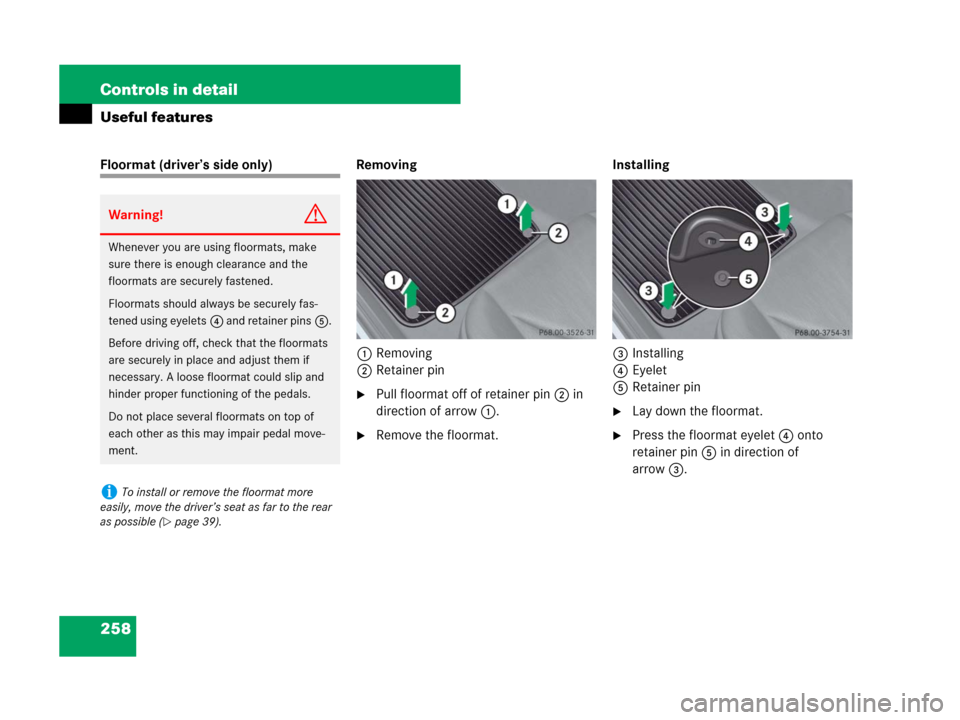
Floormat (driver’s side only) Removing
1Removing
2Retainer pin
�Pull floormat off of retainer pin2 in
direction of arrow1.
�Remove the floormat.Installing
3Installing
4Eyelet
5Retainer pin
�Lay down the floormat.
�Press the floormat eyelet4 onto
retainer pin5 in direction of
arrow3.
Warning!G
Whenever you are using floormats, make
sure there is enough clearance and the
floormats are securely fastened.
Floormats should always be securely fas-
tened using eyelets4 and retainer pins5.
Before driving off, check that the floormats
are securely in place and adjust them if
necessary. A loose floormat could slip and
hinder proper functioning of the pedals.
Do not place several floormats on top of
each other as this may impair pedal move-
ment.
iTo install or remove the floormat more
easily, move the driver’s seat as far to the rear
as possible (
�page 39).
Page 288 of 474

287 Operation
Driving instructions
Standing waterPassenger compartment
Driving abroad
Abroad, there is an extensive
Mercedes-Benz service network at your
disposal. If you plan to drive into areas
which are not listed in the index of your
Mercedes-Benz Center directory, you
should request pertinent information from
an authorized Mercedes-Benz Center.Control and operation of radio
transmitter
COMAND*, radio, and telephone*
!Do not drive through flooded areas or water
of unknown depth. Before driving through water,
determine its depth. Never accelerate before
driving into water. The bow wave could force
water into the engine and auxiliary equipment,
thus damaging them.
If you must drive through standing water, drive
slowly to prevent water from entering the pas-
senger compartment or the engine compart-
ment. Water in these areas could cause damage
to electrical components or wiring of the engine
or transmission, or could result in water being
ingested by the engine through the air intake,
causing severe internal engine damage. Any
such damage is not covered by the
Mercedes-Benz Limited Warranty.
Warning!G
Always fasten items being carried as
securely as possible.
In an accident, during hard braking or sud-
den maneuvers, loose items will be thrown
around inside the vehicle, and cause injury
to vehicle occupants unless the items are
securely fastened in the vehicle.
The trunk is the preferred place to carry
objects.
Warning!G
Please do not forget that your primary re-
sponsibility is to drive the vehicle safely.
Only operate the COMAND*, radio or tele-
phone
1 if road, traffic and weather condi-
tions permit.
Bear in mind that at a speed of just 30 mph
(approximately 50 km/h), your vehicle is
covering a distance of 44 feet
(approximately 14 m) every second.
1Observe all legal requirements.
Page 296 of 474

295 Operation
Engine compartment
�Pull hood lock release lever1 in direc-
tion of arrow.
The hood is unlocked.
2Lever for opening the hood
�Push lever2 on the hood upward to
release hood.
�With the hood released, lift the hood by
lifting it at the front edge.
The hood will be automatically held
open at shoulder height by gas-filled
struts.
Closing�Let the hood drop from a height of
approximately 1 ft (30 cm).
The hood will lock audibly.
�Check to make sure the hood is fully
closed.
If you can raise the hood at a point
above the headlamps, then it is not
properly closed. Open it again and let it
drop with somewhat greater force.!To avoid damage to the windshield wipers or
hood, never open the hood if the wiper arms are
folded forward away from the windshield.
Warning!G
When closing the hood, use extreme caution
not to catch hand or fingers. Be careful that
you do not close the hood on anyone.
Make sure the hood is securely engaged
before driving. Do not continue driving if the
hood can no longer engage after an accident
for example. The hood could otherwise
come loose while the vehicle is in motion
and injure you and/or others.
Page 381 of 474

380 Practical hints
What to do if …
Display symbolDisplay messagePossible cause/consequencePossible solution
KRetractable Roof Operation
Please WaitThe on-board voltage is too low.�Start the engine.
The hardtop drive system was
shut down for safety reasons after
multiple, consecutive attempts to
raise or lower the hardtop.After about 10 minutes you can open or
close the retractable hardtop.
�Switch on the ignition (�page 37).
�Repeat the opening or closing
procedure.
Retractable Roof
LoweringThe retractable hardtop is not
completely opened or closed. The
roof hydraulics will start to lose
pressure.�Make sure the retractable hardtop is
completely opened or closed
(
�page 240).
Retractable Roof
Operation Only At StandstillYou have attempted to open the
retractable hardtop while driving.�Stop the vehicle in a safe location and try
to open the hardtop again.
Retractable Roof Not
Opened/Closed CompletelyYou are driving with the retract-
able hardtop not properly locked.�Stop the vehicle in a safe location. Ob-
serve the traffic situation around you.
�Push the retractable hardtop switch for-
ward or rearward until the retractable
hardtop is completely closed or open
(
�page 240).
Page 392 of 474
391 Practical hints
Where will I find...?
The vehicle jack is located in the storage
compartment underneath the trunk floor.
Storage position
�Remove vehicle jack from its
compartment.
�Turn crank handle in the direction of
arrow as far as it will go.
Operational position
�Turn crank handle clockwise.
Before storing the vehicle jack in its
compartment:
�It should be fully collapsed.
�The handle must be folded in (storage
position).Setting up the collapsible wheel chock
The collapsible wheel chock serves to
additionally secure the vehicle, e.g. while
changing the wheel.
1Tilt the plate upward
2Fold the lower plate outward
3Insert the plate
Page 394 of 474

393 Practical hints
Where will I find...?
�Unscrew the valve insert from the valve
and allow the air to escape.
�Screw the valve insert back into the
valve.
�Screw the valve cap back on the valve.
�Pull the protective wrap provided with
the vehicle tool kit over the spare
wheel.
�Store the spare wheel and the valve
extractor in the storage compartment
underneath the trunk floor.
�Pierce the protective wrap with retain-
ing screw3.
�Secure the spare wheel by turning
retaining screw3 clockwise.
For information on mounting the spare
wheel, see “Flat tire” (
�page 408).
Spare wheel bolts
1Wheel bolt for light alloy rims
2Wheel bolt for spare wheel with
collapsible tire (located under plastic
cover on the outside of spare wheel
rim)
iIt may take a few minutes for the collapsible
tire to deflate completely.
!Wheel bolts2 must be used when mount-
ing the spare wheel with collapsible tire. The use
of any wheel bolts other than wheel bolts2 for
the spare wheel with collapsible tire will physi-
cally damage the vehicle’s brakes.
Page 408 of 474

407 Practical hints
Replacing wiper blades
Removing wiper blades
�Fold the wiper arms forward until they
engage.
1Wiper blade
2Tabs
3Attachment
4Cover
�Press tabs2 together and tilt wiper
blade1 in direction of arrow.
Tabs2 on both recesses of
attachment3 are detached.
�Maintaining its tilted position, remove
wiper blade1 out of attachment3.
Installing wiper blades
1Cover
2Guide tab
3Attachment
4Tabs
�Maintaining a tilted position of the
wiper blade, place cover1 onto
attachment3 so that guide tab2 is
under cover1.
�Tilt the wiper blade in direction of the
arrow towards the wiper arm.
�Simultaneously press tabs4 together
and let the wiper blade engage into
both recesses of attachment3.
�Check if the wiper blade is securely
fastened.
�Fold the wiper arm backward to rest on
the windshield.
Make sure you hold on to the wiper arm
when folding it back.
!Do not pull on the wiper blade inserts. They
could tear.
!Make sure the wiper blades are properly
installed. Improperly installed wiper blades may
cause windshield damage.