Page 113 of 474

112 Controls in detail
Lighting
When the engine is running, and you turn
the exterior lamp switch to
positionCorB, the manual head-
lamp mode has priority over the daytime
running lamp mode.
The corresponding exterior lamps switch
on (
�page 109).
Locator lighting and night security illu-
mination
The locator lighting and the night security
illumination are described in the “Control
system” section, see “Setting locator light-
ing” (
�page 144) and “Setting night secu-
rity illumination” (
�page 144).Fog lampsFront fog lamps
�Turn the exterior lamp switch to
positionCorB (
�page 109).
�Pull out the exterior lamp switch to first
stop.
The front fog lamps switch on.
The green indicator lamp‡ in the
exterior lamp switch comes on
(
�page 109).
�Push in the exterior lamp switch.
The front fog lamps switch off.
The green indicator lamp‡ in the
exterior lamp switch goes out.
Warning!G
In low ambient lighting or foggy conditions,
only switch from positionUtoB with
the vehicle at a standstill in a safe location.
Switching fromUtoB will briefly
switch off the headlamps. Doing so while
driving in low ambient lighting conditions
may result in an accident.
iFog lamps will operate with the parking
lamps and/or low beam headlamps on. Fog
lamps should only be used in conjunction with
low beam headlamps. Consult your State or
Province Motor Vehicle Regulations regarding
allowable lamp operation.
iFog lamps cannot be switched on with the
exterior lamp switch in positionU. To switch
on the fog lamps, turn the exterior lamp switch to
positionB first.
Page 119 of 474
.
1To brighten instrument cluster
illumination")
118 Controls in detail
Instrument cluster
A full view illustration of the instrument
cluster can be found in the “At a glance”
section (
�page 26).
1To brighten instrument cluster
illumination (knob+)
2To dim instrument cluster
illumination (knob-)
3Reset buttonJ
The instrument cluster is activated when
you
�open a door
�switch on the ignition (�page 37)
�press reset buttonJ
�switch on the exterior lampsFor information on changing the instru-
ment cluster settings, e.g. the language,
see “Instrument cluster submenu”
(
�page 139).Adjusting instrument cluster
illumination
Adjusting
Use knobs 1 or 2 to adjust the illumina-
tion brightness of the instrument cluster.
To brighten illumination
�Press knob1 briefly.
The instrument cluster illumination
brightens.
To dim illumination
�Press knob2 briefly.
The instrument cluster illumination
dims.
iOpening a door or pressing the reset
buttonJ without switching on the ignition or
the exterior lighting activates the multifunction
display illumination only for 30 seconds.
Warning!G
No messages will be displayed if either the
instrument cluster or the multifunction
display is inoperative.
As a result, you will not be able to see
information about your driving conditions,
such as speed or outside temperature,
warning/indicator lamps,
malfunction/warning messages or the
failure of any systems. Driving characteris-
tics may be impaired.
If you must continue to drive, do so with
added caution. Contact an authorized
Mercedes-Benz Center as soon as possible.
iThe instrument cluster illumination
automatically adjusts to the ambient light.
You can only adjust the brightness of the instru-
ment cluster illumination when it is dark outside.
iWith the exterior lighting switched on, the
brightness of the switches in the center console
will also be adjusted when using knob 1 or 2.
Page 121 of 474
120 Controls in detail
Instrument cluster
Resetting trip odometer
�Make sure you are viewing the
standard display menu (
�page 127).
�If it is not displayed, press
buttonèorÿ repeatedly until
the standard display appears in the
multifunction display.
�Press and hold reset buttonJ until
the trip odometer is reset.
Clock
Vehicles with COMAND*:
The clock in the instrument cluster can be
synchronized with the time set in
COMAND using the time synchronization
with head unit feature (
�page 141), or set
independently from COMAND using the
control system (
�page 141) with the time
synchronization with head unit feature set
to
Off.
For setting the time in COMAND, see
separate COMAND operating instructions.
For setting the time with audio system,
(
�page 141).
Page 122 of 474

121 Controls in detail
Control system
�Control system
The control system is activated as soon as
the SmartKey in the starter switch is
turned to position1. The control system
enables you to
�call up information about your vehicle
�change vehicle settings
For example, you can use the control
system to find out when your vehicle is
next due for service, to set the language
for messages in the instrument cluster
display, and much more.
The control system relays information to
the multifunction display.
Multifunction display
1Main odometer
2Trip odometer
3Current program mode
(automatic transmission* only)
4Status indicator (outside
temperature/digital speedometer)
5Current gear selector lever posi-
tion/gear range
(automatic transmission* only)
iThe displays for the audio systems (radio,
CD player) will appear in English, regardless of
the language selected.
Warning!G
A driver’s attention to the road and traffic
conditions must always be his/her primary
focus when driving.
For your safety and the safety of others, se-
lecting features through the multifunction
steering wheel should only be done by the
driver when traffic and road conditions
permit it to be done safely.
Bear in mind that at a speed of just
30 mph (approximately 50 km/h), your
vehicle is covering a distance of
44 feet (approximately 14 m) every second.
Page 123 of 474

122 Controls in detail
Control system
Multifunction steering wheel
The displays in the multifunction display
and the settings in the control system are
controlled by the buttons on the multifunc-
tion steering wheel.
Depending on the selected menu, pressing
the buttons on the multifunction steering
wheel will alter what appears in the multi-
function display.
The information available in the multifunc-
tion display are arranged in menus and
accompanying functions or submenus.
The individual functions are then found
within the relevant menu (radio or CD
operations under
AUDIO, for example).
These functions serve to call up relevant
information or to customize the settings
for your vehicle.
1Multifunction display
Operating the control system
2Selecting the submenu or setting the
volume:
Press button
æup/to increase
çdown/to decrease
3Telephone*:
Press button
sto take a call
to dial
to redial
tto end a call
to reject an incoming call
4Moving within a menu:
Press button
jfor next display
kfor previous display
5Menu systems:
Press button
èfor next menu
ÿfor previous menu
Page 124 of 474

123 Controls in detail
Control system
It is helpful to think of the menus, and the
functions within each menu, as being ar-
ranged in a circular pattern.
�If you press buttonèorÿ re-
peatedly, you will pass through each
menu one after the other.
�If you press buttonjork re-
peatedly, you will pass through each
function display, one after the other, in
the current menu.
In the
Settings menu, you will find a num-
ber of submenus instead of functions for
calling up and changing settings. For in-
structions on using these submenus, see
“Settings menu” (
�page 136).
The number of menus available in the sys-
tem depends on which optional equipment
is installed in your vehicle.
iThe headings used in the menus table are
designed to facilitate navigation within the sys-
tem and are not necessarily identical to those
shown in the control system displays.
The first function displayed in each menu will
automatically show you which part of the system
you are in.iSLK 55 AMG:
The steering wheel in this vehicle will vary from
steering wheel shown. However, multifunction
steering wheel symbols and feature description
apply to AMG vehicles as well.
Page 125 of 474
124 Controls in detail
Control system
MenusThis is what you will see when you scroll
through the menus.The table below provides an overview of
the individual menus.
Page 126 of 474
125 Controls in detail
Control system
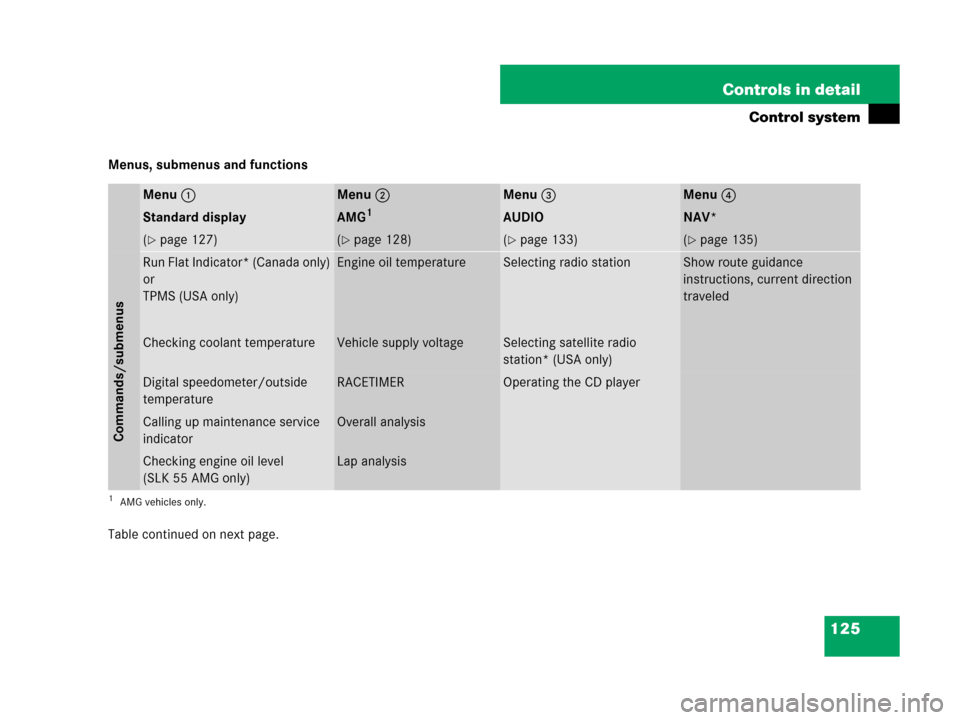
Menus, submenus and functions
Table continued on next page.
Menu1Menu2Menu3Menu4
Standard displayAMG1AUDIONAV*
(�page 127)(�page 128)(�page 133)(�page 135)
Commands/submenus
Run Flat Indicator* (Canada only)
or
TPMS (USA only)Engine oil temperatureSelecting radio stationShow route guidance
instructions, current direction
traveled
Checking coolant temperatureVehicle supply voltageSelecting satellite radio
station* (USA only)
Digital speedometer/outside
temperatureRACETIMEROperating the CD player
Calling up maintenance service
indicatorOverall analysis
Checking engine oil level
(SLK 55 AMG only)Lap analysis
1AMG vehicles only.