Page 379 of 474
 engine oil when next
refueling
(SLK 55 AMG) or Check oil
level when next refueling
(SLK 280,
SLK 350) appears w")
378 Practical hints
What to do if …
When the message Add 1 qt. (Canada:
1 liter) engine oil when next
refueling
(SLK 55 AMG) or Check oil
level when next refueling
(SLK 280,
SLK 350) appears while the engine is run-
ning and at operating temperature, the en-
gine oil level has dropped to approximately
the minimum level.
When this occurs, the warning is at first
intermittent and then remains on if the oil
level drops further.Visually check for oil leaks. If there are no
obvious oil leaks, drive to the nearest
service station to refill the engine oil
should be topped to the required level.
For information on approved engine oils,
refer to the Factory Approved Service
Products pamphlet (USA only) or contact
an authorized Mercedes-Benz Center.
Display symbolDisplay messagePossible cause/consequencePossible solution
NUSA only:
Add 1 qt. engine oil
when next refueling
.
Canada only:
Add 1 liter engine oil
when next refueling
.
SLK 55 AMG only:
The engine oil level is too low.�Add engine oil (�page 299) and check the
engine oil level (
�page 296).
Cannot Measure
Engine Oil LevelSLK 55 AMG only:
The measuring system is malfunc-
tioning.�Have the measuring system checked by an
authorized Mercedes-Benz Center.
!Engine oil level warnings should not be
ignored. Extended driving with the symbol
displayed could result in serious engine damage
that is not covered by the Mercedes-Benz
Limited Warranty.
Page 388 of 474

387 Practical hints
What to do if …
Display symbolDisplay messagesPossible cause/consequencePossible solution
HPlease correct the
tire pressure.
The tire pressure is too low in one
or more tires.�Check and correct tire inflation pressure as
required (
�page 313).
Tire Pressure
Caution - Tire DefectOne or more tires are deflating.�Carefully bring the vehicle to a halt, avoiding
abrupt steering and braking maneuvers.
�If necessary, change the wheel (�page 408).
Tire Pressure
Check TiresThe tire pressure in one or more
tires is already below the mini-
mum value.�Carefully bring the vehicle to a halt, avoiding
abrupt steering and braking maneuvers.
�Check and adjust tire pressure as required
(
�page 313).
�If necessary, change the wheel (�page 408).
Warning!G
Do not drive with a flat tire. A flat tire affects
the ability to steer or brake the vehicle. You
may lose control of the vehicle. Continued
driving with a flat tire will cause excessive
heat build-up and possibly a fire.
Warning!G
Follow recommend tire inflation pressures.
Do not underinflate tires. Underinflated tires
wear excessively and/or unevenly,
adversely affect handling and fuel economy,
and are more likely to fail from being over-
heated.
Do not overinflate tires. Overinflated tires
can adversely affect handling and ride
comfort, wear unevenly, increase stopping
distance, and result in sudden deflation
(blowout) because they are more likely to
become punctured or damaged by road
debris, potholes etc.
Page 391 of 474

390 Practical hints
Where will I find...?
1Collapsible wheel chock
2Vehicle jack
3Protective wrap
4Alignment bolt
5Towing eye bolt
6Wheel wrench
7Valve extractor
8Electric air pumpVehicles with TIREFIT*
1TIREFIT kit
2Vehicle jack
3Collapsible wheel chock
4Towing eye bolt
5Alignment bolt
6Wheel wrench
7Valve extractor
8Electric air pump
�Open the trunk (�page 99).
�Lift up trunk floor.Vehicle jack
Warning!G
The jack is designed exclusively for jacking
up the vehicle at the jack take-up brackets
built into both sides of the vehicle. To help
avoid personal injury, use the jack only to lift
the vehicle during a wheel change. Never
get beneath the vehicle while it is supported
by the jack. Keep hands and feet away from
the area under the lifted vehicle. Always
firmly set parking brake and block wheels
before raising vehicle with jack.
Do not disengage parking brake while the
vehicle is raised. Be certain that the jack is
always vertical (plumb line) when in use,
especially on hills. Always try to use the jack
on level surface. Make sure the jack arm is
fully seated in the jack take-up bracket. Al-
ways lower the vehicle onto sufficient
capacity jackstands before working under
the vehicle.
��
Page 398 of 474

397 Practical hints
Opening/closing in an emergency
�Opening/closing in an emergency
Raising retractable hardtop manually
Warning!G
If the retractable hardtop does not com-
pletely open or close, the roof hydraulics will
lose pressure and the retractable hardtop is
lowered
�after approximately 7 minutes when the
ignition is switched on
�after approximately 15 seconds when
the ignition is switched off
Shortly before the hardtop is lowered, a
warning will sound. In the multifunction dis-
play you will seeK and the message
Retractable roof Lowering.
�Properly lock retractable hardtop before
continuing to drive (
�page 240).
Warning!G
Manually closing the retractable hardtop is a
complicated and technically demanding pro-
cedure and should only be performed by an
authorized Mercedes-Benz Center or quali-
fied technician. Attempting to manually
close the retractable hardtop may cause
damage to the retractable hardtop and/or
personal injury.
Warning!G
To prevent possible accidents, drive the
vehicle only with the retractable hardtop
either completely closed and locked, or fully
lowered into its storage compartment.
Page 399 of 474

398 Practical hints
Replacing SmartKey batteries
If the batteries in the SmartKey are
discharged, the vehicle can no longer be
locked or unlocked. It is recommended
to have the batteries replaced at an autho-
rized Mercedes-Benz Center.Batteries contain materials that can harm
the environment if disposed of improperly.
Recycling of batteries is the preferred
method of disposal. Many states require
sellers of batteries to accept old batteries
for recycling.
Replacement batteries: Lithium, type
CR 2025 or equivalent.
�Remove the mechanical key from the
SmartKey (
�page 394).1Mechanical key
2Battery compartment
�Insert mechanical key1 into opening.
�Press mechanical key1 in direction of
arrow.
Battery compartment2 is unlatched.
�Pull battery compartment2 out of the
housing.
Warning!G
Batteries contain poisonous and corrosive
substances. Therefore keep the batteries
out of reach of children.
If a battery is swallowed, seek medical help
immediately.
Warning!G
SmartKey batteries contain Perchlorate
material, which may require special handling
and regard for the environment. Check with
your local government’s disposal guidelines.
California residents, see
http://www.dtsc.ca.gov/HazardousWaste
/Perchlorate/index.cfm.
iWhen inserting the batteries, make sure
they are clean and free of lint.
iWhen replacing batteries, always replace
both batteries.
The required replacement batteries are available
at any Mercedes-Benz Center.
Page 401 of 474

400 Practical hints
Replacing bulbs
Bulbs
Safe vehicle operation depends on proper
exterior lighting and signaling. It is there-
fore essential that all bulbs and lamp
assemblies are in good working order at
all times.
Correct headlamp adjustment is extremely
important. Have headlamps checked and
readjusted at regular intervals and when a
bulb has been replaced. Contact an
authorized Mercedes-Benz Center for
headlamp adjustment.
Warning!G
Bulbs and bulb sockets can be very hot. Al-
low the lamp to cool down before changing
a bulb.
Keep bulbs out of reach of children.
Halogen lamps contain pressurized gas.
A bulb can explode if you:
�touch or move it when hot
�drop the bulb
�scratch the bulb
Wear eye and hand protection.
Because of high voltage in Xenon lamps, it is
dangerous to replace the bulb or repair the
lamp and its components. We recommend
that you have such work done by a qualified
technician.
iIf the headlamps are fogged up on the inside
as a result of high humidity, driving the vehicle a
short distance with the lights on should clear up
the fogging.
iBackup bulbs will be brought into use
when lamps malfunction. Read and observe
the messages in the multifunction
display (
�page 381).
Page 404 of 474
403 Practical hints
Replacing bulbs
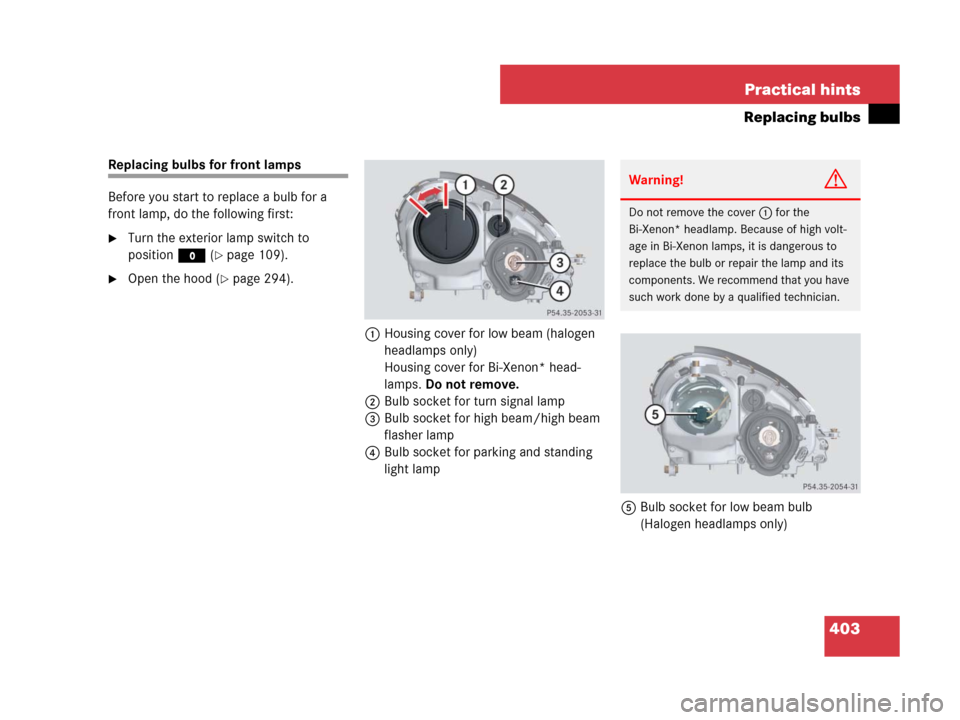
Replacing bulbs for front lamps
Before you start to replace a bulb for a
front lamp, do the following first:
�Turn the exterior lamp switch to
positionM (
�page 109).
�Open the hood (�page 294).
1Housing cover for low beam (halogen
headlamps only)
Housing cover for Bi-Xenon* head-
lamps. Do not remove.
2Bulb socket for turn signal lamp
3Bulb socket for high beam/high beam
flasher lamp
4Bulb socket for parking and standing
light lamp
5Bulb socket for low beam bulb
(Halogen headlamps only)
Warning!G
Do not remove the cover1 for the
Bi-Xenon* headlamp. Because of high volt-
age in Bi-Xenon lamps, it is dangerous to
replace the bulb or repair the lamp and its
components. We recommend that you have
such work done by a qualified technician.
Page 407 of 474
.
�Turn combination switch to wiper
se")
406 Practical hints
Replacing wiper blades
Placing wiper arms in vertical position
1Wiper arms
�Turn the SmartKey in the starter switch
to position1 (
�page 37).
�Turn combination switch to wiper
settingII (
�page 56).
�With wiper arms 1 in vertical position,
turn the SmartKey in the starter switch
to position0.
�Remover the SmartKey from the starter
switch.
Warning!G
For safety reasons, switch off wipers and
remove the SmartKey from the starter
switch before replacing a wiper blade.
Otherwise, the motor could suddenly turn
on and cause injury.
Warning!G
Wiper blades are components that are
subject to wear and tear. Replace the wiper
blades twice a year, preferably in the spring
and fall. Otherwise the windows will not be
properly wiped. As a result, you may not
be able to observe surrounding traffic condi-
tions and could cause an accident.
!To avoid damage to the hood:
�The wiper arms should only be folded for-
ward when in the vertical position.
�Never open the hood when a wiper arm is
folded forward.
!Hold on to the wiper when folding the wiper
arm back. If released, the force of the impact
from the tensioning spring could crack the wind-
shield.
Do not allow the wiper arms to contact the wind-
shield glass without a wiper blade inserted.
For your convenience, we recommend that you
have this work carried out by an authorized
Mercedes-Benz Center.