Page 40 of 474

39 Getting started
Adjusting
�Adjusting
Seats
The seats can be adjusted either manually
or electrically, depending on the vehicle’s
equipment.
Warning!G
All seat, head restraint, steering wheel, and
rear view mirror adjustments, as well as fas-
tening of seat belts, must be done before
the vehicle is put into motion.
Warning!G
Do not adjust the driver’s seat while driving.
Adjusting the seat while driving could cause
the driver to lose control of the vehicle.
Never ride in a moving vehicle with the seat
back in an excessively reclined position as
this can be dangerous. You could slide un-
der the seat belt in a collision. If you slide
under it, the seat belt would apply force at
the abdomen or neck. That could cause se-
rious or fatal injuries. The seat backrest and
seat belts provide the best restraint when
the wearer is in a position that is as upright
as possible and seat belts are properly posi-
tioned on the body.
Your seat must be adjusted so that you can
correctly fasten your seat belt (
�page 48).
Observe the following points:
�Adjust the seat backrest until your arms
are slightly angled when holding the
steering wheel.
�Adjust the seat to a comfortable seating
position that still allows you to reach the
accelerator/brake pedal safely.
The position should be as far back as
possible with the driver still able to
operate the controls properly.
�Adjust head restraint so that it is as
close to the head as possible and the
center of the head restraint supports
the back of the head at eye level.
�Never place hands under the seat or
near any moving parts while a seat is
being adjusted.
Failure to do so could result in result in an
accident and/or serious personal injury.
Page 42 of 474
41 Getting started
Adjusting
Seat fore and aft adjustment
�Pull handle1.
�Slide the seat to the desired position.
�Allow handle1 to reengage with an
audible click.
�Check for proper engagement before
driving.Seat height
�Pull or push handle2 up or down and
adjust the seat height until your legs
are slightly supported.
Seat backrest tilt
�Pull handle3 and adjust the backrest
until your arms are slightly angled
when holding the steering wheel.
�Release handle3 when the desired
backrest tilt is reached.
When you hear an audible click, the
backrest is again fixed into place.
For more information, see “Seats”
(
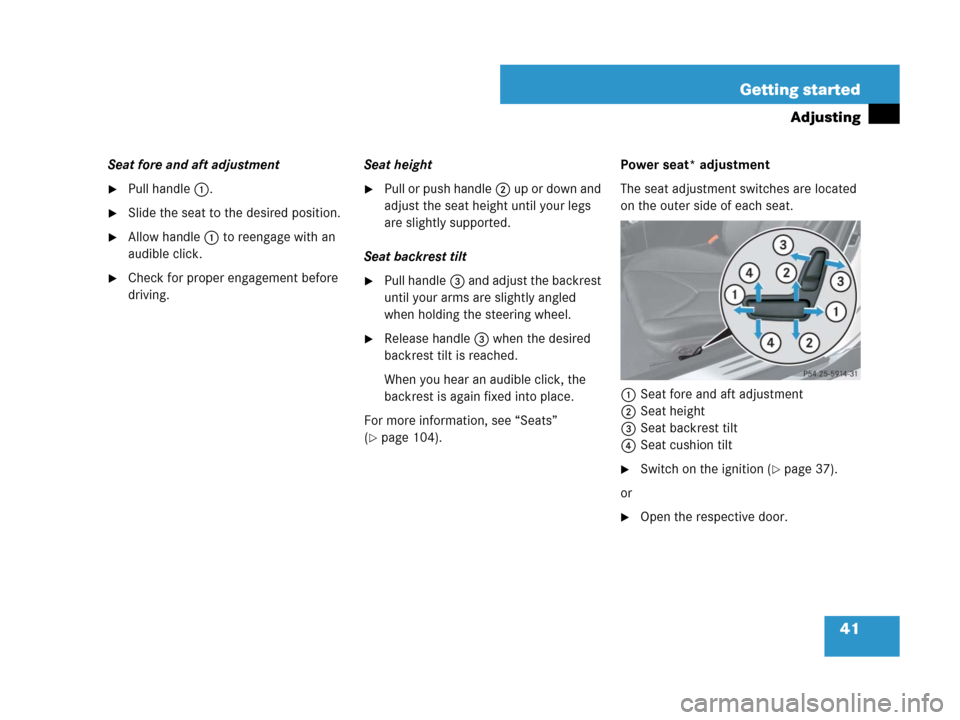
�page 104).Power seat* adjustment
The seat adjustment switches are located
on the outer side of each seat.
1Seat fore and aft adjustment
2Seat height
3Seat backrest tilt
4Seat cushion tilt
�Switch on the ignition (�page 37).
or
�Open the respective door.
Page 43 of 474

42 Getting started
Adjusting
Seat fore and aft adjustment
�Press the horizontal switch forward or
backward in direction of arrows1.
Seat height
�Press the horizontal switch up or down
in direction of arrows2 and adjust the
seat height until your legs are slightly
supported.
Seat backrest tilt
�Press the vertical switch forward or
backward in direction of arrows3.
Seat cushion tilt
�Press the horizontal switch up or down
in direction of arrows4 until your
upper legs are lightly supported.Head restraint height
Head restraint
�Adjust the height of head restraints
manually by pulling them upwards or
pushing them downwards.
iThe memory function* (�page 107) lets
you store the settings for power seats*, steering
wheel adjustment (electrical)*, and exterior rear
view mirrors.
Warning!G
For your protection, drive only with properly
positioned head restraints.
Adjust head restraint so that the head
restraint supports the back of the head at
eye level. This will reduce the potential for
injury to the head and neck in the event of
an accident or similar situation.
Do not drive the vehicle without the seat
head restraints. Head restraints are in-
tended to help reduce injuries during an
accident.
iAdjust the head restraint in such a way that
it is as close to the head as possible.
Page 44 of 474

43 Getting started
Adjusting
Steering wheelMake sure that
�you can reach the steering wheel with
your arms slightly bent at the elbows
�you can move your legs freely
�all displays (including malfunction and
indicator lamps) on the instrument
cluster are clearly visible
Steering wheel adjustment, manual
The steering wheel adjustment release
handle is located on the lower left of the
steering column.
1Steering wheel adjustment release
handle
�To unlock the steering wheel, pull
handle1 out to its stop limit.
�Move the steering wheel to the desired
position.
�To lock the steering wheel, push
handle1 in all the way until it
engages.
The steering wheel is locked into
position again.
�Make sure the steering wheel is
securely locked by trying to move the
steering wheel up and down, in and out
before driving off.
Warning!G
Do not adjust the steering wheel while driv-
ing. Adjusting the steering wheel while driv-
ing, or driving without the steering wheel
adjustment feature locked could cause the
driver to lose control of the vehicle.
When leaving the vehicle, always remove the
SmartKey from the starter switch, take it
with you, and lock the vehicle.
Even with the SmartKey removed from the
starter switch, the electrical steering wheel
adjustment feature* can be operated when
the driver’s door is open. Therefore, do not
leave children unattended in the vehicle, or
with access to an unlocked vehicle.
A child’s unsupervised access to a vehicle
could result in an accident and/or serious
personal injury.
!Do not drive the vehicle until you have
properly locked the steering wheel.
Page 45 of 474

44 Getting started
Adjusting
Steering wheel adjustment, electrical*
The steering wheel adjustment stalk is
located on the lower left of the steering
column.
1Adjusting steering wheel, in or out
2Adjusting steering wheel, up or down
�Switch on the ignition (�page 37).
or
�Open the driver’s door.Adjusting steering wheel in or out
�Move stalk forward or back in direction
of arrows1 until a comfortable steer-
ing wheel position is reached with your
arms slightly bent at the elbow.
Adjusting steering wheel up or down
�Move the stalk up or down in direction
of arrows2.Easy-entry/exit feature*
This feature allows for easier entry into and
exit from the vehicle. When entering and
exiting the vehicle, the steering wheel is in
its uppermost position.
The easy-entry/exit feature can be activat-
ed or deactivated in the
Convenience
submenu of the control system
(
�page 147).
iThe memory function* (�page 107) lets
you store the settings for the steering wheel to-
gether with the settings for the exterior rear view
mirrors and the driver’s seat position.
Page 54 of 474

53 Getting started
Driving
Parking brake
1Parking brake lever
2Release button
�Pull up slightly on parking brake
lever1 and press release button2.
�Push parking brake lever1 down to
its original position.
The brake warning lamp; (USA
only) or3 (Canada only) in the
instrument cluster goes out.
Driving off
Warning!G
When leaving the vehicle, always remove the
SmartKey from the starter switch, take it
with you, and lock the vehicle. Do not leave
children unattended in the vehicle, or with
access to an unlocked vehicle. Children
could release the parking brake, which
could result in an accident and/or serious
personal injury.
Warning!G
On slippery road surfaces, never downshift
in order to obtain braking action. This could
result in drive wheel slip and reduced vehi-
cle control. Your vehicle’s ABS will not pre-
vent this type of loss of control.
!If you hear a warning signal and the
message
Release Parking Brake appears in
the multifunction display when driving off, you
have forgotten to release the parking brake.
Release the parking brake (
�page 53).
!Do not run cold engine at high engine speed.
Running a cold engine at high engine speed may
shorten the service life of the engine.
!Simultaneously depressing the accelerator
pedal and applying the brakes reduces engine
performance and causes premature brake and
drivetrain wear.
Page 56 of 474
55 Getting started
Driving
Switching on headlamps
Low beam headlamps
The exterior lamp switch is located on the
dashboard to the left of the steering wheel.
Exterior lamp switch
1Off
2Low beam headlamps on
�Turn the exterior lamp switch to
positionB.
The low beam headlamps come on.High beam
The combination switch is located on the
left of the steering column.
Combination switch
1High beam
2High beam flasher
�Push the combination switch in
direction of arrow1.
The high beam headlamps and high
beam headlamp indicator lampA in
the instrument cluster come on
(
�page 26).
For more information on headlamps, see
“Lighting” (
�page 109).
Turn signals
The combination switch is located on the
left of the steering column.
Combination switch
1Turn signals, right
2Turn signals, left
Page 60 of 474

59 Getting started
Parking and locking
�Parking and locking
You have now completed your first drive.
You have properly stopped and parked
your vehicle. End your drive as follows.
Parking brake
Warning!G
Vehicles with manual transmission:
Wait until the vehicle is stationary before re-
moving the SmartKey from the starter
switch. The vehicle cannot be steered when
the SmartKey is removed.
Warning!G
With the engine not running, there is no
power assistance for the brake and steering
system. In this case, it is important to keep
in mind that a considerably higher degree of
effort is necessary to brake and steer the ve-
hicle.
Warning!G
Do not park this vehicle in areas where
combustible materials such as grass, hay or
leaves can come into contact with the hot
exhaust system, as these materials could be
ignited and cause a vehicle fire.
To reduce the risk of personal injury or
damage to the vehicle drivetrain as a result
of vehicle movement, before turning off the
engine and leaving the vehicle always:
�Keep right foot on brake pedal.
�Pull the parking brake lever up as many
notches as possible.
�Manual transmission: Move the gear-
shift lever into first or reverse gear.
�Automatic transmission*: Move the
gear selector lever to position P.
�Slowly release brake pedal.
�When parked on an incline, turn front
wheels towards the road curb.
�Turn the SmartKey in the starter switch
to position0 and remove.
�Take the SmartKey with you and lock
vehicle when leaving.
Warning!G
Engaging the parking brake while the vehicle
is in motion can cause the rear wheels to
lock up. You could lose control of the vehicle
and cause an accident. In addition, the
vehicle’s brake lights do not light up when
the parking brake is engaged.