Page 151 of 474

150 Controls in detail
Control system
You can use the functions in the TEL menu
to operate your telephone, provided it is
connected to a hands-free system and
switched on.
�Switch on the telephone and Audio or
COMAND*.
See separate operating instructions.
�Press buttonèorÿ repeatedly
until the
TEL menu appears in the
multifunction display.Which messages will appear in the multi-
function display depends on whether your
telephone is switched on or off:
�If the telephone is switched off, the
message in the multifunction display is:
PHONE OFF.
�If the telephone is switched on:
The telephone will then search for a
network. During this time the multi-
function display is empty.
As soon as the telephone has found a
network,
Ready is indicated in the mul-
tifunction display.
This standby message indicates that your
telephone is ready for use and you can op-
erate it using the control system.Answering a call
When your telephone is ready to receive
calls, you can answer a call at any time. In
the multifunction display you will see the
message, or if available, the caller ID
(name and number):Audio system
COMAND*
�Press buttons.
You have answered the call.
The duration of the call appears in the
multifunction display.
Never operate radio transmitters equipped
with a built-in or attached antenna (i.e. with-
out being connected to an external antenna)
from inside the vehicle while the engine is
running. Doing so could lead to a malfunc-
tion of the vehicle’s electronic system, pos-
sibly resulting in an accident and/or
personal injury.��
Page 152 of 474

151 Controls in detail
Control system
Ending a call or rejecting an incoming
call
�Press buttont.
Dialing a number from the phone book
If your telephone is ready to receive calls,
you may select and dial a number from the
phone book at any time.
�Press buttonèorÿ repeatedly
until the
TEL menu and the standby
message appear in the multifunction
display.
�Press buttonjork.
The control system reads the phone
book which is stored in the telephone.
This may take up to 30 seconds. In the
multifunction display you will see the
message
Please Wait.
When the message
Please wait
disappears, the phone book has been
loaded.
�Press buttonjork repeatedly
until the desired name appears in the
multifunction display.
The stored names are displayed in
ascending or descending alphabetical
order.
1Selected name from phone book�Press buttons.
The control system dials the selected
phone number.
�If the connection is successful, the
name of the party you called and
the duration of the call will appear
in the display.
�If no connection is made, the con-
trol system stores the dialed num-
ber in the redial memory.
or
�Cancel the call you have intended to
make by pressing buttont.
iIf you press and hold buttonj ork
for longer than 1 second, the system scrolls
rapidly through the list of names until you
release the button again.
Cancel the quick search mode by pressing
buttont.
Page 153 of 474
152 Controls in detail
Control system
Redialing
The control system stores the most recent-
ly dialed phone numbers. This eliminates
the need to search through your entire
phone book.
�Press buttonèorÿ repeatedly
until the
TEL menu and the standby
message appear in the multifunction
display.
�Press buttons.
In the multifunction display you will see
the first number in the redial memory.
�Press buttonjork repeatedly
until the desired number or name
appears in the multifunction display.
�Press buttons.
The control system dials the selected
phone number.
If the connection is successful, the
duration of the call will appear in the
multifunction display, and
�the name of the party if stored in
the phone book
or
�instead of it the dialed number
or
�Cancel the call you have intended to
make by pressing buttont.
Page 197 of 474
 and the
function buttons (left side of radio panel)
are")
196 Controls in detail
Audio system
Button and soft key operation
In these instructions, the alphanumeric
keypad (right side of radio panel) and the
function buttons (left side of radio panel)
are referred to as “buttons”. The four keys
below the display panel are referred to as
“soft keys”.Operation
Switching the unit on/off
Switching on
�Turn the SmartKey in the starter switch
to position1 or2 (
�page 37).
�If the audio system was on as you
removed the SmartKey from the starter
switch, the audio system will
automatically come back on as you
turn the SmartKey to position1 or2.
or
�PressDbutton.Switching off
�Remove the SmartKey from the starter
switch.
or
�PressDbutton.
Adjusting the volume
�Turn rotary control ofEbutton.
The volume will increase or decrease
depending on the direction turned.
!Do not press directly in the display face.
Otherwise, the display will be damaged.
iIf the radio is switched on without the
SmartKey in the starter switch, it will automati-
cally switch off again after approximately
30 minutes.
If your vehicle is equipped with a mobile
telephone*, the display may prompt you to enter
your PIN (GSM network) or code (TDMA or
CDMA network).
iShould excessively high temperatures occur
while the audio system is being operated, the
display will dim. If temperatures continue to rise,
HIGH TEMP will appear in the display, after which
the audio system will be switched off for a
cooling-down period.
iIf your vehicle equipment includes a
Mercedes-Benz specified mobile telephone*,
you can adjust its volume separately from the
volume of the audio system while the telephone
is being used.
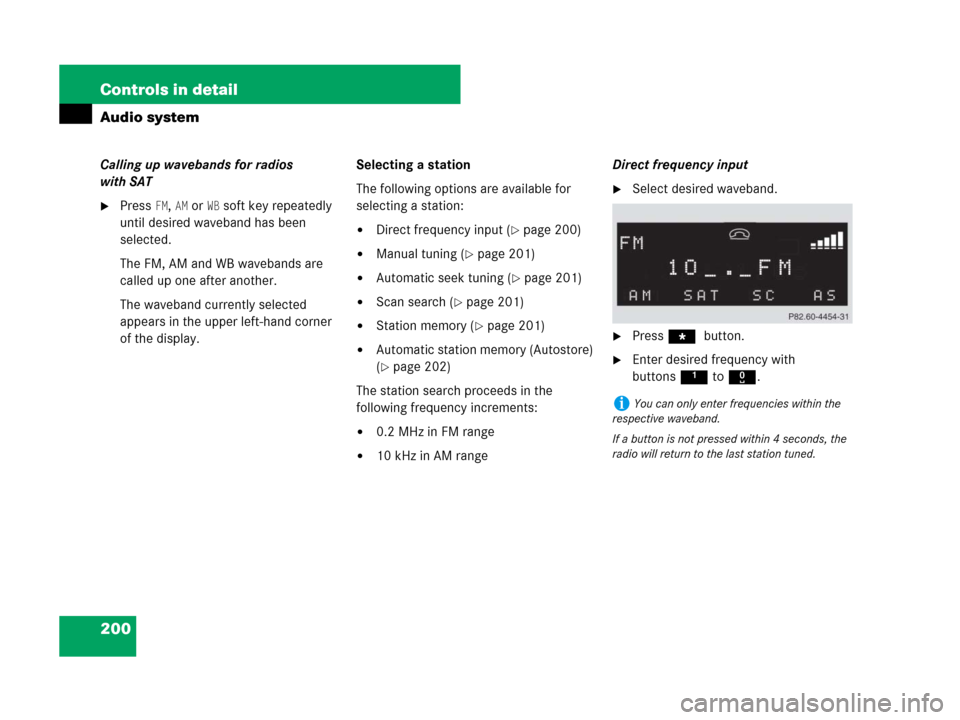
Page 201 of 474
200 Controls in detail
Audio system
Calling up wavebands for radios
with SAT
�Press FM, AM or WB soft key repeatedly
until desired waveband has been
selected.
The FM, AM and WB wavebands are
called up one after another.
The waveband currently selected
appears in the upper left-hand corner
of the display.Selecting a station
The following options are available for
selecting a station:
�Direct frequency input (�page 200)
�Manual tuning (�page 201)
�Automatic seek tuning (�page 201)
�Scan search (�page 201)
�Station memory (�page 201)
�Automatic station memory (Autostore)
(
�page 202)
The station search proceeds in the
following frequency increments:
�0.2 MHz in FM range
�10 kHz in AM rangeDirect frequency input
�Select desired waveband.
�Press * button.
�Enter desired frequency with
buttons1to R.
iYou can only enter frequencies within the
respective waveband.
If a button is not pressed within 4 seconds, the
radio will return to the last station tuned.
Page 203 of 474

202 Controls in detail
Audio system
Autostore – automatic station memory
The Autostore memory function provides
an additional memory level. The station
memory for manually stored stations is not
overwritten.
�Calling up Autostore memory level and
storing stations
�Press AS soft key briefly.
The radio switches to the Autostore
memory level.
AS and SEARCH
appear in the display and the radio
finds the ten stations with the
strongest signals. These stations
are stored on the station
buttons1 to R in order of
signal strength.
�Calling up stations
�Press desired station button1
to R.
�Leaving the Autostore memory level
�Press FM or AMsoft key briefly.
Interrupting radio mode
The radio mode is interrupted by an
incoming call on the telephone*
(
�page 224).
�Mute on
�PressFbutton.
The radio mode is interrupted and
MUTED appears in the display.
�Mute off
�PressFbutton.
The radio mode is again active.Weather band
�Press WB soft key.
The weather band station last received
is tuned in.
Selecting a weather band station
directly
�Select desired weather band station
with buttons 1 to 7.
If a station cannot be tuned in, a search
is automatically started.
Page 213 of 474

212 Controls in detail
Audio system
Operating the single CD player in the
audio system unit
Loading a CD
The single CD player in the audio system
unit has capacity for one CD. The CD slot
for loading the drive is located underneath
the soft keys.
�Make sure the system is switched on.
�Insert CD into CD slot. The label side of
the CD must face upwards.
The system automatically pulls the CD
into the CD slot. The audio CD begins
to play.Ejecting a CD
�Make sure the system is switched on.
�Press gbutton.
The system ejects the CD.
Remove CD0
will appear in the display.
�Remove CD from slot.
With the CD removed,
NO CD will appear
in the display.Operational readiness of CD changer*
If a CD changer has been installed in the
vehicle, it can be operated from the front
control panel of the audio system.
The CD changer is located in the glove box.
1CD loading slot
2Magazine slot button
A magazine is integrated into the CD
changer as a fixed element. It holds a
maximum of six CDs.
The CD changer features six magazine slot
buttons2 for controlling the loading
procedure.
!If a CD is already loaded, it must be ejected
before inserting a new CD. Inserting a second
CD in the slot with another CD still loaded will
cause damage to the CD drive not covered by the
Mercedes-Benz Limited Warranty.
iIf a CD has been inserted incorrectly or
cannot be read,
WRONG CD0 will appear in the
display.
iIf you do not take the CD out of the CD slot
within approximately 15 seconds, the system
automatically pulls the CD back in and plays it.
If a CD is pulled back in, press gbutton, the
CD will then be ejected.
Page 214 of 474

213 Controls in detail
Audio system
A light-emitting diode in the buttons shows
the status of the corresponding magazine
slot.
CD loading slot1 is above buttons2
and is used to load CDs.Loading the CD magazine
Loading single CDs
�Open the glove box (�page 253).
1CD loading slot
2Magazine slot button
�Briefly press button2 for the empty
magazine slot that you would like to
use.
The light-emitting diode in the maga-
zine slot button flashes in green.
INSERT CD appears in the display along
with the slot number.
The flashing light indicates that the CD
changer is ready to receive a CD.
�Insert an audio CD into CD loading
slot1 within 5 seconds, label side up.
The CD is pulled in and played.
�Close the glove box.
LEDs
no LED is litMagazine slot is
empty.
green LED flashesCD can be loaded.
red LED is litMagazine slot is in
use.
red LED flashesCD is being ejected.
iIf a CD has been inserted incorrectly or
cannot be read,
WRONG CD0 will appear in the
display.
Loading one or more CDs interrupts the
CD playback.