2008 MERCEDES-BENZ SLK ROADSTER height
[x] Cancel search: heightPage 63 of 273
Seats
60 Secure children as recommended; see the
"Children in the vehicle" section.
! When you move the seats, make sure that
there are no objects in the footwell or
behind the seats. Otherwise, you could
damage the seats and the objects.
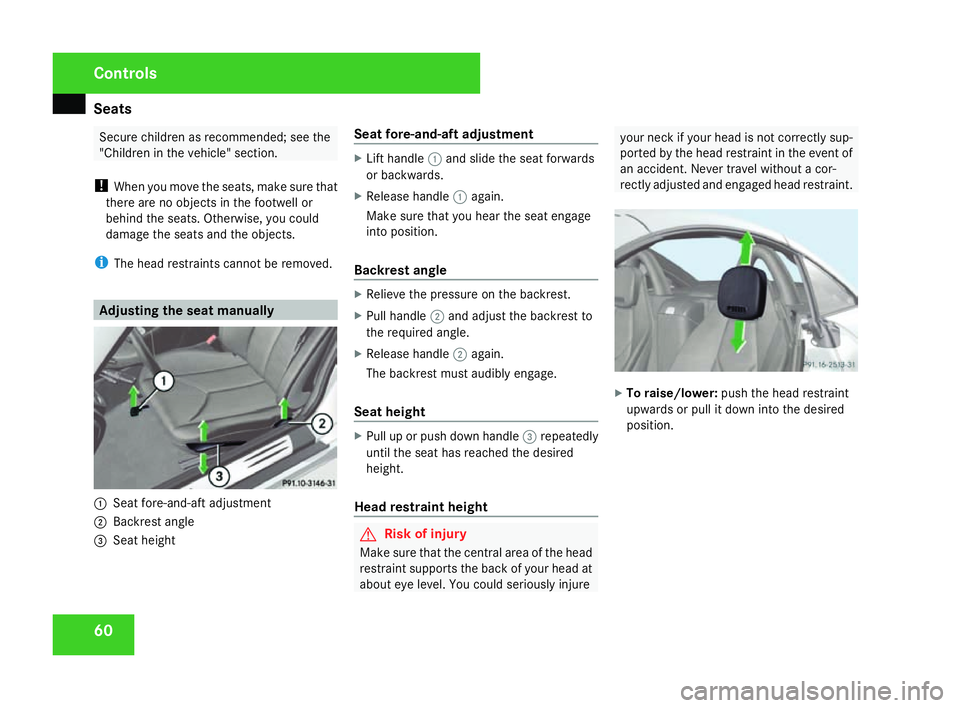
i The head restraints cannot be removed. Adjusting the seat manually
1
Seat fore-and-aft adjustment
2 Backrest angle
3 Seat height Seat fore-and-aft adjustmen
t X
Lift handle 1and slide the seat forwards
or backwards.
X Release handle 1again.
Make sure that you hear the seat engag e
into position .
Backrest angle X
Relieve the pressure on the backrest.
X Pull handle 2and adjust the backrest to
the required angle.
X Release handle 2again.
The backrest must audibly engage.
Seat height X
Pull up or push down handle 3repeatedly
until the seat has reached the desired
height.
Head restraint height G
Risk of injury
Make sure that the central area of the head
restraint supports the back of your head at
about eye level. You could seriously injure your neck if your head is not correctly sup-
ported by the head restraint in the event of
an accident. Never travel without a cor-
rectly adjusted and engaged head restraint. X
To raise/lower: push the head restraint
upwards or pull it down into the desire d
position. Controls
171_AKB; 3; 4, en-GB
vpfaff7,
2007-11-13T10:50:25+01:00 - Seite 60
Page 64 of 273
Seats
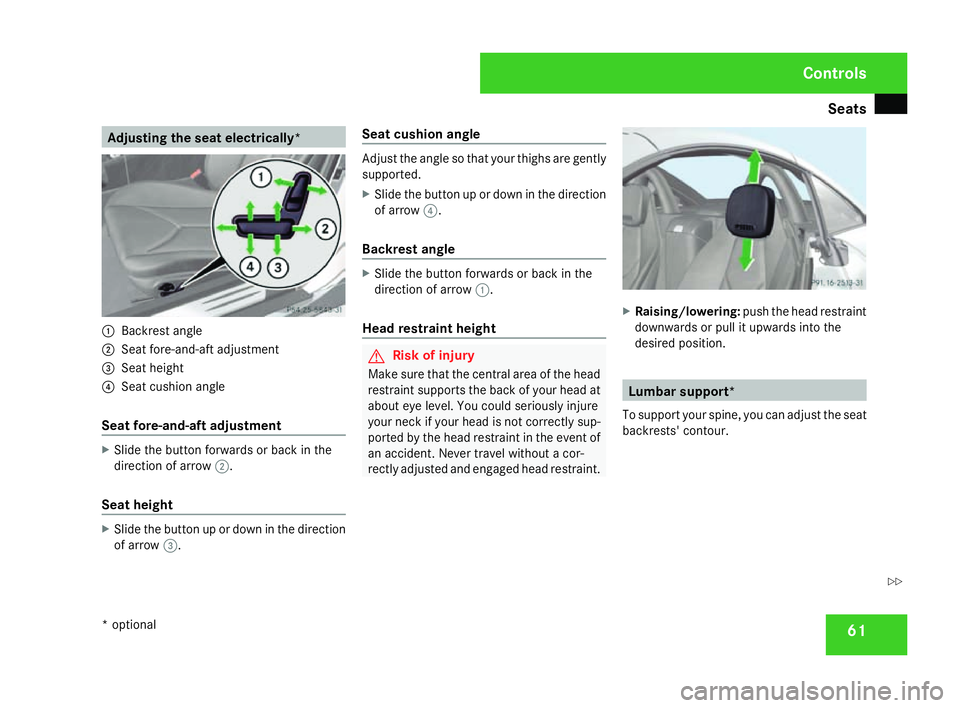
61Adjusting the seat electrically*
1
Backrest angle
2 Seat fore-and-aft adjustment
3 Seat height
4 Seat cushion angle
Seat fore-and-aft adjustmen tX
Slide the button forwards or back in the
direction of arrow 2.
Seat height X
Slide the button up or down in the directio n
of arrow 3. Seat cushion angle Adjust the angle so that your thighs are gently
supported.
X
Slide the button up or down in the directio n
of arrow 4.
Backrest angle X
Slide the button forwards or back in the
direction of arrow 1.
Head restraint height G
Risk of injury
Make sure that the central area of the head
restraint supports the back of your head at
about eye level. You could seriously injure
your neck if your head is not correctly sup-
ported by the head restraint in the event of
an accident. Never travel without a cor-
rectly adjusted and engaged head restraint. X
Raising/lowering :push the head restraint
downwards or pull it upwards into the
desired position. Lumbar support*
To support your spine, you can adjust the seat
backrests' contour. Controls
* optional
171_AKB; 3; 4, en-GB
vpfaff7,
2007-11-13T10:50:25+01:00 - Seite 61 Z
Page 67 of 273
Steering wheel
64
When you adjust the steering wheel, make
sure that:
R
the steering wheel can be reached with
your arms slightly bent
R you can move your legs freely
R you can see all the displays in the instru-
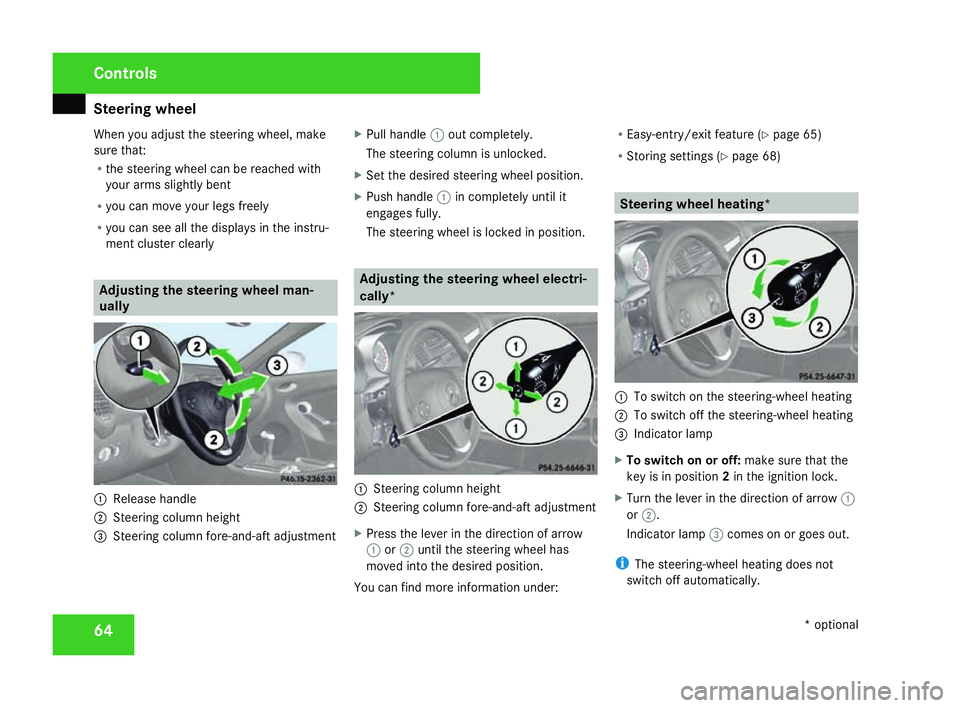
ment cluster clearly Adjusting the steering wheel man-
ually
1
Release handle
2 Steering column height
3 Steering column fore-and-aft adjustment X
Pull handle 1out completely.
The steering column is unlocked.
X Set the desired steering wheel position.
X Push handle 1in completely until it
engages fully.
The steering wheel is locked in position . Adjusting the steering wheel electri-
cally*
1
Steering column height
2 Steering column fore-and-aft adjustment
X Press the lever in the direction of arrow
1 or2 until the steering wheel has
moved into the desired position.
You can find more information under :R
Easy-entry/exit feature (Y page 65)
R Storing settings (Y page 68) Steering wheel heating*
1
To switch on the steering-wheel heating
2 To switch off the steering-wheel heating
3 Indicator lamp
X To switch on or off: make sure that the
key is in position 2in the ignition lock .
X Turn the lever in the direction of arrow 1
or 2 .
Indicator lamp 3comes on or goes out.
i The steering-wheel heating does not
switch off automatically. Controls
* optional
171_AKB; 3; 4, en-GB
vpfaff7,
2007-11-13T10:50:25+01:00 - Seite 64
Page 154 of 273
Engine compartment
151
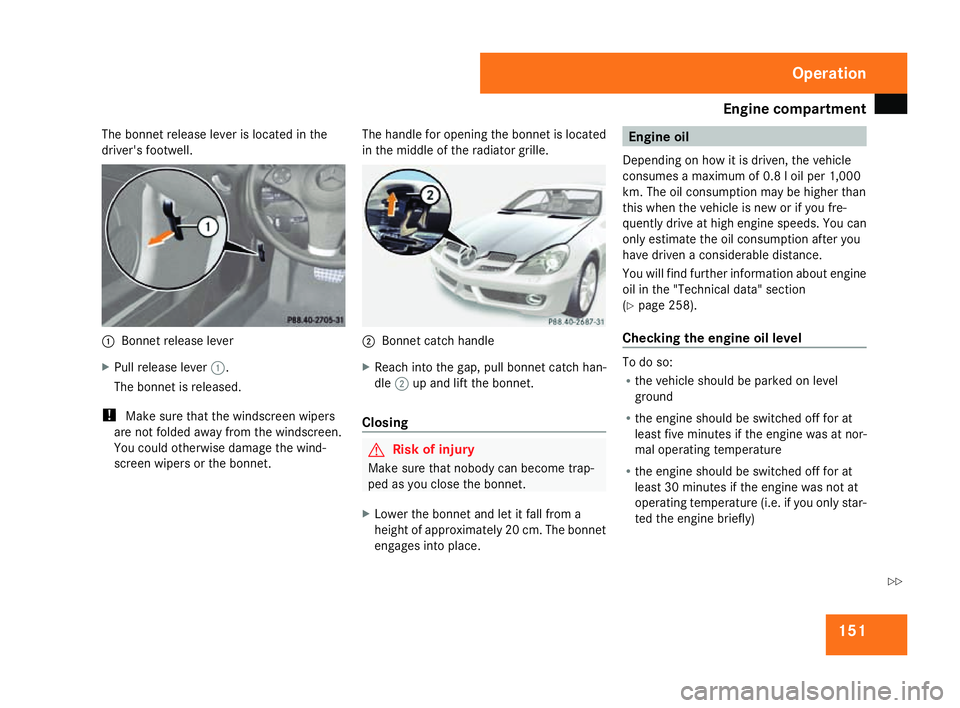
The bonnet release lever is located in th
e
driver's footwell. 1
Bonnet release lever
X Pull release lever 1.
The bonnet is released.
! Make sure that the windscreen wipers
are not folded away from the windscreen.
You could otherwise damage the wind-
screen wipers or the bonnet. The handle for opening the bonnet is located
in the middle of the radiator grille. 2
Bonnet catch handl e
X Reach into the gap, pull bonnet catch han-
dle 2up and lift the bonnet.
Closing G
Risk of injury
Make sure that nobody can become trap-
ped as you close the bonnet.
X Lower the bonnet and let it fall from a
height of approximately 20 cm. The bonnet
engages into place. Engine oil
Depending on how it is driven, the vehicle
consumes a maximum of 0.8 l oil per 1,000
km. The oil consumption may be higher than
this when the vehicle is new or if you fre-
quently drive at high engine speeds. You can
only estimate the oil consumption after you
have driven a considerable distance.
You will find further information about engine
oil in the "Technical data" section
( Y page 258).
Checking the engine oil level To do so:
R
the vehicle should be parked on leve l
ground
R the engine should be switched off for at
least five minutes if the engine was at nor -
mal operating temperature
R the engine should be switched off for at
least 30 minutes if the engine was not at
operating temperature (i.e. if you only star-
ted the engine briefly ) Operation
171_AKB; 3; 4, en-GB
vpfaff7,
2007-11-13T10:50:25+01:00 - Seite 151 Z
Page 222 of 273
Flat tyre
219
For all vehicles X
All occupants must get out of the vehicle.
Make sure that they are not endangered as
they do so.
X Make sure that no one is near the danger
area whilst a wheel is being changed. Any-
one who is not directly assisting in the
wheel change should, for example, stand
behind the barrier.
X Switch off the engine.
X Remove the key from the ignition lock.
X Place the warning triangle (Y page 172) or
warning lamps at a suitable distance.
Observe legal requirements. G
Risk of injury
The jack is designed only to raise the vehi-
cle for a short time while a wheel is being
changed .
If you intend to work under the vehicle, it
must be placed on stands.
Make sure that the jack is placed on a firm,
non-slip, level surface. Do not use wooden
blocks or similar as jacking supports. Oth-
erwise, the jack will not be able to achieve
its load-bearing capacity due to the restric-
ted height. Do not start the engine at any time while
the wheel is being changed.
Do not lie under the vehicle when it is being
supported by the jack. If you do not rais
e
the vehicle as described, it could slip off the
jack (e.g. if the engine is started or a door
or the boot lid are opened or closed) and
you could be seriously injured . Using the TIREFIT kit
You can use the TIREFIT kit to seal small
punctures, particularly those in the tyre tread.
You can use TIREFIT in outdoor temperature s
down to -20 °C. G
Risk of accident
In the following situations, your safety is at
particular risk and TIREFIT is unable to pro -
vide breakdown assistance:
R if there are cuts or punctures in the tyre
greater than 4 mm
R if the wheel rim is damaged
R if you have driven at very low tyre pres-
sures or on a flat tyre
Do not drive any further. Consult a qualified
specialist workshop which has the neces- sary specialist knowledge and tools to carr
y
out the work required.
Mercedes-Benz recommends that you use
a Mercedes-Benz Service Centre for this
purpose. In particular, work relevant to
safety or on safety-related systems must be
carried out at a qualified specialist work-
shop.
X Do not remove any foreign objects which
have penetrated the tyre, e.g. screws or
nails .
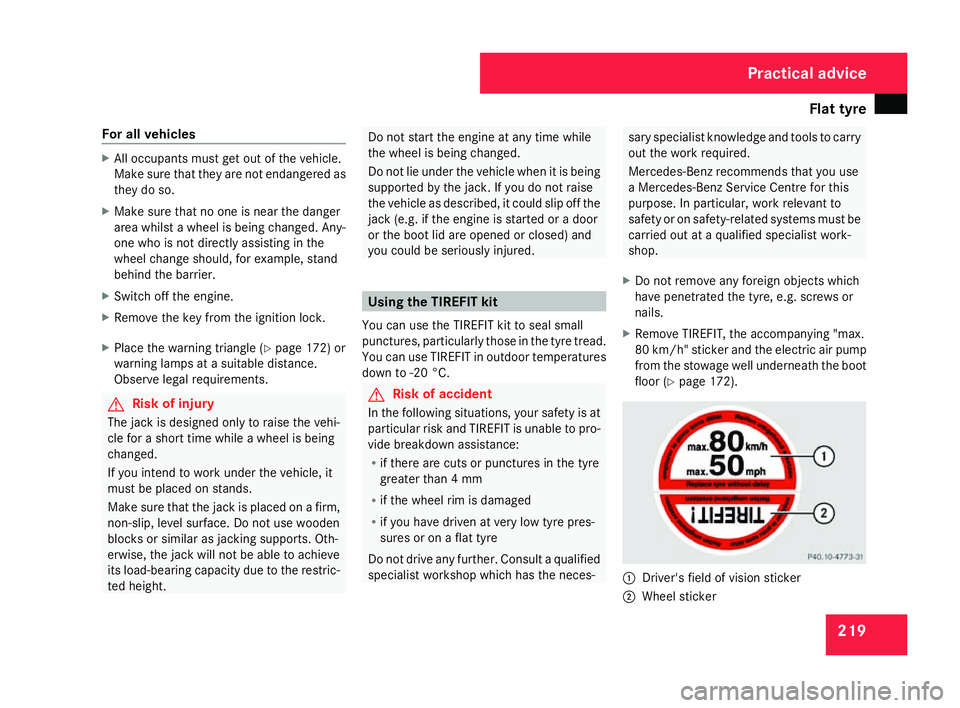
X Remove TIREFIT, the accompanying "max .
80 km/h" sticker and the electric air pum p
from the stowage well underneath the boot
floor (Y page 172). 1
Driver's field of vision sticker
2 Wheel sticker Practical advice
171_AKB; 3; 4, en-GB
vpfaff7
, 2007-11-13T10:50:25+01:00 - Seite 219
Page 256 of 273
Vehicle weights
25
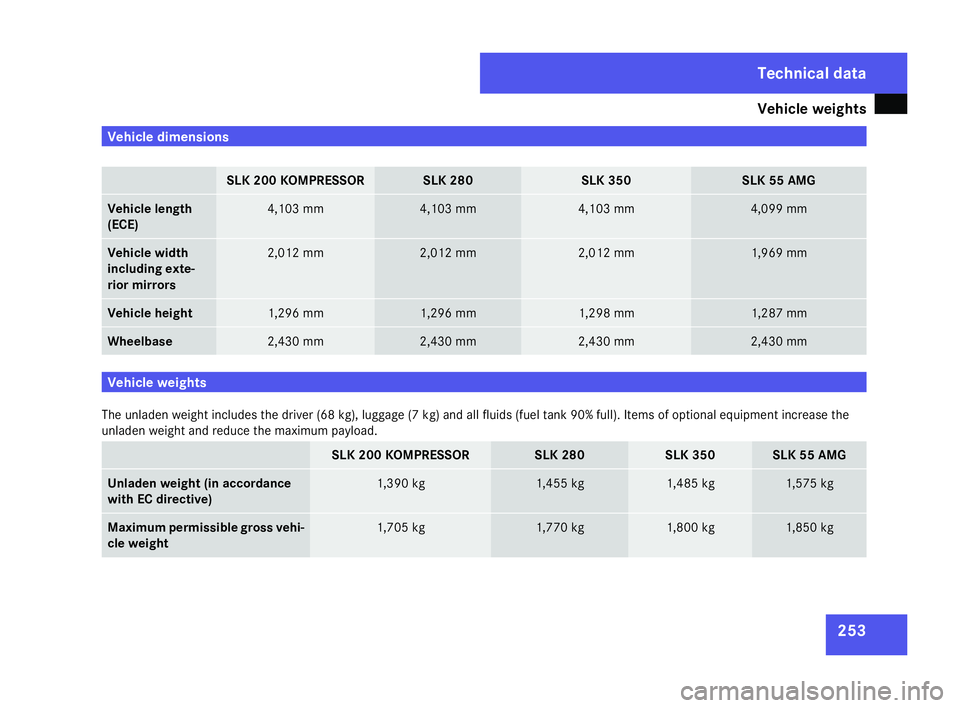
3 Vehicle dimensions
SLK 200 KOMPRESSO
R SLK 280 SLK 350 SLK 55 AMG
Vehicle length
(ECE) 4,103 mm 4,103 mm 4,103 mm 4,099 mm
Vehicle width
including exte
-
rior mirrors 2,012 mm 2,012 mm 2,012 mm 1,969 mm
Vehicle height 1,296 mm 1,296 mm 1,298 mm 1,287 mm
Wheelbas
e 2,430 mm 2,430 mm 2,430 mm 2,430 mm
Vehicle weights
The unladen weight includes the driver (68 kg), luggage (7 kg) and all fluids (fuel tank 90% full). Items of optional equipment increase the
unladen weight and reduce the maximum payload. SLK 200 KOMPRESSO
R SLK 280 SLK 350 SLK 55 AMG
Unladen weight (in accordance
with EC directive) 1,390 kg 1,455 kg 1,485 kg 1,575 kg
Maximum permissible gross vehi-
cle weight 1,705 kg 1,770 kg 1,800 kg 1,850 kgTechnical data
171_AKB; 3; 4, en-GB
vpfaff7,
2007-11-13T10:50:25+01:00 - Seite 253