2008 MERCEDES-BENZ SLK ROADSTER ESP
[x] Cancel search: ESPPage 118 of 273
Driving sys
tems 11
5
X
Press the æorç button to select the
Vehicl esubmenu.
X Press the jbutton to select Speed
limit (winter tyres) .X
Press the æorç button to select the
desired setting.
The following settings can be selected:
R Off
Permanent Speedtronic is deactivated.
R A limit speed between 240 km/hand
160 km/h by increments of 10 km/h
X To select a different display, press the
j ,è orÿ button . Parktronic*
G
Risk of acciden
t
Parktronic is only an aid and may not detect
all obstacles. It does not relieve you of the
responsibility to pay attention.
You are always responsible for safety and
must continue to pay attention to your
immediate surroundings when parking and
manoeuvring. You could otherwise endan-
ger yourself and others. G
Risk of injury
Make sure that no persons or animals ar e
in the manoeuvring range. Otherwise, they
could be injured.
Parktronic is an electronic parking aid. It indi-
cates visually and audibly the distance
between your vehicle and an object.
Parktronic is automatically activated when
you switch on the ignition and release the
handbrake.
Parktronic is deactivated at speeds above
18 km/h. It is reactivated at lower speeds.
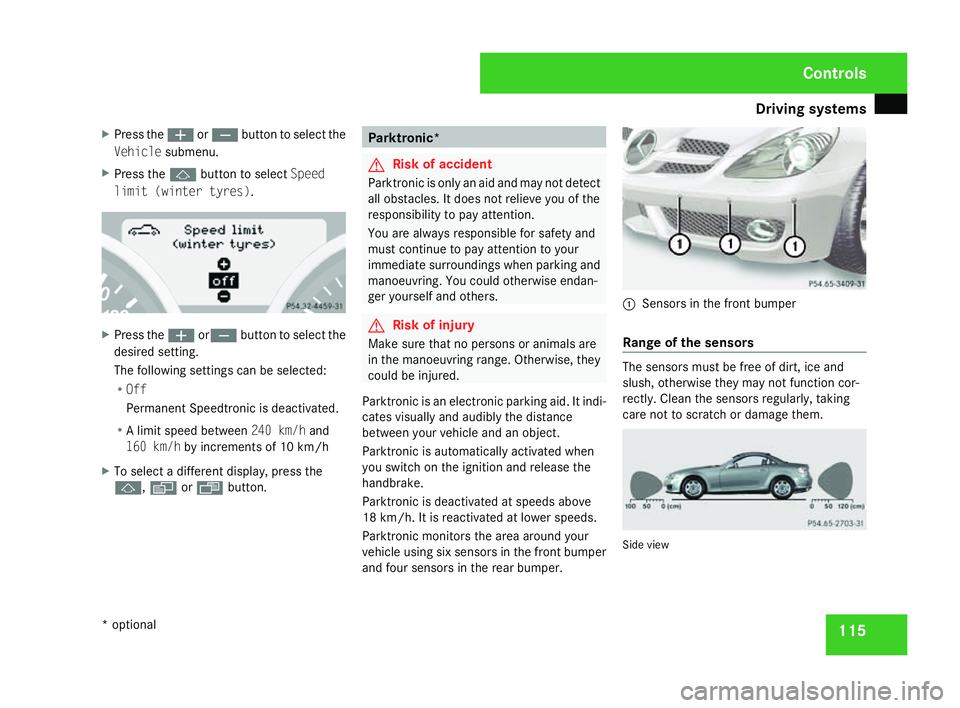
Parktronic monitors the area around your
vehicle using six sensors in the front bumper
and four sensors in the rear bumper. 1
Sensors in the front bumpe r
Range of the sensors The sensors must be free of dirt, ice and
slush, otherwise they may not function cor-
rectly. Clean the sensors regularly, taking
care not to scratch or damage them
. Side vie
w Controls
* optional
171_AKB; 3; 4, en-GB
vpfaff7,
2007-11-13T10:50:25+01:00 - Seite 11
5
Page 132 of 273
Air conditionin
g 129
Setting the AIRSCARF* vents G
Risk of injury
When AIRSCARF is in operation, very hot ai r
can flow from the vents in the hea d
restraints. This could cause burns to bare
skin in the immediate vicinity of the vents.
Make sure that you reduce the heater out-
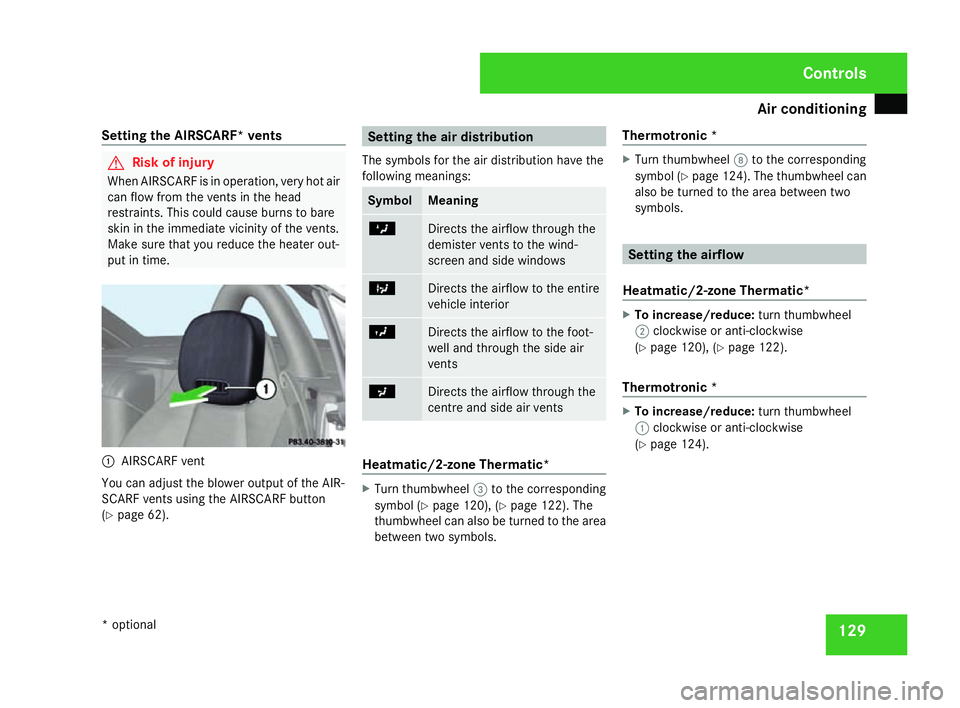
put in time. 1
AIRSCARF vent
You can adjust the blower output of the AIR -
SCARF vents using the AIRSCARF button
( Y page 62). Setting the air distribution
The symbols for the air distribution have the
following meanings: Symbol Meaning
Z
Directs the airflow through the
demister vents to the wind-
screen and side windows
b
Directs the airflow to the entire
vehicle interior
Y
Directs the airflow to the foot-
well and through the side ai
r
vents a
Directs the airflow through the
centre and side air vents
Heatmatic/2-zone Thermatic
* X
Turn thumbwheel 3to the corresponding
symbol (Y page 120), (Y page 122). The
thumbwheel can also be turned to the area
between two symbols. Thermotronic
* X
Turn thumbwheel 8to the corresponding
symbol (Y page 124). The thumbwheel can
also be turned to the area between two
symbols. Setting the airflow
Heatmatic/2-zone Thermatic* X
To increase/reduce: turn thumbwheel
2 clockwise or anti-clockwise
( Y page 120), (Y page 122).
Thermotronic * X
To increase/reduce: turn thumbwheel
1 clockwise or anti-clockwise
( Y page 124). Controls
* optional
171_AKB; 3; 4, en-GB
vpfaff7,
2007-11-13T10:50:25+01:00 - Seite 129
Page 138 of 273
Opening/closing the roof
135Closing the boot separator
Closing the boot separator
X
Pull the boot separator backwards in the
direction of the arrow by its handle until it
engages in the luggage compartment lip on
both sides.
Opening the boot separator X
Reach into the handle of the boot separa-
tor.
X Press the release button in the handle of
the boot separator.
The boot separator is unlocked. X
Pull the boot separator up out of the eyelets
on the luggage compartment lip.
X Push the boot separator forwards by the
handle in the opposite direction of the
arrow. Draught stop*
The draught stop is a wind protection device
for driving with the soft top open.
Depending on the vehicle's equipment, a dif-
ferent draught stop may be provided. In this
case you should read the assembly instruc-
tions provided with the draught stop. G
Risk of acciden
t
Dismantle the draught stop if your vision is
restricted or as soon as it is dark. It could
otherwise impair your rear view. You could
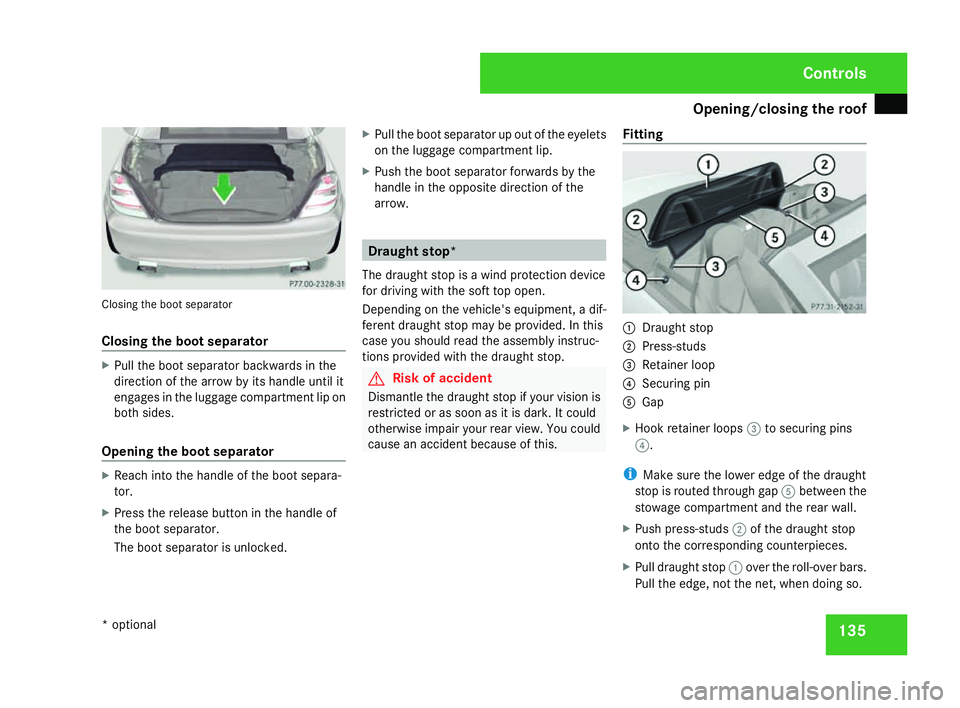
cause an accident because of this. Fittin
g 1
Draught sto p
2 Press-studs
3 Retainer loop
4 Securing pi n
5 Gap
X Hook retainer loops 3to securing pins
4 .
i Make sure the lower edge of the draught
stop is routed through gap 5between the
stowage compartment and the rear wall.
X Push press-studs 2of the draught stop
onto the corresponding counterpieces.
X Pull draught stop 1over the roll-over bars.
Pull the edge, not the net, when doing so. Controls
* optional
171_AKB; 3; 4, en-GB
vpfaff7,
2007-11-13T10:50:25+01:00 - Seite 135
Page 158 of 273
Tyres and wheels
15
5
X
Add windscreen washer concentrate to the
washer fluid all year round. G
Risk of fire
Windscreen washer concentrate is highly
flammable. Fire, naked flames and smoking
are prohibited when windscreen washe r
concentrate is being handled.
Use
R a windscreen washer fluid additive
such as MB Summerwash to preven t
smearing (for temperatures above freez-
ing).
R a windscreen washer fluid additive wit h
antifreeze properties such as MB Winter-
wash (if there is a risk of frost).
X Mix the windscreen washer fluid in a con-
tainer beforehand. Adapt the mixing ratio
to the outside temperatures.
! Only use windscreen washer fluid which
is suitable for plastic lamp lenses. Unsuit-
able windscreen washer fluid could dam-
age the plastic lamp lenses of the head-
lamps. X
To open: pull cap1upwards by the tab .
X To close: press cap 1onto the filler neck
until it clicks into place. Tyres and wheels
Points to remember
! For safety reasons, Mercedes-Benz rec-
ommends that you only use tyres and
wheels which have been approved by
Mercedes-Benz specifically for your vehi-
cle. These tyres have been specially adap-
ted for use with the control systems, such
as ABS or ESP ®
, and are marked as follows:
R MO = Mercedes-Benz Original
R MOE = Mercedes-Benz Original Extended
(with run-flat characteristics)*
Mercedes-Benz Original Extended tyres*
should only be used on wheels that have
been specifically approved by Mercedes-
Benz.
If you use other tyres and wheels,
Mercedes-Benz cannot accept any respon-
sibility for damage that may result from
this. Further information about tyres,
wheels and approved combinations can be
obtained from any Mercedes-Benz Service
Centre.
If you use tyres other than those tested and
recommended for Mercedes-Benz vehi-
cles, characteristics such as handling, vehi-
cle noise emissions and fuel consumption Operation
* optional
171_AKB; 3; 4, en-GB
vpfaff7,
2007-11-13T10:50:25+01:00 - Seite 155 Z
Page 161 of 273
Tyres and wheels
15
8
If the vehicle is to be heavily laden or driven
at high speeds, the tyre pressure must be
adapted according to the specifications given
in the fuel filler flap
(Y page 148).
Use the highest specified tyre pressure for
the spare wheel* . G
Risk of accident
Should the tyre pressure drop repeatedly:
R Check the tyre for foreign bodies.
R Check whether the wheel is losing air or
the valve is leaking .
Tyre pressure that is too low has a negative
effect on the vehicle’s active safety, which
could lead to your causing an accident .
Tyre pressure changes by approximately
0.1 bar for every 10 °C change in ambient
temperature.
If you measure the tyre pressure in enclosed
spaces where the temperature differs from
the outside temperature, you will have to cor-
rect the measured value accordingly.
When the vehicle is driven, the tyre tempera-
ture, and with it the tyre pressure, will
increase depending on the road speed and
the load on the tyres.
Therefore, you should only correct tyre pres-
sures when the tyres are cold. The pressure of warm tyres should only be
corrected if it is too low for the current oper-
ating conditions.
You will find a table of tyre pressures for var-
ious operating conditions on the inside of
your vehicle's fuel filler flap.
Driving with tyre pressure that is too high or
too low can:
R shorten the service life of the tyres
R cause increased tyre damag e
R have a negative effect on handling charac-
teristics (e.g. by causing aquaplaning)
i The tyre pressure values given for low
loads are minimum values which offer you
good ride comfort characteristics.
You can, however, also use the values given
for higher loads. These are permissible and
will not adversely affect the running of the
vehicle.
Also check the tyre pressure of the spare
wheel*. H
Environmental not
e
Check the tyre pressure regularly, and at
least every 14 days. Tyre pressure loss warning system*
G
Risk of accident
The tyre pressure loss warning system doe s
not warn you of an incorrectly set tyre pres-
sure. The table on the inside of the fuel fille r
flap will help you decide whether the tyre
pressures should be corrected.
The tyre pressure loss warning system does
not replace the need to regularly check
your vehicle's tyre pressures, since an even
loss of pressure on several tyres at the
same time cannot be detected by the tyre
pressure loss warning system.
The tyre pressure loss warning system is
not able to warn you of a sudden loss of
pressure, e.g. if the tyre is penetrated by a
foreign object.
In the event of a sudden loss of pressure,
bring the vehicle to a halt by braking care-
fully. Do not make any sudden steering
movements when doing so.
While the vehicle is in motion, the tyre pres-
sure loss warning system monitors the set
tyre pressure using the rotational speed of
the wheels. This enables the system to detect
significant pressure loss in a tyre. If the spee d
of rotation of a wheel changes as a result of
a loss of pressure, a corresponding warning Operation
* optional
171_AKB; 3; 4, en-GB
vpfaff7,
2007-11-13T10:50:25+01:00 - Seite 158
Page 164 of 273
Winter driving
161
the vehicle, affix an appropriate warning sign
in the driver's field of vision. This can be
obtained at a qualified specialist workshop,
e.g. from a Mercedes-Benz Service Centre.
In such circumstances, you should also
restrict the maximum speed of the vehicle
using permanent Speedtronic 24
to the maxi-
mum permissible speed for winter tyres
( Y page 114). G
Risk of accident
If you fit the spare wheel* when driving with
winter tyres, bear in mind that driving sta-
bility will be impaired owing to unstable
cornering characteristics caused by the dif-
ferent tyres. You should therefore adap t
your driving style and drive carefully.
Have the spare wheel* replaced at th e
nearest qualified specialist workshop
which has the necessary specialist knowl-
edge and tools to carry out the work
required. Mercedes-Benz recommends
that you use a Mercedes-Benz Service
Centre for this purpose. In particular, work
relevant to safety or on safety-related sys-
tems must be carried out at a qualified
specialist workshop . Snow chains
For safety reasons, Mercedes-Benz recom-
mends that you only use snow chains which
have been specially approved for your vehicle
by Mercedes-Benz or are of a correspondin g
standard of quality.
! Information about the use of snow chain-
compatible AMG winter tyres is applicable
for AMG tyres. Use of snow chains is only
permissible with these tyres.
If you intend to fit snow chains, please bear
the following points in mind:
R Snow chains cannot be fitted to all wheel /
tyre combinations.
R Snow chains must not be fitted to emer-
gency spare wheels, e.g. a collapsibl e
emergency spare wheel.
R Fit snow chains to both rear wheels. Com-
ply with the manufacturer's installation
instructions.
! If snow chains are fitted to the front
wheels, they may come into contact with
the bodywork and axle components whe n
the vehicle is in motion and damage the
tyre or the vehicle. Do not exceed the maximum permissibl
e
speed of 50 km/h.
i You may wish to deactivate ES P®
when
pulling away with snow chains fitted
( Y page 51). This way you can allow the
wheels to spin in a controlled manner, ach-
ieving an increased driving force (cutting
action). Winter driving
G
Risk of accident
Do not shift down for additional engine
braking on a slippery road surface. Thi s
could cause the drive wheels to lose thei r
grip and the vehicle could skid.
You should drive particularly carefully on slip-
pery road surfaces. Avoid sudden accelera-
tion, steering and braking manoeuvres.
If the vehicle threatens to skid or cannot be
stopped when moving at low speed:
24 Only available for certain countries. Operation
171_AKB; 3; 4, en-GB
vpfaff7,
2007-11-13T10:50:25+01:00 - Seite 161 Z
Page 165 of 273
Driving
tips 16
2
X
Vehicles with manual transmission: engage
neutral.
X Vehicles with automatic transmission*:
shift the selector lever to N.
X Try to bring the vehicle under control using
corrective steering. Driving tips
Rolling with the engine switched off
G
Risk of accident
Never switch the engine off while the vehi-
cle is in motion.
There is no power assistance for the steer-
ing and the service brake when the engine
is not running.
You will require considerably more effort to
steer and brake and you could therefore
lose control of the vehicle and cause an
accident. Brakin
g G
Risk of accident
Do not change down for additional engine
braking on a slippery road surface. Thi s
could cause the drive wheels to lose thei r
grip and the vehicle could skid. G
Risk of accident
Make sure that other road users are not
endangered by your braking. Downhill gradients On long and steep downhill gradients, espe-
cially if the vehicle is laden, you must shift to
a lower gear in good time or, on vehicles with
automatic transmission*, select shift rang e
1 ,2 or 3.
i This also applies if you have activated
cruise control or Speedtronic.
This uses the braking effect of the engine and
you will not have to brake to such an exten t
to maintain the same speed. This relieves the
load on the brake system and prevents the
brakes from overheating and wearing too
quickly. If you need additional braking ,
depress the brake pedal repeatedly rather
than continuously.
Heavy and light loads If the brakes have been subjected to a heavy
load, do not stop the vehicle immediately, but
drive on for a short while. This allows the air-
flow to cool the brakes more quickly. G
Risk of accident
Never depress the brake pedal continu -
ously while the vehicle is in motion, e.g.
never cause the brakes to rub by applying Operation
* optional
171_AKB; 3; 4, en-GB
vpfaff7,
2007-11-13T10:50:25+01:00 - Seite 162
Page 169 of 273
Car
e 166 Calling up the service due dat
e
Use the buttons on the multi-function steer-
ing wheel.
X Switch on the ignition.
X Press èorÿ to select the Basic
display menu(Y page 95).
X Press the jork button to select the
service information .
The 9 service symbol and the service
due date are displayed. Care
Notes on care
Regular and proper care maintains the value
of your vehicle.
i It is advisable to use Mercedes-Benz care
products.
Scratches, corrosive deposits, areas affected
by corrosion and damage caused by inade-
quate care cannot always be completely
repaired. In such cases, visit a qualified spe-
cialist workshop immediately, e.g. a
Mercedes-Benz Service Centre.
Repair damage caused by loose chippings
and remove the following substances imme-
diately, whilst avoiding rubbing too hard:
R Soak insect remains with insect remover
and rinse off afterwards .
R Soak bird droppings with water and rins e
off afterwards.
R Remove tree resin, oils, fuels and greases
by rubbing gently with a cloth soaked in
petroleum ether or lighter fluid .
R Use silicone remover to remove wax.
R Use tar remover to remove tar stains. H
Environmental not
e
Dispose of empty packaging, cleaning
cloths and polishing wads in an environ-
mentally responsible manner.
! Do not affix :
R stickers
R films
R magnetic plates or similar items
to painted surfaces, otherwise you could
damage the paintwork. Vehicle care
! Do not park the vehicle for a long perio d
of time directly after cleaning, especially if
the wheels have just been cleaned with a
wheel cleaner. Wheel cleaners could cause
rapid corrosion of the brake discs and
brake pads/linings. After cleaning, park
the vehicle when it is at normal operatin g
temperature.
Automatic car wash You can wash the vehicle in an automatic car
wash from the very start.Operatio
n
171_AKB; 3; 4, en-GB
vpfaff7,
2007-11-13T10:50:25+01:00 - Seite 166