2008 MERCEDES-BENZ SLK ROADSTER turn signal
[x] Cancel search: turn signalPage 78 of 273
Light
s 75
X
To switch off the front foglamps/rear
foglamp: push in the light switch to the
stop .
The corresponding indicator lamp goes out. Combination switch (main-beam
headlamps, headlamp flasher, turn
signals)
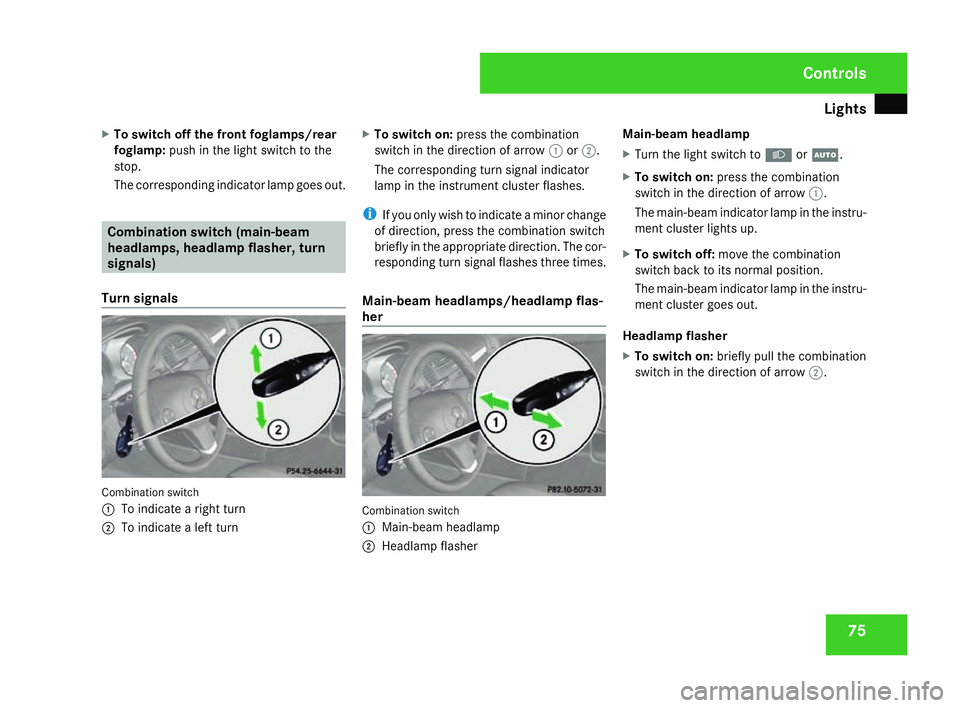
Turn signals Combination switch
1
To indicate a right turn
2 To indicate a left turn X
To switch on :press the combination
switch in the direction of arrow 1or2 .
The corresponding turn signal indicator
lamp in the instrument cluster flashes.
i If you only wish to indicate a minor change
of direction, press the combination switch
briefly in the appropriate direction. The cor-
responding turn signal flashes three times.
Main-beam headlamps/headlamp flas-
her Combination switch
1
Main-beam headlamp
2 Headlamp flasher Main-beam headlamp
X
Turn the light switch to BorU .
X To switch on: press the combinatio n
switch in the direction of arrow 1.
The main-beam indicator lamp in the instru-
ment cluster lights up.
X To switch off: move the combinatio n
switch back to its normal position.
The main-beam indicator lamp in the instru-
ment cluster goes out.
Headlamp flasher
X To switch on: briefly pull the combinatio n
switch in the direction of arrow 2. Cont
rols
171_AKB; 3; 4, en-GB
vpfaff7,
2007-11-13T10:50:25+01:00 - Seite 75
Page 79 of 273
Light
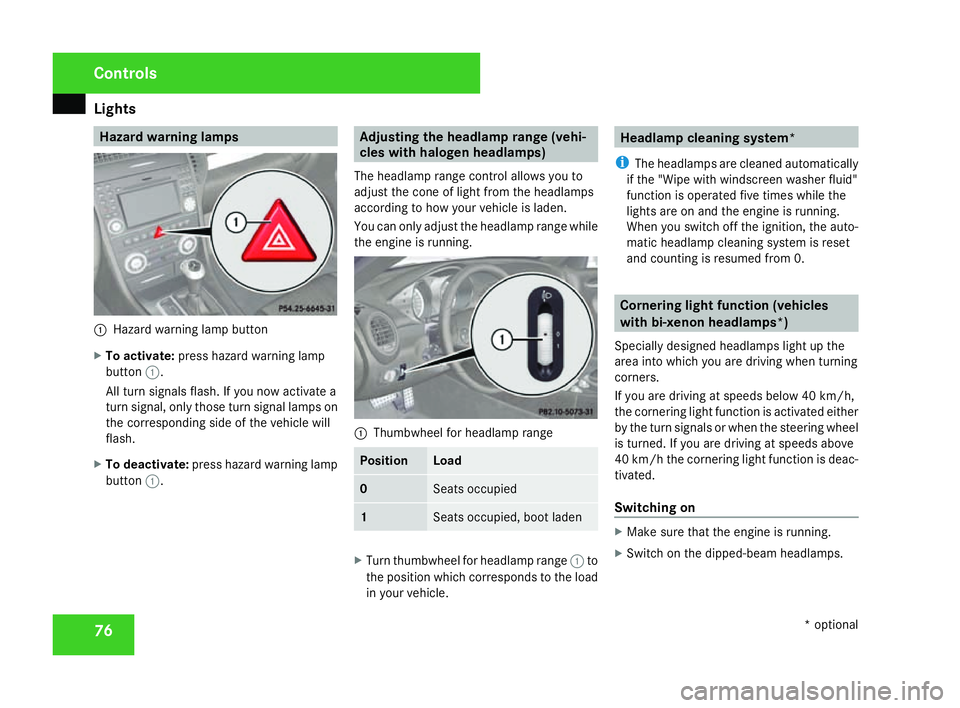
s 76 Hazard warning lamps
1
Hazard warning lamp button
X To activate :press hazard warning lamp
button 1.
All turn signals flash. If you now activate a
turn signal, only those turn signal lamps on
the corresponding side of the vehicle will
flash.
X To deactivate :press hazard warning lamp
button 1. Adjusting the headlamp range (vehi-
cles with halogen headlamps)
The headlamp range control allows you to
adjust the cone of light from the headlamps
according to how your vehicle is laden.
You can only adjust the headlamp range while
the engine is running. 1
Thumbwheel for headlamp range Position Load
0 Seats occupied
1 Seats occupied, boot lade
n X
Turn thumbwheel for headlamp range 1to
the position which corresponds to the load
in your vehicle. Headlamp cleaning system*
i The headlamps are cleaned automatically
if the "Wipe with windscreen washer fluid"
function is operated five times while the
lights are on and the engine is running.
When you switch off the ignition, the auto-
matic headlamp cleaning system is reset
and counting is resumed from 0. Cornering light function (vehicles
with bi-xenon headlamps*)
Specially designed headlamps light up the
area into which you are driving when turning
corners.
If you are driving at speeds below 40 km/h,
the cornering light function is activated either
by the turn signals or when the steering wheel
is turned. If you are driving at speeds above
40 km/h the cornering light function is deac-
tivated.
Switching on X
Make sure that the engine is running.
X Switch on the dipped-beam headlamps. Control
s
* optional
171_AKB; 3; 4, en-GB
vpfaff7,
2007-11-13T10:50:25+01:00 - Seite 76
Page 80 of 273
Light
s 77
X
Switch off the fog lights .
X Switch on the turn signal .
The cornering light on the same side as the
turn signal comes on, even if you turn the
steering wheel in the opposite direction
after indicating.
or
X Turn the steering wheel in the desired
direction .
When in a forwards gear: the cornering
lamp on the inside of the bend comes on.
When in reverse gear: the cornering light on
the outside of the bend comes on.
Switching off X
Switch off the turn signal .
i The cornering light is activated until you
turn the steering wheel back to the straight -
ahead position and the turn signal switches
off. The cornering light may remain lit for a
short time, but no more than three minutes.
It then goes out, even if the turn signal is
still switched on. Interior lighting
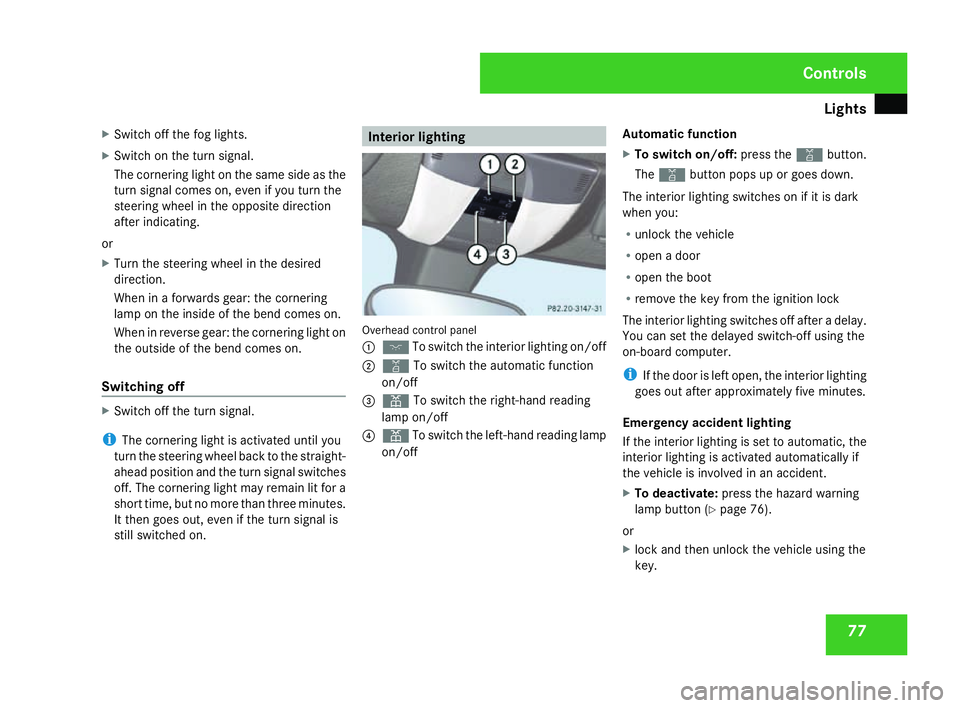
Overhead control panel
1
ð To switch the interior lighting on/of f
2 ¡ To switch the automatic function
on/of f
3 X To switch the right-hand reading
lamp on/of f
4 X To switch the left-hand reading lamp
on/of f Automatic function
X
To switch on/off: press the¡button.
The ¡ button pops up or goes down.
The interior lighting switches on if it is dark
when you:
R unlock the vehicl e
R open a door
R open the boot
R remove the key from the ignition lock
The interior lighting switches off after a delay.
You can set the delayed switch-off using the
on-board computer .
i If the door is left open, the interior lighting
goes out after approximately five minutes.
Emergency accident lighting
If the interior lighting is set to automatic, the
interior lighting is activated automatically if
the vehicle is involved in an accident.
X To deactivate: press the hazard warning
lamp button (Y page 76).
or
X lock and then unlock the vehicle using the
key. Controls
171_AKB; 3; 4, en-GB
vpfaff7,
2007-11-13T10:50:25+01:00 - Seite 77
Page 148 of 273
Features
145
X
Erase the memory of the integrated remote
control (Y page 146)before programming
it for the first time.
X Turn the key to position 2in the ignition
lock .
X Press and hold one of transmitter button s
2 to4 on the integrated remote control.
Indicator lamp 1starts to flash after a
short while. It flashes about once a second.
i Indicator lamp 1flashes immediately
the first time the transmitter button is pro-
grammed. If this transmitter button has
already been programmed, indicator
lamp 1will only start flashing at a rate of
once a second after 20 seconds have
elapsed .
X Keep the transmitter buttons depressed.
X Point the garage door's remote control with
the transmitter towards the left-hand side
of the rear-view mirror from a distance of 5
to 20 cm.
i The distance between the garage door's
remote control and the integrated garage
door opener depends on the system of the
garage door drive. You might require sev-
eral attempts. You should test every posi- tion for at least 20 seconds before trying
another position.
X Keep the transmitter button on the garage
door's remote control depressed until indi-
cator lamp 1starts to flash rapidly.
The programming was successful if indica-
tor lamp 1flashes rapidly .
X Release the transmitter buttons on th e
garage door's remote control and the inte-
grated remote control.
If indicator lamp 1goes out after approxi-
mately 20 seconds and did not flash rapidly
before this:
X Release the transmitter buttons on th e
integrated and portable remote controls.
X Repeat the programming procedure. In
doing so, change the distance between th e
garage door's remote control and the sig-
nal transmitter buttons in the overhead
control panel.
i If the garage door system works with a
rolling code, after programming you must
synchronise the remote control integrated
in the overhead control panel with the
garage door system receiver. You will find further information in the
garage door opening system's operating
instructions, e.g. the sections on “Synchro-
nising the transmitter” or “Registering
a
new transmitter”. You can also call the hot-
line mentioned above .
Opening or closing the garage door Once programmed, the integrated remot
e
control will assume the function of the garag e
door system's remote control. Please read
the operating instructions for the garage door
system.
X Turn the key to position 2in the ignition
lock .
X Press the transmitter button in the over-
head control panel that you have program-
med to operate the garage door.
Garage door system with fixed code: indi-
cator lamp 1lights up continuously.
Garage door system with rolling code: indi-
cator lamp 1flashes briefly and then lights
up for approximately two seconds. This is
repeated for up to 20 seconds.
i The transmitter will transmit a signal for
as long as the transmitter button is being
pressed. The transmission will be halted Controls
171_AKB; 3; 4, en-GB
vpfaff7,
2007-11-13T10:50:25+01:00 - Seite 145 Z
Page 186 of 273
Display
messages 18
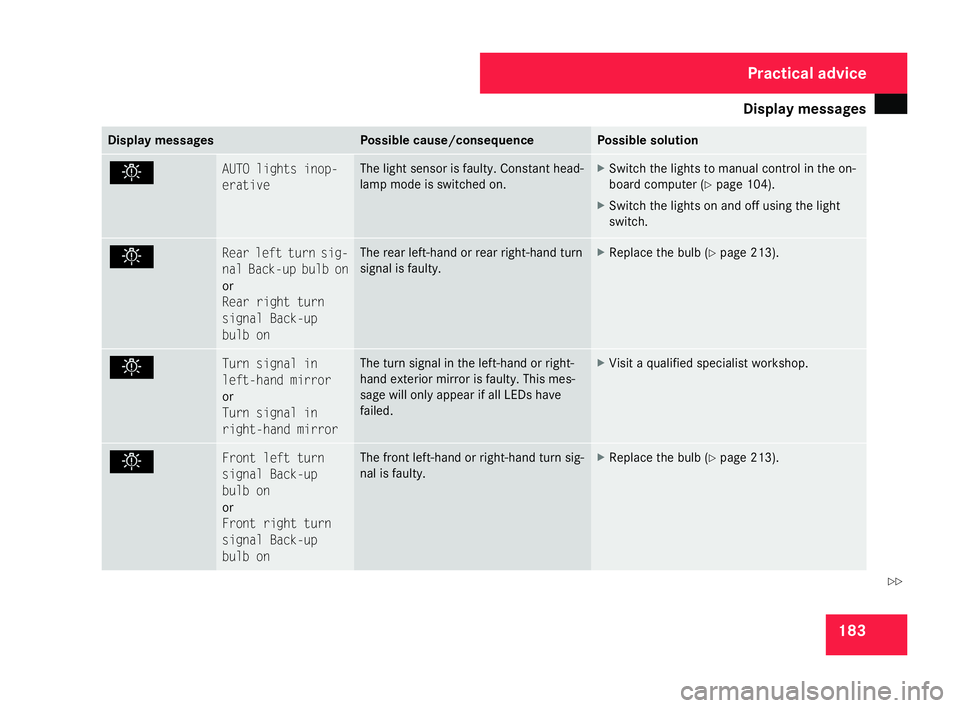
3 Display messages Possible cause/consequence Possible solution
. AUTO lights inop-
erative The light sensor is faulty. Constant head-
lamp mode is switched on. X
Switch the lights to manual control in the on-
board computer (Y page 104).
X Switch the lights on and off using the light
switch. . Rear left turn sig-
nal Back-up bulb on
or
Rear right turn
signal Back-up
bulb on The rear left-hand or rear right-hand turn
signal is faulty. X
Replace the bulb (Y page 213). . Turn signal in
left-hand mirror
or
Turn signal in
right-hand mirror The turn signal in the left-hand or right-
hand exterior mirror is faulty. This mes-
sage will only appear if all LEDs have
failed. X
Visit a qualified specialist workshop. . Front left turn
signal Back-up
bulb on
or
Front right turn
signal Back-up
bulb on The front left-hand or right-hand turn sig-
nal is faulty. X
Replace the bulb (Y page 213). Practical advice
171_AKB; 3; 4, en-GB
vpfaff7,
2007-11-13T10:50:25+01:00 - Seite 183 Z
Page 208 of 273
Troubleshooting
20
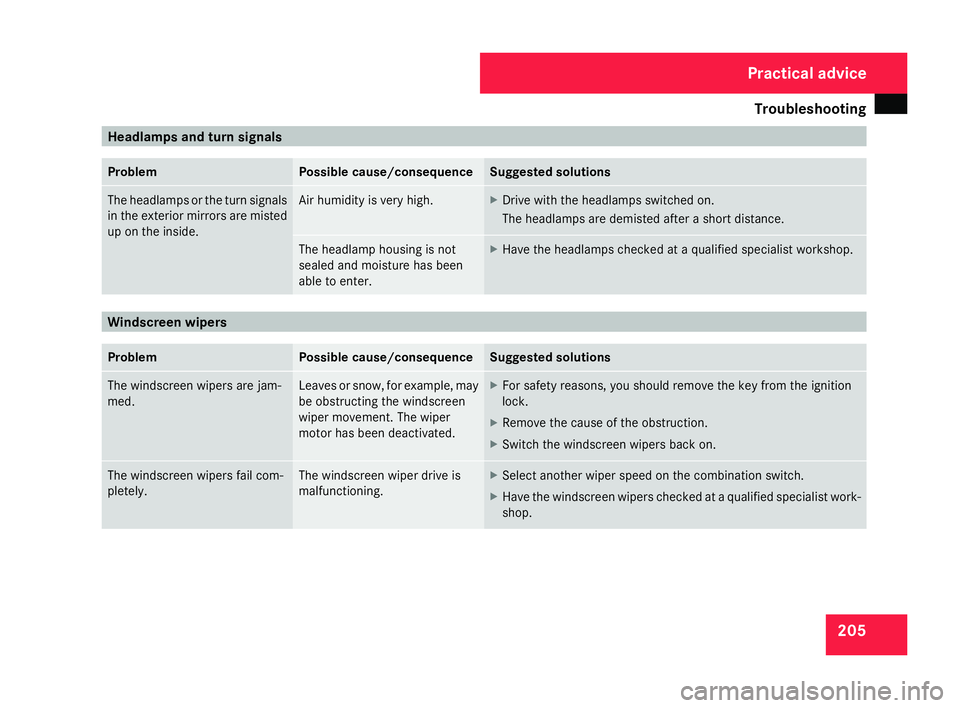
5 Headlamps and turn signals
Problem Possible cause/consequence Suggested solutions
The headlamps or the turn signals
in the exterior mirrors are misted
up on the inside. Air humidity is very high
. X
Drive with the headlamps switched on.
The headlamps are demisted after a short distance. The headlamp housing is not
sealed and moisture has been
able to enter. X
Have the headlamps checked at a qualified specialist workshop .Windscreen wipers
Problem Possible cause/consequence Suggested solutions
The windscreen wipers are jam-
med. Leaves or snow, for example, may
be obstructing the windscreen
wiper movement. The wiper
motor has been deactivated. X
For safety reasons, you should remove the key from the ignition
lock.
X Remove the cause of the obstruction .
X Switch the windscreen wipers back on. The windscreen wipers fail com-
pletely. The windscreen wiper drive is
malfunctioning. X
Select another wiper speed on the combination switch.
X Have the windscreen wipers checked at a qualified specialist work-
shop . Practical advice
171_AKB; 3; 4, en-GB
vpfaff7,
2007-11-13T10:50:25+01:00 - Seite 205
Page 217 of 273
Changing the bulbs
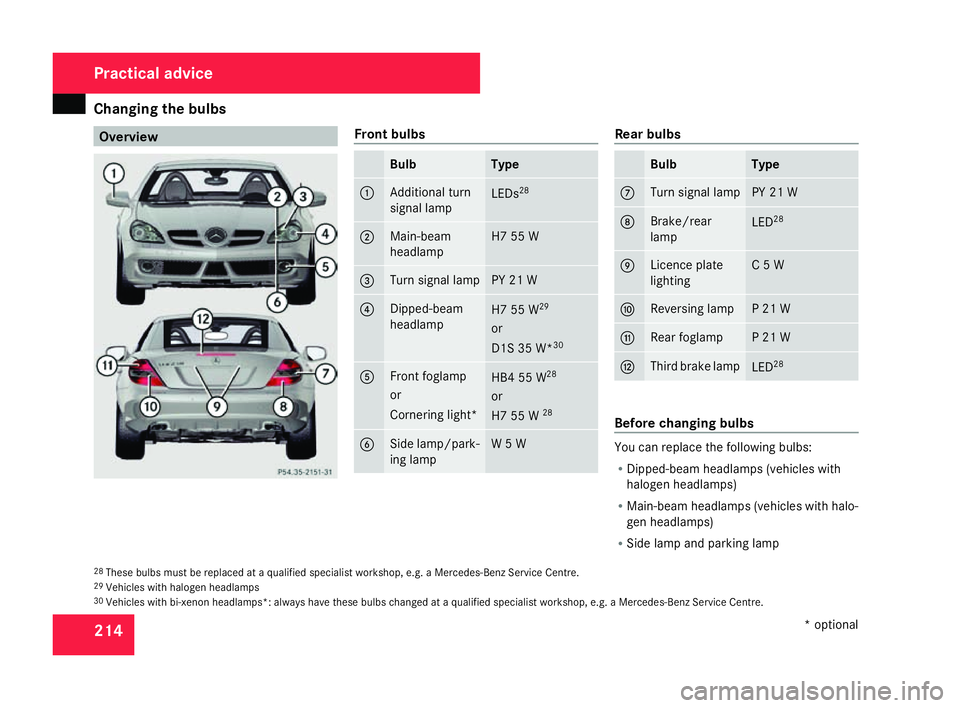
214 Overview Front bulbs
Bulb Typ
e 1 Additional turn
signal lamp
LEDs
28 2 Main-beam
headlamp H7 55
W 3 Turn signal lamp PY 21
W 4 Dipped-beam
headlamp
H7 55
W29
or
D1S 35 W* 30 5 Front foglamp
or
Cornering light*
HB4 55
W28
or
H7 55 W 28 6 Side lamp/park-
ing lamp W 5
W Rear bulb
s Bul
b Type
7 Turn signal lamp PY 21
W 8 Brake/rea
r
lamp LED
28 9 Licence plate
lighting C 5
W a Reversing lamp P 21
W b Rear foglamp P 21
W c Third brake lamp
LED
28 Before changing bulbs
You can replace the following bulbs:
R
Dipped-beam headlamps (vehicles with
halogen headlamps)
R Main-beam headlamps (vehicles with halo-
gen headlamps)
R Side lamp and parking lamp
28 These bulbs must be replaced at a qualified specialist workshop, e.g. a Mercedes-Benz Service Centre .
29 Vehicles with halogen headlamps
30 Vehicles with bi-xenon headlamps*: always have these bulbs changed at a qualified specialist workshop, e.g. a Mercedes-Benz Service Centre. Practical advic
e
* optional
171_AKB; 3; 4, en-GB
vpfaff7,
2007-11-13T10:50:25+01:00 - Seite 214
Page 218 of 273
Changing the bulbs
215
R
Turn signal lamp (front )
R Reversing lamp
R Rear foglamp
R Turn signal (rear)
R Licence plate lighting
Observe the following points:
R Use only the bulb types specified here.
R To prevent a short-circuit, switch off the
lights before changing a bulb.
R Only hold bulbs with a clean, lint-free cloth.
R Do not work with wet or greasy fingers.
R If the new bulb still does not light up, con-
sult a qualified specialist workshop, e.g. a
Mercedes-Benz Service Centre.
i Have the headlamp setting checked reg-
ularly at a qualified specialist workshop ,
e.g. a Mercedes-Benz Service Centre. Changing the front bulbs
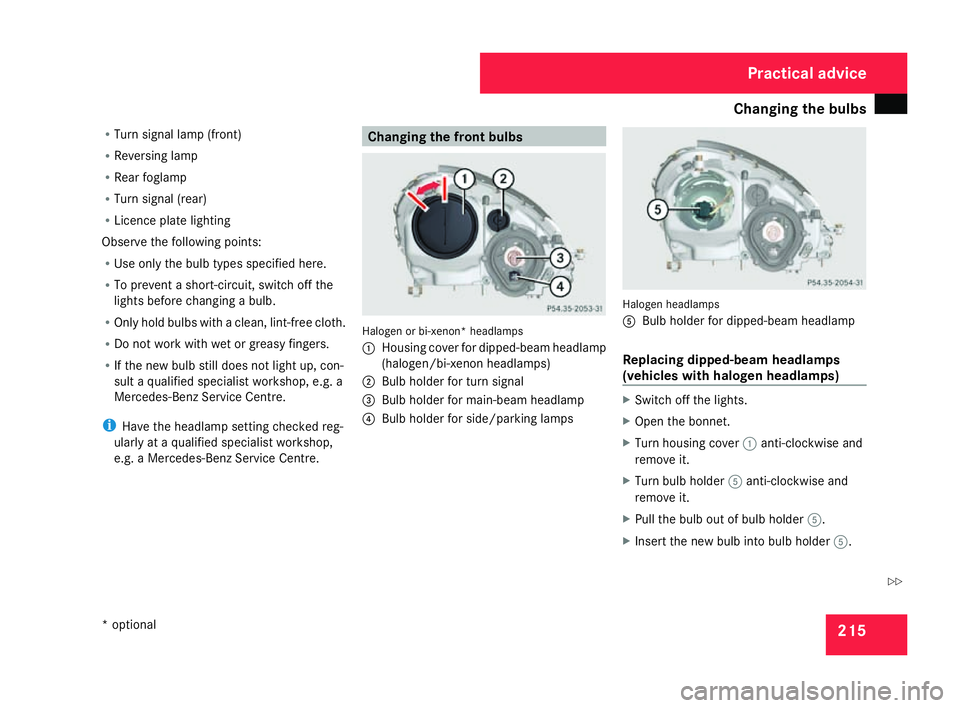
Halogen or bi-xenon* headlamps
1
Housing cover for dipped-beam headlam p
(halogen/bi-xenon headlamps)
2 Bulb holder for turn signa l
3 Bulb holder for main-beam headlamp
4 Bulb holder for side/parking lamps Halogen headlamps
5
Bulb holder for dipped-beam headlamp
Replacing dipped-beam headlamps
(vehicles with halogen headlamps) X
Switch off the lights.
X Open the bonnet.
X Turn housing cover 1anti-clockwise and
remove it.
X Turn bulb holder 5anti-clockwise and
remove it.
X Pull the bulb out of bulb holder 5.
X Insert the new bulb into bulb holder 5. Practical advice
* optional
171_AKB; 3; 4, en-GB
vpfaff7,
2007-11-13T10:50:25+01:00 - Seite 215 Z