Page 216 of 273
Changing the bulbs
213
X
Insert emergency key element 1into the
opening in the key and push in the direction
of the arrow.
Battery tray 2is released .
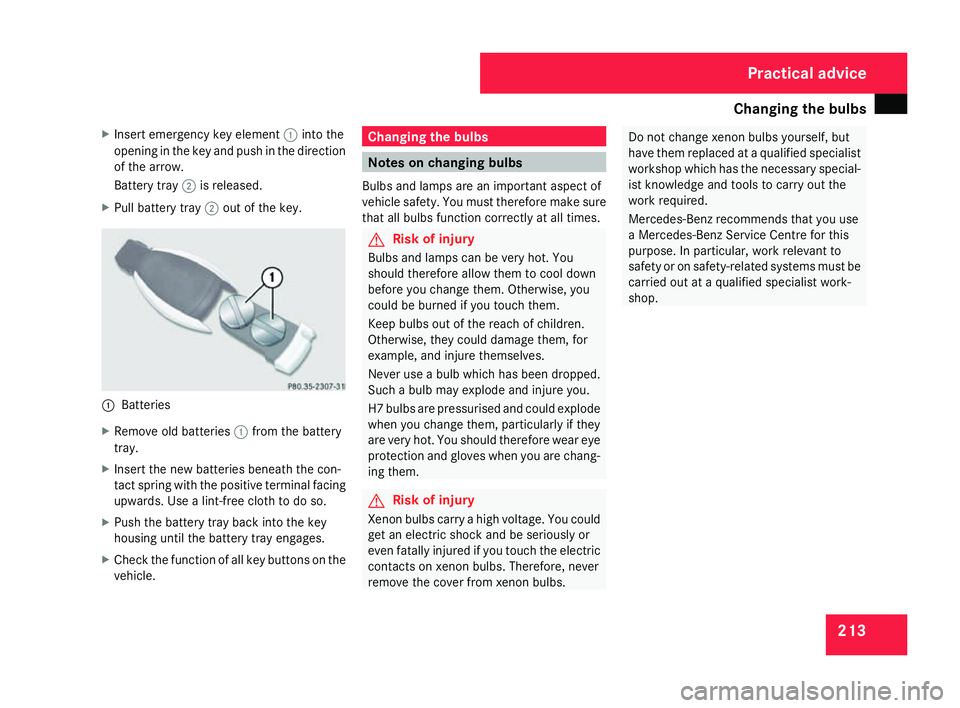
X Pull battery tray 2out of the key. 1
Batterie s
X Remove old batteries 1from the battery
tray .
X Insert the new batteries beneath the con-
tact spring with the positive terminal facing
upwards. Use a lint-free cloth to do so.
X Push the battery tray back into the key
housing until the battery tray engages.
X Check the function of all key buttons on th e
vehicle. Changing the bulbs
Notes on changing bulbs
Bulbs and lamps are an important aspect of
vehicle safety. You must therefore make sur e
that all bulbs function correctly at all times . G
Risk of injury
Bulbs and lamps can be very hot. Yo u
should therefore allow them to cool down
before you change them. Otherwise, you
could be burned if you touch them.
Keep bulbs out of the reach of children.
Otherwise, they could damage them, for
example, and injure themselves.
Never use a bulb which has been dropped.
Such a bulb may explode and injure you.
H7 bulbs are pressurised and could explode
when you change them, particularly if they
are very hot. You should therefore wear eye
protection and gloves when you are chang-
ing them. G
Risk of injury
Xenon bulbs carry a high voltage. You could
get an electric shock and be seriously or
even fatally injured if you touch the electri c
contacts on xenon bulbs. Therefore, neve r
remove the cover from xenon bulbs . Do not change xenon bulbs yourself, bu
t
have them replaced at a qualified specialist
workshop which has the necessary special-
ist knowledge and tools to carry out the
work required.
Mercedes-Benz recommends that you use
a Mercedes-Benz Service Centre for this
purpose. In particular, work relevant to
safety or on safety-related systems must be
carried out at a qualified specialist work-
shop. Practical advice
171_AKB; 3; 4, en-GB
vpfaff7,
2007-11-13T10:50:25+01:00 - Seite 213
Page 217 of 273
Changing the bulbs
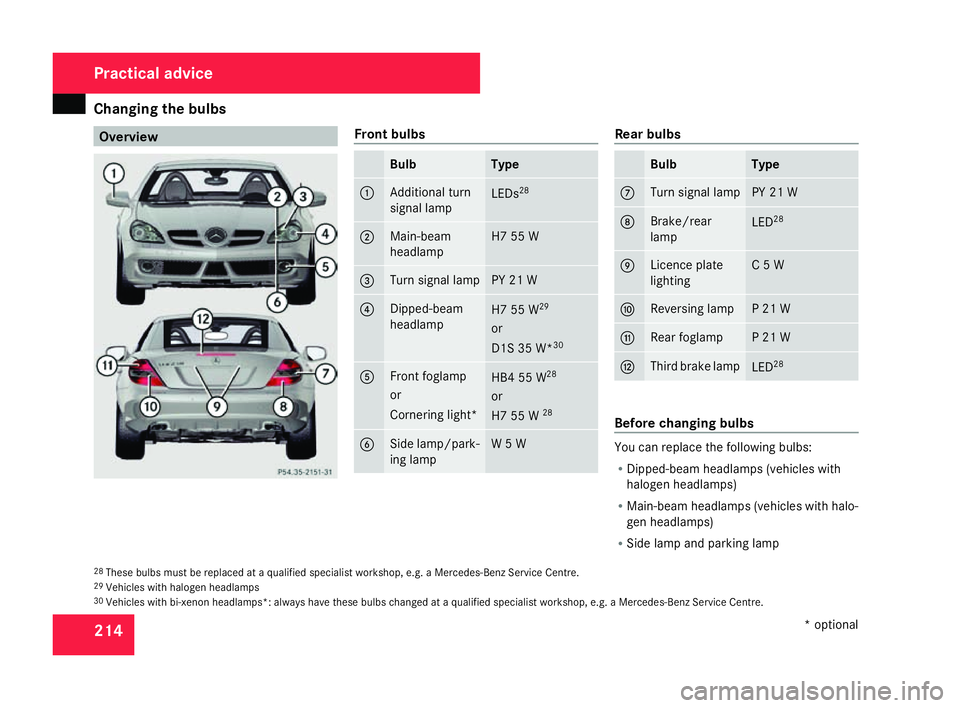
214 Overview Front bulbs
Bulb Typ
e 1 Additional turn
signal lamp
LEDs
28 2 Main-beam
headlamp H7 55
W 3 Turn signal lamp PY 21
W 4 Dipped-beam
headlamp
H7 55
W29
or
D1S 35 W* 30 5 Front foglamp
or
Cornering light*
HB4 55
W28
or
H7 55 W 28 6 Side lamp/park-
ing lamp W 5
W Rear bulb
s Bul
b Type
7 Turn signal lamp PY 21
W 8 Brake/rea
r
lamp LED
28 9 Licence plate
lighting C 5
W a Reversing lamp P 21
W b Rear foglamp P 21
W c Third brake lamp
LED
28 Before changing bulbs
You can replace the following bulbs:
R
Dipped-beam headlamps (vehicles with
halogen headlamps)
R Main-beam headlamps (vehicles with halo-
gen headlamps)
R Side lamp and parking lamp
28 These bulbs must be replaced at a qualified specialist workshop, e.g. a Mercedes-Benz Service Centre .
29 Vehicles with halogen headlamps
30 Vehicles with bi-xenon headlamps*: always have these bulbs changed at a qualified specialist workshop, e.g. a Mercedes-Benz Service Centre. Practical advic
e
* optional
171_AKB; 3; 4, en-GB
vpfaff7,
2007-11-13T10:50:25+01:00 - Seite 214
Page 218 of 273
Changing the bulbs
215
R
Turn signal lamp (front )
R Reversing lamp
R Rear foglamp
R Turn signal (rear)
R Licence plate lighting
Observe the following points:
R Use only the bulb types specified here.
R To prevent a short-circuit, switch off the
lights before changing a bulb.
R Only hold bulbs with a clean, lint-free cloth.
R Do not work with wet or greasy fingers.
R If the new bulb still does not light up, con-
sult a qualified specialist workshop, e.g. a
Mercedes-Benz Service Centre.
i Have the headlamp setting checked reg-
ularly at a qualified specialist workshop ,
e.g. a Mercedes-Benz Service Centre. Changing the front bulbs
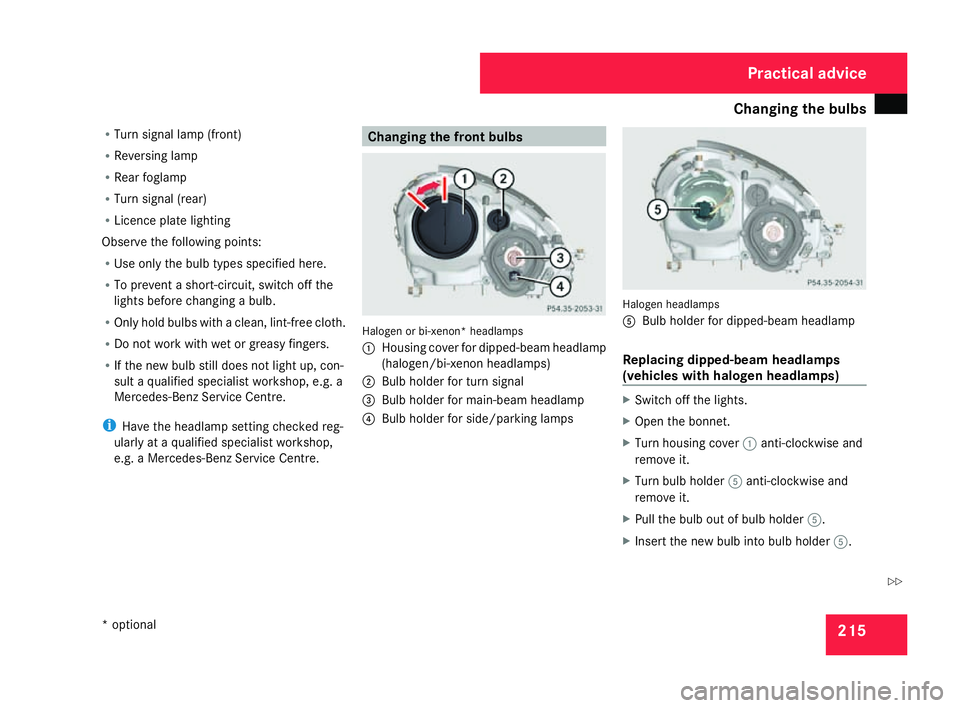
Halogen or bi-xenon* headlamps
1
Housing cover for dipped-beam headlam p
(halogen/bi-xenon headlamps)
2 Bulb holder for turn signa l
3 Bulb holder for main-beam headlamp
4 Bulb holder for side/parking lamps Halogen headlamps
5
Bulb holder for dipped-beam headlamp
Replacing dipped-beam headlamps
(vehicles with halogen headlamps) X
Switch off the lights.
X Open the bonnet.
X Turn housing cover 1anti-clockwise and
remove it.
X Turn bulb holder 5anti-clockwise and
remove it.
X Pull the bulb out of bulb holder 5.
X Insert the new bulb into bulb holder 5. Practical advice
* optional
171_AKB; 3; 4, en-GB
vpfaff7,
2007-11-13T10:50:25+01:00 - Seite 215 Z
Page 219 of 273
Changing the bulbs
216
X
Insert bulb holder 5into the lamp and tur n
it clockwise .
X Align housing cover 1and turn it clock -
wise.
Replacing main-beam headlamps (vehi-
cles with halogen headlamps) X
Switch off the lights .
X Open the bonnet.
X Turn bulb holder 3anti-clockwise and
remove it.
X Pull the bulb out of bulb holder 3.
X Insert the new bulb into bulb holder 3.
X Insert bulb holder 3into the headlamp
and turn it clockwise .
Changing the bulbs in the side lamps
and parking lamps X
Switch off the lights .
X Open the bonnet.
X Pull out bulb holder 4with the bulb.
X Pull the bulb out of bulb holder 4. X
Insert the new bulb into bulb holder 4.
X Insert bulb holder 4into the lamp.
Replacing the turn signal lamps X
Switch off the lights .
X Open the bonnet.
X Turn bulb holder 2anti-clockwise and
remove it together with the bulb.
X Unscrew the bulb from bulb holder 2
X Insert the new bulb into bulb holder 2.
X Insert bulb holder 2into the headlamp
and turn it clockwise . Changing the rear bulb
s
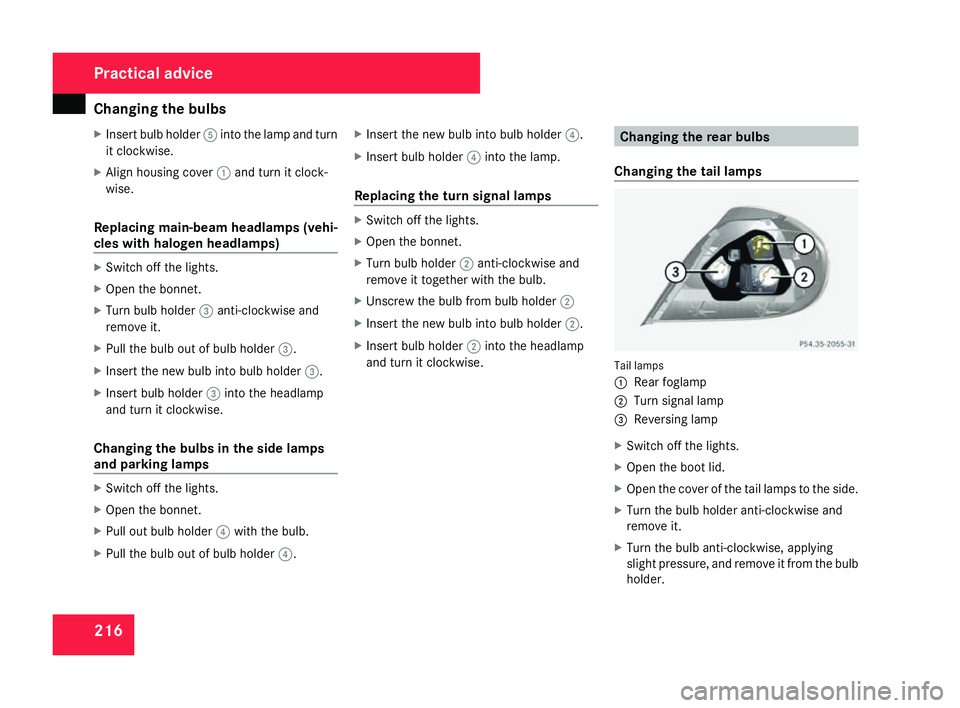
Changing the tail lamps Tail lamps
1
Rear foglamp
2 Turn signal lamp
3 Reversing lamp
X Switch off the lights .
X Open the boot lid.
X Open the cover of the tail lamps to the side.
X Turn the bulb holder anti-clockwise and
remove it.
X Turn the bulb anti-clockwise, applying
slight pressure, and remove it from the bulb
holder. Practical advice
171_AKB; 3; 4, en-GB
vpfaff7,
2007-11-13T10:50:25+01:00 - Seite 216
Page 220 of 273
Replacing the wiper blades
21
7
X
Insert the new bulb into the bulb holder and
turn it clockwise.
X Insert the bulb holder and turn it clockwise.
X Close the cover of the tail lamps .
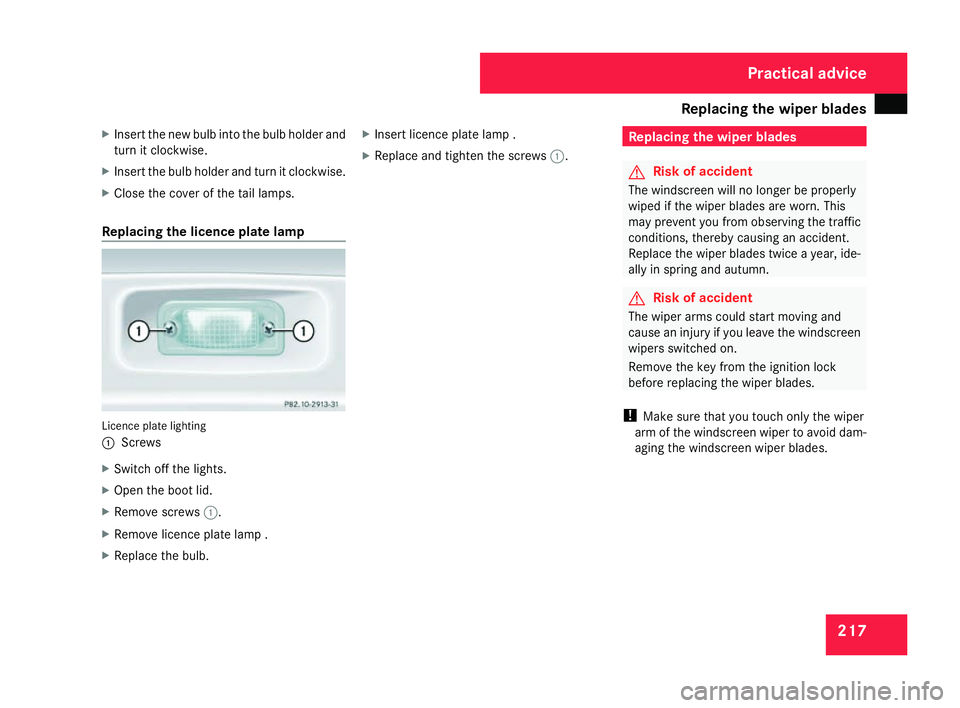
Replacing the licence plate lamp Licence plate lighting
1
Screw s
X Switch off the lights .
X Open the boot lid.
X Remove screws 1.
X Remove licence plate lamp .
X Replace the bulb. X
Insert licence plate lamp .
X Replace and tighten the screws 1. Replacing the wiper blades
G
Risk of accident
The windscreen will no longer be properly
wiped if the wiper blades are worn. Thi s
may prevent you from observing the traffic
conditions, thereby causing an accident.
Replace the wiper blades twice a year, ide-
ally in spring and autumn. G
Risk of accident
The wiper arms could start moving and
cause an injury if you leave the windscreen
wipers switched on.
Remove the key from the ignition lock
before replacing the wiper blades.
! Make sure that you touch only the wiper
arm of the windscreen wiper to avoid dam-
aging the windscreen wiper blades. Practical advice
171_AKB; 3; 4, en-G
B
vpfaff7, 2007-11-13T10:50:25+01:00 - Seite 217