Page 490 of 761

489 Controls in detail
Panorama roof with power tilt/sliding panel*
�Panorama roof with power tilt/sliding panel*
Roller sunblinds
The roller sunblinds are designed to pro-
tect you from excessive sunlight streaming
in through the panorama roof with power
tilt/sliding panel.
The front roller sunblind only operates with
the tilt/sliding panel closed. The front and
rear roller sunblind cannot be operated in-
dividually.
�Switch on the ignition (�page 344).Operating front roller sunblind
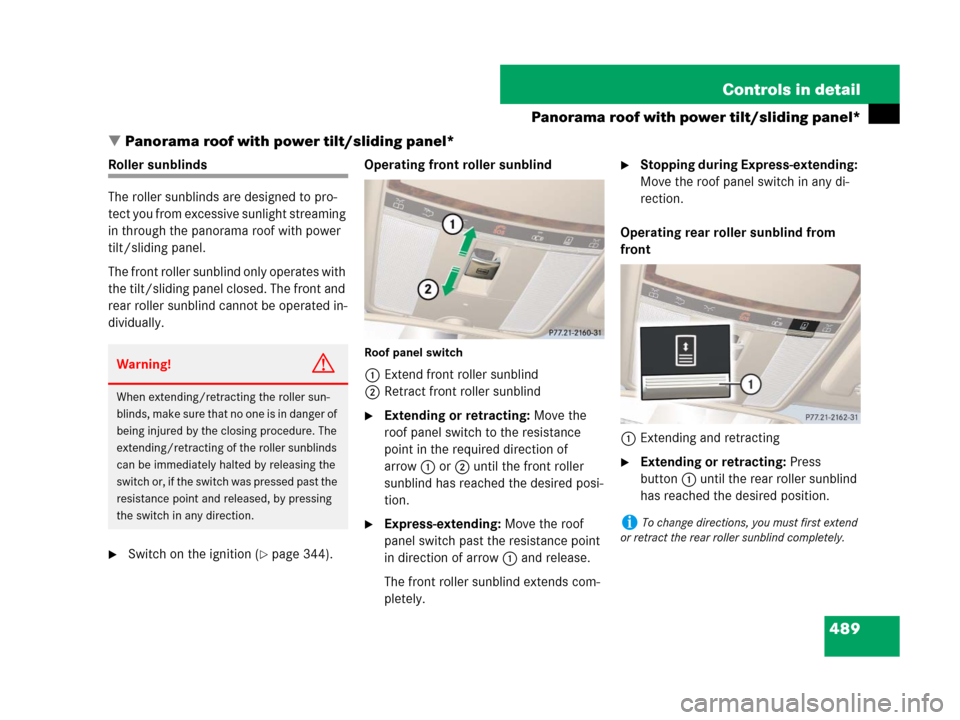
Roof panel switch
1Extend front roller sunblind
2Retract front roller sunblind
�Extending or retracting: Move the
roof panel switch to the resistance
point in the required direction of
arrow1 or2 until the front roller
sunblind has reached the desired posi-
tion.
�Express-extending: Move the roof
panel switch past the resistance point
in direction of arrow1 and release.
The front roller sunblind extends com-
pletely.
�Stopping during Express-extending:
Move the roof panel switch in any di-
rection.
Operating rear roller sunblind from
front
1Extending and retracting
�Extending or retracting: Press
button1 until the rear roller sunblind
has reached the desired position.
Warning!G
When extending/retracting the roller sun-
blinds, make sure that no one is in danger of
being injured by the closing procedure. The
extending/retracting of the roller sunblinds
can be immediately halted by releasing the
switch or, if the switch was pressed past the
resistance point and released, by pressing
the switch in any direction.
iTo change directions, you must first extend
or retract the rear roller sunblind completely.
Page 497 of 761
496 Controls in detail
Loading and storing
Parcel net in front passenger footwellA small convenience parcel net is located
in the front passenger footwell. It is for
small and light items, such as road maps,
mail, etc.Storage compartments in rear passen-
ger compartment
Armrest with integrated storage
compartment
Vehicles without control panel* in rear arm-
rest
�Opening: Pull release catch1 and
swing the cover upward.
Warning!G
The parcel net is intended for storing
light-weight items only.
Heavy objects, objects with sharp edges or
fragile objects may not be transported in the
parcel net. In an accident, during hard brak-
ing, or sudden maneuvers, they could be in-
jury to vehicle occupants.
The parcel net cannot protect transported
goods in the event of an accident.
!Before storing the armrest in the backrest,
close the storage compartment cover.
!Do not sit on or lean your body weight
against the armrest when it is folded down, as
you could otherwise damage it.
Page 499 of 761

498 Controls in detail
Loading and storing
Ruffled storage pockets
Ruffled storage pockets 1 are located on
the back of the front seats.Cup holders
Warning!G
Do not place objects with a combined
weight of more than 4.4 lbs (2 kg) into the
ruffled storage pocket. Otherwise, the Occu-
pant Classification System OCS (
�page 47)
may not be able to properly approximate the
occupant weight category.
The ruffled storage pocket is intended for
storing light-weight items only.
Heavy objects, objects with sharp edges or
fragile objects may not be transported in the
ruffled storage pocket. In an accident, dur-
ing hard braking, or sudden maneuvers, they
could be thrown around inside the vehicle
and cause injury to vehicle occupants.
The ruffled storage pocket cannot protect
transported goods in the event of an acci-
dent.
Warning!G
In order to help prevent spilling liquids on
vehicle occupants and/or vehicle equip-
ment, only use containers that fit into the
cup holder. Use lids on open containers and
do not fill containers to a height where the
contents, especially hot liquids, could spill
during braking, vehicle maneuvers, or in an
accident. Liquids spilled on vehicle occu-
pants may cause serious personal injury.
Liquids spilled on vehicle equipment may
cause damage not covered by the
Mercedes-Benz Limited Warranty.
When not in use, keep the cup holders
closed. An open cup holder may cause injury
to you or others when contacted during
braking, vehicle maneuvers, or in an acci-
dent.
Page 505 of 761

504 Controls in detail
Useful features
Opening ashtray
�Press mark on cover plate2 forward.
Removing ashtray insert
�Push sliding button1 to the left.
The ashtray is disengaged and slides
out a short way.
�Remove the insert from the ashtray
frame.
Reinstalling ashtray insert
�Install the insert by pushing it back into
the frame until it engages.
Closing ashtray
�Briefly press mark on cover plate2
forward.
Rear door ashtray
Opening ashtray
�Lift up the cover.Removing ashtray insert
1Insert
�Press the open cover outwards beyond
the stop.
Ashtray insert1 pops out of the hold-
er.
�Remove insert by pulling it upward.
Reinstalling ashtray insert
�Install the insert by pushing it back into
the frame until it engages.
Cigarette lighters
Warning!G
Never touch the heating element or sides of
the lighter; they are extremely hot. Hold the
knob only.
Make sure that any children traveling with
you do not injure themselves or start a fire
with the hot cigarette lighter.
When leaving the vehicle, always remove the
SmartKey or SmartKey with KEYLESS-GO*
from the starter switch, take it with you, and
lock the vehicle. Do not leave children unat-
tended in the vehicle, or with access to an
unlocked vehicle. A child’s unsupervised ac-
cess to a vehicle could result in an accident
and/or serious personal injury.
To avoid possible injury to children sitting in
the rear seat, activate the override switch
(
�page 63). Activation of the override
switch deactivates the rear center console
lighter.
Page 507 of 761

506 Controls in detail
Useful features
Power outlet
The power outlet is located in the rear cen-
ter console.
�Switch on the ignition (�page 344).
�Flip up cover1 and insert electrical
plug (cigarette lighter type).
Floormats*
1Retainer pin
2Eyelet
Removing
�Pull floormat off of retainer pins1.
�Remove the floormat.
Installing
�Lay down the floormat in the respective
footwell.
�Press the floormat eyelets2 onto re-
tainer pins1.
iThe power outlet can be used to
accommodate 12V DC electrical accessories
(e.g. air pump, auxiliary lamps) up to a maximum
of 180 W.
If the engine is off and the outlet is being used
extensively, the vehicle battery may become dis-
charged.
Warning!G
Whenever you are using floormats, make
sure there is enough clearance and that the
floormats are securely fastened.
Floormats should always be securely fas-
tened using the eyelets and the retainer
pins.
Before driving off, check that the floormats
are securely in place and adjust them if nec-
essary. A loose floormat could slip and
hinder proper functioning of the pedals.
Do not place several floormats on top of
each other as this may impair pedal move-
ment.
iTo install or remove the floormat more easi-
ly, move the driver’s seat or front passenger seat
as far to the rear as possible (
�page 347).
Page 535 of 761

534 Operation
Driving instructions
For more information on winter driving, see
“Winter driving” (
�page 580).
Standing water
Warning!G
Make sure not to endanger any other road
users when carrying out these braking ma-
neuvers.
Warning!G
If the vehicle becomes stuck in snow, make
sure that snow is kept clear of the exhaust
pipe and from around the vehicle with the
engine running. Otherwise, deadly carbon
monoxide (CO) gases may enter vehicle in-
terior resulting in unconsciousness and
death.
To assure sufficient fresh air ventilation,
open a window slightly on the side of the ve-
hicle not facing the wind.
Warning!G
The outside temperature indicator is not de-
signed to serve as an ice-warning device and
is therefore unsuitable for that purpose. In-
dicated temperatures just above the freez-
ing point do not guarantee that the road
surface is free of ice.!Do not drive through flooded areas or water
of unknown depth. Before driving through water,
determine its depth. Never accelerate before
driving into water. The bow wave could force wa-
ter into the engine and auxiliary equipment, thus
damaging them.
If you must drive through standing water, drive
slowly to prevent water from entering the pas-
senger compartment or the engine compart-
ment. Water in these areas could cause damage
to electrical components or wiring of the engine
or transmission, or could result in water being in-
gested by the engine through the air intake caus-
ing severe internal engine damage. Any such
damage is not covered by the Mercedes-Benz
Limited Warranty.
Page 542 of 761

541 Operation
Engine compartment
�Engine compartment
Hood
Opening1Release lever
�Pull release lever 1.
The hood is unlocked.
2Handle for opening the hood
�Lift the hood slightly.
Handle2 will extend out of the radia-
tor grille.
�Pull handle 2 to its stop out of radiator
grille.
�Lift bottom of hood at edge of radiator
grille.
The hood will be automatically held
open at shoulder height by gas-filled
struts.
Warning!G
Do not pull the release lever while the vehi-
cle is in motion. Otherwise the hood could
be forced open by passing air flow.
This could cause the hood to come loose
and injure you and/or others.
Warning!G
You could be injured when the hood is open
– even when the engine is turned off.
Parts of the engine can become very hot. To
prevent burns, let the engine cool off com-
pletely before touching any components on
the vehicle. Comply with all relevant safety
precautions.
!To avoid damage to the windshield wipers or
hood, never open the hood if the wiper arms are
folded forward away from the windshield.
!To avoid damage to handle2 never pull up
the hood on handle2.
��
Page 553 of 761

552 Operation
Tires and wheels
Tread depth
Do not allow your tires to wear down too
far. Adhesion properties on wet roads are
sharply reduced at tread depths of less
than
1/8in (3 mm).
Treadwear indicators (TWI) are required by
law. These indicators are located in six
places on the tread circumference and
become visible at a tread depth of approx-
imately
1/16in (1.6 mm), at which point the
tire is considered worn and should be re-
placed.
Recommended minimum tire tread depth:
�Summer tires 1/8in (3 mm)
�Winter tires 1/6in (4 mm)
1TWI (T
readWear Indicator)
The treadwear indicator appears as a solid
band across the tread.Storing tires
Cleaning tiresWarning!G
Although the applicable federal motor safety
laws consider a tire to be worn when the
treadwear indicators (TWI) become visible at
approximately
1/16in (1.6 mm), we recom-
mend that you do not allow your tires
to wear down to that level. As tread depth
approaches 1/8in (3 mm), the adhesion
properties on a wet road are sharply re-
duced.
Depending upon the weather and/or road
surface (conditions), the tire traction varies
widely.!Keep unmounted tires in a cool, dry place
with as little exposure to light as possible. Pro-
tect tires from contact with oil, grease and gaso-
line.
!Never use a round nozzle to power wash
tires. The intense jet of water can result in dam-
age to the tire.
Always replace a damaged tire.