Page 30 of 761

29 At a glance
Instrument cluster
ItemPage
1Coolant temperature gauge417
2Fuel gauge with:
Fuel tank reserve warning
lamp
AHigh beam headlamp
indicator lamp
-ABS indicator lamp
=SRS indicator lamp
605
375
598
607
3Parktronic*/Park Assist*
warning indicator for left
front area 446,
451
4Multifunction display with:
Speedometer
0
USA only
!
Canada onlyElectronic
parking brake
warning or indi-
cator lamps600
ItemPage
;
USA only
3
Canada onlyBrake warning
lamp599
HCombination low tire
pressure/TPMS mal-
function telltale, USA
only
Low tire pressure*
telltale, Canada only608
LLeft turn signal
indicator lamp393
KRight turn signal
indicator lamp393
vESP® warning lamp604
lDistance warning
lamp*178,
427,
604
1Vehicles without DISTRONIC Plus*: Warning lamp
without function. It illuminates when the ignition is
on. It should go out when the engine is running.
ItemPage
5Parktronic*/Park Assist*
warning indicator for right
front area 446,
451
6Gear position/range
indicator 408
7Tachometer with:
±Engine malfunction
indicator lamp602
8Selected program mode indi-
cator 410
9Main menu for control sys-
tem, multifunction display264
aOutside temperature 418
bDisplay with:
Additional speedometer282
:PRE-SAFE® Brake*
indicator279
Page 32 of 761

31 At a glance
Control systems
ItemPage
1Lto cancel Voice
Control*
back287
265
2$to scroll up
%to scroll down
&to scroll to the right
(to scroll to the left
#to confirm selection
3Multifunction display 264
4sto take a call
to dial
to redial
tto end a call
to reject an incoming
call
æto increase volume
çto decrease volume
Fto mute276
276
ItemPage
5!to activate Voice
Control*
to accept a call287
142
6Instrument cluster illumina-
tion417
7Swivel COMAND display 87
8COMAND display illumination87
9COMAND display86
aCD/DVD changer115
bPCMCIA card slot117
cFavorite button238
dRear head restraints retract
button354
eProgram mode selector
switch for:
�automatic transmission
shift program
�suspension tuning of
Airmatic (only S 550) or
ABC*
409
440
442
ItemPage
fShortcut button for:
�CD/DVD
�radio
120
101
gBack button94
hHazard warning flasher377
jSeat menu259
kShortcut button for:
�telephone*
�navigation
132
166
lCOMAND on/off button86
mVolume control96
nMute button96
oTelephone keypad134
pCOMAND controller88
Page 48 of 761

automatically tur")
47 Safety and Security
Occupant safety
The window curtain air bags fill up the area
indicated by the arrows.
Occupant Classification System
The Occupant Classification System (OCS)
automatically turns the front passenger
front air bag on or off based on the classi-
fied occupant weight category determined
by weight sensor readings from the front
passenger seat.
Occupants must sit properly belted in a po-
sition that is as upright as possible with
their back against the seat backrest and
feet on the floor to be correctly classified.
If the occupant’s weight is transferred to
another object in the vehicle (e.g. by lean-
ing on armrests), the OCS may not be able
to properly approximate the occupant’s
weight category.Furthermore, the occupant weight may ap-
pear to increase or decrease due to
objects hanging on the seat, other passen-
gers pushing on the seat, objects lodged
underneath the seat or stuffed between
seat and middle console or between seat
and door or due to objects applying pres-
sure on the back of the seat. Always make
sure that the seat has clearance in all
directions at all times.
Both driver and the front passenger should
always use the 59indicator
lamp as an indication of whether or not the
front passenger is properly positioned.
iThe system does not deactivate the front
passenger side impact air bag, the window cur-
tain air bag and the emergency tensioning de-
vice.
iIf your seat, including your trim cover and
cushion needs to be serviced in any way, take
the vehicle to an authorized Mercedes-Benz
Center.
Only seat accessories approved by
Mercedes-Benz may be used.
Warning!G
If the 59indicator lamp illumi-
nates when an adult or someone larger than
a small individual is in the front passenger
seat, have the front passenger re-position
himself or herself in the seat until the
59indicator lamp goes out, or
check whether objects are caught under or
around the seat.
More information about air bag display mes-
sages (
�page 618).
In the event of a collision, the air bag control
unit will not allow front passenger front air
bag deployment when the OCS classified
the front passenger seat occupant as being
up to or less than the weight of a typical
12-month-old child in a standard child re-
straint or if the front passenger seat is
sensed as being empty.
��
Page 86 of 761
 is an information and operating
center for vehicle sound and communica-
tions systems, includi")
85 Control systems
COMAND introduction
�COMAND introduction
COMAND (Cockpit Management and Data
System) is an information and operating
center for vehicle sound and communica-
tions systems, including the radio and nav-
igation system, as well as other optional
equipment (satellite radio*, telephone*,
etc.).
Availability of functions while the vehi-
cle is in motion
For safety reasons, certain COMAND func-
tions are not available while the vehicle is
in motion or they are only available to a
limited extent. You will notice this, for ex-
ample, by the fact that certain menu items
cannot be selected or that the COMAND
display shows a corresponding message.
Switching COMAND on or off
�Press the o shortcut button in the
center console (
�page 86).
COMAND calls up the menu last select-
ed.
COMAND components
In your vehicle, COMAND can be used to
operate:
�audio functions
�the navigation system
�the telephone* and communication
functions (SMS*)
�Video DVD (USA only)
�various vehicle settings
COMAND consists of the following:
�COMAND shortcut buttons
�COMAND display
�telephone* keypad
�COMAND controller
iWhen you switch off COMAND, you also
switch off the currently playing audio source.
During a telephone call, you cannot switch off
COMAND.
Page 87 of 761
86 Control systems
COMAND introduction
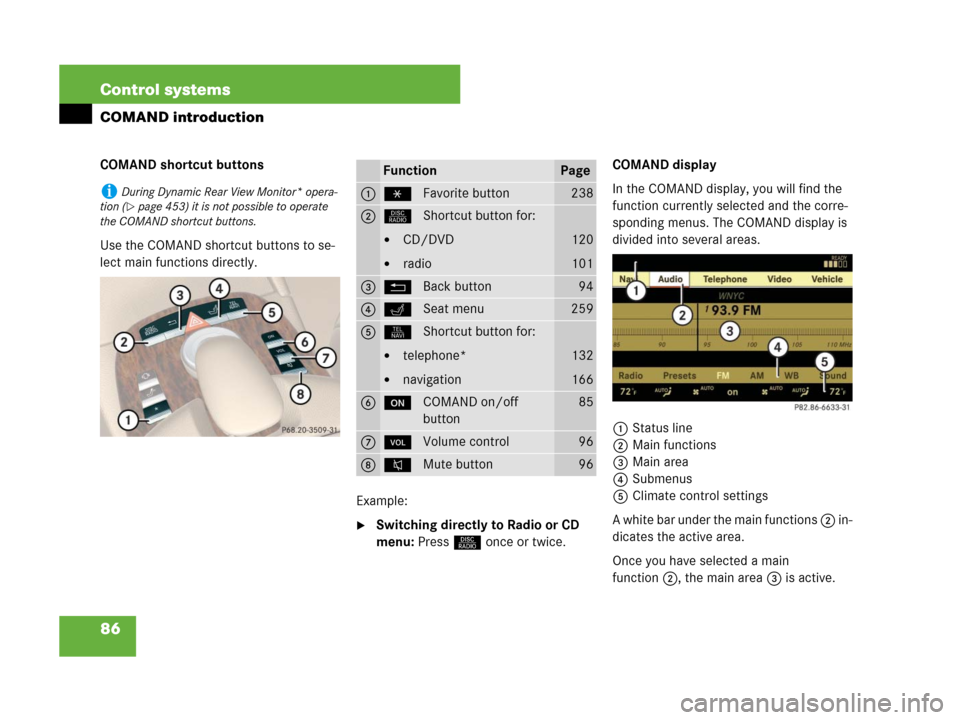
COMAND shortcut buttons
Use the COMAND shortcut buttons to se-
lect main functions directly.
Example:
�Switching directly to Radio or CD
menu: Press M once or twice.COMAND display
In the COMAND display, you will find the
function currently selected and the corre-
sponding menus. The COMAND display is
divided into several areas.
1Status line
2Main functions
3Main area
4Submenus
5Climate control settings
A white bar under the main functions 2 in-
dicates the active area.
Once you have selected a main
function2, the main area 3 is active.
iDuring Dynamic Rear View Monitor* opera-
tion (
�page 453) it is not possible to operate
the COMAND shortcut buttons.
FunctionPage
1PFavorite button238
2MShortcut button for:
�CD/DVD
�radio
120
101
3LBack button94
4OSeat menu259
5NShortcut button for:
�telephone*
�navigation
132
166
6oCOMAND on/off
button85
7,Volume control96
8FMute button96
Page 88 of 761
87 Control systems
COMAND introduction
Instrument cluster multifunction
display
This section describes features and con-
trols via the COMAND controller, display
and shortcut buttons only.
Please refer to the “Instrument cluster
control system” section of this manual
(
�page 264) for function descriptions and
operation of the instrument cluster multi-
function display and multifunction steering
wheel buttons as they relate to COMAND
features described in this section.Adjusting COMAND display
illumination
1Knob
�Brightening illumination: Turn
knob1 clockwise.
�Dimming illumination: Turn knob1
counterclockwise.Swiveling COMAND display
1Button for swiveling display to the left
2Button for swiveling display to the right
You can swivel the COMAND display to the
left or right. The buttons are on the
right-hand side of the instrument cluster.
iThe layout of the menus may vary depending
on your vehicle’s equipment. This manual shows
the menus for a fully equipped vehicle.
Page 89 of 761
88 Control systems
COMAND introduction
Telephone keypad*
With the help of the telephone keypad, you
can use your mobile phone if it is inserted
in the cradle.
1Telephone keypad
2Folding coverCOMAND controller
Use the COMAND controller to select
menu functions shown on the COMAND
display.
1COMAND controllerYou can operate the COMAND controller
as follows:
�press briefly or press and hold
�rotate to the left or right
�slide to the left, right, up, down or
diagonally
In this way, you can move through the
menus, select menu items or exit menus.
You can move through the menus either by
rotating or sliding the controller.
Operating COMAND controller
Page 91 of 761
90 Control systems
COMAND introduction
Operating COMAND
Menu overview
The illustration below shows the structure
of the main functions and their main
menus.Each main function has a main menu. Each
menu item in the main menu in turn has
several submenu items.
NaviPageAudioPageTelephone*Page
Commands/menus
Map Display168FM/AM Radio100Telephone*132
Mode171Sat Radio* (USA only)105Address Book*224
CD112Telephone OFF*134
DVD-Audio112
MP3112
Audio OFF99