Page 483 of 761
482 Controls in detail
Trunk
Vehicles without KEYLESS-GO*
1Trunk closing switch
Vehicles with KEYLESS-GO*
1Trunk closing switch
�Press trunk closing switch1 briefly.
The trunk closes.
Closing trunk and locking vehicle from
outside (vehicles with KEYLESS-GO*)
In vehicles with trunk opening/closing sys-
tem* and KEYLESS-GO*, you can close the
trunk and lock the vehicle simultaneously
from the outside using the KEYLESS-GO
locking/closing switch.1KEYLESS-GO locking/closing switch
�Make sure you have the SmartKey with
KEYLESS-GO with you.
�Press switch1 briefly.
With all doors closed:
�The locking knobs in the doors
move down.
�The trunk starts to close automati-
cally.
�All turn signal lamps flash three
times to confirm locking once the
trunk has closed completely.
iIf the trunk lid comes into contact with an
object while closing (e.g. luggage that has been
piled too high) in the upper motion sequence, the
closing procedure is stopped and the trunk re-
opens slightly.
Page 484 of 761
.
�The anti-theft alarm system is
armed.Closing trunk from inside
automatically*
In vehicles")
483 Controls in detail
Trunk
�An acoustic signal sounds three
times (if equipped and feature acti-
vated).
�The anti-theft alarm system is
armed.Closing trunk from inside
automatically*
In vehicles with trunk opening/closing sys-
tem* you can close the trunk from the in-
side using the remote trunk opening/
closing* switch.
1Remote trunk opening/closing* switch
(vehicles with trunk opening/closing
system*)
iIf the trunk lid comes into contact with an
object while closing (e.g. luggage that has been
piled too high) in the upper motion sequence, the
closing procedure is stopped and the trunk re-
opens slightly.
Warning!G
Maintain sight of trunk area while operating
door mounted switch. Monitor the closing
procedure carefully to make sure no one is
in danger of being injured.
To interrupt the closing procedure, release
the door mounted remote trunk open-
ing/closing* switch.
Even with the SmartKey or SmartKey with
KEYLESS-GO* removed from the starter
switch or the SmartKey with KEYLESS-GO*
removed from the vehicle, the remote trunk
opening/closing* switch can be operated.
Therefore, do not leave children unattended
i n t h e v e h i c l e , o r w i t h a c c e s s t o a n u n l o c k e d
vehicle. A child’s unsupervised access to a
vehicle could result in an accident and/or
serious personal injury.
iIf the trunk lid comes into contact with an
object while closing (e.g. luggage that has been
piled too high) in the upper motion sequence, the
closing procedure is stopped and the trunk re-
opens slightly.
��
Page 485 of 761

484 Controls in detail
Trunk
�Press and hold switch1 until the
trunk is closed.
The indicator lamp in the switch goes
out when the trunk is closed.
To interrupt the closing procedure:
�Release switch1.
Trunk emergency release
With the emergency release button, the
trunk can be opened from inside the trunk.
1Emergency release button
�Briefly press emergency release
button1.The trunk opens.
Illumination of the emergency release but-
ton:
�The button will flash for 30 minutes af-
ter opening the trunk.
�The button will flash for 60 minutes af-
ter closing the trunk.
Valet locking
1Neutral position
2Locked
�Close the trunk (�page 480).
�Remove the mechanical key from the
SmartKey (
�page 671).
�Insert the mechanical key in the trunk
lid lock.
iThe emergency release button unlocks and
opens the trunk while the vehicle is standing still
or in motion.
iThe emergency release button does not
open the trunk if the vehicle battery is dis-
charged or disconnected.
iTo deny any unauthorized person access to
the trunk, e.g. when you valet park the vehicle,
lock it separately with the mechanical key. Leave
only the SmartKey or SmartKey with
KEYLESS-GO* less its mechanical key with the
vehicle.
��
Page 486 of 761
485 Controls in detail
Trunk
�Turn the mechanical key clockwise to
position 2 to lock the trunk.
The trunk remains locked even when the
vehicle is centrally unlocked.
�Insert the mechanical key in the trunk
lid lock.
�Turn the mechanical key counterclock-
wise to neutral position 1 to unlock the
trunk.
You can now open the trunk
(
�page 479).
iYou can only cancel the separate trunk lock-
ing mode by means of the mechanical key.
Page 494 of 761

493 Controls in detail
Loading and storing
�Loading and storing
Roof rack*
�Flip the covers upward.
�Only attach the roof-rack system to the
anchorage points under the covers.
Observe manufacturer’s instructions
for installation.
Loading instructions
The total load weight including vehicle oc-
cupants and luggage/cargo should not
exceed the load limit as indicated on the
corresponding placard located on the driv-
er’s door B-pillar (
�page 553).
Warning!G
Only use roof racks approved by
Mercedes-Benz for your vehicle model to
avoid damage to the vehicle.
Follow the manufacturer’s installation
instructions. Otherwise, an improperly
attached roof rack system or its load could
become detached from the vehicle.
Do not exceed the maximum roof load of
220 lb (100 kg).
Take into consideration that when the roof
rack is loaded, the handling characteristics
are different from those when operating the
vehicles without the roof rack loaded.
!Load the roof rack in such a way that the ve-
hicle cannot be damaged while driving.
Make sure
�you can fully raise tilt/sliding sunroof or the
panorama roof with tilt/sliding panel*
�you can fully open the trunk
Warning!G
Always fasten items being carried as secure-
ly as possible using cargo tie-down hooks
and fastening materials appropriate for the
weight and size of the load.
In an accident, during hard braking or sud-
den maneuvers, loose items will be thrown
around inside the vehicle and can cause in-
jury to vehicle occupants unless the items
are securely fastened in the vehicle.
��
Page 495 of 761

494 Controls in detail
Loading and storing
Storage compartments Storage compartments in the front pas-
senger compartment
Glove box
The glove box can be unlocked and locked
with the mechanical key (
�page 671).
�Opening: Press glove box lid
release1.
�Closing: Push the lid up.
To help avoid personal injury during a colli-
sion or sudden maneuver, exercise care
when transporting cargo. Put luggage or car-
go in the trunk if possible.
Do not pile luggage or cargo higher than the
seat backs. Do not place anything on the
rear-window shelf.
Never drive vehicle with trunk open. Deadly
carbon monoxide (CO) gases may enter ve-
hicle interior resulting in unconsciousness
and death.
Warning!G
To help avoid personal injury during a colli-
sion or sudden maneuver, exercise care
when storing objects in the vehicle. Put lug-
gage or cargo in the trunk if possible. Do not
pile luggage or cargo higher than the seat
backs.
Parcel nets cannot secure hard or heavy ob-
jects.
Keep compartment lids closed. This will help
to prevent stored objects from being thrown
about and injuring vehicle occupants during
�braking
�vehicle maneuvers or
�an accident.
iAn overview of the storage compartments
can be found on (
�page 36).
1Glove box lid release
2Unlocking glove box
3Locking glove box
��
Page 501 of 761
500 Controls in detail
Loading and storing
Trunk
Storage spaces under trunk floor
You can place a suitcase in the hollow un-
der the front part of the trunk floor.
1Trunk floor
2Storage spaces1Storage space
2Trunk floorCargo tie-down hooks
4 hooks are located in the trunk.
�Carefully secure cargo by applying
even load on all hooks with rope of suf-
ficient strength to hold down the cargo.
!Fold down the suitcase handle before clos-
ing the trunk to avoid damaging the trunk lid.
Page 502 of 761
501 Controls in detail
Loading and storing
Retaining hooks
A hook is located on the upper edge of the
trunk and can be used to attach cargo
items such as bags.
1Tab
2Retaining hook
�Pull tab1 of retaining hook2 down.Parcel net in trunk
There is a pocket net on each side of the
right and left trunk side walls to secure
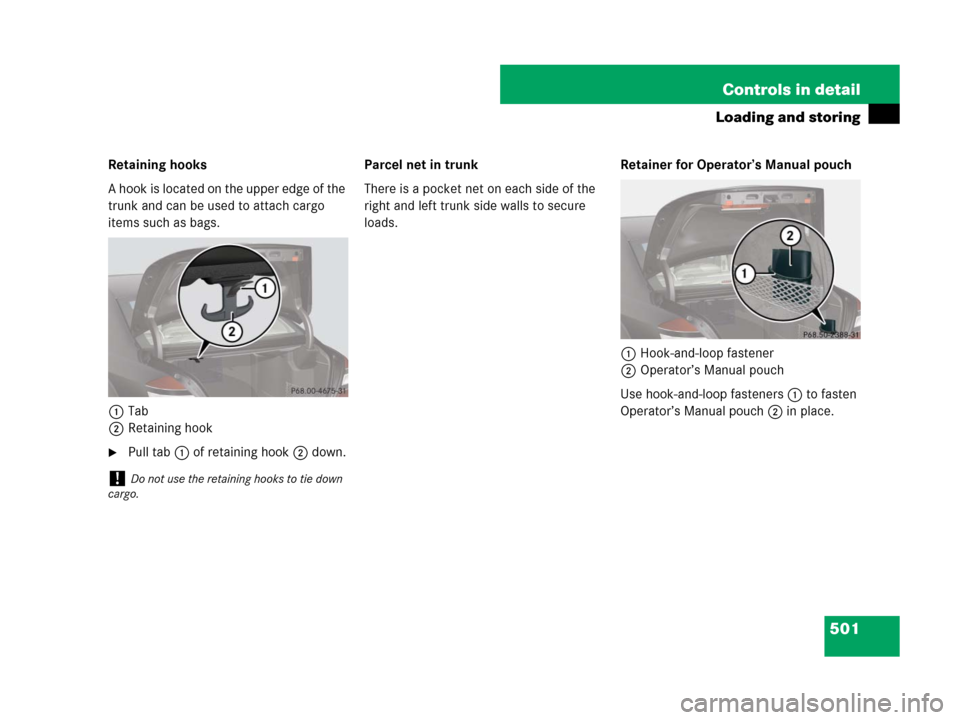
loads.Retainer for Operator’s Manual pouch
1Hook-and-loop fastener
2Operator’s Manual pouch
Use hook-and-loop fasteners1 to fasten
Operator’s Manual pouch2 in place.
!Do not use the retaining hooks to tie down
cargo.