Page 136 of 569
135 Controls in detail
Seats
�To move seat backrest back, lean
lightly against backrest.
�To move seat backrest forward, lean
forward with handle 1 pulled and held
at resistance point.
The seat backrest will move forward
against your back.
�Release handle 1 when the seat back-
rest has reached the desired position.
To make sure the seat backrest has
engaged, lean firmly against the back-
rest.Seat backrest tilt (third-row seats)
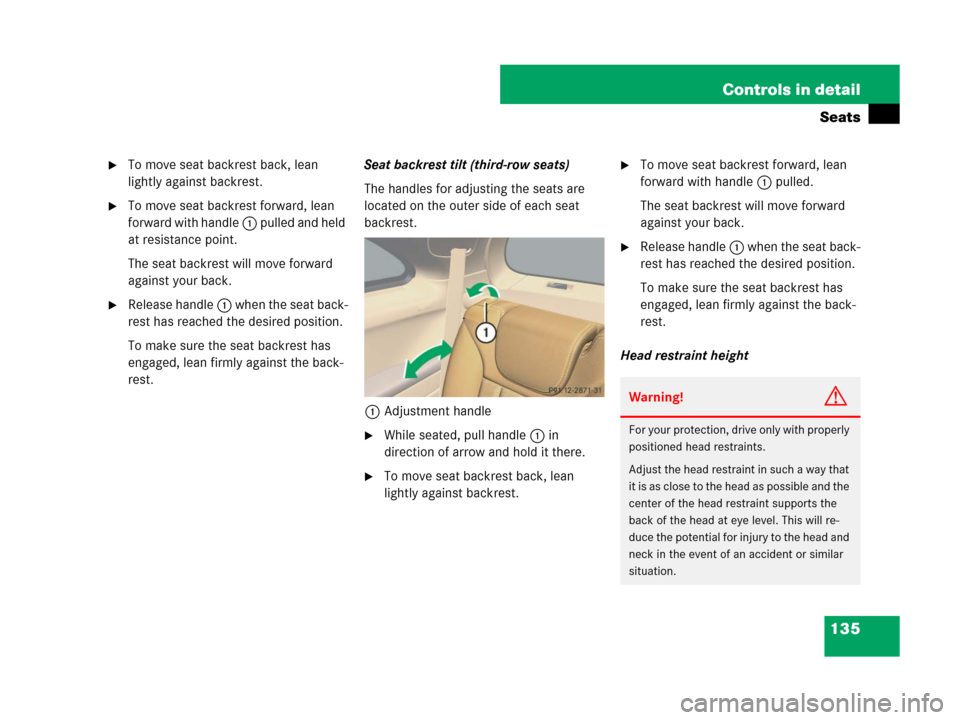
The handles for adjusting the seats are
located on the outer side of each seat
backrest.
1Adjustment handle
�While seated, pull handle 1 in
direction of arrow and hold it there.
�To move seat backrest back, lean
lightly against backrest.
�To move seat backrest forward, lean
forward with handle 1 pulled.
The seat backrest will move forward
against your back.
�Release handle 1 when the seat back-
rest has reached the desired position.
To make sure the seat backrest has
engaged, lean firmly against the back-
rest.
Head restraint height
Warning!G
For your protection, drive only with properly
positioned head restraints.
Adjust the head restraint in such a way that
it is as close to the head as possible and the
center of the head restraint supports the
back of the head at eye level. This will re-
duce the potential for injury to the head and
neck in the event of an accident or similar
situation.
Page 137 of 569
136 Controls in detail
Seats
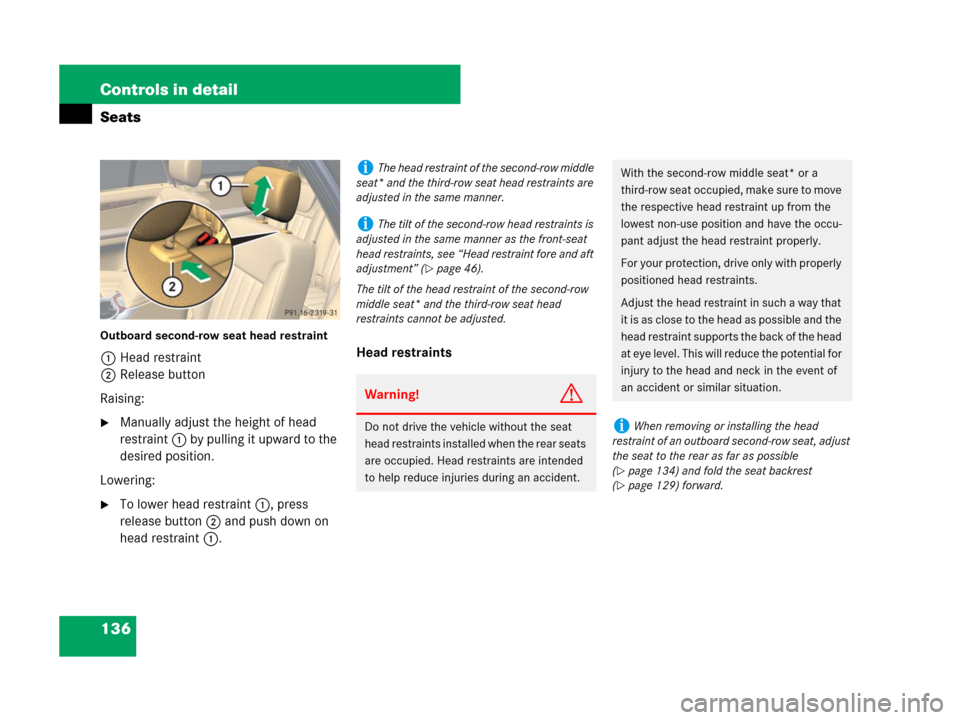
Outboard second-row seat head restraint
1Head restraint
2Release button
Raising:
�Manually adjust the height of head
restraint 1 by pulling it upward to the
desired position.
Lowering:
�To lower head restraint 1, press
release button2 and push down on
head restraint 1.Head restraints
iThe head restraint of the second-row middle
seat* and the third-row seat head restraints are
adjusted in the same manner.
iThe tilt of the second-row head restraints is
adjusted in the same manner as the front-seat
head restraints, see “Head restraint fore and aft
adjustment” (
�page 46).
The tilt of the head restraint of the second-row
middle seat* and the third-row seat head
restraints cannot be adjusted.
Warning!G
Do not drive the vehicle without the seat
head restraints installed when the rear seats
are occupied. Head restraints are intended
to help reduce injuries during an accident.
With the second-row middle seat* or a
third-row seat occupied, make sure to move
the respective head restraint up from the
lowest non-use position and have the occu-
pant adjust the head restraint properly.
For your protection, drive only with properly
positioned head restraints.
Adjust the head restraint in such a way that
it is as close to the head as possible and the
head restraint supports the back of the head
at eye level. This will reduce the potential for
injury to the head and neck in the event of
an accident or similar situation.
iWhen removing or installing the head
restraint of an outboard second-row seat, adjust
the seat to the rear as far as possible
(
�page 134) and fold the seat backrest
(
�page 129) forward.
Page 138 of 569
137 Controls in detail
Seats
Removing head restraints
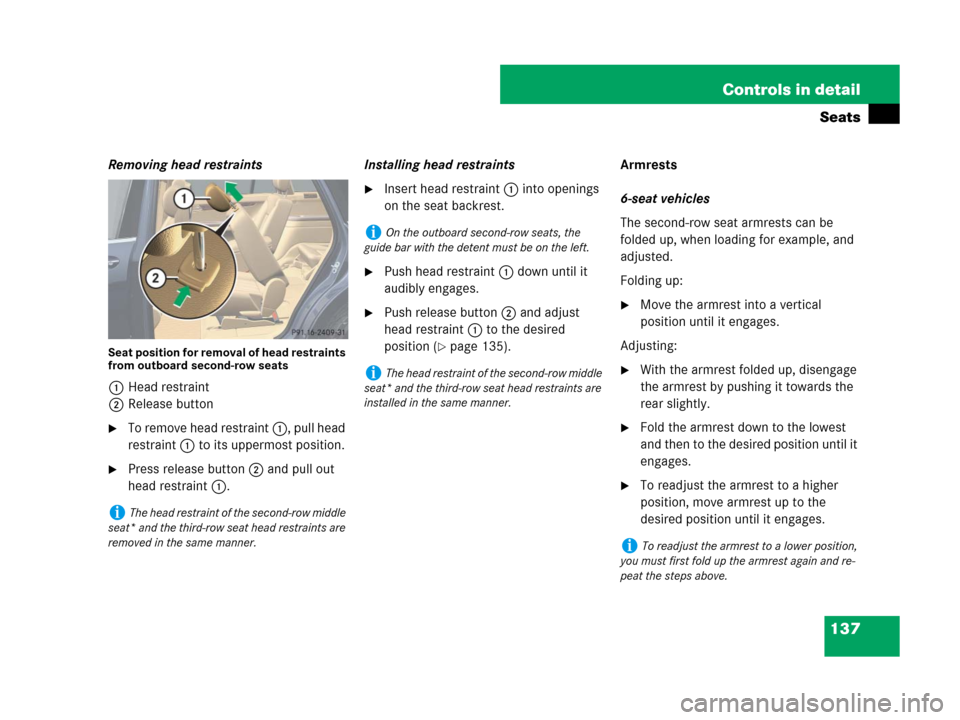
Seat position for removal of head restraints
from outboard second-row seats
1Head restraint
2Release button
�To remove head restraint 1, pull head
restraint 1 to its uppermost position.
�Press release button2 and pull out
head restraint 1.Installing head restraints
�Insert head restraint 1 into openings
on the seat backrest.
�Push head restraint 1 down until it
audibly engages.
�Push release button2 and adjust
head restraint 1 to the desired
position (
�page 135).Armrests
6-seat vehicles
The second-row seat armrests can be
folded up, when loading for example, and
adjusted.
Folding up:
�Move the armrest into a vertical
position until it engages.
Adjusting:
�With the armrest folded up, disengage
the armrest by pushing it towards the
rear slightly.
�Fold the armrest down to the lowest
and then to the desired position until it
engages.
�To readjust the armrest to a higher
position, move armrest up to the
desired position until it engages.
iThe head restraint of the second-row middle
seat* and the third-row seat head restraints are
removed in the same manner.
iOn the outboard second-row seats, the
guide bar with the detent must be on the left.
iThe head restraint of the second-row middle
seat* and the third-row seat head restraints are
installed in the same manner.
iTo readjust the armrest to a lower position,
you must first fold up the armrest again and re-
peat the steps above.
Page 139 of 569
138 Controls in detail
Seats
7-seat vehicles*
You can use the seat backrest of the
second-row middle seat as an armrest for
the outboard seats.
�Before folding the seat, completely
lower the head restraint of the
second-row middle seat (
�page 135).
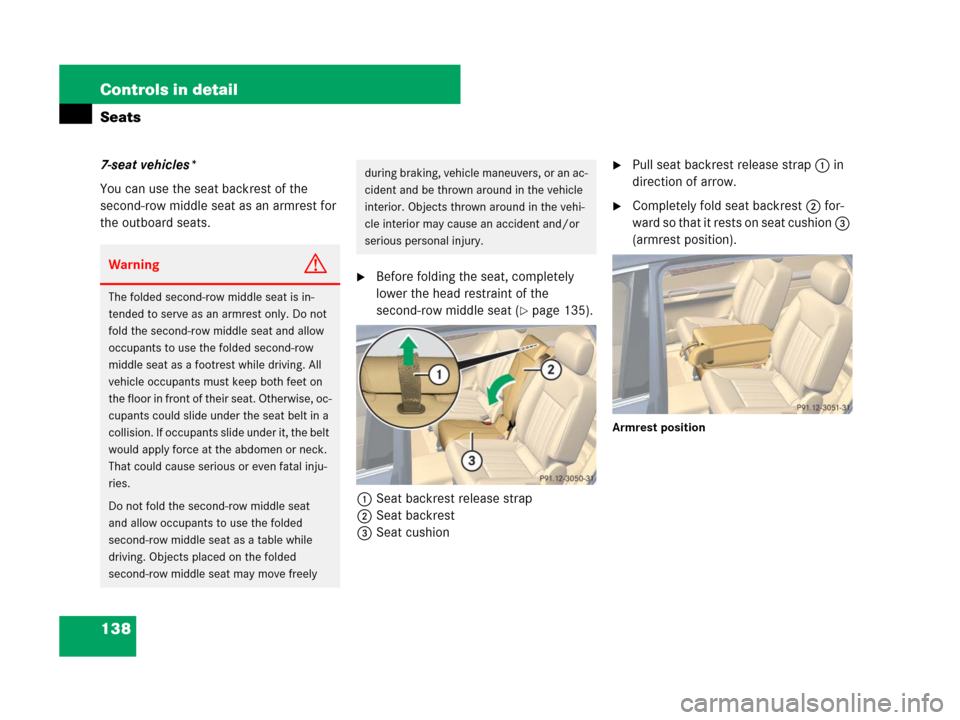
1Seat backrest release strap
2Seat backrest
3Seat cushion
�Pull seat backrest release strap 1 in
direction of arrow.
�Completely fold seat backrest 2 for-
ward so that it rests on seat cushion 3
(armrest position).
Armrest position
WarningG
The folded second-row middle seat is in-
tended to serve as an armrest only. Do not
fold the second-row middle seat and allow
occupants to use the folded second-row
middle seat as a footrest while driving. All
vehicle occupants must keep both feet on
the floor in front of their seat. Otherwise, oc-
cupants could slide under the seat belt in a
collision. If occupants slide under it, the belt
would apply force at the abdomen or neck.
That could cause serious or even fatal inju-
ries.
Do not fold the second-row middle seat
and allow occupants to use the folded
second-row middle seat as a table while
driving. Objects placed on the folded
second-row middle seat may move freely
during braking, vehicle maneuvers, or an ac-
cident and be thrown around in the vehicle
interior. Objects thrown around in the vehi-
cle interior may cause an accident and/or
serious personal injury.
Page 140 of 569
139 Controls in detail
Seats
Seat heating*
The switches for front-seat heating are lo-
cated in the center console.
Front seat heating
1Seat heating switch
2Indicator lampsThe switches for the outboard second-row
seats are located in the rear center
console.
Outboard second-row seat heating
1Seat heating switch
2Indicator lampsThe red indicator lamps in the switch come
on to show which heating level you have
selected.
�Switch on the ignition (�page 39).
Level
3Three indicator lamps on
(highest level)
The seat heating automatically
switches to level 2 after approxi-
mately 5 minutes.
2Two indicator lamps on
The seat heating automatically
switches to level 1 after approxi-
mately 10 minutes.
1One indicator lamp on
(lowest level)
The seat heating automatically
switches off after approximately
20 minutes.
offNo indicator lamp on.
Page 141 of 569
140 Controls in detail
Seats
Switching on
�Press switch1.
Three red indicator lamps2 in the
switch come on.
�Continue pressing switch1 until
desired seat heating level is reached.
Switching off
�Press switch1 repeatedly until all
indicator lamps2 go out.
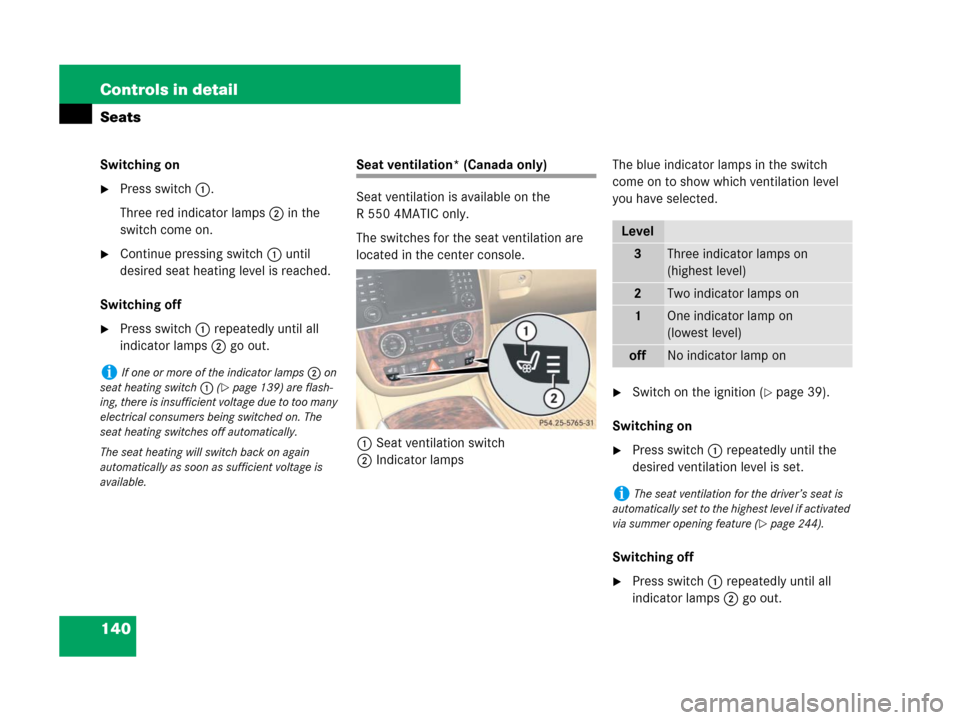
Seat ventilation* (Canada only)
Seat ventilation is available on the
R 550 4MATIC only.
The switches for the seat ventilation are
located in the center console.
1Seat ventilation switch
2Indicator lampsThe blue indicator lamps in the switch
come on to show which ventilation level
you have selected.
�Switch on the ignition (�page 39).
Switching on
�Press switch1 repeatedly until the
desired ventilation level is set.
Switching off
�Press switch1 repeatedly until all
indicator lamps2 go out.
iIf one or more of the indicator lamps2 on
seat heating switch 1 (
�page 139) are flash-
ing, there is insufficient voltage due to too many
electrical consumers being switched on. The
seat heating switches off automatically.
The seat heating will switch back on again
automatically as soon as sufficient voltage is
available.
Level
3Three indicator lamps on
(highest level)
2Two indicator lamps on
1One indicator lamp on
(lowest level)
offNo indicator lamp on
iThe seat ventilation for the driver’s seat is
automatically set to the highest level if activated
via summer opening feature (
�page 244).
Page 143 of 569
142 Controls in detail
Memory function*
Storing positions into memory
�Adjust the seat (�page 44).
�On the driver’s side, additionally adjust
the steering wheel (
�page 46) and
exterior rear view mirrors (
�page 48)
to the desired positions.
�Press memory buttonM.
�Release memory button M and press
stored position button1, 2 or 3 within
3 seconds.
When the settings are stored to the
selected position, an acknowledge-
ment signal sounds.
Recalling positions from memory
�Press and hold stored position
button1,2 or3 until the seat, steering
wheel and exterior rear view mirrors
have fully moved to the stored posi-
tions.
!Do not operate the power seats using mem-
ory button M if the seat backrest is in an exces-
sively reclined position. Doing so could cause
damage to front or rear seats.
Move seat backrest to an upright position first.
iReleasing the stored position button stops
movement to the stored positions immediately.
Page 221 of 569
220 Controls in detail
Climate control
Deactivating
�Press button9 (�page 210) again.
The indicator lamp on the button goes
out.
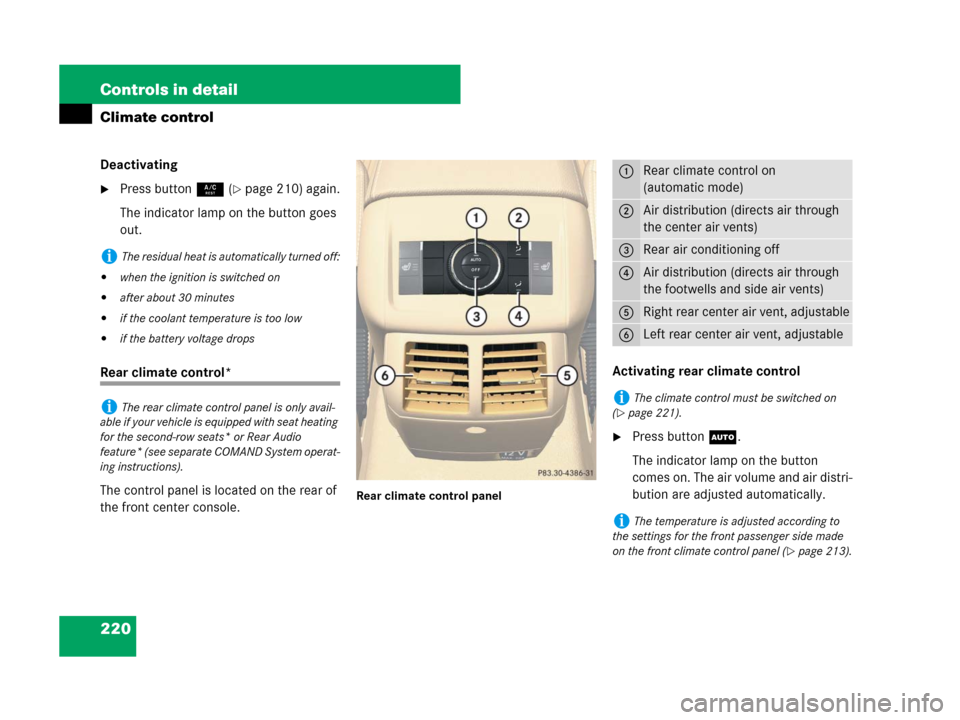
Rear climate control*
The control panel is located on the rear of
the front center console.
Rear climate control panel
Activating rear climate control
�Press buttonU.
The indicator lamp on the button
comes on. The air volume and air distri-
bution are adjusted automatically.
iThe residual heat is automatically turned off:
�when the ignition is switched on
�after about 30 minutes
�if the coolant temperature is too low
�if the battery voltage drops
iThe rear climate control panel is only avail-
able if your vehicle is equipped with seat heating
for the second-row seats* or Rear Audio
feature* (see separate COMAND System operat-
ing instructions).
1Rear climate control on
(automatic mode)
2Air distribution (directs air through
the center air vents)
3Rear air conditioning off
4Air distribution (directs air through
the footwells and side air vents)
5Right rear center air vent, adjustable
6Left rear center air vent, adjustable
iThe climate control must be switched on
(
�page 221).
iThe temperature is adjusted according to
the settings for the front passenger side made
on the front climate control panel (
�page 213).