Page 494 of 569

493 Practical hints
Flat tire
Mounting the spare wheel
Preparing the vehicle
�Prepare the vehicle as described
(
�page 492).
�Take the wheel wrench and the vehicle
jack from the vehicle tool kit
(
�page 469).
�Take the spare wheel from the wheel
well under the cargo compartment
floor (
�page 472).Lifting the vehicle
iYou can use the power outlets, except for
the power outlet in the front center console, to
operate the electric air pump even when the
ignition is switched off, e.g. in order to inflate the
collapsible tire (
�page 499).
An emergency shut-off feature ensures that the
vehicle’s electrical voltage does not fall below a
minimum level. If the voltage drops to this mini-
mum level, the power outlets are automatically
switched off. This ensures that enough power
remains to start the engine.
Warning!G
When jacking up the vehicle, only use the
jack which has been specifically approved
by Mercedes-Benz for your vehicle.
The jack is designed exclusively for jacking
up the vehicle at the jack take-up brackets
built into both sides of the vehicle. Make
sure the jack arm is fully seated in the jack
take-up bracket.
The jack is intended only for lifting the
vehicle briefly for wheel changes. It is not
suited for performing maintenance work
under the vehicle. To help avoid personal in-
jury, use the jack only to lift the vehicle dur-
ing a wheel change.
Never get beneath the vehicle while it is sup-
ported by the jack. Keep hands and feet
away from the area under the lifted vehicle.
Always lower the vehicle onto sufficient
capacity jackstands before working under
the vehicle.
��
Page 499 of 569

498 Practical hints
Flat tire
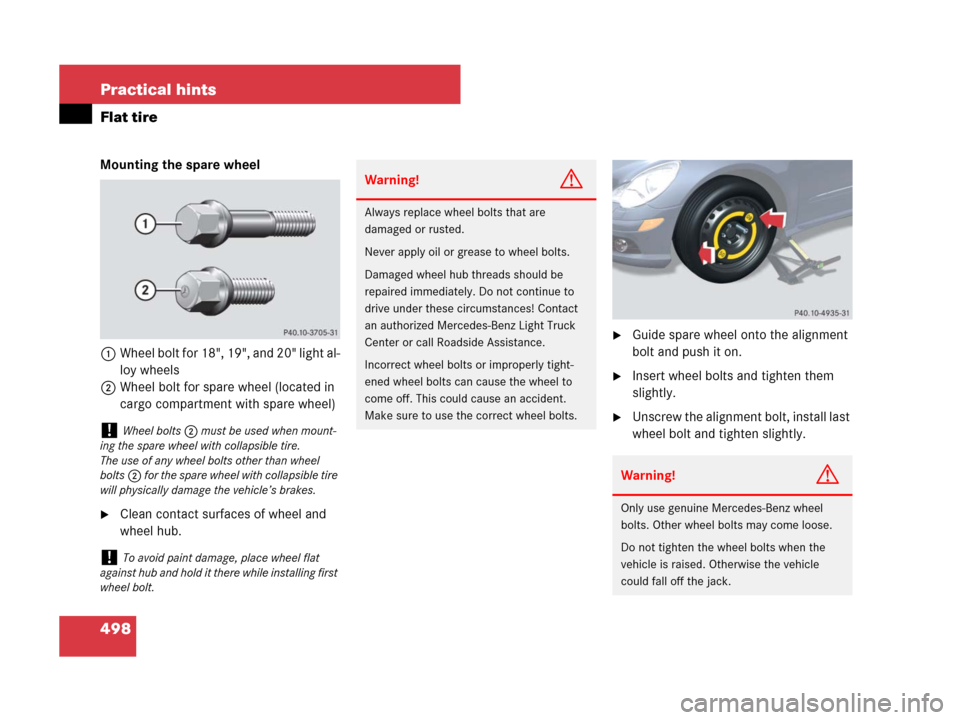
Mounting the spare wheel
1Wheel bolt for 18", 19", and 20" light al-
loy wheels
2Wheel bolt for spare wheel (located in
cargo compartment with spare wheel)
�Clean contact surfaces of wheel and
wheel hub.
�Guide spare wheel onto the alignment
bolt and push it on.
�Insert wheel bolts and tighten them
slightly.
�Unscrew the alignment bolt, install last
wheel bolt and tighten slightly.
!Wheel bolts2 must be used when mount-
ing the spare wheel with collapsible tire.
The use of any wheel bolts other than wheel
bolts2 for the spare wheel with collapsible tire
will physically damage the vehicle’s brakes.
!To avoid paint damage, place wheel flat
against hub and hold it there while installing first
wheel bolt.
Warning!G
Always replace wheel bolts that are
damaged or rusted.
Never apply oil or grease to wheel bolts.
Damaged wheel hub threads should be
repaired immediately. Do not continue to
drive under these circumstances! Contact
an authorized Mercedes-Benz Light Truck
Center or call Roadside Assistance.
Incorrect wheel bolts or improperly tight-
ened wheel bolts can cause the wheel to
come off. This could cause an accident.
Make sure to use the correct wheel bolts.
Warning!G
Only use genuine Mercedes-Benz wheel
bolts. Other wheel bolts may come loose.
Do not tighten the wheel bolts when the
vehicle is raised. Otherwise the vehicle
could fall off the jack.
Page 501 of 569

500 Practical hints
Flat tire
�Inflate the spare wheel tire to the
recommended tire inflation pressure
given in the “Technical data” section
(
�page 529).
This takes about 5 minutes for the
collapsible tire.
�Press 0 on electric air pump switch 2.
�Turn the SmartKey in the starter switch
to position0.
�Vehicles with KEYLESS-GO*:
Press the KEYLESS-GO start/stop
button twice without depressing
the brake pedal.
�If the tire inflation pressure is above
the recommended tire inflation pres-
sure given in this Operator’s Manual,
release excess tire inflation pressure
using the vent screw.
�Detach the electric air pump.
�Store the electrical plug and the air
hose behind the flap and place the
electric air pump back in the vehicle
tool kit storage well.
Warning!G
Air hose 4 and union nut5 can become
hot during inflation. Exercise proper caution
to avoid burning yourself when using the
equipment.
!Do not operate the electric air pump longer
than 8 minutes without interruption. Otherwise it
may overheat.
You may operate the electric air pump again
after it has cooled off.
!Please compare the recommended tire in-
flation pressure for your vehicle with the tire in-
flation pressure on the yellow label located on
the spare wheel rim.
If the tire inflation pressure on the yellow label
on the spare wheel rim differs from the values
given in this Operator’s Manual, inflate the tire to
the recommended tire inflation pressure given
on the yellow label on the spare wheel rim.Warning!G
Follow recommend tire inflation pressures.
Do not overinflate tires. Overinflating tires
can result in sudden deflation (blowout) be-
cause they are more likely to become punc-
tured or damaged by road debris, potholes,
etc.
Do not underinflate tires. Underinflated tires
wear unevenly, adversely affect handling
and fuel economy, and are more likely to fail
from being overheated.
��
Page 502 of 569

501 Practical hints
Flat tire
Lowering the vehicle
�Vehicles with scissors-type jack:
Attach ratchet to vehicle jack in such a
way that the wordDOWN can be seen.
�Lower the vehicle until it is resting fully
on its own weight:
�Vehicles with screw-type jack:
Turn crank counterclockwise.
�Vehicles with scissors-type jack:
Turn ratchet in directionDOWN.
�Remove the jack.1-5Wheel bolts
6Wheel wrench
�Tighten the five wheel bolts evenly,
following the diagonal sequence
illustrated (1to5), until all bolts
are tight. Observe a tightening torque
of 110 lb-ft (150 Nm).
�Store jack and all other vehicle tool kit
items back into the storage well.
Warning!G
Inflate collapsible tire only after the wheel is
properly mounted.
Inflate the collapsible tire using the electric
air pump (
�page 499) before lowering the
vehicle.
Warning!G
Have the tightening torque checked after
changing a wheel. The wheels could come
loose if they are not tightened to a torque of
110 lb-ft (150 Nm).
iThe removed road wheel cannot be stored in
the spare wheel well under the cargo compart-
ment floor, but should be transported in the
cargo compartment wrapped in a protective
wrap.
Vehicles with TPMS or Advanced TPMS*:
Do not activate the tire inflation pressure moni-
tor until a full size wheel/tire with functioning
sensor has been placed back into service on the
vehicle.
Page 520 of 569
519 Practical hints
Fuses
Fuse box in engine compartment
The main fuse box is located on the pas-
senger side of the engine compartment.
�Open the hood (�page 356).
1Clamp
2Main fuse box cover
�Release clamp1.
�Lift fuse box cover2 up.
�Install fuse box cover in reverse order.
�Close the hood after checking or re-
placing fuses (
�page 358).
Fuse box in cargo compartment
The fuse box is located under the cargo
compartment cover on the right-hand side
of the spare wheel well.
�Open the tailgate (�page 119).
�Lift the cargo compartment cover
(
�page 467).
�Secure cargo compartment cover with
securing hook (
�page 468).
1Cover
�Fold cover1 to the left as indicated by
the arrow.
!The fuse box cover must be installed
properly to prevent moisture and/or dirt from
entering the fuse box and possibly impairing fuse
operation.
Page 533 of 569
532 Technical data
Rims and tires
Spare wheel
ModelR 320 CDI 4MATIC
R 3501
R 350 4MATIC
R 550 4MATIC2
1USA only.2Canada only.
Rim (steel)6.5 B x 18 H2
Wheel offset1.58 in (40 mm)
Collapsible tire3
3Must not be used with snow chains.
195/75-18 106P
Recommended tire inflation pressure44 psi (3.0 bar)
!Please compare the recommended tire
inflation pressure for your vehicle with the tire
inflation pressure on the yellow label located on
the spare wheel rim.
If the tire inflation pressure on the yellow label
on the spare wheel rim differs from the values
given in this Operator’s Manual, inflate the
collapsible tire to the recommended tire inflation
pressure given on the yellow label on the spare
wheel rim.iPlease note that the tire inflation pressure of
the collapsible tire differs from the tire inflation
pressure of the road tires.
Page 548 of 569

547 Index
Bleeding the fuel system (diesel
engine) 502
Bolts, Spare wheel 498
Bottle opener 309
Brake Assist System see BAS
Brake fluid 539
Checking 355
Messages in the multifunction
display 447
Brake lamp
Cleaning lenses 407
Messages in the multifunction
display 455–460
Replacing bulbs 480
Brake pads 340
Messages in the multifunction
display 445
Brakes 340
Warning lamp 415
Break-in the vehicle 338
Bulbs, replacing see Replacing bulbsC
CAC (Customer Assistance Center) 17
California retail buyers and lessees,
Important notice for 11
Call priority, Tele Aid* 328
Can holder see Cup holder
Capacities and recommended
fuel/lubricants 536
Card holder 32, 309
Cargo compartment
Tie-down rings 290
Cargo compartment cover blind 299
Cargo net* 301
Cargo tie-down rings 290
Carpets, Cleaning 411
Catalytic converter (gasoline
engine) 349
CD changer* 167, 304
CD player 167
Center console 31
Central locking 183
Automatic 126
Locking/unlocking from the
inside 126Central locking switch 126
Certification label 524, 525
CHECK ENGINE malfunction indicator
lamp 417, 418
Checking tire pressure electronically
Advanced Tire Pressure Monitoring
System (Advanced TPMS)*, (Canada
only) 379
Tire Pressure Monitoring System
(TPMS), (USA only) 376
Child safety
Infant and child restraint systems 88
Children in the vehicle 87
Air bags 73, 89
Blocking rear door window
operation 97
Indicator lamp, Front passenger front
air bag 81
Infant and child restraint
systems 91, 92
LATCH-type child seat anchors 91
Occupant Classification System
(OCS) 77
Cigarette lighter 313
Page 552 of 569

551 Index
Engine coolant see Coolant
Engine oil 358, 538
Adding 359, 538
Additives 538
Changing 359, 538
Checking level 358
Consumption 358
Filler neck 359
Recommended engine oils and
filters 538
ESP
®101
Messages in the multifunction
display 435–436
Warning lamp 27, 419
ETD 85
Safety guidelines 74
ETS/4-ETS 103
Extending cargo compartment 292
Exterior rear view mirrors 48, 203
Power folding* 204
Synchronizing 204F
Fastening the seat belts 50
Filler neck, Engine oil 359
First aid kit 467
Flat tire 492
Collapsible tire 471, 498, 532
Jacking up the vehicle 493
Lowering the vehicle 501
Mounting the spare wheel 498
Preparing the vehicle 493
Spare wheel 471, 498, 532
Floormats 335
Fluids
Automatic transmission
fluid 360, 536
Brake fluid 355, 536, 539
Capacities 536
Engine coolant 355, 360, 537, 541
Engine oil 358, 536, 538
Power steering fluid 536
Windshield washer and headlamp
cleaning* system 362, 538Fog lamp, Front see Corner-illuminating
front fog lamps*
Fog lamp, Rear 147
Messages in the multifunction
display 458
Replacing bulbs 480
Fog lamps 146
4MATIC see Permanent four-wheel
drive 281
Front air bags 75
Front defroster 214, 229
Front lamps see Headlamps
Front passenger front
air bag 75, 77, 82, 425
Front passenger front air bag
off indicator lamp 31, 75, 77, 82, 425
Front seat head restraints see
Head restraints
Front towing eye 515