Page 321 of 569
320 Controls in detail
Useful features
Please note that these functions are only
available with Mercedes-Benz approved
mobile phones. Please contact an
authorized Mercedes-Benz Light Truck
Center for information on features avail-
able for your mobile phone of choice.
The cradle is located in the front center
armrest.
�Open telephone tray (�page 306).
Inserting mobile phone in mobile phone
cradle
Once the mobile phone has been inserted
in the mobile phone cradle, you have to
use the hands-free device to respond
during phone calls.
�If applicable, remove the cover for the
external antenna connection from the
back of the mobile phone and store it in
a s a f e p l a c e . B e s u r e t o c o m p l y w i t h t h e
mobile phone’s operating instructions
as well.
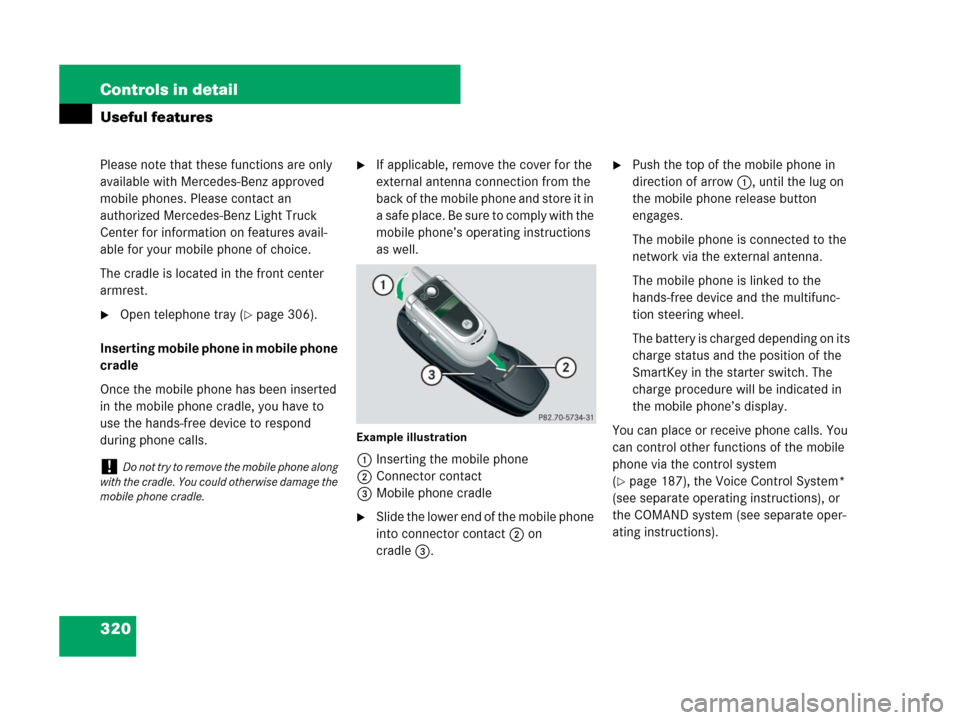
Example illustration
1Inserting the mobile phone
2Connector contact
3Mobile phone cradle
�Slide the lower end of the mobile phone
into connector contact 2 on
cradle3.
�Push the top of the mobile phone in
direction of arrow 1, until the lug on
the mobile phone release button
engages.
The mobile phone is connected to the
network via the external antenna.
The mobile phone is linked to the
hands-free device and the multifunc-
tion steering wheel.
The battery is charged depending on its
charge status and the position of the
SmartKey in the starter switch. The
charge procedure will be indicated in
the mobile phone’s display.
You can place or receive phone calls. You
can control other functions of the mobile
phone via the control system
(
�page 187), the Voice Control System*
(see separate operating instructions), or
the COMAND system (see separate oper-
ating instructions). !Do not try to remove the mobile phone along
with the cradle. You could otherwise damage the
mobile phone cradle.
Page 414 of 569
413 Practical hints
What to do if …
Where will I find ...?
Unlocking / locking in an
emergency
Resetting activated head restraints
Replacing SmartKey batteries
Replacing bulbs
Replacing wiper blades
Flat tire
Bleeding the fuel system
(diesel engine only)
Battery
Jump starting
Towing the vehicle
Fuses
Page 476 of 569
475 Practical hints
Unlocking / locking in an emergency
Locking the vehicle
If you cannot lock the vehicle with the
SmartKey or KEYLESS-GO*, lock the
vehicle carrying out the following steps.
�Close the front passenger door, the
rear right door and the tailgate.
�Open the driver’s door and the rear left
door.
�Press the central locking switch on the
driver’s door (
�page 127).
The locking knobs of the front passen-
ger door and the rear doors move
down.
If the vehicle battery is disconnected or
drained:
�Press down the locking knobs of
the front passenger door and the
rear doors manually.
�Exit the vehicle.
�Close the driver’s door.
�Enter the vehicle through the rear left
door.
�Press down the locking knob of the
driver’s door.
�Exit the vehicle.
�Close the rear left door.
The vehicle is locked.
Fuel filler flap
�Open the tailgate (�page 119).
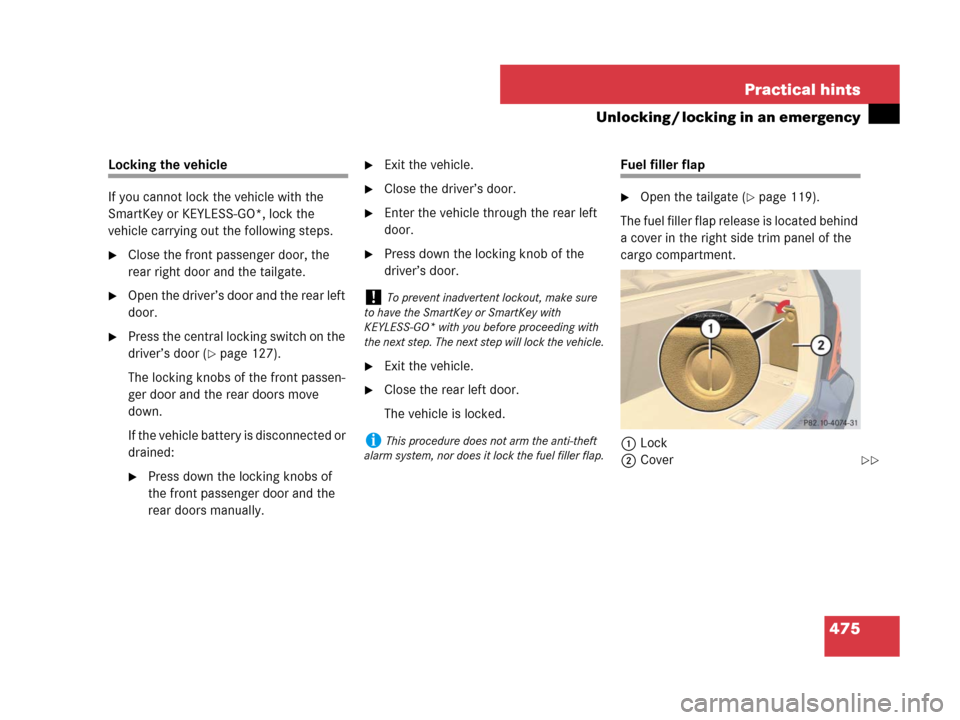
The fuel filler flap release is located behind
a cover in the right side trim panel of the
cargo compartment.
1Lock
2Cover
!To prevent inadvertent lockout, make sure
to have the SmartKey or SmartKey with
KEYLESS-GO* with you before proceeding with
the next step. The next step will lock the vehicle.
iThis procedure does not arm the anti-theft
alarm system, nor does it lock the fuel filler flap.
��
Page 480 of 569
479 Practical hints
Replacing SmartKey batteries
�Replacing SmartKey batteries
If the batteries in the SmartKey or the
SmartKey with KEYLESS-GO* are
discharged, the vehicle can no longer be
locked or unlocked. It is recommended to
have the batteries replaced at an autho-
rized Mercedes-Benz Light Truck Center.
Batteries contain materials that can harm
the environment if disposed of improperly.
Recycling of batteries is the preferred
method of disposal. Many states require
sellers of batteries to accept old batteries
for recycling.Replacement batteries: Lithium, type
CR 2025 or equivalent.
�Remove the mechanical key from the
SmartKey (
�page 474).
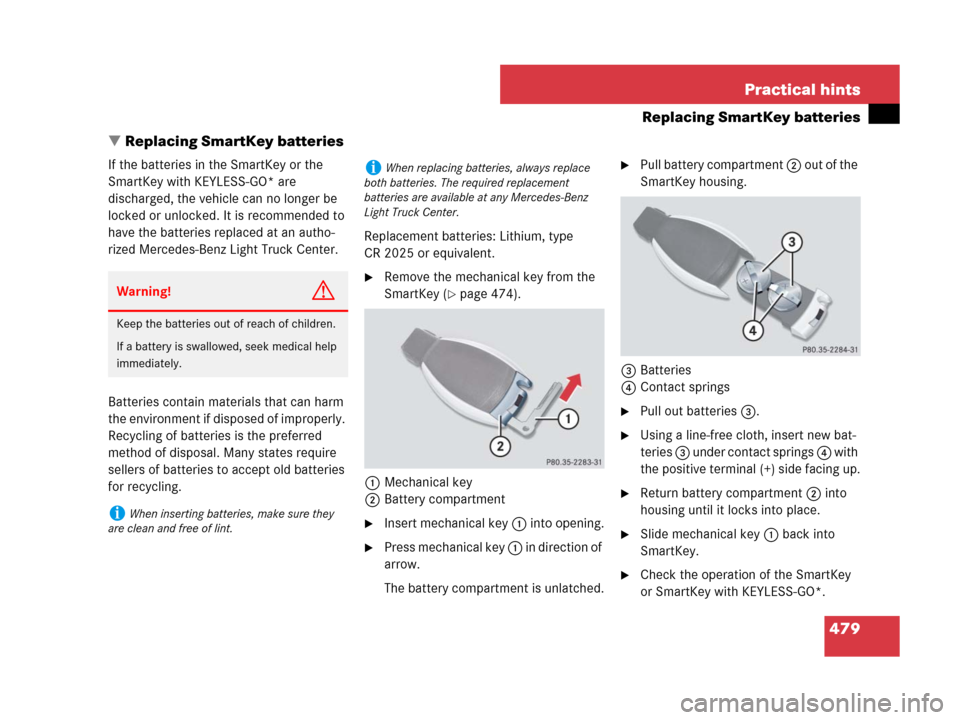
1Mechanical key
2Battery compartment
�Insert mechanical key 1 into opening.
�Press mechanical key 1 in direction of
arrow.
The battery compartment is unlatched.
�Pull battery compartment 2 out of the
SmartKey housing.
3Batteries
4Contact springs
�Pull out batteries3.
�Using a line-free cloth, insert new bat-
teries 3 under contact springs 4 with
the positive terminal (+) side facing up.
�Return battery compartment 2 into
housing until it locks into place.
�Slide mechanical key 1 back into
SmartKey.
�Check the operation of the SmartKey
or SmartKey with KEYLESS-GO*.
Warning!G
Keep the batteries out of reach of children.
If a battery is swallowed, seek medical help
immediately.
iWhen inserting batteries, make sure they
are clean and free of lint.
iWhen replacing batteries, always replace
both batteries. The required replacement
batteries are available at any Mercedes-Benz
Light Truck Center.
Page 506 of 569
505 Practical hints
Battery
Disconnecting, removing, reinstalling
and reconnecting the battery
Step 1 (Disconnecting)
�Set the automatic transmission to
positionP (
�page 192).
�Firmly depress the parking brake
(
�page 65).
�Turn off the engine (�page 66).
�Leave the ignition switched on
(
�page 39).
!Never loosen or detach battery terminal
clamps while the engine is running or the
SmartKey is in the starter switch. Otherwise the
alternator and other electronic components
could be severely damaged.
Have the battery checked regularly by an autho-
rized Mercedes-Benz Light Truck Center.
Contact your authorized Mercedes-Benz Light
Truck Center for further information.
Warning!G
Do not place metal objects on the battery as
this could result in a short circuit.
Use leak-proof battery only to avoid the risk
of acid burns in the event of an accident.
Warning!G
Disconnecting, removing, reinstalling and
reconnecting the battery is a complicated
and technically demanding procedure that
also requires safety precautions to avoid the
risk of injury. We strongly recommend that it
be performed by a qualified technician or an
authorized Mercedes-Benz Light Truck
Center only. Please read the instructions
fully before beginning operation and only
undertake it if you feel fully capable of
performing all of the tasks involved as
described in these instructions. Observe all
safety instructions and precautions when
handling automotive batteries
(
�page 503). Performing the tasks involved
incorrectly can cause damage to the vehicle
and impair the operating safety of the
vehicle, and/or cause severe injury to you
or others.
iWith a disconnected battery you will no
longer be able to turn the SmartKey in the
starter switch and pressing the KEYLESS-GO*
start/stop button will have no effect.
iIf your battery is discharged, the vehicle
must be jump started (
�page 511) using the
jump start contacts in the engine compartment,
or an accessory battery charge unit* approved
by Mercedes-Benz must be connected using the
jump start contacts in the engine compartment
(see separate instructions for the accessory
battery charge unit*) before any of the following
steps can be performed. If the battery cannot be
jumped or charged, please contact an autho-
rized Mercedes-Benz Light Truck Center.
��
Page 507 of 569
506 Practical hints
Battery
�Switch off all electrical consumers.
�Read and observe safety instructions
and precautions (
�page 503).
�Open the front passenger door.
�Move the front passenger seat to the
most rearward position (
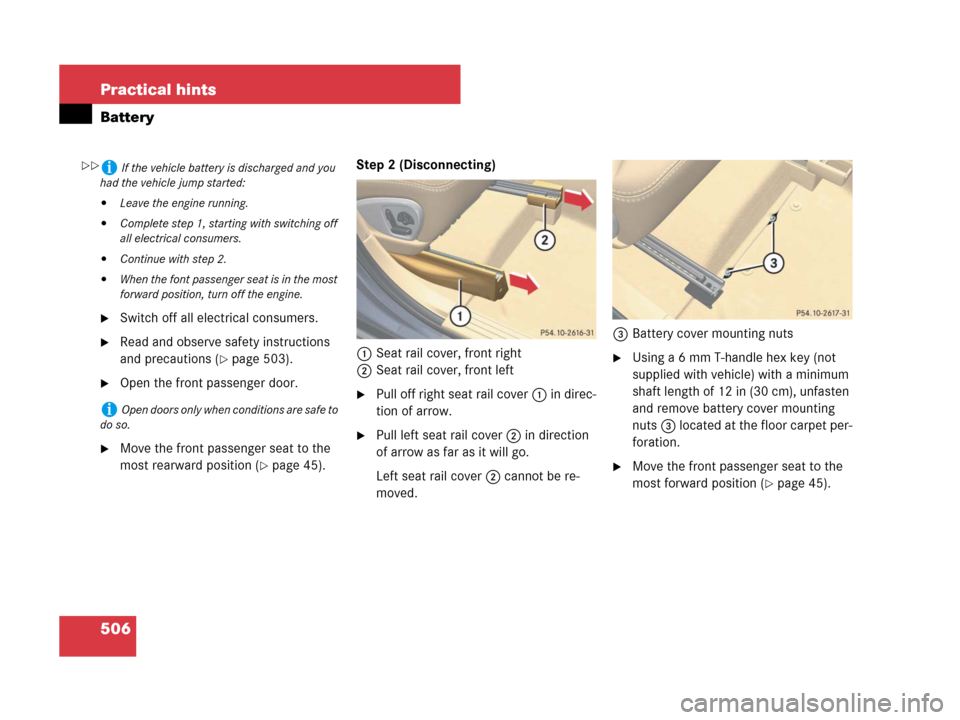
�page 45).Step 2 (Disconnecting)
1Seat rail cover, front right
2Seat rail cover, front left
�Pull off right seat rail cover 1 in direc-
tion of arrow.
�Pull left seat rail cover 2 in direction
of arrow as far as it will go.
Left seat rail cover 2 cannot be re-
moved.3Battery cover mounting nuts
�Using a 6 mm T-handle hex key (not
supplied with vehicle) with a minimum
shaft length of 12 in (30 cm), unfasten
and remove battery cover mounting
nuts 3 located at the floor carpet per-
foration.
�Move the front passenger seat to the
most forward position (
�page 45).
iIf the vehicle battery is discharged and you
had the vehicle jump started:
�Leave the engine running.
�Complete step 1, starting with switching off
all electrical consumers.
�Continue with step 2.
�When the font passenger seat is in the most
forward position, turn off the engine.
iOpen doors only when conditions are safe to
do so.
��
Page 508 of 569
507 Practical hints
Battery
�Switch off the ignition (�page 40).
�Remove the SmartKey from the starter
switch.
Vehicles with KEYLESS-GO*:
�Make sure the vehicle’s on-board
electronics have status 0.
After turning off the engine with the
KEYLESS-GO start/stop button,
with the driver’s door closed, the
starter switch is in position1.
With the driver’s door opened, the
starter switch is set to position0,
same as SmartKey removed from
starter switch (
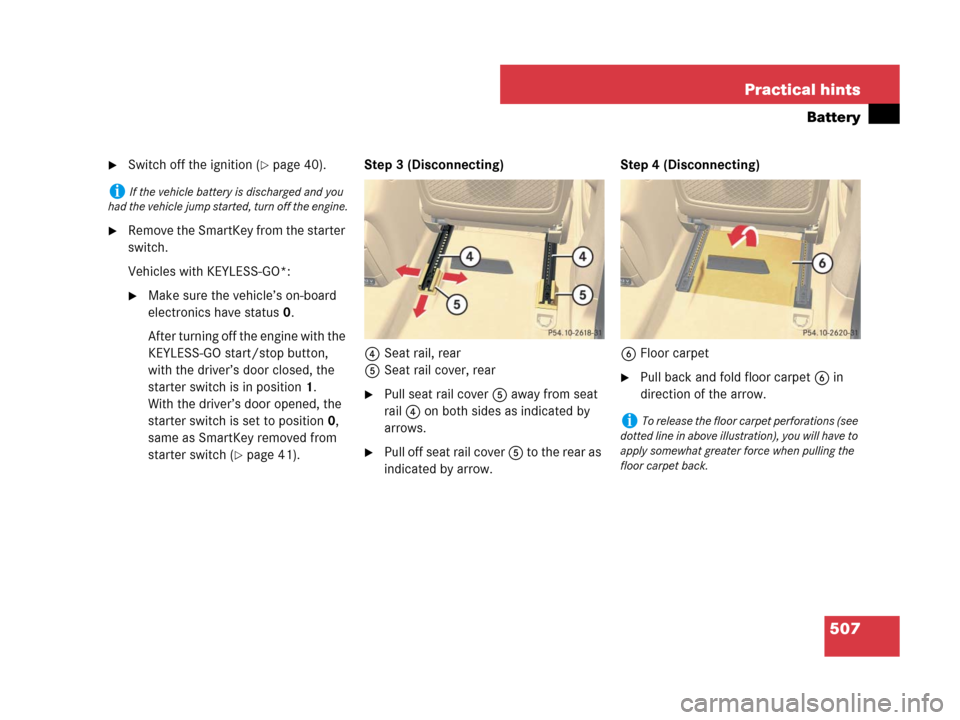
�page 41).Step 3 (Disconnecting)
4Seat rail, rear
5Seat rail cover, rear
�Pull seat rail cover 5 away from seat
rail 4 on both sides as indicated by
arrows.
�Pull off seat rail cover 5 to the rear as
indicated by arrow.Step 4 (Disconnecting)
6Floor carpet
�Pull back and fold floor carpet6 in
direction of the arrow.
iIf the vehicle battery is discharged and you
had the vehicle jump started, turn off the engine.
iTo release the floor carpet perforations (see
dotted line in above illustration), you will have to
apply somewhat greater force when pulling the
floor carpet back.
Page 510 of 569
509 Practical hints
Battery
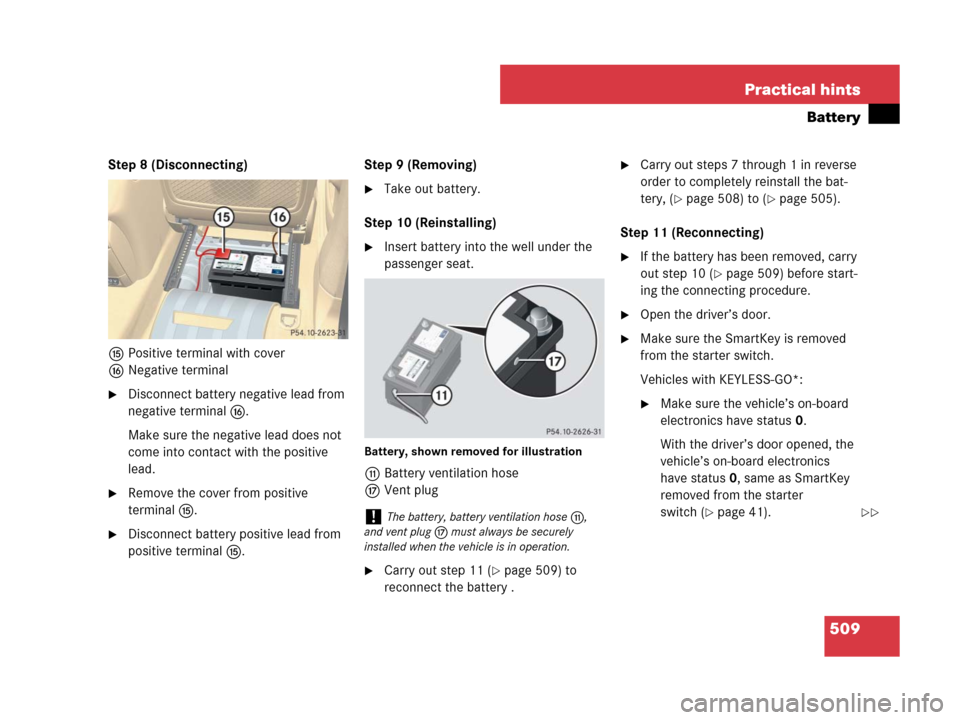
Step 8 (Disconnecting)
fPositive terminal with cover
gNegative terminal
�Disconnect battery negative lead from
negative terminal g.
Make sure the negative lead does not
come into contact with the positive
lead.
�Remove the cover from positive
terminal f.
�Disconnect battery positive lead from
positive terminal f.Step 9 (Removing)
�Take out battery.
Step 10 (Reinstalling)
�Insert battery into the well under the
passenger seat.
Battery, shown removed for illustration
bBattery ventilation hose
hVent plug
�Carry out step 11 (�page 509) to
reconnect the battery .
�Carry out steps 7 through 1 in reverse
order to completely reinstall the bat-
tery, (
�page 508) to (�page 505).
Step 11 (Reconnecting)
�If the battery has been removed, carry
out step 10 (
�page 509) before start-
ing the connecting procedure.
�Open the driver’s door.
�Make sure the SmartKey is removed
from the starter switch.
Vehicles with KEYLESS-GO*:
�Make sure the vehicle’s on-board
electronics have status 0.
With the driver’s door opened, the
vehicle’s on-board electronics
have status 0, same as SmartKey
removed from the starter
switch (
�page 41).!The battery, battery ventilation hoseb,
and vent plug h must always be securely
installed when the vehicle is in operation.��