Page 32 of 569
31 At a glance
Center console
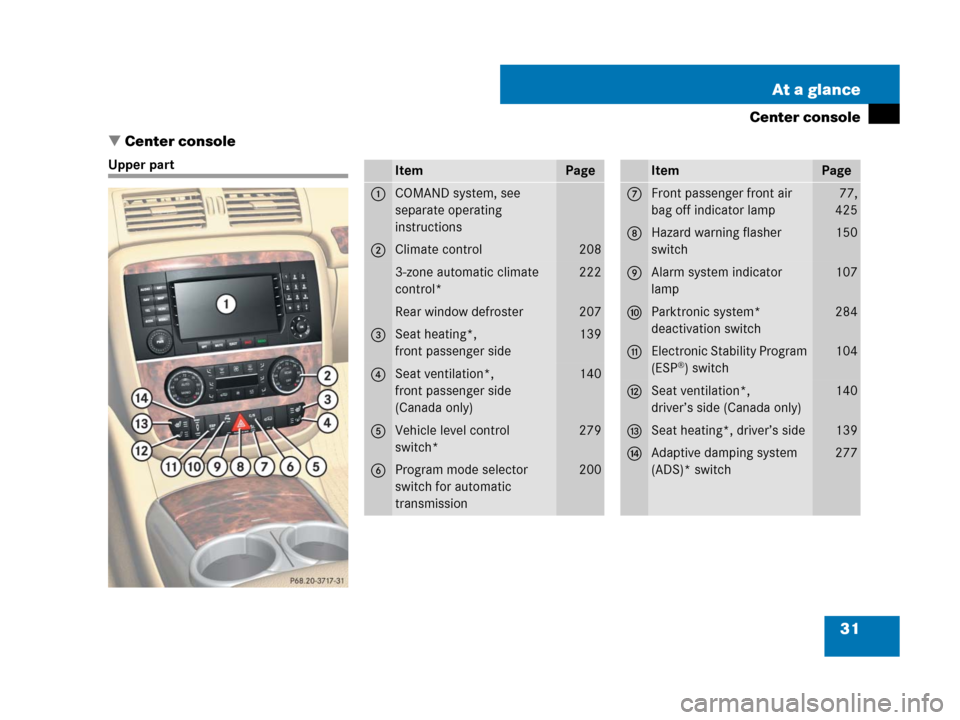
�Center console
Upper partItemPage
1COMAND system, see
separate operating
instructions
2Climate control208
3-zone automatic climate
control*222
Rear window defroster207
3Seat heating*,
front passenger side139
4Seat ventilation*,
front passenger side
(Canada only)140
5Vehicle level control
switch*279
6Program mode selector
switch for automatic
transmission200
ItemPage
7Front passenger front air
bag off indicator lamp 77,
425
8Hazard warning flasher
switch150
9Alarm system indicator
lamp107
aParktronic system*
deactivation switch284
bElectronic Stability Program
(ESP®) switch
104
cSeat ventilation*,
driver’s side (Canada only)140
dSeat heating*, driver’s side139
eAdaptive damping system
(ADS)* switch277
Page 167 of 569

166 Controls in detail
Control system
Selecting radio station
�Turn on the COMAND system and
select radio. Refer to separate
COMAND system operating instruc-
tions.
�Press buttonè orÿ repeatedly
until the currently tuned station
appears in the multifunction display.
1Waveband setting or stored memory
position (
FM0 through FM9)
2Station frequency
�Press buttonk orj repeatedly
until the desired station is found.
The station search depends on the
selected setting in the
Vehicle
submenu of the control system
(
�page 182). Pressing buttonkorj will
either start a frequency scan or select
the next stored radio station.
Selecting satellite radio station*
The satellite radio is treated as a radio
application.
�Select satellite radio with the
corresponding soft key on the
COMAND system.
1SAT mode or stored memory position
(
SAT0 through SAT9)
2Channel name or number
�Press buttonk orj repeatedly
until the desired channel is found.
iYou can only store new stations using the
corresponding feature on the radio. Refer to
separate COMAND system operating
instructions. You can also operate the radio in
the usual manner.
iAdditional optional satellite radio equipment
and a subscription to satellite radio service
provider are required for satellite radio opera-
tion. Contact an authorized Mercedes-Benz
Light Truck Center for details and availability for
your vehicle.
For more information, refer to separate
COMAND system operating instructions.
Page 168 of 569

167 Controls in detail
Control system
Operating the CD player
Selecting CD track
�Turn on the COMAND system and
select CD. Refer to separate COMAND
system operating instructions.
�Press buttonè orÿ repeatedly
until the settings for the CD currently
being played appear in the multifunc-
tion display.
1Current CD (for CD changer*)
2Current track
�Press buttonk orj repeatedly
until the desired track is selected.Selecting MP3-CD track
�Turn on the COMAND system and
select MP3. Refer to separate
COMAND system operating
instructions.
�Press buttonè orÿ repeatedly
until the settings for the MP3-CD cur-
rently being played appear in the multi-
function display.
1MP3 mode
2Current track
�Press buttonk orj repeatedly
until the desired track is selected.
NAV menu*
The
NAV menu contains the functions
needed to operate your navigation system.
�Press buttonè orÿ repeatedly
until the message
NAV appears in the
multifunction display.
The message shown in the multifunction
display depends on the status of the navi-
gation system:
�With the COMAND system switched
off, the message
NAV off appears in
the multifunction display.
�With the COMAND system switched on
but route guidance not activated, the
direction of travel and, if applicable, the
name of the street currently traveled
on appear in the multifunction display.
iVehicles with CD changer*: To select a CD
from the magazine, press a number on the
COMAND system key pad located in the center
console.
Page 169 of 569

168 Controls in detail
Control system
�With the COMAND system switched on
and route guidance activated, the
direction of travel and maneuver in-
structions appear in the multifunction
display.
Please refer to the COMAND system
manual for instructions on how to activate
the route guidance system.AIRMATIC*/Compass menu
The
AIRMATIC/Compass menu displays the
AIRMATIC* messages and the direction
into which you are currently driving.
�Press buttonè orÿ repeatedly
until the
AIRMATIC/Compass menu
appears in the multifunction display.
For information on AIRMATIC*, see
“AIRMATIC*” (
�page 276).
For information on the compass, see
“Vehicle submenu” (
�page 180) and
“Compass” (
�page 334).
Distronic* menu
Use the
DISTRONIC menu (�page 267) to
display the current settings for your
Distronic system. The information shown
in the multifunction display depends on
whether the Distronic system is activated
or deactivated.
Please refer to the “Driving systems”
section of this manual (
�page 262) for
instructions on how to activate Distronic.
�Press buttonè orÿ repeatedly
to select the Distronic menu in the
multifunction display.
Page 175 of 569

174 Controls in detail
Control system
Instrument cluster submenu
Access the
Instrument Cluster submenu
via the
Settings menu. Use the
Instrument Cluster submenu to change
the instrument cluster display settings.
The following functions are available:Selecting speedometer display mode
�Move the selection marker with
buttonæ orç to the
Instrument Cluster submenu.
�Press buttonj ork repeatedly
until the message
Display Unit
Digital Speedometer
appears in the
multifunction display.
The selection marker is on the current
setting.
�Press buttonæ orç to set
speedometer unit to
Km or Miles.Selecting language
�Move the selection marker with
buttonæ orç to the
Instrument Cluster submenu.
�Press buttonj ork repeatedly
until the message
Language appears in
the multifunction display.
The selection marker is on the current
setting.
�Press buttonæ orç to select
the language to be used for the
multifunction display messages.
FunctionPage
Selecting speedometer display
mode174
Selecting language174
Selecting display (digital
speedometer or outside
temperature) for status indicator175
iIf you select a language that is not available
in the COMAND system, the messages for the
audio systems, such as radio or CD player, will
appear in English, regardless of the language
selected. For more information see separate
COMAND operating instructions.
Page 177 of 569

176 Controls in detail
Control system
Time/Date submenu
Access the
Time/Date submenu via the
Settings menu. Use the Time/Date
submenu to change the time and date
settings.
The following functions are available:Setting the time
This function is not available if your vehicle
is equipped with the COMAND system and
navigation module*.
�Move the selection marker with
buttonæ orçto the
Time/Date
submenu.
�Press buttonj ork repeatedly
until the message
Clock Set Hour or
Clock Set Minute(s) appears in the
multifunction display.
Example illustration for setting the hour
�Press buttonæ orç to set the
time.Setting the date
This function is not available if your vehicle
is equipped with the COMAND system and
navigation module*.
�Move the selection marker with
buttonæ orç to the
Time/Date
submenu.
�Press buttonj ork repeatedly
until the message
Date Set Month,
Date Set Day, or Date Set Year
appears in the multifunction display.
Example illustration for setting the month
�Press buttonæ orç to set the
date.
FunctionPage
Setting the time176
Setting the date176
iIf your vehicle is equipped with the
COMAND system and navigation module*, see
separate COMAND operating instructions for
information on how to set the date and time.
Page 181 of 569

180 Controls in detail
Control system
Setting interior lighting delayed shut-off
Use this function to set whether you would
like the interior lighting to remain on for
10 seconds during darkness after you have
removed the SmartKey from the starter
switch.
�Move the selection marker with
buttonæ orç to the
Lighting
submenu.
�Press buttonj ork repeatedly
until the message
Interior Lighting
Delayed Shut-off
appears in the
multifunction display.
The selection marker is on the current
setting.
�Press buttonæ orç to switch
the interior lighting delayed shut-off
feature
On or Off.Vehicle submenu
Access the
Vehicle submenu via the
Settings menu. Use the Vehicle submenu
to make general vehicle settings.
The following functions are available:Compass adjustment
This function is not available if your vehicle
is equipped with the COMAND system and
navigation module*.
Determine your location on the basis of the
following zone maps.
Zone map North America
FunctionPage
Compass adjustment180
Compass calibration181
Audio search function182
Setting automatic locking183
Limiting opening height of
tailgate*183
Page 182 of 569

181 Controls in detail
Control system
Zone map South America
�Press buttonæ orç to move
the selection marker to the
Vehicle
submenu.
�Press buttonj ork repeatedly
until the message
Compass Setting
Zone
appears in the multifunction
display.
The selection marker is on the current
setting.
�Press buttonæ orç to set the
respective compass zone.
For information on how to call up the
compass, see “Compass” (
�page 334).Compass calibration
This function is not available if your vehicle
is equipped with the COMAND system and
navigation module*.
In order to calibrate the compass properly,
mind the following:
�Calibrate the compass in open terrain.
Nearby buildings, bridges, power lines
and large antenna masts, for example,
could impair compass calibration.
�Switch off electrical consumers (e.g.
climate control, windshield wipers, or
rear window defroster).
�Close all doors and the tailgate.
�Start the engine (�page 53).
�Press buttonæ orç to move
the selection marker to the
Vehicle
submenu.
iMake sure you are in an area where you can
drive a full circle with your vehicle without dis-
turbing traffic in order to calibrate your compass.
��