Page 150 of 569

149 Controls in detail
Lighting
Switching off corner-illuminating front
fog lamps
The combination switch for the turn signal
resets automatically after major steering
wheel movements. This will switch off the
corner-illuminating front fog lamps if they
were activated by switching on the left or
right turn signal.
If the turn signal should stay on after
making the turn, the turn signal and
corner-illuminating front fog lamps can be
switched off by returning the combination
switch to its original position.Driving in reverse
Switching on corner-illuminating front
fog lamps
�Shift the automatic transmission to
reverse gearR (
�page 192).
The front fog lamp opposite to your
steering direction comes on.
Switching off corner-illuminating front
fog lamps
�Shift the automatic transmission
to a gear other than reverse
gearR(
�page 190).
The respective front fog lamp goes out.
iThe corner-illuminating front fog lamps tem-
porarily come on both sides of the vehicle if you
turn the steering wheel in one direction and then
again in the other direction shortly thereafter.
iThe corner-illuminating front fog lamps will
come on automatically depending on the steer-
ing angle, even if you did not switch on either
turn signal. If the corner-illuminating front fog
lamps came on automatically, they will also go
out automatically depending on the steering
angle.
iThere may be a brief delay before the
corner-illuminating front fog lamps switch off.
Page 151 of 569

150 Controls in detail
Lighting
Hazard warning flasher
The hazard warning flasher can be
switched on at all times, even with the
SmartKey removed from the starter switch
or with the SmartKey with KEYLESS-GO*
removed from the vehicle.
The hazard warning flasher switches on
automatically when an air bag deploys.
The hazard warning flasher switch is
located on the upper part of the center
console.
1Hazard warning flasher switchSwitching on hazard warning flasher
�Press hazard warning flasher
switch1.
All turn signals are flashing.
Switching off hazard warning flasher
�Press hazard warning flasher switch1
again.
Interior lighting
1Front left reading lamp, on/off
2Rear interior lighting, on/off
3Automatic interior lighting
4Front interior lighting, on/off
5Front right reading lamp, on/off
6Front right interior lamp
7Reading lamps
8Front left interior lamp
iWith the hazard warning flasher activated
and the combination switch set for either left or
right turn, only the respective left or right turn
signals will operate when the ignition is
switched on.
iIf the hazard warning flasher has been
activated automatically, press hazard warning
flasher switch1 once to switch it off.
Page 152 of 569
 rem")
151 Controls in detail
Lighting
The controls are located in the overhead
control panel.
Deactivating automatic control
�Press switch3.
The interior lighting and the locator
lighting (
�page 178) remain switched
off even when you
�unlock the vehicle
�remove the SmartKey from the
starter switch
�open a door
�open the tailgateActivating automatic control
�Press switch3.
The interior lighting and the locator
lighting (
�page 178) come on when
you
�unlock the vehicle
�remove the SmartKey from the
starter switch
�open a door
�open the tailgate
The interior lighting switches off after
10 seconds see “Setting interior lighting
delayed shut-off” (
�page 180).Manual control
Switching front/rear interior lighting on
and off
�Press front/rear interior lighting
switch4 or 2 (
�page 150) to switch
on the desired interior light.
�Press front/rear interior lighting
switch4 or 2 again to switch off the
respective interior light.
Switching front reading lamps on and off
The front reading lamps are located in the
lower edge of the interior rear view mirror.
�Press front reading lamp
switch1or5 (
�page 150) to
switch on the desired front reading
lamp.
�Press front reading lamp
switch1or5 again to switch off the
respective front reading lamp.
!An interior lamp switched on manually does
not go out automatically.
Leaving an interior lamp switch in the ON
position for extended periods of time with the
engine turned off could result in a discharged
battery.
iThe interior lighting is factory-set to
automatic mode.
iIf a door remains open, the interior lighting
switches off automatically after approximately
5minutes.
Page 153 of 569
152 Controls in detail
Lighting
Switching second-row reading lamps on
and off
The second row reading lamps are located
above the side windows.
Passenger side reading lamp
1Second-row reading lamp
�Press on reading lamp 1 where indi-
cated by arrow.
The reading lamp comes on.
�Press on reading lamp 1 once more.
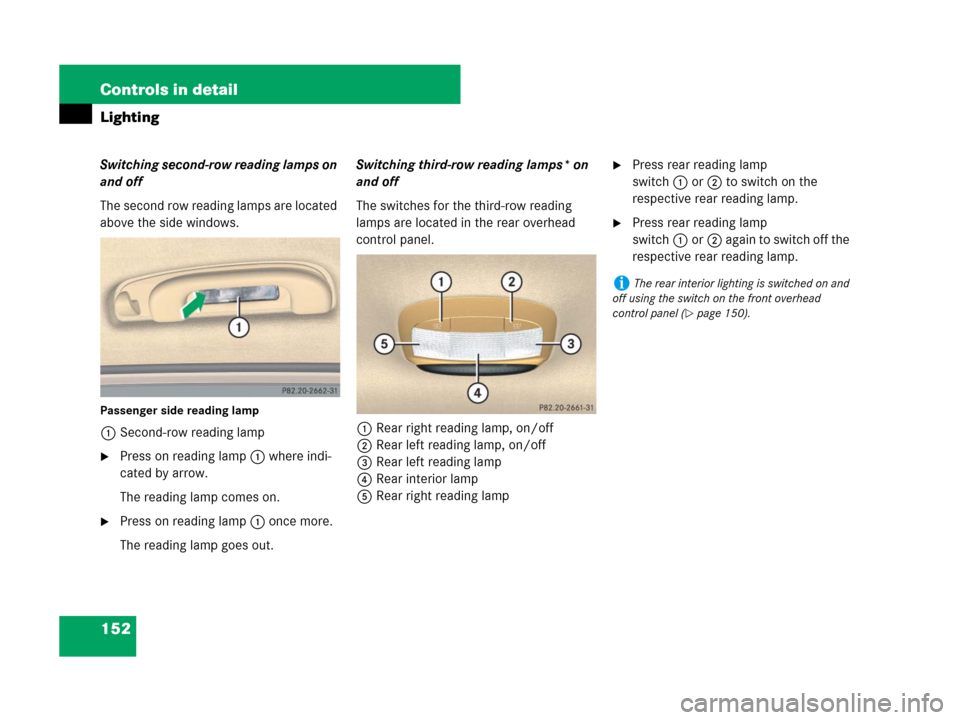
The reading lamp goes out.Switching third-row reading lamps* on
and off
The switches for the third-row reading
lamps are located in the rear overhead
control panel.
1Rear right reading lamp, on/off
2Rear left reading lamp, on/off
3Rear left reading lamp
4Rear interior lamp
5Rear right reading lamp
�Press rear reading lamp
switch1or2 to switch on the
respective rear reading lamp.
�Press rear reading lamp
switch1or2 again to switch off the
respective rear reading lamp.
iThe rear interior lighting is switched on and
off using the switch on the front overhead
control panel (
�page 150).
Page 154 of 569
153 Controls in detail
Lighting
Door entry lamps
For better orientation in the dark, the
corresponding door entry lamps will switch
on in darkness when you open a door and
the automatic control is activated.
The door entry lamps will switch off when
the corresponding door is closed.Cargo compartment lamp
The cargo compartment lamp comes on
when the tailgate is opened.
If you leave the tailgate open for an
extended period of time, the cargo
compartment lamp will switch off
automatically after approximately
10 minutes.
iIf you turn the SmartKey in the starter
switch to position0 and switch off the
headlamps, the door entry lamps will remain lit
for approximately 5 minutes.
Page 155 of 569
.
1To dim instrument cluster illumination
2Reset button
3To")
154 Controls in detail
Instrument cluster
For a full view illustration of the instrument
cluster, see “Instrument cluster”
(
�page 26).
1To dim instrument cluster illumination
2Reset button
3To brighten instrument cluster
illumination
The instrument cluster is activated when
you
�open a door
�switch on the ignition (�page 39)
�press reset button 2
�switch on the exterior lamps
(
�page 143)For information on changing the instru-
ment cluster settings, e.g. the language,
see “Instrument cluster submenu”
(
�page 174).Adjusting instrument cluster
illumination
Use button 1 or 3 to adjust the illumina-
tion brightness for the instrument cluster.
To brighten illumination
�Press and hold button 3 until the
desired level of illumination is reached.
To dim illumination
�Press and hold button 1 until the
desired level of illumination is reached.
iOpening a front door or pressing the reset
button without switching on the ignition or the
exterior lighting activates the multifunction
display illumination only for 30 seconds.
Warning!G
No messages will be displayed if either the
instrument cluster or the multifunction
display is inoperative.
As a result, you will not be able to see
information about your driving conditions,
such as speed or outside temperature,
warning/indicator lamps,
malfunction/warning messages or the
failure of any systems. Driving characteris-
tics may be impaired.
If you must continue to drive, do so with
added caution. Contact an authorized
Mercedes-Benz Light Truck Center as soon
as possible.
iThe instrument cluster illumination is
dimmed or brightened automatically to suit
ambient light conditions.
The instrument cluster illumination will also be
adjusted automatically when you switch on the
vehicle’s exterior lamps.
iWith the exterior lighting switched on, the
brightness of the switches in the center console
will also be adjusted when using button 1 or 3.
Page 164 of 569

163 Controls in detail
Control system
Menus, submenus and functions
Menu6Menu7Menu8Menu9Menua
Vehicle status message
memory1
1The vehicle status message memory menu is only displayed if there is a message stored.
SettingsDistance warning
function*Trip computerTelephone*
(�page 169)(�page 170)(�page 185)(�page 185)(�page 187)
Commands/submenus
Calling up malfunction mes-
sages, warning messages,
and system status
messages stored in memoryResetting to factory settingsDistance warning
function* on/offFuel consumption statistics
since startLoading phone
book
Instrument cluster submenuFuel consumption statistics
since the last resetSearching for
name in phone
book
Time/Date submenuResetting fuel consumption
statistics
Lighting submenuDistance to empty
Vehicle submenu
Comfort submenu*
iThe headings used in the menus table are
designed to facilitate navigation within thesystem and are not necessarily identical to those
shown in the control system displays. The first function displayed in each menu will automati-
cally show you which part of the system you are
in.
Page 167 of 569

166 Controls in detail
Control system
Selecting radio station
�Turn on the COMAND system and
select radio. Refer to separate
COMAND system operating instruc-
tions.
�Press buttonè orÿ repeatedly
until the currently tuned station
appears in the multifunction display.
1Waveband setting or stored memory
position (
FM0 through FM9)
2Station frequency
�Press buttonk orj repeatedly
until the desired station is found.
The station search depends on the
selected setting in the
Vehicle
submenu of the control system
(
�page 182). Pressing buttonkorj will
either start a frequency scan or select
the next stored radio station.
Selecting satellite radio station*
The satellite radio is treated as a radio
application.
�Select satellite radio with the
corresponding soft key on the
COMAND system.
1SAT mode or stored memory position
(
SAT0 through SAT9)
2Channel name or number
�Press buttonk orj repeatedly
until the desired channel is found.
iYou can only store new stations using the
corresponding feature on the radio. Refer to
separate COMAND system operating
instructions. You can also operate the radio in
the usual manner.
iAdditional optional satellite radio equipment
and a subscription to satellite radio service
provider are required for satellite radio opera-
tion. Contact an authorized Mercedes-Benz
Light Truck Center for details and availability for
your vehicle.
For more information, refer to separate
COMAND system operating instructions.