Page 353 of 569

352 Operation
At the gas station
Refueling
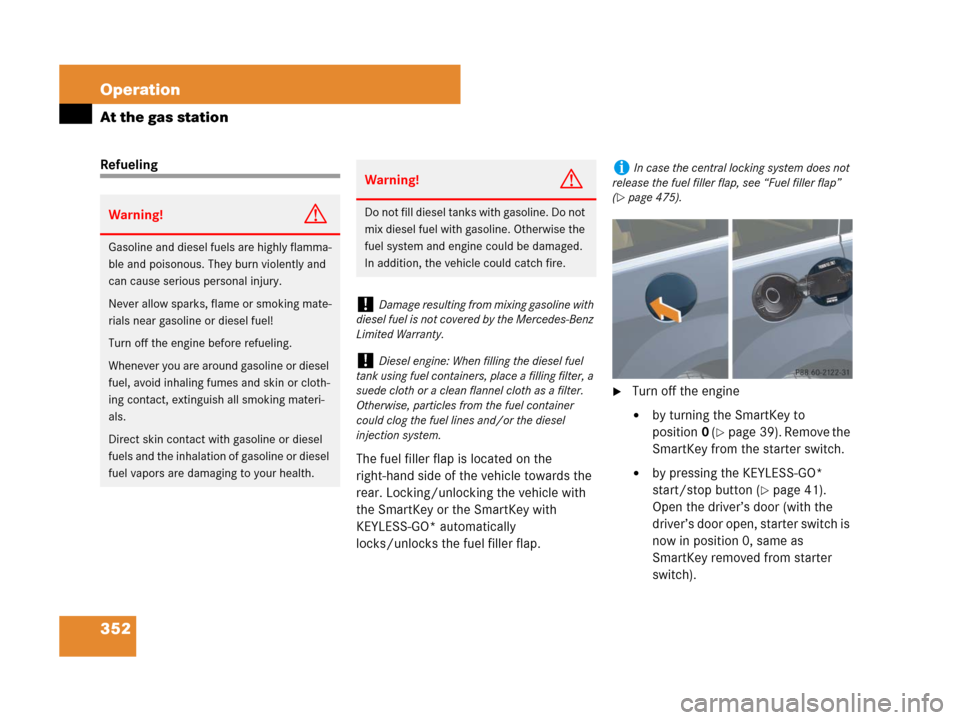
The fuel filler flap is located on the
right-hand side of the vehicle towards the
rear. Locking/unlocking the vehicle with
the SmartKey or the SmartKey with
KEYLESS-GO* automatically
locks/unlocks the fuel filler flap.
�Turn off the engine
�by turning the SmartKey to
position0 (
�page 39). Remove the
SmartKey from the starter switch.
�by pressing the KEYLESS-GO*
start/stop button (
�page 41).
Open the driver’s door (with the
driver’s door open, starter switch is
now in position 0, same as
SmartKey removed from starter
switch).
Warning!G
Gasoline and diesel fuels are highly flamma-
ble and poisonous. They burn violently and
can cause serious personal injury.
Never allow sparks, flame or smoking mate-
rials near gasoline or diesel fuel!
Turn off the engine before refueling.
Whenever you are around gasoline or diesel
fuel, avoid inhaling fumes and skin or cloth-
ing contact, extinguish all smoking materi-
als.
Direct skin contact with gasoline or diesel
fuels and the inhalation of gasoline or diesel
fuel vapors are damaging to your health.
Warning!G
Do not fill diesel tanks with gasoline. Do not
mix diesel fuel with gasoline. Otherwise the
fuel system and engine could be damaged.
In addition, the vehicle could catch fire.
!Damage resulting from mixing gasoline with
diesel fuel is not covered by the Mercedes-Benz
Limited Warranty.
!Diesel engine: When filling the diesel fuel
tank using fuel containers, place a filling filter, a
suede cloth or a clean flannel cloth as a filter.
Otherwise, particles from the fuel container
could clog the fuel lines and/or the diesel
injection system.
iIn case the central locking system does not
release the fuel filler flap, see “Fuel filler flap”
(
�page 475).
Page 414 of 569
413 Practical hints
What to do if …
Where will I find ...?
Unlocking / locking in an
emergency
Resetting activated head restraints
Replacing SmartKey batteries
Replacing bulbs
Replacing wiper blades
Flat tire
Bleeding the fuel system
(diesel engine only)
Battery
Jump starting
Towing the vehicle
Fuses
Page 475 of 569
474 Practical hints
Unlocking / locking in an emergency
Unlocking the vehicle
If you cannot unlock the vehicle with the
SmartKey or KEYLESS-GO*, open the
driver’s door using the mechanical key.Removing the mechanical key
1Mechanical key locking tab
2Mechanical key
�Move locking tab1 in direction of
arrow.
�Slide mechanical key2 out of the
housing.Unlocking the driver’s door
�Insert mechanical key 2 into the
driver’s door lock until it stops.
�Turn mechanical key 2 counterclock-
wise to position1 and hold it there.
�Pull the door handle until the locking
knob moves up.
The driver’s door is unlocked.
�Pull the door handle once more to open
the driver’s door.
iUnlocking the driver’s door with the
mechanical key will trigger the anti-theft
alarm system.
To cancel the alarm, insert the SmartKey or
SmartKey with KEYLESS-GO* in the starter
switch.
1Unlocking
2Mechanical key
Page 476 of 569

475 Practical hints
Unlocking / locking in an emergency
Locking the vehicle
If you cannot lock the vehicle with the
SmartKey or KEYLESS-GO*, lock the
vehicle carrying out the following steps.
�Close the front passenger door, the
rear right door and the tailgate.
�Open the driver’s door and the rear left
door.
�Press the central locking switch on the
driver’s door (
�page 127).
The locking knobs of the front passen-
ger door and the rear doors move
down.
If the vehicle battery is disconnected or
drained:
�Press down the locking knobs of
the front passenger door and the
rear doors manually.
�Exit the vehicle.
�Close the driver’s door.
�Enter the vehicle through the rear left
door.
�Press down the locking knob of the
driver’s door.
�Exit the vehicle.
�Close the rear left door.
The vehicle is locked.
Fuel filler flap
�Open the tailgate (�page 119).
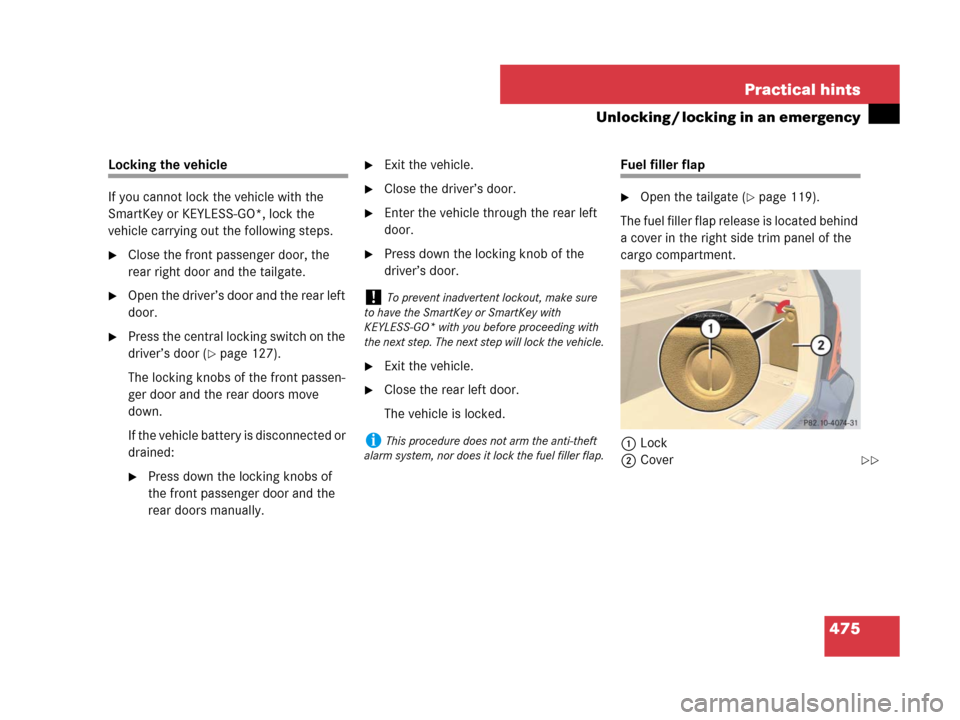
The fuel filler flap release is located behind
a cover in the right side trim panel of the
cargo compartment.
1Lock
2Cover
!To prevent inadvertent lockout, make sure
to have the SmartKey or SmartKey with
KEYLESS-GO* with you before proceeding with
the next step. The next step will lock the vehicle.
iThis procedure does not arm the anti-theft
alarm system, nor does it lock the fuel filler flap.
��
Page 477 of 569
476 Practical hints
Unlocking / locking in an emergency
�Insert a suitable object such as a coin
into the slot of lock1.
�Turn lock1 counterclockwise by 90°
in direction of arrow.
�Remove cover2.
3Fuel filler flap release
�Pull red fuel filler flap release 3 in
direction of arrow.
The fuel filler flap is unlocked.
�Open the fuel filler flap (�page 352).
��
Page 495 of 569

494 Practical hints
Flat tire
�Prevent the vehicle from rolling away
by blocking wheels with wheel chocks
or other sizeable objects.
One wheel chock is included with the
vehicle tool kit (
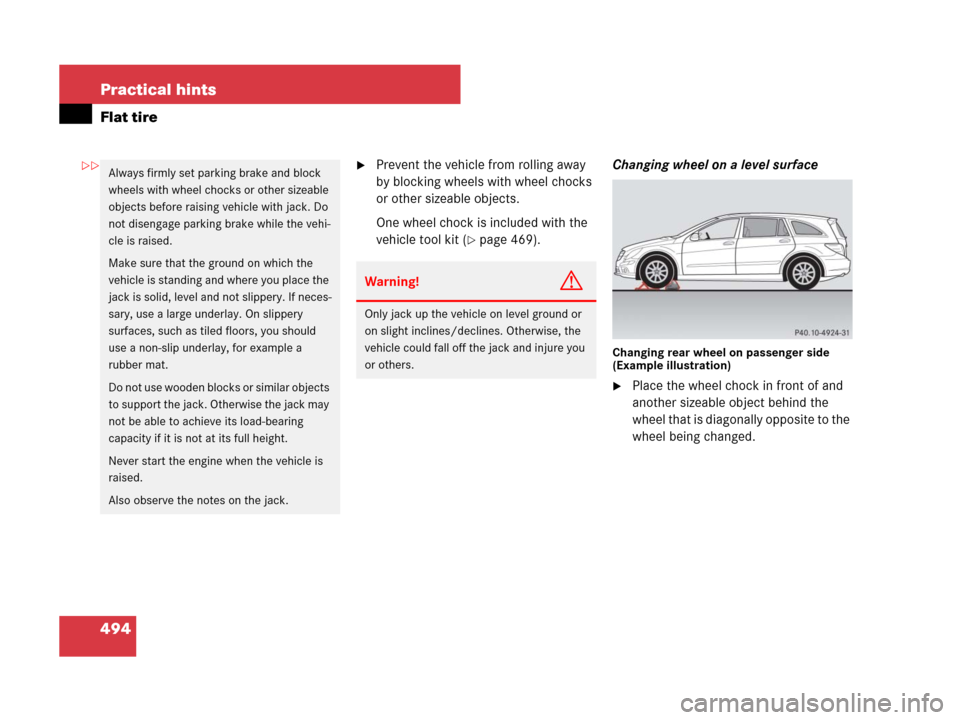
�page 469).Changing wheel on a level surface
Changing rear wheel on passenger side
(Example illustration)
�Place the wheel chock in front of and
another sizeable object behind the
wheel that is diagonally opposite to the
wheel being changed.
Always firmly set parking brake and block
wheels with wheel chocks or other sizeable
objects before raising vehicle with jack. Do
not disengage parking brake while the vehi-
cle is raised.
Make sure that the ground on which the
vehicle is standing and where you place the
jack is solid, level and not slippery. If neces-
sary, use a large underlay. On slippery
surfaces, such as tiled floors, you should
use a non-slip underlay, for example a
rubber mat.
Do not use wooden blocks or similar objects
to support the jack. Otherwise the jack may
not be able to achieve its load-bearing
capacity if it is not at its full height.
Never start the engine when the vehicle is
raised.
Also observe the notes on the jack.
Warning!G
Only jack up the vehicle on level ground or
on slight inclines/declines. Otherwise, the
vehicle could fall off the jack and injure you
or others.
��
Page 514 of 569

513 Practical hints
Towing the vehicle
�Towing the vehicle
Mercedes-Benz recommends that the
vehicle be transported with all wheels off
the ground using flatbed or appropriate
wheel lift/dolly equipment. This method is
preferable to other types of towing.If circumstances do not permit the recom-
mended towing methods, the vehicle may
be towed with all wheels on the ground
only so far as necessary to have the vehicle
moved to a safe location where the recom-
mended towing methods can be employed.
When towing the vehicle with all wheels on
the ground, the vehicle may be towed only
for distances up to 30 miles (50 km) and at
a speed not to exceed 30 mph (50 km/h).
!Do not tow-start the vehicle.
!Use flatbed or wheel lift/dolly equipment,
with the SmartKey in starter switch turned to
position0.
Do not tow with sling-type equipment. Towing
with sling-type equipment over bumpy roads will
damage radiator and supports.
To prevent damage during transport, do not tie
down vehicle by its chassis or suspension parts.
Use the towing eyes.
Switch off the ESP
® (�page 104) and the
automatic central locking (
�page 126).
!Do not tow with one axle raised. Doing so
could damage the transfer case, which is not
covered by the Mercedes-Benz Limited
Warranty.
All wheels must be on or off the ground. Observe
instructions for towing the vehicles with all
wheels on the ground.
Warning!G
If circumstances require towing the vehicle
with all wheels on the ground, always tow
with a tow bar if
�the engine will not run
�there is a malfunction in the brake
system
�there is a malfunction in the power
supply or in the vehicle’s electrical
system
as that will be necessary to adequately
control the vehicle.
Prior to towing the vehicle with all wheels on
the ground, make sure the automatic trans-
mission is in neutral positionN.
Page 546 of 569

545 Index
A
ABS 99
Indicator lamp 414, 415
Messages in the multifunction
display 429
Accelerator position, automatic
transmission 197
Accessory weight 393
Accident 63
Active head restraint 86, 133, 477
Air bags 72
Children 73, 89
Front, Driver 75
Front, Passenger 75
Messages in the multifunction
display 438–441
Occupant Classification System
(OCS) 77
Safety guidelines 74
Side impact 76
Window curtain 76
Air conditioning, Cooling 219, 233
Air conditioning refrigerant 538Air conditioning system see
Climate control or Automatic climate
control (3-zone)*
Air distribution 213, 228
Air pressure see Tire inflation pressure
Air pressure, Tires 393
Air pump, Electric 499
Air recirculation mode 216, 231
Air vents, Front 208, 214, 222, 228
Air vents, Rear 220, 236, 239, 240
Air volume 214, 229
AIRMATIC* 276
Messages in the multifunction
display 464, 465
Alarm system see Anti-theft systems
Alignment bolt (vehicle tool kit) 467, 497
All-wheel drive see Permanent four-wheel
drive 281
Anticorrosion/antifreeze 541, 544
Antiglare, Interior rear view mirror 203
Antiglare, Auto-dimming rear view
mirrors* 203Anti-theft systems 106
Anti-theft alarm system 106
Immobilizer 106
Aquaplaning see Hydroplaning
Arm rests, Second-row 137
Armrest storage compartments
Front 306
Rear* 306
Telephone* tray 306
Ashtrays 311
Aspect ratio 393
ATF 360
AUDIO menu 165
CD operation 167
Radio operation 166
Satellite radio* operation 166
Audio search function 182
Auto-dimming*, Rear view mirrors 203
Automatic antiglare for rear view
mirrors* 203
Automatic central locking, Control
system 183