Page 285 of 569

284 Controls in detail
Driving systems
Each warning indicator is divided into five
yellow and two red distance segments for
either side of the vehicle. The Parktronic
system is ready when the yellow readiness
indicators3 are illuminated.
The current transmission position deter-
mines which warning indicator will be
activated.As your vehicle approaches an object, one
or more distance segments will illuminate,
depending on the distance. When the
seventh distance segment illuminates, you
have reached the minimum distance.
�Front area: An intermittent acoustic
warning lasting a maximum of
2 seconds will sound as the first red
distance segment illuminates and a
constant acoustic warning lasting a
maximum of 2 seconds will sound for
the second red distance segment. The
signal is canceled when the automatic
transmission is set to positionP or the
parking brake is set.
�Rear area: An intermittent acoustic
warning lasting a maximum of
2 seconds will sound as the first red
distance segment illuminates and a
constant acoustic warning lasting a
maximum of 2 seconds will sound for
the second red distance segment. The
signal is canceled when the automatic
transmission is set to positionD, P, or
the parking brake is set.Switching the Parktronic system
on/off
You can switch off the Parktronic system
manually.
The Parktronic switch is located in the
upper part of the center console.
1Parktronic switch
2Indicator lamp
Switching off
�Press Parktronic switch1.
Indicator lamp2 comes on.
Transmission
positionWarning indicator
DFront area activated
R or NFront and rear area
activated
PNeither activated
Page 296 of 569
.
�Remove the rear center console*, if so
equipped (
�page 315).
�Remove the head restraint from the")
295 Controls in detail
Loading
�Move the seat to be folded to its rear-
most position (
�page 134).
�Remove the rear center console*, if so
equipped (
�page 315).
�Remove the head restraint from the
respective second-row seat
(
�page 136).1Seat backrest
2Seat cushion
3Release lever
�Place the head restraint on the seat
cushion.
�Relieve the load on seat backrest 1
and pull release lever 3 past the
resistance point in direction of arrow
as far as it will go.
Seat and seat backrest are unlocked.
�Fold seat backrest 1 forward until it
fully rests on seat cushion 2 in a
horizontal position.
1Seat backrest
2Seat cushion
�Push down on folded seat backrest 1
until seat cushion 2 engages in seat
base.
iThe rear center console* can remain
installed, if installed in the most forward position
(
�page 317). However, the cargo compartment
floor will then not be an even plane.
The storage compartment and the cupholders in
the rear center console* are only illuminated,
when the rear center console* is installed in the
most rearward position (position 0)
(
�page 317).
Page 306 of 569
305 Controls in detail
Useful features
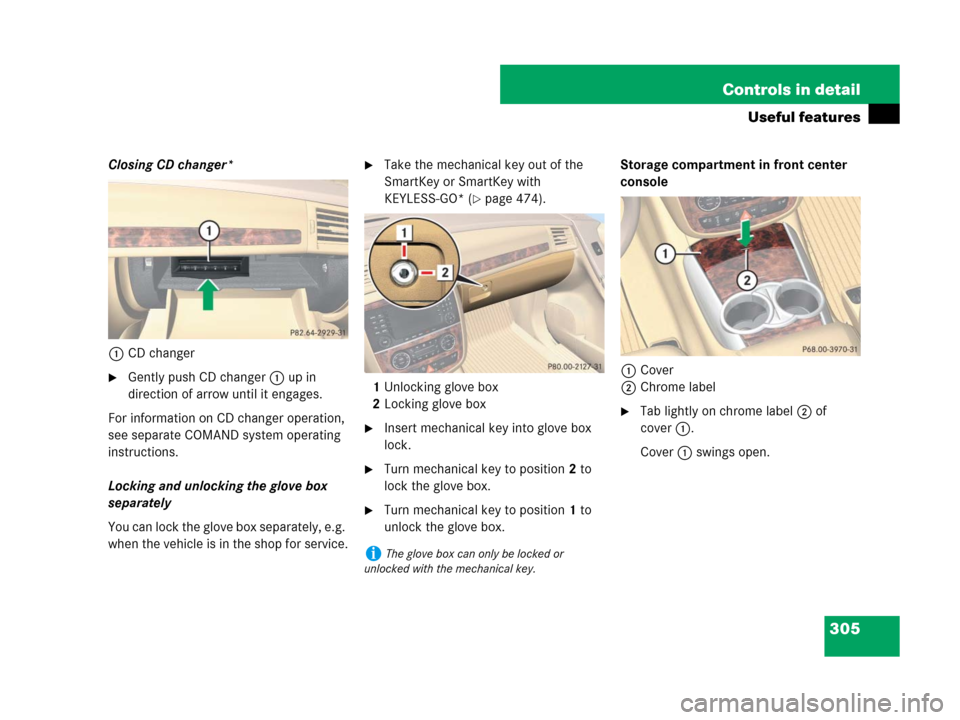
Closing CD changer*
1CD changer
�Gently push CD changer 1 up in
direction of arrow until it engages.
For information on CD changer operation,
see separate COMAND system operating
instructions.
Locking and unlocking the glove box
separately
You can lock the glove box separately, e.g.
when the vehicle is in the shop for service.
�Take the mechanical key out of the
SmartKey or SmartKey with
KEYLESS-GO* (
�page 474).
1Unlocking glove box
2Locking glove box
�Insert mechanical key into glove box
lock.
�Turn mechanical key to position 2 to
lock the glove box.
�Turn mechanical key to position 1 to
unlock the glove box.Storage compartment in front center
console
1Cover
2Chrome label
�Tab lightly on chrome label 2 of
cover1.
Cover 1 swings open.
iThe glove box can only be locked or
unlocked with the mechanical key.
Page 307 of 569
306 Controls in detail
Useful features
Front armrest storage compart-
ment/telephone* tray
The storage compartment and the
telephone* tray can be opened separately.
1Button to open telephone* tray
2Button to open storage compartment3Telephone tray
4Coinholders
Opening the storage compartment
�Press button2 and lift up armrest.
Opening the telephone tray
�Press button1 and lift up armrest.
Two coin holders 4 are located in front of
telephone tray 3.Rear armrest storage compartment*
A storage compartment is located in the
armrest of the rear center console*
between the second-row seats.
�Press button under armrest and lift up
armrest.
iIf your vehicle is equipped with Rear Seat
Entertainment Package*, the storage compart-
ment contains the DVD player (see separate
operating instructions).
iThe mobile phone cradle (�page 320), the
Roadside Assistance button• (
�page 325)
and the Information button¡ (
�page 326)
are located in telephone tray 3.
Page 309 of 569

308 Controls in detail
Useful features
Parcel net in front passenger footwell
1Parcel net
Parcel nets on front seat backrests
1Parcel netCup holders
Cup holders in front center console
A cupholder and a card/ticket holder with
bottle opener are located in the front
center console.
1Cup holders
Warning!G
In order to help prevent spilling liquids on
vehicle occupants and/or vehicle equip-
ment, only use containers that fit into the
cup holder. Use lids on open containers and
do not fill containers to a height where the
contents, especially hot liquids, could spill
during braking, vehicle maneuvers, or an
accident. Liquids spilled on vehicle occu-
pants may cause serious personal injury.
Liquids spilled on vehicle equipment may
cause damage not covered by the
Mercedes-Benz Limited Warranty.
When not in use, keep rear cup holders
closed. An open cup holder may cause injury
to you or others when contacted during
braking, vehicle maneuvers, or in an
accident.
Keep in mind that objects placed in a cup
holder may come loose during braking,
vehicle maneuvers, or an accident and be
thrown around in the vehicle interior.
Objects thrown around in the vehicle in-
terior may cause an accident and/or serious
personal injury.
Page 310 of 569
309 Controls in detail
Useful features
Card/ticket holder with bottle opener
A card/ticket holder and a bottle opener
are located in the cup holder of the front
center console.
Cards and tickets can be inserted into the
slot in the middle. The card/ticket holder
is removable and has a bottle opener
underneath.
Removing
1Card/ticket holder with bottle opener
�Lift card/ticket holder 1 at the rear
and take it out.The bottle opener is located underneath
the card/ticket holder and has openers for
crown caps and screw caps.
2Opener for screw caps
3Opener for crown capsReinserting
1Tabs
2Card/ticket holder
�Guide tabs 1 into openings.
�Guide rear of card/ticket holder 2
into the cupholder.iWith the card/ticket holder removed, you
can also take the rubber inlet from the cupholder
for cleaning.
Page 311 of 569
310 Controls in detail
Useful features
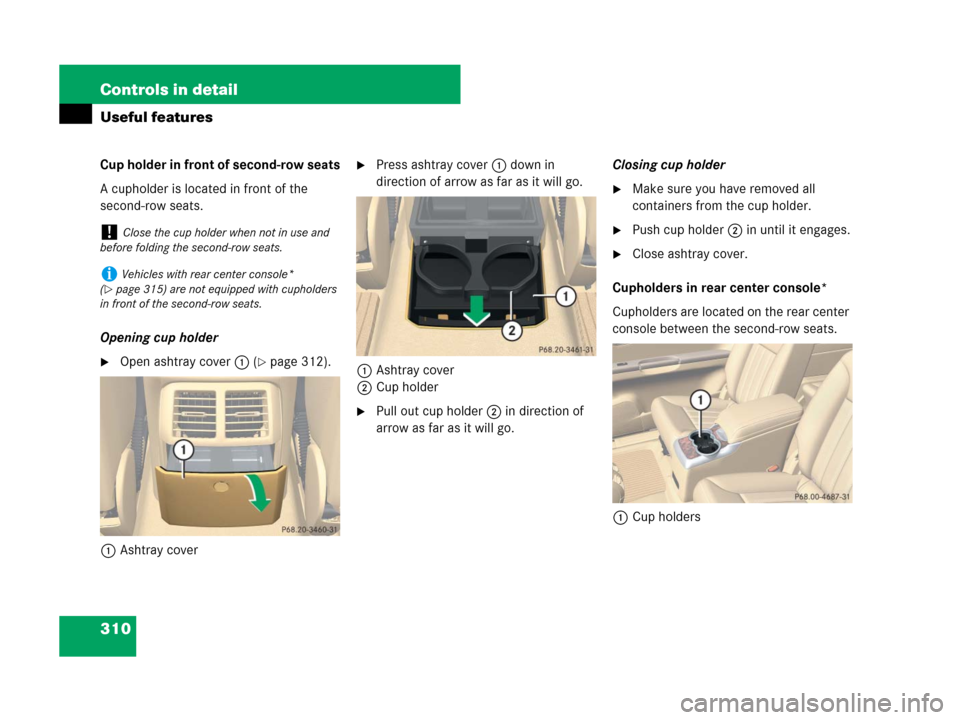
Cup holder in front of second-row seats
A cupholder is located in front of the
second-row seats.
Opening cup holder
�Open ashtray cover1(�page 312).
1Ashtray cover
�Press ashtray cover 1 down in
direction of arrow as far as it will go.
1Ashtray cover
2Cup holder
�Pull out cup holder 2 in direction of
arrow as far as it will go.Closing cup holder
�Make sure you have removed all
containers from the cup holder.
�Push cup holder 2 in until it engages.
�Close ashtray cover.
Cupholders in rear center console*
Cupholders are located on the rear center
console between the second-row seats.
1Cup holders
!Close the cup holder when not in use and
before folding the second-row seats.
iVehicles with rear center console*
(
�page 315) are not equipped with cupholders
in front of the second-row seats.
Page 312 of 569
311 Controls in detail
Useful features
Cupholders in third-row side trim
Cupholders are located in the side trims of
the third-row seats.
1Cup holderAshtrays
Your vehicle is equipped with an ashtray
and a cigarette lighter (
�page 313)
located in the front center console and an
ashtray located in front of the second-row
seats (
�page 312).
Ashtray in the front center console
Opening the ashtray
1Cover
2Chrome label
�Tab lightly on chrome label 2 of
cover1.
Cover 1 swings open.
Removing ashtray insert
Warning!G
Remove ashtray insert only with vehicle
standing still. Set the parking brake to
secure vehicle from movement. Set auto-
matic transmission toP. With the automatic
transmission set toP, turn off the engine.